Secure Your Network Connection By Using Your Own Private VPNs Hosted In Azure
Have you ever used a public WiFi in a coffee shop? Or did you use one in an airport, hotel, restaurant or a museum? I bet you were wondering how safe these networks are and whether your HTTP traffic can be sniffed by anyone nearby! Well, to keep the answer short, public WiFi networks are anything but safe and the traffic can be sniffed with ease in almost any available public WiFi.
On the other hand, did you ever try to watch movies on Netflix, listen to some good music on Spotify or Internet radio on Pandora from an Eastern-European country (e.g. Romania), just to find out that these services don't work in Romania (yet)?
Well, Azure is here to the rescue! During this article, you'll go through all the steps necessary to create a VM hosted in one of Azure's data centers so that all your Internet traffic goes through a secure VPN tunnel to the data center. In the end, this basically means that your traffic will look as if originates from within Azure and thus you'll be able to use the kind of services mentioned earlier.
The infrastructure schema of what we're trying to achieve looks something like this (please try to bear with me here - I'm totally aware my drawing skills are close to nonexistent):

Prerequisites
There are a few requirements in order to successfully complete this step-by-step guide:
- you will most certainly need an Azure subscription. You can either use a 30-days free trial account or a Pay-As-You-Go account. Additionally, if you have an MSDN subscription, you can also use your Azure credits, which are part of your benefits as an MSDN subscriber. Here's a link on how to sign-up for a 30-day trial account today using your Microsoft Account
- a SSL certificate. Yes again, there are a few options here: the obvious one is to buy a SSL certificate from a publicly available Certificate Authority (CA), or to create a self-signed certificate which you'll manually install in the Trusted Root Certificate Authority container. In order to create self signed certificates, you can either use makecert.exe, a utility which comes with any installation of Visual Studio 2013 (or 2012, for that matter) and/or Windows SDK, or selfssl.exe, part of the lightweight IIS6 Resource Kit.
Step-by-step guide
Create Azure Virtual Machine
- The obvious first step is to create a VM. We'll do this by using the current generally available (GA) Azure portal on the http://manage.windowsazure.com address. Press the '+ New' button on the bottom gray bar. In the menu dialog which pops up, select 'Compute' > 'Virtual machine' > 'Quick create' and insert the values for DNS Name, username and password. Make sure you write these values somewhere down as you'll use them later on for creating the VPN connection on your client devices. In the same window, make sure you select the desired Azure region where you want you'll VM to be hosted on. In the end, this is where the service you're trying to use will believe the traffic originates from and thus you'll have to choose this correspondingly. In the picture below, West Europe corresponds to a VM hosted in The Netherlands; similarly, North Europe is the Azure datacenter in Ireland:

- Once you have chosen all the correct values, click the 'Create a virtual machine' button.
- After pressing the button mentioned earlier, the Azure Portal will start to provision the VM. Once this is done (it shouldn't take more than 2-3 minutes), move to the next step.
Configure RRAS role
- Since Windows Server 2008, the server family operating system got more secure even by simply not having all the roles installed from scratch. Thus, if whatever vulnerability exists within one of the server services, not having that particular service installed will keep you safe (-er). However, in order to create VPN connections, the VM machine should listen to any incoming VPN tunnel requests. The simplest out-of-the-box way to achieve this is by adding the Routing and Remote Access Role to the server; of course there are other ways to complete VPN tunnel requests, such as by installing an OpenVPN service on the VM, but such services are out of the scope of this article.
- Using the Azure Management portal, go to the Virtual Machines listing and click on the previously created VM.
- Next, click on 'Dashboard' and click the 'Connect' button on the gray menu bar. This will prompt you to save an .rdp file which represents an already configured remote-desktop-connection profile file which you can use to connect to the VM.

- If the Remote Desktop Connection window warns you about the identity of the remote desktop connection publisher, hit 'Connect'.
- You'll be asked to provide the connection credentials. These are the ones you've used when you originally created the VM in the previous step. If you computer is domain joined, you'll probably see the username already filled in with your domain username which might prevent you from using the correct username: in order to solve this matter, simply select 'user another account' and prefix the username with '\ (no quote signs though), which will instruct the remote machine - the VM - to look for the username in the Local Users repository.
- If a Remote Desktop Connection windows pop up warning you about the identity of the certificate, simply click 'Yes' in order to acknowledge the self-signed certificate generated by RDP in order to connect to this VM.
- Once connected to the VM, you should see the Server Manager window pop up. If that window isn't shown, click on the small icon next to the Start button on the taskbar representing a monitor and a toolbox - this should bring up the server manager screen.
- In the Server Manager screen, choose 'Manage' on the top gray bar and select 'Add Roles and Features'. This will bring up the Add Roles and Features Wizard.
- Within the Wizard, keep pressing the Next button until you reach the 'Server roles' section.
- Within the 'Server roles' section, select 'Remote Access'
- Keep pressing 'Next' until you reach the 'Role services' section.
- Within the 'Role services' section, select 'Direct Access and VPN (RAS)' and 'Routing'
- Keep pressing 'Next' until you reach the 'Confirmation' section.
- Within the 'Confirmation' section, press 'Install'. This will start installing the required roles and services in order for the server to start to listen to any incoming VPN connections
Create a self-signed SSL certificate
Because our security schema of the VPN tunnels which are going to be created within the client machines and our Azure VM require a SSL certificate, we'll now create a self-signed SSL certificate. However, there are devices which require the VPN connections to use a SSL certificate signed by a public CA which will involve you to buy one. If you already have a SSL certificate with the required properties, you can skip the following two steps.
Install IIS6 Resource Kit
- On your local machine, open 'iis60rkt.exe'
- Click 'Next' through the installer views up until you reach the 'Customer Information' pane
- Insert whatever values you desire in the 'User Name' and 'Company Name' text boxes (e.g. Alex and home, respectively)
- Click 'Next'
- In the 'Setup Type' window, select 'Custom'
- Click 'Next' twice
- In the 'Select Features' window, select only the 'SelfSSL 1.0' option
- Keep clicking 'Next' until the installer completes
Create self-signed SSL certificate using IIS6 Resource Kit
- In order to successfully create the self-signed SSL certificate, we will need to run the selfssl.exe tool under an elevated command prompt. On the local machine, opening and elevated command prompt can be done by pressing (Windows key) + X and selecting 'Command prompt (Admin)' from the context menu.
- Change the current directory to the folder where SelfSSL has been installed (if you've installed in the default directory, this should work: cd "%ProgramFiles(x86)%\IIS Resources\SelfSSL"
- Run selfssl with the following parameters, after you replace the [VM DNS name] container with your VM's DNS name: selfssl.exe /N:cn=[VM DNS name].cloudapp.net /V:1000 (1000 stands for 1,000 days meaning that the certificate will be valid for almost 3 years by the date you issue it)
- Confirm the operation with 'Y'
- Open the certificate manager for the computer account by opening the 'Run' window (simply press the Windows key + X keys and select 'Run' on the context menu or by pressing the Windows key + R key combination) and writing mmc in the Run window. Open File > Add/Remove snap-in and select and add 'Certificates' in the 'Add or Remove Snap-In' window. When prompted to choose the account for which to manage the certificates, choose 'Computer account'. Click Next, Finish and OK.
- In the 'Certificates' hierarchy, expand 'Personal', and select Certificates.
- On the right-side of the window, right-click the previously created SSL certificate (the one which ends with 'cloudapp.net' and select All tasks > Export
- Click 'Next' in the 'Welcome to the Certificate Export Wizard'
- Choose to export the private keys and click 'Next'
- In the 'Export file format' window, select to export all extended properties and to include all certificates in the certificate path, but make sure not to delete the private key after the export.
- In the 'Security' window, check the 'Password' option and choose a password to protect the certificate (e.g. 1234567 should be fine)
- Click 'Next'
- In the 'File to Export' window, choose a location where the export will be saved
- Click 'Next' and 'Finish'.
Copy the exported security certificate to the VM
On the VM, follow these steps in order to copy the newly generated certificate to the VM.
- Copy the exported certificate from the local machine to the VM using your clipboard.
- Install the certificate by opening it on the VM
- This will open up the 'Certificate Import Wizard'. Choose to store the certificate on the Local machine rather than the 'Current user' profile
- Click 'Next' twice and in the 'Private key protection window, insert your password (the one used when you've exported the certificate)
- Click 'Next'
- Click 'Next' again.
- Click 'Finish'.
Configure RRAS
On the VM, follow these steps to configure RRAS to accept incoming connections:
- On the VM, in Server Manager, click 'Tools' on the gray top bar and choose 'Routing and Remote Access' once the roles have finished installing.
- In the Routing and Remote Access window, right-click the server name and choose 'Configure and Enable Routing and Remote Access'.
- In the Routing and Remote Access Wizard, click 'Next'.
- In the Configuration window, choose 'Custom configuration' and click 'Next'.
- In the Custom configuration window, select 'VPN Access' and 'NAT' and click 'Next'.
- Click 'Finish' in the Routing and Remote Access Wizard and, if prompted, choose to start the service.
- in the Routing and Remote Access window and right-click the server name and choose 'Properties' on the context menu.
- Go to the 'Security' tab and in the lower part of the dialog, make sure 'Use HTTP' is unchecked. Also, select the certificate you've generated. Since a certificate with the same name might have already been generated, make sure you select the correct certificate by clicking the view button and checking if the certificate expires in less than 3 years.
- Go to the IPv4 tab and select to get an IP address assigned from a static pool by selecting ' 'Static pool' in the IP Address assignment group box and clicking the 'Add button'.
- In the 'New IPv4 Address Range' window, insert the range 10.0.0.1 - 10.0.0.10 and click 'OK'.
- Click 'Apply' and then click 'OK' to close the 'Properties' window.
- In 'Routing and Remote Access' window, expand the server node and the IPv4 node and right-click 'NAT and choose 'New Interface'.
- In the 'New Interface for Network Address Translation (NAT) window' select the external interface (usually named 'Ethernet') and click 'OK'.
- In the 'network Address Translation Properties' window, choose the 'Public interface connected to the Internet' radio button and check 'Enable NAT on this interface'
- Click 'OK' to close the properties window.
Create a special user designed to accept incoming VPN connections
The VPN authentication mechanism will require a username + password set of credentials to be sent in order for the VPN tunnel to be successfully created. You can also use the user you generated when you initially created the VM (the same one you've used to connect to the VM), in which case you can skip this step.
- On the VM, open the Computer Management tool by pressing the Windows key + X keys configuration.
- From the context menu, choose 'Computer Management'
- In the 'Computer Management' window, expand 'System Tools' > 'Local Users and Groups' > 'Users'.
- In the right pane, right-click and choose 'New User...'
- Fill in the 'New User' window with the desired username and password of the new user
- Make sure you unselect 'User must change password at next logon'
- Select the 'Password never expires option'
Configure the user for remote dial-in permissions
- Within the 'Computer Management' window and the same selection as previous (System Tools > Local Users and groups > Users), right-click the newly created user and select 'Properties' from the context menu
- Go to the 'Dial-in' tab
- Within the 'Network Access permission', select 'Allow access'.
- Click 'OK'.
Install the security certificates on the client computers which will initiate the VPN connection
This step will assure that each PC which will initiate the VPN connection will have the required security certificate installed, so that the VPN connection will be successful. Please be advised that this step is required even if you're going to use the same machine you've used to issue the certificate in the first place, due to the fact that the self-signed security certificate is originally placed in a different store ('Personal').
- Copy the security certificate on the target computer.
- Double-click the certificate. The 'Certificate Import Wizard' opens up.
- Make sure that you select to install the certificate on the 'Local machine' rather than the current user context
- Click 'Next' twice
- Insert the password used to encrypt the security certificate (e.g. 1234567)
- Click 'Next'
- In the 'Certificate Store' window, choose to import the security certificate in the 'Trusted Root Certification Authorities' by selecting 'Place the certificates in the following store'. Click 'Next'
- Click 'Finish'.
Configure the Azure VM to allow connection on port 443
In order to allow incoming connection through the 443 port, we have to instruct the Cloud Service where the VM resides in to access this port as an incoming port. In order to achieve this, an endpoint on port 443 will be required.. This operation basically instructs the internal Azure firewalls to lets network traffic through this port. However, if there's no Windows firewall configured to allow 443 connection through (which isn't the case, by default), you'll have to configure the firewall on the VM as well.
- In the Azure Management portal, go to the VM created earlier and go to the 'Endpoint' tab.
- Click the 'Add' button on the bottom gray bar
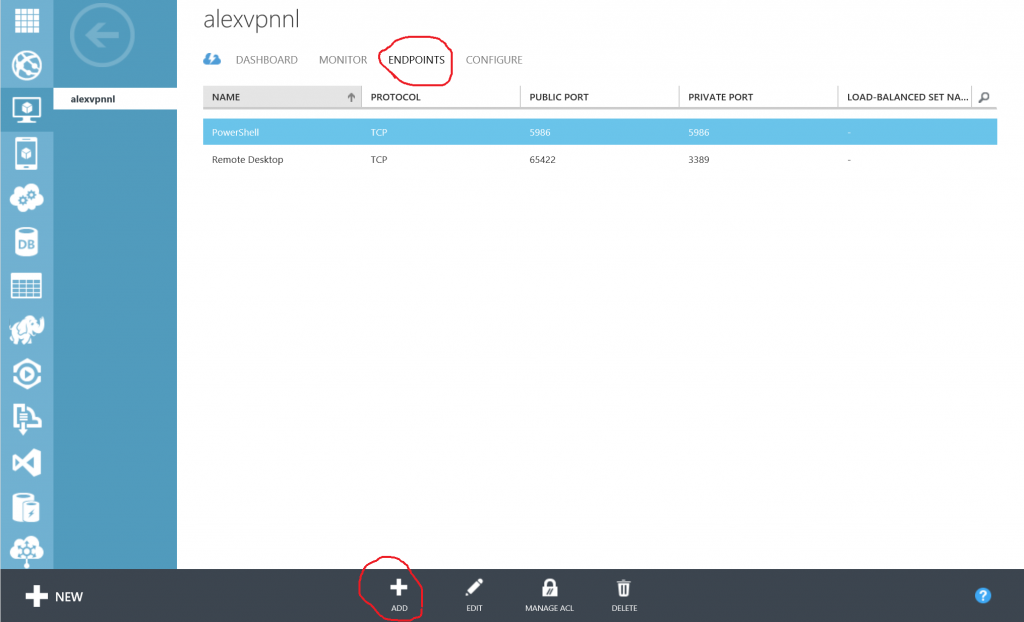
- In the 'Add endpoint' dialog box, choose to add a stand-alone endpoint and click the right arrow to configure the new endpoint
- From the name drop-down menu, select HTTPS and make sure the values are filled in correctly (as the next images show)
- Click the mark check in order to configure the new endpoint

Configure the client connection
- Open the 'Network and Configurations Center' window, either from Control Panel or by right-clicking an active connection you have on the target computer
- Choose the 'Set up a new connection or network'
- In the 'Set Up Network a Connection or Network', select the 'Connect to a workplace' option and click 'Next'
- In the 'Do you want to use a connection that you already have?' window, select 'No' and click 'Next'
- In the 'How do you want to connect?' window, select 'Use my Internet connection (VPN' option) and click 'Next'
- In the 'Type the Internet address to connect to' window, enter [VM DNS name].cloudapp.net for 'Internet address', after replacing the [VM DNS name] container with your VM's name and enter a name for 'Destination name' that describes this connection (you will use this name when you initiate new connections)
- Click 'Create'.
- Back in the 'Network and Connections Center', click 'Change adapter settings'.
- Right-click the newly created connection and choose 'Properties'
- Go to the 'Security' tab
- Change the type of the VPN to 'Secure Socket Tunneling Protocol (SSTP)' and also select to allow the MS-CHAP v2 protocol.
- Click 'OK'
- Voila, you're all done.
Checking if you're using a different IP address
- Quickly navigate to www.speedtest.net to check what your new IP address is.
- You should not only see a different IP address, but that address should also map to 'Microsoft Corporation'
Future considerations
There are a few considerations to keep in mind:
Pricing
Considering that in Azure, Virtual Machines are charged by the minute, it makes total sense to only start the VM when you need a secure connection or a connection from the country where the data center is located. Once the VM is stopped, you will no longer pay for CPU, but only for the storage allocated to the size of the operating system disk.
Additionally, besides the minutes related to your CPU consumptions, you will also be charged for the outside-going network traffic so if you're going to stream HD videos using this VPN connection, make sure to check your bandwidth consumption every now and then.
If you're going to share this VM with your roommates so that you can all use a secure VPN connection, it might make sense to have multiple Windows accounts with remote dial-in permissions created. In the end, you could also add the Network Policies Server and configure traffic shapers for each individual account, you can schedule VPN permissions for each and every single account or even configure health policies for these connections (such as, specifying that each VPN client must have Windows Updated activated and all updates installed, must have an anti-virus software installed and so on).
In terms of actual VM costs, since Microsoft is regularly updating Azure's pricing table it makes more sense to check what the current VM prices are yourself, at http://azure.microsoft.com/en-us/pricing/details/virtual-machines/.
Other services
If you go across other services currently available in Azure, you'll find out that there's an additional service called Azure Virtual networks which allows the creation of VPN tunnels, both site-to-site (STS), and point-to-site (PTS). However, in regard to the PTS connections, remember that these are VPN tunnels created in split-tunnel mode, meaning that only the traffic targeting your Azure Cloud Service will go through the VPN tunnel, whilst the rest will remain outside (and use your computer's Internet connection), which is different from anything we desire.
Conclusion
From now on, you can secure your connection whenever you're in a hotel, a coffee shop or use any public unsafe WiFi. Additionally, if you live in Eastern Europe, you also get access to services currently not available in Eastern Europe such as Netflix, Spotify etc.
Hope this helps! Alex