Using Microsoft Azure DocumentDB in an ASP.NET MVC Application
Scope
The following article demonstrates the use of Microsoft Azure DocumentDB in an ASP.NET MVC Application.
Introduction
Azure DocumentDB is a no-sql storage service which stores JSON documents natively and provides indexing capabilities along with other interesting features.
Below are some of the key terms used in this article:
Collection
A collection is a named logical container for documents.
A database may contain zero or more named collections and each collection consists of zero or more JSON documents.
Being schema-free, the documents in a collection do not need to share the same structure or fields.
Since collections are application resources, they can be authorized using either the master key or resource keys.
DocumentClient
The DocumentClient provides a client-side logical representation of the Azure DocumentDB service.
This client is used to configure and execute requests against the service.
Creating a DocumentDB Account
Please refer to this Wiki to create and set up a DocumentDB Account on Microsoft Azure.
Getting Started
To get started, Create a new ASP.NET MVC project in Visual Studio and add the DocumentDB NuGet package by going to Tools NuGet Package Manager > Package Manager Console and key in the following:
*Install-Package Microsoft.Azure.Documents.Client -Pre
*


The Web.Config File
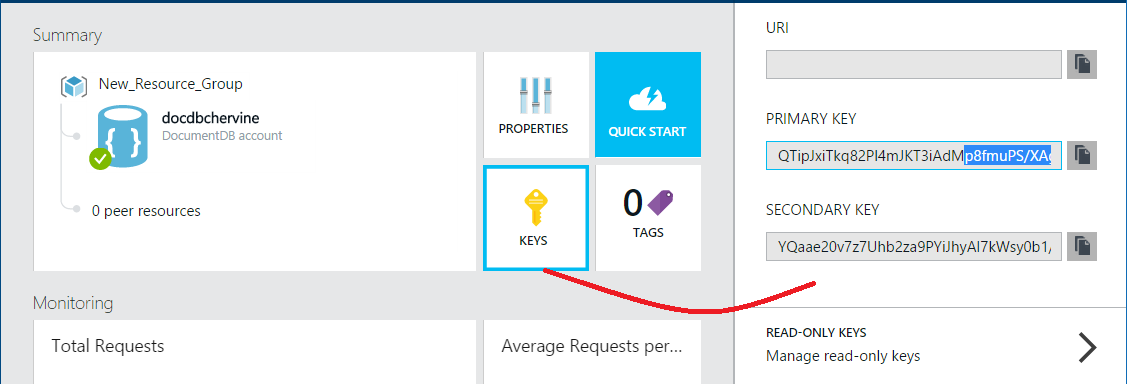
Retrieve the endpoint(URI) and the authKey (Primary/Secondary key) from your DocumentDb Account and add them in the Web Config file.
The keys database and collection represents the name of the database and collections that shall be used in your applications respectively.
<add key="endpoint" value="xxx" />
<add key="authKey" value="xxx" />
<add key="database" value="NotesCb" />
<add key="collection" value="NotesCOllectionCb" /> sCOllectionCb" />
Create DocumentDB Repository Class
This is where all the codes that shall be used to communicate with Azure DocumentDB shall be found.
Step 1: Retrieve the DatabaseId and CollectionId
Retrieve the DatabaseId and CollectionId from the Web.Config file.
/// <summary>
/// Retrieve the Database ID to use from the Web Config
/// </summary>
private static  string databaseId;
private static  String DatabaseId
{
    get
    {
if (string.IsNullOrEmpty(databaseId))
{
    databaseId = ConfigurationManager.AppSettings["database"];
}

return databaseId;
    }
}

/// <summary>
/// Retrieves the Collection to use from Web Config
/// </summary>
private static  string collectionId;
private static  String CollectionId
{
    get
    {
if (string.IsNullOrEmpty(collectionId))
{
    collectionId = ConfigurationManager.AppSettings["collection"];
}

return collectionId;
    }
}
Step 2: Retrieve the DocumentClient.
The document Client provides a client-side logical representation of the Azure DocumentDB service.
This client is used to configure and execute requests against the service.
private static  DocumentClient client;
private static  DocumentClient Client
{
    get
    {
if (client == null)
{
    string endpoint = ConfigurationManager.AppSettings["endpoint"];
    string authKey = ConfigurationManager.AppSettings["authKey"];
    Uri endpointUri = new  Uri(endpoint);
    client = new  DocumentClient(endpointUri, authKey);
}

return client;
    }
}
Step 3: Get the database that shall be used.
If no database is found, the method ReadOrCreateDatabase() is called, to verify if the database exists and creates if, if it does not exist yet.
private static  Database database;
private static  Database Database
{
    get
    {
if (database == null)
{
    database = ReadOrCreateDatabase();
}

return database;
    }
}

private static  Database ReadOrCreateDatabase()
{

    var db = Client.CreateDatabaseQuery()
    .Where(d => d.Id == DatabaseId)
    .AsEnumerable()
    .FirstOrDefault();

    if (db == null)
    {
db = Client.CreateDatabaseAsync(new Database { Id = DatabaseId }).Result;
    }

    return db;
}
Step 4: Get the DoucmentCollection which will be used.
A collection is a named logical container for documents.
A database may contain zero or more named collections and each collection consists of zero or more JSON documents.
If the required collection is not found, the method ReadOrCreateCollection is called that creates it.
private static  DocumentCollection collection;
private static  DocumentCollection Collection
{
    get
    {
if (collection == null)
{
    collection = ReadOrCreateCollection(Database.SelfLink);
}

return collection;
    }
}

private static  DocumentCollection ReadOrCreateCollection(string databaseLink)
{

    var col = Client.CreateDocumentCollectionQuery(databaseLink)
      .Where(c => c.Id == CollectionId)
      .AsEnumerable()
      .FirstOrDefault();

    if (col == null)
    {
col = Client.CreateDocumentCollectionAsync(databaseLink, new  DocumentCollection { Id = CollectionId }).Result;
    }

    return col;
}
Define the Model
public class  Note
{
    [JsonProperty(PropertyName = "id")]
    public string  Id { get; set; }
    public string  Title { get; set; }
    public string  Description { get; set; }
}
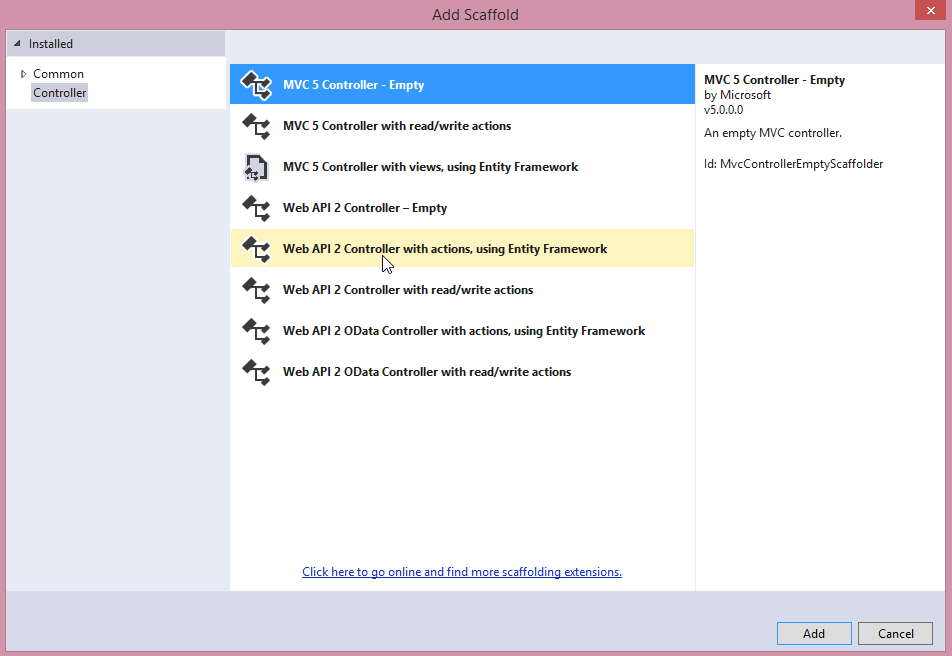
Add the Controller
- Right-Click on Controller > Add > Controller.
- Select MVC5 Controller - Empty
- Call it the NoteController

Generate the Views
Step 1: Create View
- Right-Click on Views > Note > Add View
- Set the parameters as in the image below and Click on Add

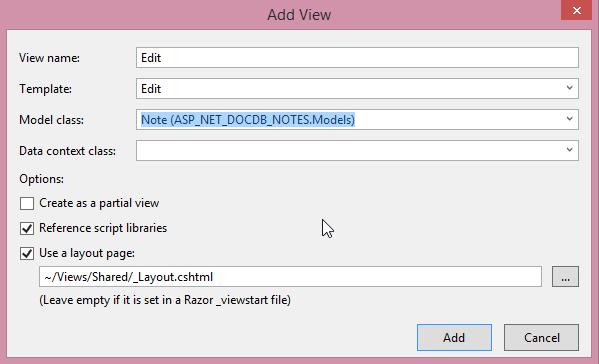
Step 2: Edit View
- Right-Click on Views > Note > Add View
- Set the parameters as in the image below and Click on Add
Step 3: Index View
- Right-Click on Views > Note > Add View
- Set the parameters as in the image below and Click on Add

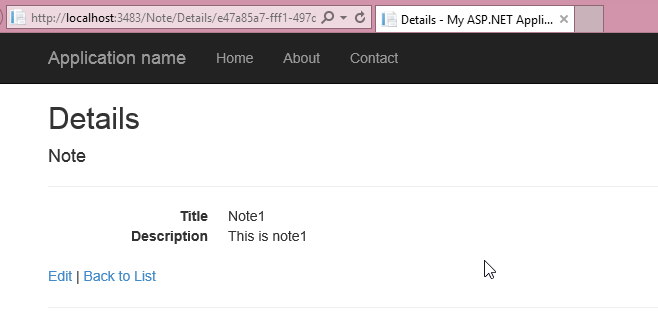
Step 4: Details View
- Right-Click on Views > Note > Add View
- Set the parameters as in the image below and Click on Add

Implement the Create Page
This allows the user to add a new note and save it in the Document Database.
In the note controller, add the following code to redirect the user to the create page on the Create Action.
public ActionResult Create()
{
    return View();
}

The next step is to implement the method that shall be triggered when the save button is clicked.
[HttpPost]
[ValidateAntiForgeryToken]
public async Task<ActionResult> Create([Bind(Include =  "Id,Title,Description")] Note note)
{
    if (ModelState.IsValid)
    {
await DocumentDBRepository.CreateItemAsync(note);
//return RedirectToAction("Index");
return RedirectToAction("Create");

    }
    return View(note);
}
Note
Notice that the Redirect to the Index page is commented as it has not been created at this stage.
The method CreateItemAsync needs to be added to the DocumentRespository which performs the insert.
//Create
public static  async Task<Document> CreateItemAsync(Note note)
{
    return await Client.CreateDocumentAsync(Collection.SelfLink, note);
}

When clicking on Save, the following should happen.
a. Create the Database

b. Create the Collection

c. Create the Document

Implement the Index Page
In the Note Controller, replace the contents of the Index method with the following:
// GET: Note
public ActionResult Index()
{
    var notes = DocumentDBRepository.GetNotes();
    return View(notes);
}
Also, in the DocumentRepository, add the GetNotes method, which selects all the documents of the current collection
public static  List<Note> GetNotes()
{
    return Client.CreateDocumentQuery<Note>(Collection.DocumentsLink)
    .AsEnumerable()
    .ToList<Note>();
}
The Index page now displays a list of notes.

Implement the Edit Page
a. In the controller, implement the following method which fetches the selected note to edit and returns it to the page to display.
public ActionResult Edit(string id)
{
    if (id == null)
    {
return new  HttpStatusCodeResult(HttpStatusCode.BadRequest);
    }

    Note note = (Note)DocumentDBRepository.GetNote(id);
    if (note == null)
    {
return HttpNotFound();
    }

    return View(note);
}
b. In the repository, implement the GetNote method, which returns a document based on its ID
public static  Note GetNote(string  id)
{
    return Client.CreateDocumentQuery<Note>(Collection.DocumentsLink)
.Where(d => d.Id == id)
.AsEnumerable()
.FirstOrDefault();
}
At this point, when clicking on Edit from the Index page, the selected note is displayed.

c. In the controller, implement the edit method that shall be triggered when clicking on the save button.
[HttpPost]
[ValidateAntiForgeryToken]
public async Task<ActionResult> Edit([Bind(Include =  "Id,Title,Description")] Note note)
{
    if (ModelState.IsValid)
    {
await DocumentDBRepository.UpdateNoteAsync(note);
return RedirectToAction("Index");
    }

    return View(note);
}
d. In the repository, implement the UpdateNoteAsync, which replace the current document with the updated one.
public static  async Task<Document> UpdateNoteAsync(Note note)
{
    Document doc = Client.CreateDocumentQuery(Collection.DocumentsLink)
.Where(d => d.Id == note.Id)
.AsEnumerable()
.FirstOrDefault();

    return await Client.ReplaceDocumentAsync(doc.SelfLink, note);
}
Implement the Details Page
In the Controller, add the following method. It calls the GetNote method implemented for the Edit part and returns the required document.
public ActionResult Details(string id)
{

    if (id == null)
    {
return new  HttpStatusCodeResult(HttpStatusCode.BadRequest);
    }

    Note note = (Note)DocumentDBRepository.GetNote(id);
    if (note == null)
    {
return HttpNotFound();
    }

    return View(note);

}
Implement the Delete Method
Add the method Delete in the controller. It calls the Method DeleteNote in the Controller and returns the user to the Index page.
public async Task<ActionResult> Delete([Bind(Include =  "Id")] Note note)
{
    if (ModelState.IsValid)
    {
await DocumentDBRepository.DeleteNote(note);
return RedirectToAction("Index");
    }

    return View(note);
}
Code Sample
The Code Sample is available here.