Azure: Migration Accelerator (MA) (4/4)
Find the previous posts here:
- The way to migrate to Hyper-V / Azure : Introduction
- The way to migrate VMware to Hyper-V: SCVMM V2V
- The way to migrate VMware/Physical to Hyper-V / Azure: MVMC/MAT
So, what if I tell you that Microsoft found the Aladdin’s magic lamp, and the magic lamp name is Inmage. InMage is a computer software company based in the US and India. It markets a product line called Scout that uses continuous data protection (CDP) for backup and replication. Scout consists of two product lines: the host-offload line, which uses a software agent on the protected servers, and the fabric line, which uses an agent on the Fibre Channel switch fabric.
Microsoft brought Inmage in July 2014, and the acquisition goal is to use Scout to offer customers a powerful solution to protect and migrate their infrastructure using Microsoft Azure. The overall solution is called Migration Accelerator (MA). Today, MA is in it’s the first version and it’s currently in preview. MA is only available in North America, that means that you can only use MA to protect and replicate workload to North America azure regions.
Is Migration Accelerator free?
MA preview is free, but Microsoft did not mention anything about MA licensing. Maybe it will be free, or maybe it will paying, hard to guess. But if it will be paying, I think it will be licensed by protected or migrated an instance, Anyway, keep our finger crossed.
A small enlightenment
MA is not a converting tool, but a replication tool, it’s agent based, ie, an agent is installed in each operating system to protect, and data is replicated from inside the OS. This is why we will see that the mechanism is different from other converting tools like MVMC.
What can we do with MA
So let’s talk straightly about MA. I guess the first things we think about it when we hear about MA are the migration paths.
Migration paths
MA is a real piece of jewellery for Microsoft Azure because it created lovers for Azure.
Ma can replicate workloads from
- VMware VSphere
- VMware VCenter
- VMware Vcloud
- Amazon Web Services
- Hyper-V hosts
- Physical server
To
- Microsoft Azure
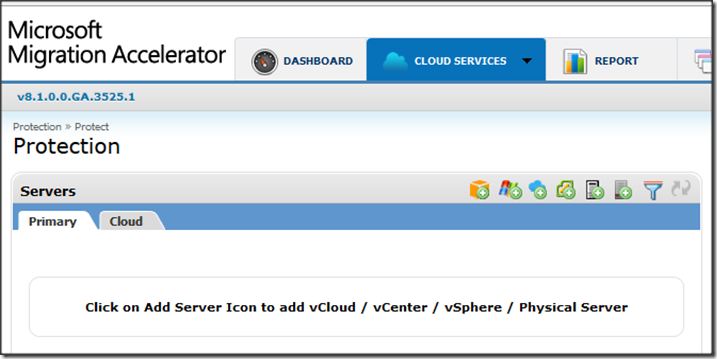
Yes, you can certainly see that the target platform is always Azure, no Hyper-V nor VMM clouds. Microsoft is shifting gears, the ultimate goal is to accelerate Azure adoption, and provide customers with an efficient tool that can do the migration. The following picture shows the Cloud Services/Protection view in the MA (Preview) portal. You can see icons used to connect MA to the source platforms.
https://buildwindows.files.wordpress.com/2015/03/snap-2015-03-09-at-10-13-03_thumb.png?w=717&h=359
** How it works **
This is the best part because we will discuss and explain how this solution is working. You can notice that I’m always referring to MA as a solution and not a tool, and this is intentional. MA is like ASR (Azure Site Recovery), it’s a service hold in Azure and orchestrates replication and migration between different sites. It’s the operation master and it’s accessed via a web portal. The actual preview URL is https://ma-wus-01.cloudapp.net. You need a subscription to use MA, and for the happiness of all, you can request for a preview subscription freely via this link.
** Components **
The MA solution includes 5 mandatory components, these components should be correctly installed and configured to start protection and migration of workloads, the following ^picture describes the components and their placement:
https://buildwindows.files.wordpress.com/2015/03/snap-2015-03-09-at-10-47-31_thumb.png?w=612&h=366
- Mobility Service (MS): The MS is a light weight OS-based service installed on target, it’s what we called the agent. This agent has to be installed on the source machines to be protected. the MS will Capture data in real time and syncs source volumes to target volumes. The Mobility Service can be manually installed or pushed via the MA portal. Of course, the push method will be always be used (easiest, faster) unless you can’t do it and need to use your hands.
- Process Server (PS): This is an on-premises server that facilitates communication between the Mobility Service and target virtual machines in Azure. The PS provides caching, queuing, compression, encryption and bandwidth management. You have to dedicate a server or a virtual machine in your source platform (LAN) for the best performances. If you enable compression or encryption for the replication, the PS will be more CPU intensive and this is why the sizing is important. The PS will handle all your workloads replication (1 VM or 100 VM…)
- Master Target (MT): The MT is the target for replicating disks of on-premises servers. It’s installed within a dedicated Azure VM in an Azure subscription. Disks are attached to the MT to maintain duplicate copies. Can you see it? This VM (Like the PS server) is so resource intensive, it will handle all the replication traffic to commit changes to attached disks (VHDs). The hardware configuration of this machine should be well calculated or even over sized. A bad sizing of PS or MT will result in poor performances, low replication processing and maybe errors and timeouts.
- Configuration Server (CS): The CS manages the communication between the Master Target and the MA Portal. Installed on a dedicated Azure VM in an Azure subscription. Regular synchronization occurs between the CS and MA Portal to maintain a valid and straight configuration of the overall process.
- MA Portal: This is the web portal we talk about, it’s a multi-tenant portal to discover, configure protection and migrate the on-premises workloads into Azure. It’s a single pane of glass where you can configure the protection and migrations.
https://buildwindows.files.wordpress.com/2015/03/snap-2015-03-09-at-10-59-23_thumb.png?w=844&h=121
The MA portal includes a dashboard, a report view and a settings configuration view. It also exposes a Support view to open a support ticket or view help links or articles related to MA
** A fast jump to the portal **
So let’s see what can we do with MA, and precisely, with the MA portal. After signing in to the MA portal, let’s go to the Cloud Services view. The cloud services includes tow options: Protection and Migration
https://buildwindows.files.wordpress.com/2015/03/snap-2015-03-09-at-11-38-53_thumb.png?w=769&h=246
This is a good point, what is the difference between them: In fact, you should first now that MA is a one-way replication and migration tool, it only allow replicating data to Microsoft Azure. Reversing replication even after failover is not possible nor supported. So if you plan to use MA as a tool for DR to Azure, it’s not what you need. MA is a migration tool to Azure.
- Protection: The projection view will give you the possibility to initiate replication from On-premises to Azure. This is the first step you will make. You will discover your workloads and tell MA to replicate them to Azure.
- Migration: This is the “Failover” view, it will permit you to cut over with your on-premise, and start using your workloads in Azure.
KEEP IN MIND, MA is a one-way replication and failover tool, after you failover to Azure, you can’t use it to go back to on-premises
Now if we go to the Protection view, MA will ask us which Account to use
https://buildwindows.files.wordpress.com/2015/03/snap-2015-03-09-at-11-52-21_thumb.png?w=595&h=241
This is very interesting, since MA supports multi accounts, this will permit partners to use MA to migrate their customers to Azure using the same portal and subscription. After selecting the account, the protection view will appear, and we can see two tabs: The Primary tab and the Cloud tab.
https://buildwindows.files.wordpress.com/2015/03/snap-2015-03-09-at-12-06-14_thumb.png?w=576&h=496
The Cloud tab will let us add an Azure subscription, ie where to replicate workloads. It will show us, in addition, the scout components, ie the two components that reside in Azure, aka the MT server and the CS server. The red arrow shows that the only possible target is Azure
https://buildwindows.files.wordpress.com/2015/03/snap-2015-03-09-at-12-41-08_thumb.png?w=548&h=377
The picture above shows the Primary tab, this tab will allow us to add our on-premise workloads to replicate and migrate. As discussed at the beginning, 6 sources are possible: AWS, VSphere, VCloud, VCenter, Hyper-V and Physical.
Let’s see if we select a resource to protect. The following picture shows that a related projection view appears at right. You should first (If it is not already done) install the Mobility Service (The agent) on the target, then click Protect to configure the protection (ie the replication). The red narrow show a shield icon. In this picture the shield is grey, this is because the machine is not protected. After you start the protection, it will turn to Green.
https://buildwindows.files.wordpress.com/2015/03/snap-2015-03-09-at-12-50-55_thumb.png?w=756&h=127
What if I click Protect?
The following picture shows a Protect configuration page:
https://buildwindows.files.wordpress.com/2015/03/snap-2015-03-09-at-13-04-49_thumb.png?w=734&h=397
You can see that here, you will make some configuration:
Replication policy: You can choose between replicating with compression or without compression. You can even create your custom policy for custom values
Azure Cloud Account: You will choose here to which Azure subscription you will replicate
Configuration Server: Which configuration server you will use for this replication
You will have to configure the Protection Details like the MT server, the retention drive, the Azure storage account to use and the process server (Next picture)
https://buildwindows.files.wordpress.com/2015/03/snap-2015-03-09-at-13-14-04_thumb.png?w=795&h=323
NB Notice that when configuring protection, there are options for the global protection (Protection Options), and other options per protected instance (Protection Details). This is because you can include other instances under the same protection group that will share the Protection Options, and with specific Protection Details.
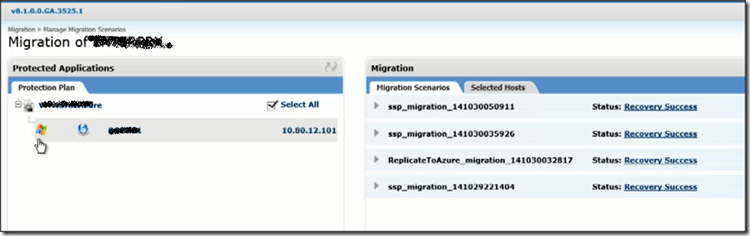
Finally, we can see here the Migration view that will permit a ONE WAY failover to Azure
https://buildwindows.files.wordpress.com/2015/03/snap-2015-03-09-at-13-20-08_thumb.png?w=750&h=236
**Conclusion **
Here we are, this was the last post in this series. This series intend to give you a global picture of how to migrate to Hyper-V and Azure, and what are the tools and solutions provided by Microsoft. There are other partners and third-party tools like DoubleTake move and 5nine V2V that can be used too. You can find below a table comparing these tools
https://buildwindows.files.wordpress.com/2015/03/snap-2015-03-09-at-14-56-02_thumb.png?w=885&h=359
Keep in mind:
- MA is not a real protection tool, but it is a migration tool, and a one time failover tool. There is only one way migration, always to Azure.
- MA stills in preview, maybe there will be feature changes or enhancement. MA preview is free, no word about the GA date or licensing.
- If your on-premise datacenter uses Hyper-V and VMM, think about ASR (Azure Site Recovery) instead, don’t use MA. ASR is more efficient, very specific to Hyper-V and gives you two-way replication and failover to Azure
The series is divided into four parts: