SBS 2011 Essentials: Router Setup
**Windows Small Business Server 2011 Essentials: Router Setup
**Proper inflow and outflow of network traffic requires careful setup of the device that directs the traffic - your router. Email, Internet access, remote access, and other services require ports to be opened and forwarded to function successfully. This article covers router setup for Windows Small Business Server 2011 Essentials.
Directions are provided for the following routers. If your router is not listed, use the General Directions.
- Linksys BEFSR41
- Netgear RP614
- Sonicwall TZ170
- Sonicwall TZ100
- D-Link DIR-825
- Linksys WRT160N
- Linksys WRT54GL
- Watchguard Firebox X20e
Note: this article was written for Windows SBS 2011 Essentials specifically.
Important: Verify Your Settings!
You should verify any settings in this document to ensure your router is properly directing and filtering Internet traffic as desired.
Overview
The following is a diagram of a typical home or small business network.

A typical home or small business network consists of the following:
- An Internet connection: provided by your Internet Service Provider (ISP).
- An Internet connection device: usually a cable or DSL modem provided by your ISP. Some ISPs provide a device that combines a modem with a broadband router.
- A broadband router: a device that routes network traffic from your local network to the Internet. Small business routers usually provide firewall services requiring port configuration. Some routers support UPnP to simplify configuration. The router may also function as a wireless access point.
- Client computers: connect to each other through a switch (sometimes part of the router) and to the Internet through the broadband router. Multiple switches may be used if you connect more than a few desktop and notebook computers.
- A home or small business server: provides file sharing and remote access.
Reality Check
This article assumes you have a basic understanding of small business networking.
If the terms ping, static IP address, DHCP, firewall ports, and UPnP are a foreign language for you, consider having a friend or consultant help you set up your network.
The following links provide information on small business networking:
- http://www.tomsguide.com/us/forum/forum-13.html
- http://social.technet.microsoft.com/Forums/en-US/smallbusinessserver2011essentials/threads
- http://www.cisco.ws/cisco/web/solutions/small_business/resource_center/articles/connect_employees_and_offices/index.html
- http://h30187.www3.hp.com/courses/overview/p/courseId/2084/Networking_101.htm
General Directions
UPnP Router Configuration
Many broadband routers designed for small business support UPnP – a standard that simplifies router setup. Check your product documentation for UPnP support. If UPnP is supported, Windows SBS 2011 Essentials may be able to automatically configure your broadband router.
- If your router supports UPnP, ensure that UPnP is enabled.
- Open your Web browser, and then connect to the configuration Web page for your router. Usually the Web page is at the IP address of your router.
- If necessary, type your user name and password to log on to the configuration Web page. Some routers include a default user name, password, and IP address on the underside of the router. For more information, see the documentation for your router.
- Find the UPnP setting page on your router. For more information, see the documentation for your router.
- Save the configuration on your router, and then close the browser. If your router needs to restart, wait until it restarts completely before you proceed.
It is important to note that once the UPnP feature has been used to configure the router you can disable the UPnP feature should you so desire.
Begin the wizard by clicking on Set up Remote Web Access.

Once the wizard begins, it will attempt to set up your router using UPnP. If it is successful it will have set up the ports it needs and enable the Web site. If it is unsuccessful a warning will be shown:

You will now need to manually set up your router if it cannot enable the ports. Click I want to skip the listed issues for now and run the wizard again later and click next. Go back to setup the router and click on "Skip router setup. I want to set up my router manually." and click next. Follow the below guidance for each router and then close the wizard.
Manual Router Configuration
If your router does not support UPnP, or if UPnP is disabled, there red warning that the wizard could not set up the router when Windows SBS 2011 Essentials attempts to configure your router. If your router does not support the UPnP standard, you must manually configure your router to forward the following ports to the IP address of your Windows SBS 2011 Essentials server:
| Service or Protocol | Port |
| HTTPS web traffic | TCP 443 |
To manually configure your router
- Open your Web browser, and then connect to the configuration Web page for your router. Usually the Web page is at the IP address of your router.
- If necessary, type your user name and password to log on to the configuration Web page. Some routers include a default user name, password, and IP address on the underside of the router. For more information, see the documentation for your router.
- Disable UPnP on your router.
- Find the port forwarding configuration page on your router.
- Type the necessary information to forward TCP port 443 to your Windows SBS 2011 Essentials server.
- Save the port-forwarding configuration on your router, and then close the browser. If your router needs to restart, wait until it restarts completely before you proceed.
Configure the Linksys BEFSR41 for Remote Access
Model: BEFSR41
Version: 4.1
Firmware: 1.04.09
http://homesupport.cisco.com/en-us/wireless/lbc/BEFSR41?referrer=www.linksysbycisco.com
UPnP Router Configuration
The Linksys BEFSR41 broadband router supports UPnP – a standard that simplifies router setup. If you enable UPnP in the Linksys BEFSR41, Windows SBS 2008 may be able to automatically configure your remote access settings.
- Open the Web browser on your computer and enter the address for the Linksys router in the address field. The default IP address is 192.168.1.1.
- At the login screen, leave the User Name field blank and enter the router password. The default password is admin.
- Click the Administration tab, the Management page should be selected. If not, click the Management tab.
- For UPnP, click Enabled, and then click Save Settings.
- Close the Web browser.

Once the router is configured, open the Windows SBS 2011 Essentials Console, click Set up Remote Web Access. The Windows SBS 2011 Remote Web Access wizard will attempt to find and configure the remote access settings on your router.
Manual Router Configuration
If you prefer to not use UPnP, you must manually configure your router to forward the following ports to the IP address of your Windows SBS 2011 Essentials server:
| Service or Protocol | Port |
| HTTPS web traffic | TCP 443 |
To manually configure your router
- Open the Web browser on your computer and enter the address for the Linksys router in the address field. The default IP address is 192.168.1.1.
- At the login screen, leave the User Name field blank and enter the router password. The default password is admin.
- Find the screen with UPnP settings and disable UPnP.
- Click the Applications and Gaming tab, the Port Range Forwarding page should be selected. If not, click the Port Range Forwarding tab.
- Enter the settings as in the screenshot below. The IP address should be the IP address of your server.
- Click Save Settings, and then close the Web browser.

(Please note this example image includes more than you need for SBS 2011 Essentials - the only forwarding you need to do is HTTPS - 443 to 443 with a protocol of TCP.)
Once the router is configured, you can complete the process by setting up the Domain name.
Configure the Netgear RP614 for Remote Access

Model: RP614
Version: 4
Firmware: 1.0.2_06.29
http://www.netgear.com/Products/RoutersandGateways/WiredRouters/RP614.aspx
UPnP Router Configuration
The Netgear RP614v4 broadband router supports UPnP – a standard that simplifies router setup. If you enable UPnP in the Netgear RP614v4, Windows SBS 2011 Essentials may be able to automatically configure your remote access settings.
- Open the Web browser on your computer and enter the address for the Netgear router in the address field. The default IP address is 192.168.1.1.
- At the login screen, enter the user name and password. The default user name is admin. The default password is password.
- Under Advanced, click UPnP.
- Click Turn UPnP On, and then click Apply.
- Close the Web browser.

Once the router is configured, open the Windows SBS 2011 Essentials Console, click Set up Remote Web Access. The Windows SBS 2011 Remote Web Access wizard will attempt to find and configure the remote access settings on your router.
Manual Router Configuration
If you prefer to not use UPnP, you must manually configure your router to forward the following ports to the IP address of your Windows SBS 2011 Essentials server:
| Service or Protocol | Port |
| HTTPS web traffic | TCP 443 |
To manually configure your router
Open the Web browser on your computer and enter the address for the Netgear router in the address field. The default IP address is 192.168.1.1.
At the login screen, enter the user name and password. The default user name is admin. The default password is password.
Find the screen with UPnP settings and disable UPnP.
Under Advanced, click Port Forwarding / Port Triggering.
Under Service Name, click HTTP, enter the server IP address, and then click Add.
Click Add Custom Service, and then enter the following settings:
Service Name: HTTPS
Service Type: TCP
Starting Port: 443
Ending Port: 443
Server IP Address: your server IP addressClick Apply.
Continue adding the custom services you see in the screenshot below.
Close the Web browser.

(Please note this example image includes more than you need for SBS 2011 Essentials - the only forwarding you need to do is Service name HTTPS with a start port of 443 and end port 443.)
Once the router is configured, open the Windows SBS 2011 Essentials Console, click Set up Remote Web Access. The Windows SBS 2011 Remote Web Access wizard will attempt to find and configure the remote access settings on your router.
Configure the Sonicwall TZ170 for Remote Access

Model: TZ170
Version: Standard
Firmware: SonicOS Standard 3.1.6.3-4s
http://www.sonicwall.com/us/support/3134.html
UPnP Router Configuration
The Sonicwall TZ170 broadband router does not support UPnP.
Manual Router Configuration
You must manually configure your router to forward the following ports to the IP address of your Windows SBS 2011 Essentials server:
To manually configure your router
Open the Web browser on your computer and enter the address for the Sonicwall router in the address field. The default IP address is 192.168.1.1.
At the login screen, enter the user name and password. The default user name is admin. The default password is password.
Find the screen with UPnP settings and disable UPnP.
Click Firewall, and then click Services.
Under Custom Services, click Add.
Enter the following settings:
Name: HTTPS
Port Range: 443-443
Protocol: TCP(6)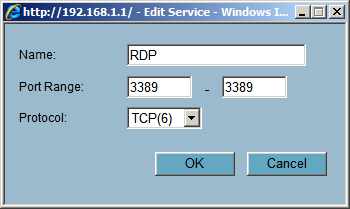 (please note the image is for example only and not exact)
Click OK.
Action: Allow
Click OK.
Close the Web browser.

(Please note this example image includes more than you need for SBS 2011 Essentials - the only forwarding you need to do is WAN HTTPS.)
Once the router is configured, open the Windows SBS 2011 Essentials Console, click Set up Remote Web Access. The Windows SBS 2011 Remote Web Access wizard will attempt to find and configure the remote access settings on your router.
Configure the Sonicwall TZ100 for Remote Access
Model: TZ100 wireless-N
Firmware: SonicOS Enhanced 5.5.1.0-5o
http://www.sonicwall.com/us/support/13528.html
UPnP Router Configuration
The Sonicwall TZ100 broadband router does not support UPnP.
Manual Router Configuration
You must manually configure your router to forward the following ports to the IP address of your Windows SBS 2011 Essentials server:
| Service or Protocol | Port |
| HTTPS web traffic | TCP 443 |
To manually configure your router
Open the Web browser on your computer and enter the address for the Sonicwall router in the address field. The default IP address is 192.168.168.168.
At the login screen, enter the user name and password. The default user name is admin. The default password is password.
Find the screen with UPnP settings and disable UPnP.
Click Firewall, and then click Services.
Under Service Groups, View Style, click Custom Services.
Unders Services, click Add.
Enter the following settings:
Click OK.
Under Service Groups, click Add Group.
For Name, enter: SBSPorts
From the list on the left, select the following Services and add them to the list on the right with the right arrow button:
HTTPS
 (please note this image is not exact)
Click OK.
On the left navigation menu, under Firewall, click Access Rules
Under Access Rules, View Style, click Drop-down Boxes.
For the From Zone, select: WAN
For the To Zone, select: LAN
Click OK.
Click Add.
Under Settings, enter the following:
Action: Allow
Service: SBSPorts
Source: Any
Destination: WAN Primary IP (or the port use use for broadband)
Users Allowed: All
Schedule: Always on
Click OK.
Close the Web browser.
Once the router is configured, open the Windows SBS 2011 Essentials Console, click Set up Remote Web Access. The Windows SBS 2011 Remote Web Access wizard will attempt to find and configure the remote access settings on your router.
Configure the D-Link DIR-825 for Remote Access

Model: DIR-825
Hardware Version: B1
Firmware Version: 2.02NA
http://www.dlink.com/products/?tab=3&pid=DIR-825&rev=DIR-825_revB
UPnP Router Configuration
Though the D-Link DIR-825 broadband router supports UPnP, UPnP configuration did not test successfully.
Manual Router Configuration
You must manually configure your router to forward the following ports to the IP address of your Windows SBS 2011 Essentials server:
| Service or Protocol | Port |
| HTTPS web traffic | TCP 443 |
To manually configure your router
- Open the Web browser on your computer and enter the address for the D-Link router in the address field. The default IP address is 192.168.0.1.
- At the login screen, enter the user name and password. The default user name is admin. The default password is blank.
- Find the screen with UPnP settings and disable UPnP.
- On the top menu, click Advanced.
- On the left menu, click VIRTUAL SERVER.
- Click the first Application Name list box and select SMTP.
- Click the left double arrow to place HTTPS in the Name box.
- In the first IP Address box, enter the IP address of your server.
- Select the check box to enable it.
- Repeat for any other applications you need to
- In the IP Address box, enter the IP address of your server.
- Select the check box to enable it.
- Click Save Settings.
- Click Continue when the settings are saved and close the Web browser.

(Please note this example image includes more than you need for SBS 2011 Essentials - the only forwarding you need to do is HTTPS - Public Port 443 to Private Port 443 with a protocol of TCP.)
Once the router is configured, open the Windows SBS 2011 Essentials Console, click Set up Remote Web Access. The Windows SBS 2011 Remote Web Access wizard will attempt to find and configure the remote access settings on your router.
Configure the Linksys WRT160N for Remote Access

Model: WRT160N
Hardware Version: V3
Firmware Version: 3.0.02
http://homesupport.cisco.com/en-us/wireless/lbc/WRT160N
UPnP Router Configuration
The Linksys WRT160N broadband router supports UPnP – a standard that simplifies router setup. If you enable UPnP in the Linksys WRT160N , Windows SBS 2011 Essentials may be able to automatically configure your remote access settings.
- Open the Web browser on your computer and enter the address for the Linksys router in the address field. The default IP address is 192.168.1.1.
- At the login screen, enter the user name and password. The default user name is blank. The default password is admin.
- Click the Administration tab.
- For UPnP, click Enabled, and then click Save Settings.
- Close the Web browser.

Once the router is configured, open the Windows SBS 2011 Essentials Console, click Set up Remote Web Access. The Windows SBS 2011 Remote Web Access wizard will attempt to find and configure the remote access settings on your router.
Manual Router Configuration
If you prefer to not use UPnP, you must manually configure your router to forward the following ports to the IP address of your Windows SBS 2011 Essentials server:
| Service or Protocol | Port |
| HTTPS web traffic | TCP 443 |
To manually configure your router
- Open the Web browser on your computer and enter the address for the Linksys router in the address field. The default IP address is 192.168.1.1.
- At the login screen, leave the User Name field blank and enter the router password. The default password is admin.
- Find the screen with UPnP settings and disable UPnP.
- Click the Applications and Gaming tab, the Port Range Forwarding page should be selected. If not, click the Port Range Forwarding tab.
- Enter the settings as in the screenshot below. The IP address should be the IP address of your server.
- Click Save Settings, and then close the Web browser.

(Please note this example image includes more than you need for SBS 2011 Essentials - the only forwarding you need to do is HTTPS - 443 to 443 with a protocol of TCP.)
Once the router is configured, open the Windows SBS 2011 Essentials Console, click Set up Remote Web Access. The Windows SBS 2011 Remote Web Access wizard will attempt to find and configure the remote access settings on your router.
Configure the Linksys WRT54GL for Remote Access

Model: WRT54GL
Version: 1.1
Firmware: v4.30.11
http://homesupport.cisco.com/en-us/wireless/lbc/WRT54GL
UPnP Router Configuration
The Linksys WRT54GL broadband router supports UPnP – a standard that simplifies router setup. If you enable UPnP in the Linksys WRT54GL, Windows SBS 2011 Essentials may be able to automatically configure your remote access settings.
- Open the Web browser on your computer and enter the address for the Linksys router in the address field. The default IP address is 192.168.1.1.
- At the login screen, leave the User Name field blank and enter the router password. The default password is admin.
- Click the Administration tab, the Management page should be selected. If not, click the Management tab.
- For UPnP, click Enabled, and then click Save Settings.
- Close the Web browser.

Once the router is configured, open the Windows SBS 2011 Essentials Console, click Set up Remote Web Access. The Windows SBS 2011 Remote Web Access wizard will attempt to find and configure the remote access settings on your router.
Manual Router Configuration
If you prefer to not use UPnP, you must manually configure your router to forward the following ports to the IP address of your Windows SBS 2011 Essentials server:
| Service or Protocol | Port |
| HTTPS web traffic | TCP 443 |
To manually configure your router
- Open the Web browser on your computer and enter the address for the Linksys router in the address field. The default IP address is 192.168.1.1.
- At the login screen, leave the User Name field blank and enter the router password. The default password is admin.
- Find the screen with UPnP settings and disable UPnP.
- Click the Applications and Gaming tab, the Port Range Forwarding page should be selected. If not, click the Port Range Forwarding tab.
- Enter the settings as in the screenshot below. The IP address should be the IP address of your server.
- Click Save Settings, and then close the Web browser.

(Please note this example image includes more than you need for SBS 2011 Essentials - the only forwarding you need to do is HTTPS - 443 to 443 with a protocol of TCP.)
Once the router is configured, open the Windows SBS 2011 Essentials Console, click Set up Remote Web Access. The Windows SBS 2011 Remote Web Access wizard will attempt to find and configure the remote access settings on your router.
Configure the Watchguard Firebox X20e for Remote Access
Model: X20e
Firmware: 10.2.12
http://www.watchguard.com/products/edge-e/overview.asp?t=main
UPnP Router Configuration
The Firebox X20e broadband router does not support UPnP.
Manual Router Configuration
You must manually configure your router to forward the following ports to the IP address of your Windows SBS 2011 Essentials server:
| Service or Protocol | Port |
| HTTPS web traffic | TCP 443 |
To manually configure your router
Open the Web browser on your computer and enter the address for the Firebox router in the address field. The default IP address is 192.168.111.1.
At the login screen, enter the user name and password. The default user name is admin. The default password is admin.
Find the screen with UPnP settings and disable UPnP.
Click Firewall, and then click Configure Incoming.
Under Common Packet Filter Policies, for the HTTPS policies, set the following:
Filter: Allow
Host: IP address of your server
Port Redirect, HTTPS: 443
Click Submit.
(Please note this example image includes more than you need for SBS 2011 Essentials - the only forwarding you need to do is HTTPS - Port Redirect.)
Once the router is configured, open the Windows SBS 2011 Essentials Console, click Set up Remote Web Access. The Windows SBS 2011 Remote Web Access wizard will attempt to find and configure the remote access settings on your router.