Exchange Hybrid
Exchange Hybrid
Exchange Hybrid means you want to maintain rich coexistence with Exchange Online and an Exchange on premises. When configured properly, can provide almost seamless coexistence between Exchange Online and your on-premises Exchange environment. Part of this concept is that while you technically have two separate Exchange organizations, the mail flow between these organizations appears “internal” so that a message from a cloud user looks no different than a message from an on-premises user.
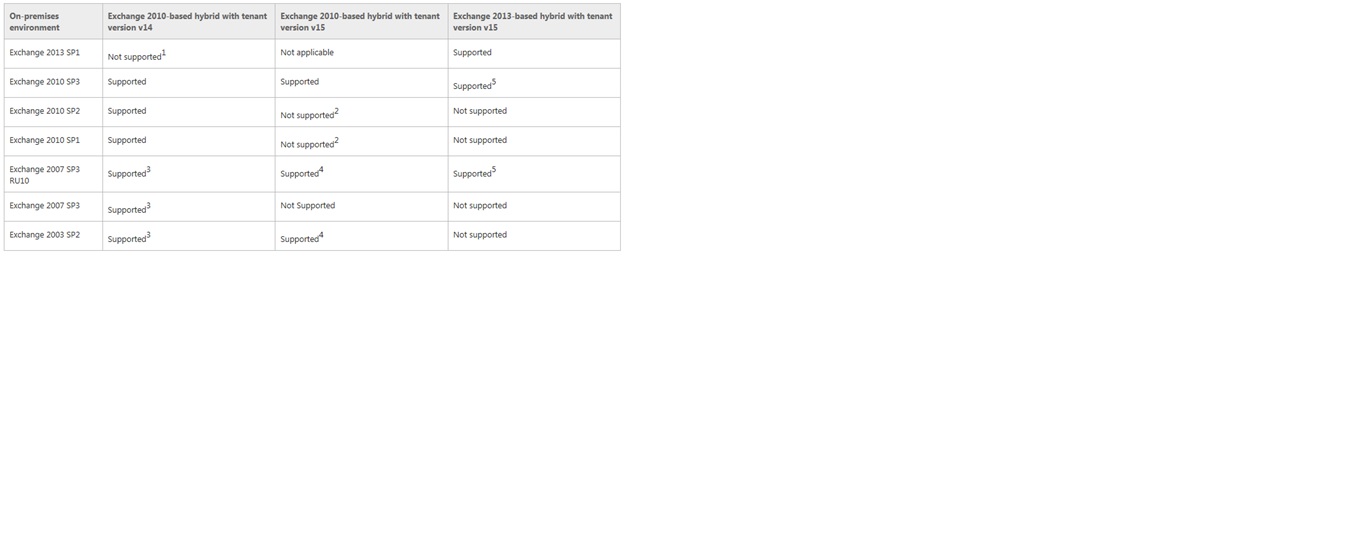
Hybrid deployment prerequisites
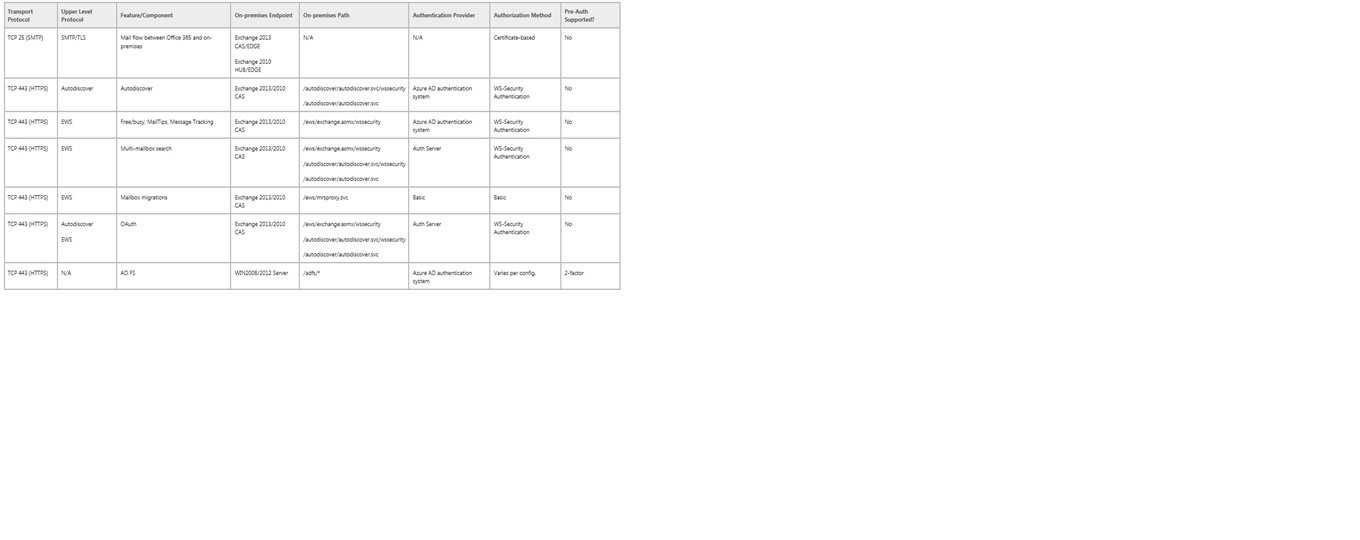
Hybrid Deployment protocols, ports and endpoints
Hybrid deployment features and components require certain incoming protocols, ports and connection endpoints to be accessible to Office 365 in order to work correctly. Before configuring your hybrid deployment, verify that your on-premises network and security configuration can support the features and components in the table below.
Recommended Tools and Services
In addition to the required prerequisites described earlier, other tools and services are beneficial when you’re configuring hybrid deployments with Hybrid Configuration wizard.
Exchange Server Deployment Assistant
Exchange Server Deployment Assistant is a free web-based tool that helps you deploy Exchange 2013 in your on-premises organization, configure a hybrid deployment between your on-premises organization and Office 365, or migrate completely to Office 365. The tool asks you a small set of simple questions and then, based on your answers, creates a customized checklist with instructions to deploy or configure Exchange Server. The Deployment Assistant gives you exactly the right information you need to configure your hybrid deployment.
Remote Connectivity Analyzer tool
The Microsoft Remote Connectivity Analyzer tool checks the external connectivity of your on-premises Exchange organization and makes sure that you’re ready to configure your hybrid deployment. We strongly recommend that you check your on-premises organization with the Remote Connectivity Analyzer tool prior to configuring your hybrid deployment with the Hybrid Configuration wizard.
Single sign-on
Although not a requirement for hybrid deployments, single sign-on enables users to access both the on-premises and Exchange Online organizations with a single user name and password. Single sign-on provides users with a familiar sign-on experience and allows administrators to easily control account policies for Exchange Online organization mailboxes by using on-premises Active Directory management tools.
Single sign-on is also highly recommended for organizations that plan on deploying Exchange Online Archiving (EOA) in their Exchange organization.
If you decide to deploy single sign-on with your hybrid deployment, we recommend that you deploy it with Active Directory synchronization and before using the Hybrid Configuration wizard.
Verify Office 365 tenant version and status
To verify the version and status of your Office 365 tenant, follow the steps below:
- Connect to the Office 365 tenant using remote Windows PowerShell.
$UserCredential = Get-Credential
$Session = New-PSSession -ConfigurationName Microsoft.Exchange -ConnectionUri https://outlook.office365.com/powershell-liveid/ -Credential $UserCredential -Authentication Basic -AllowRedirection
Import-PSSession $Session
- After connecting to the Office 365 tenant, run the following command.
Get-OrganizationConfig | Format-List AdminDisplayVersion,IsUpgradingOrganization
Verify that your Office 365 tenant and status meet the following requirements:
- AdminDisplayVersion parameter value is equal to or greater than 15.0.620.28
- IsUpgradingOrganization parameter is False.
For example, “0.20 (15.0.620.51)” and “False”.
- Disconnect from the Office 365 tenant remote PowerShell session.
Use the Exchange admin center and Hybrid Configuration wizard to create a hybrid deployment
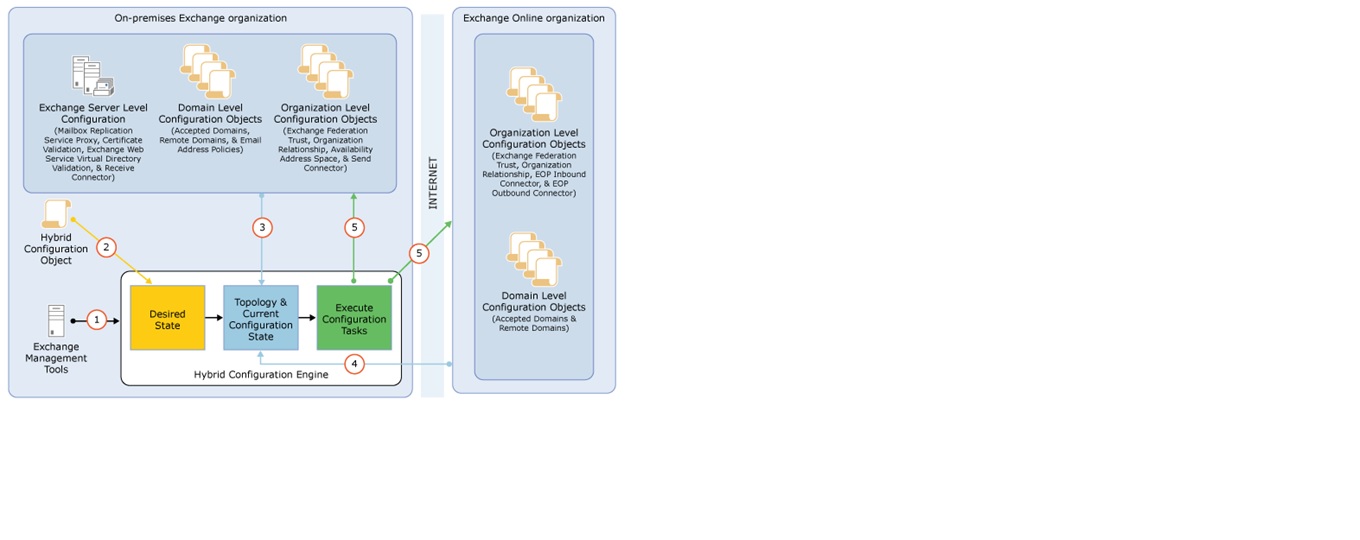
The following figure shows a summary of how the Hybrid Configuration Engine retrieves and modifies on-premises Exchange server and Exchange Online in Office 365 configuration settings during the hybrid deployment process.
Use the following procedure to create and configure a hybrid deployment
Office 365 Identity Federation
By using the WS-Federation (WS-Fed) and WS-Trust protocols, Active Directory Federation Services (ADFS) 2.0 provides claims-based single sign-on (aka identity federation) for the services in the Office 365 service offering. The benefits of using indentity federation is to provide the users in the enterprise with a SSO experience no matter if they are located on an external network or on the internal corporate network.
Basically, ADFS 2.0 is a Security Token Service (STS) that is capable of issuing, validating and exchanging security tokens on behalf of the users in the enterprise.
Although ADFS can be deployed using stand-alone federation servers, the identity federation service usually consist of two or more ADFS Proxy servers in placed in the perimeter network and two or more ADFS servers located on the internal corporate network. The internal ADFS servers are configured in a so called federation server farm, which then again is load balanced using some form of load balancing solution. The ADFS Proxy servers are not configured in a federation server farm per se, but incoming sessions hitting these servers are simply load balanced

The reason why it’s recommended to deploy at least two ADFS Proxy and ADFS servers is in order to achieve redundancy. This is critical since an unavailable ADFS infrastructure means that users won’t be able to access any used services in Office 365.
By default, the ADFS configuration is stored in a Windows Internal Database (WID) both when it comes to ADFS Proxy and ADFS servers. If you need more than five federation servers in a farm or need to spread them over multiple locations, it’s possible to store the ADFS configuration in a SQL database, but generally such a configuration should be avoided because of costs as well as complexity.
It’s also worth noting that the ADFS Proxy servers can be eliminated in certain scenarios where a TMG array or an UAG farm is located in the perimeter network. However, UAG is not capable of pre-authenticating active Office 365 clients (ActiveSync, Outlook Anywhere and Lync) only passive clients (browser-based clients such as OWA).
Its important to bear in mind that identity federation required directory synchronization (DirSync) from the on-premise Active Directory forest to the Office 365 tenant, so that a shadow user is created for each on-premise user in the Office 365 tenant.
Importing the Server Authentication Certificate into IIS
Since all client authentication against ADFS occurs via SSL, we need to import a server authentication certificate on each ADFS server. Because all clients should trust this certificate, it’s recommended to import a certificate from a 3rd party certificate provider. Although we use a wildcard certificate in this article series, a single name SSL certificate is sufficient. If you use a single name certificate, the FQDN included should match the FQDN we configured in the previous article (in this example sts.office365labs.dk).
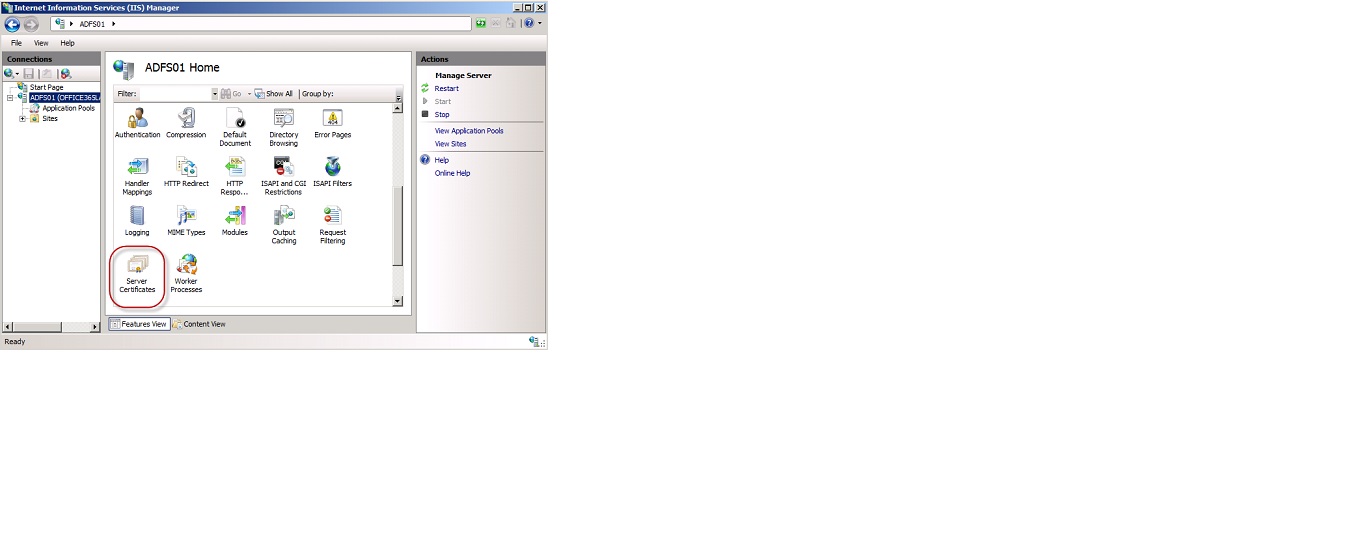
To import the certificate, open the IIS Manager and select the web server object and then open “Server Certificates” in the middle pane.
**
**
Under Server Certificates, click ”Import” in the action pane as shown in Figure 2.
**
**
Point to the certificate you wish to import and then specify the password, then click ”OK”.

As can be seen in Figure 4, the certificate has now been imported to IIS.

Next step is to bind the certificate to the “Default Web Site”. To do so, expand ”Sites” then select the ”Default Web Site” and click on the ”Bindings” link in the ”Action Pane”.
**
**
Under ”Site Bindings” click ”Add”. In ”Add Site Bindings”, select ”HTTPS” in the ”Type” drop-down box and then point at the imported certificate under ”SSL certificate”.
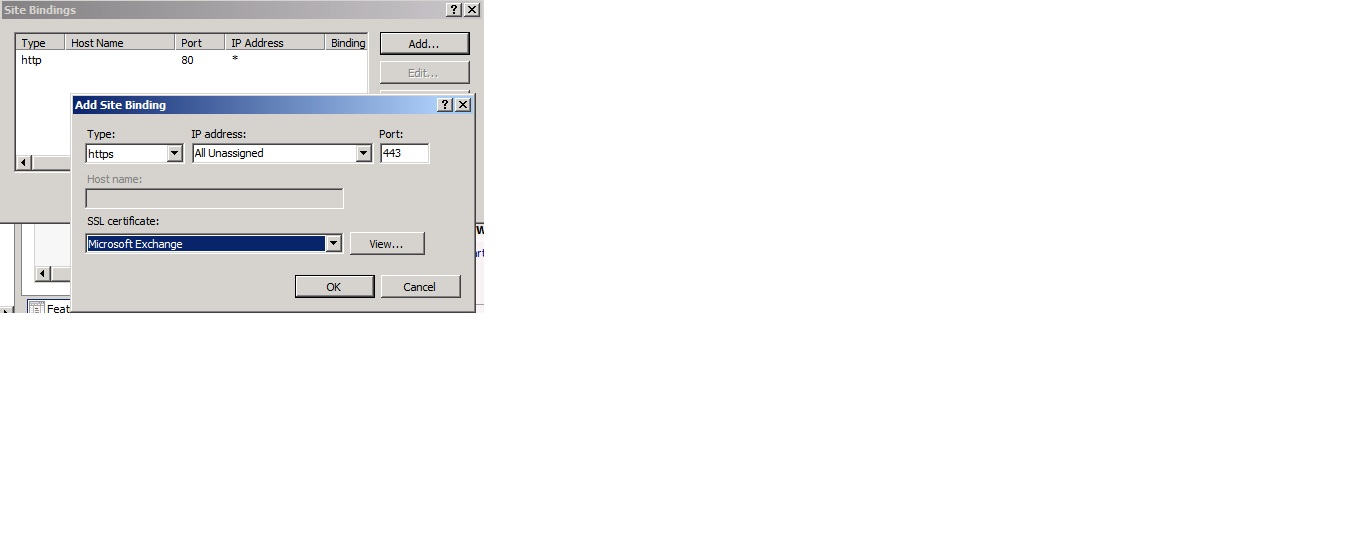
Click ”OK” twice.
Repeat the above steps on the second ADFS server.
Installing & Configuring the ADFS Farm
With the two ADFS servers configured in a WNLB cluster and the required certificate imported, it’s time to get the ADFS 2.0 RTW component installed and configured on both servers.
Important:
It’s not the ADFS component included with Windows Server 2008 R2 that we need to install. We need to download a separate package from the Internet. ADFS 2.0 RTW can be downloaded here. And while we’re at it, we also need to download the latest update for ADFS 2.0 RTW, which currently is Update 2.
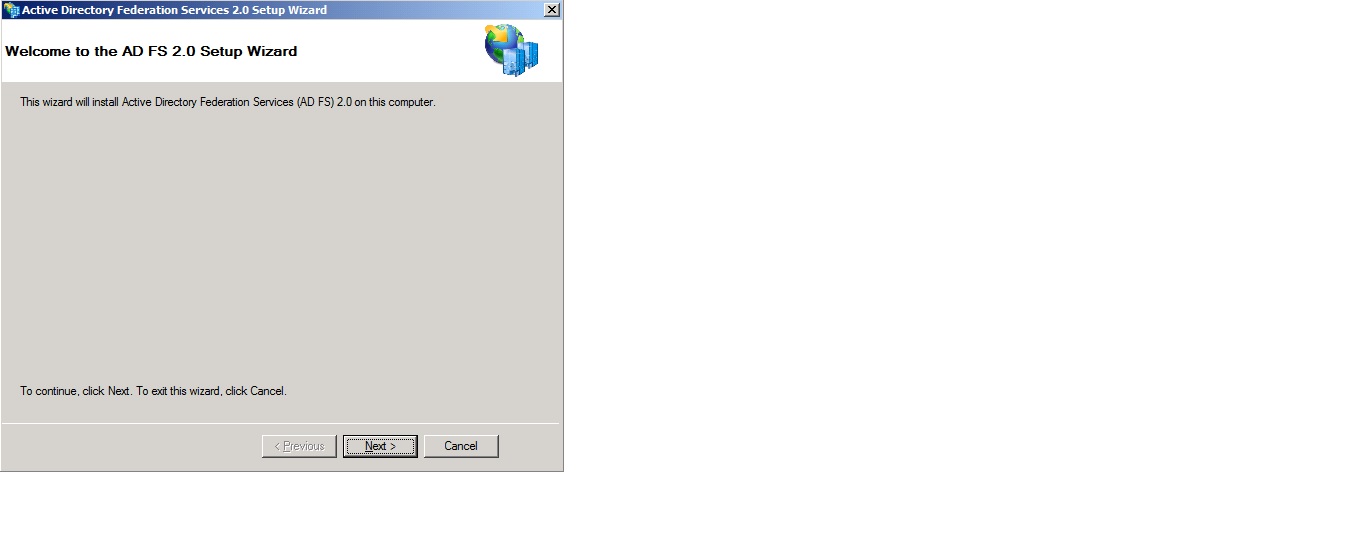
Ok, launch “AdfsSetup.exe” and then accept the license agreement.
**
**
On the “Server Role” page, we need to specify which to configure. Since these are the two internal ADFS servers, we wish to configure a “Federation server” so select that and click “Next”.

On the “Welcome to the AD FS 2.0 Setup Wizard” page, click “Next”.
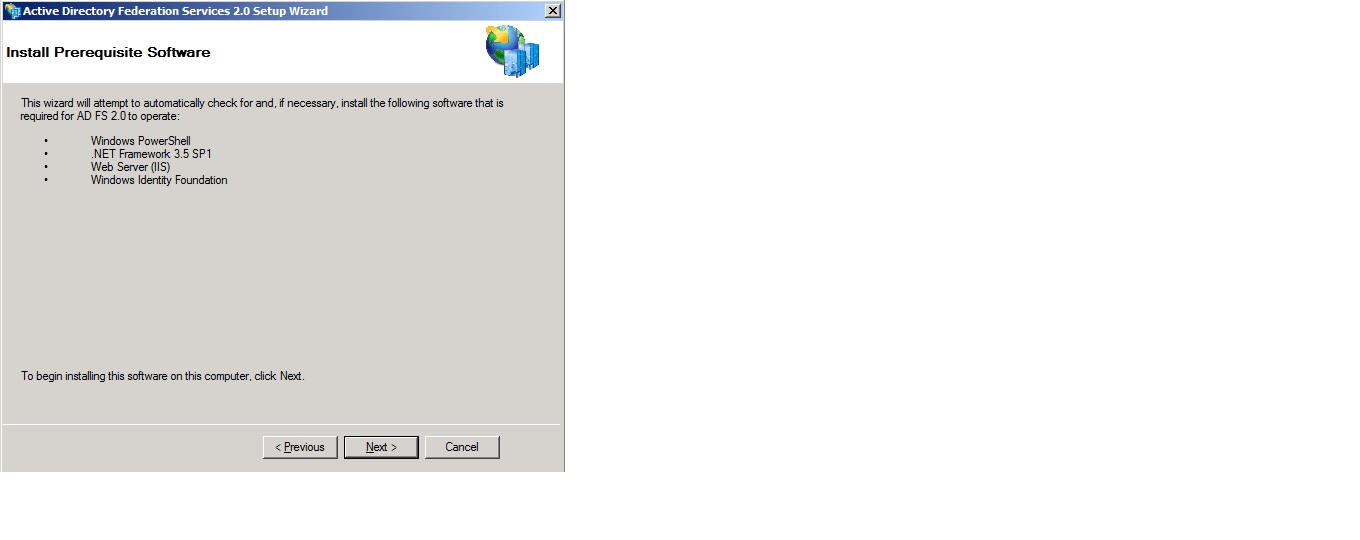
As you can see on the next page, the wizard will now install a couple of prerequisites on the server. Click “Next”.
After a minute or so the wizard will complete successfully and we can now click “Finish”. Make sure to untick “Start AD FS 2.0 Management snap-in when this wizard closes” as we want to install Update 2 for AD FS 2.0 before we continue.
**
**
When the update has been applied, launch the AD FS 2.0 management console by going to “Start” > “Administrative tools” and in here selecting “AD FS 2.0 Management”. In the AD FS 2.0 Management console, click “AD FS 2.0 Federation Server Configuration Wizard”.
**
**
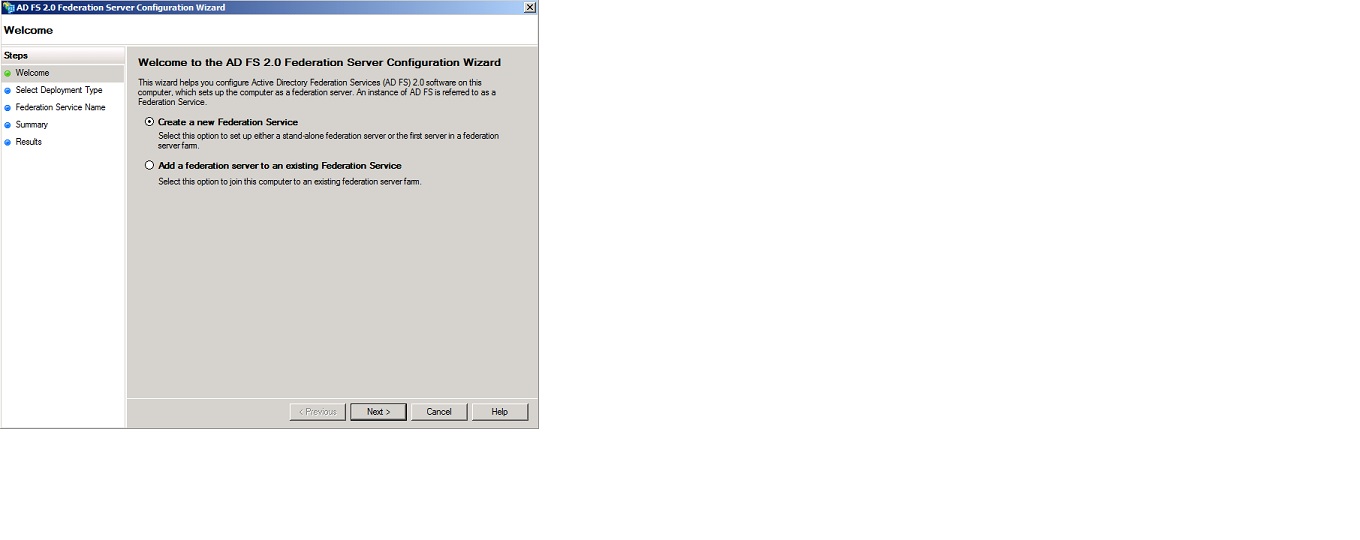
On the “Welcome to the AD FS 2.0 Federation Server Configuration Wizard”, select “Create a new Federation service” and click “Next”.
**
**
On the “Select Stand-Alone or Farm Deployment”, select “New federation server farm” and click “Next”.
**
**
Now we need to specify the federation service name which in this case is “sts.office365lab.dk”. Well, actually based on the common name in the certificate the wizard will do this automatically, but since we use a wildcard certificate in this article series, the wizard cannot determine the name meaning we need to specify it manually.

Replace the “*” with “sts” in the federation service name and click “Next”.
**

**
On the next page, we need to specify the service account that should be used for the federation server farm. This account must be the one that is used on all federation servers in the respective farm.
The service account specified should just be an Active Directory user account with “domain user” permissions.
**
**
When the account has been created enter the username and password and click “Next”.
**
**
On the appearing page, we can see a list of the settings that will be configured for AD FS 2.0
Click “Next”.
**
**
When the wizard has configured each component with success, click “Close” to exit the wizard.
**
**
As we can see in the AD FS 2.0 console, we need to add a trusted relying party in order to manage SSO for our Office 365 users. We will actually do this using PowerShell, but first we want to add the other ADFS server to the federation server farm.
**
**
So switch to the other ADFS server and install ADFS 2.0 RTW plus Update 2 and then launch the ADFS 2.0 setup wizard.
Select the same options through the wizard as you did with the primary ADFS server and then open AD FS 2.0 Management”. In the AD FS 2.0 Management console, click “AD FS 2.0 Federation Server Configuration Wizard”.
On the “Welcome to the AD FS 2.0 Federation Server Configuration Wizard”, select “Add a federation server to an existing Federation Service” and click “Next”.

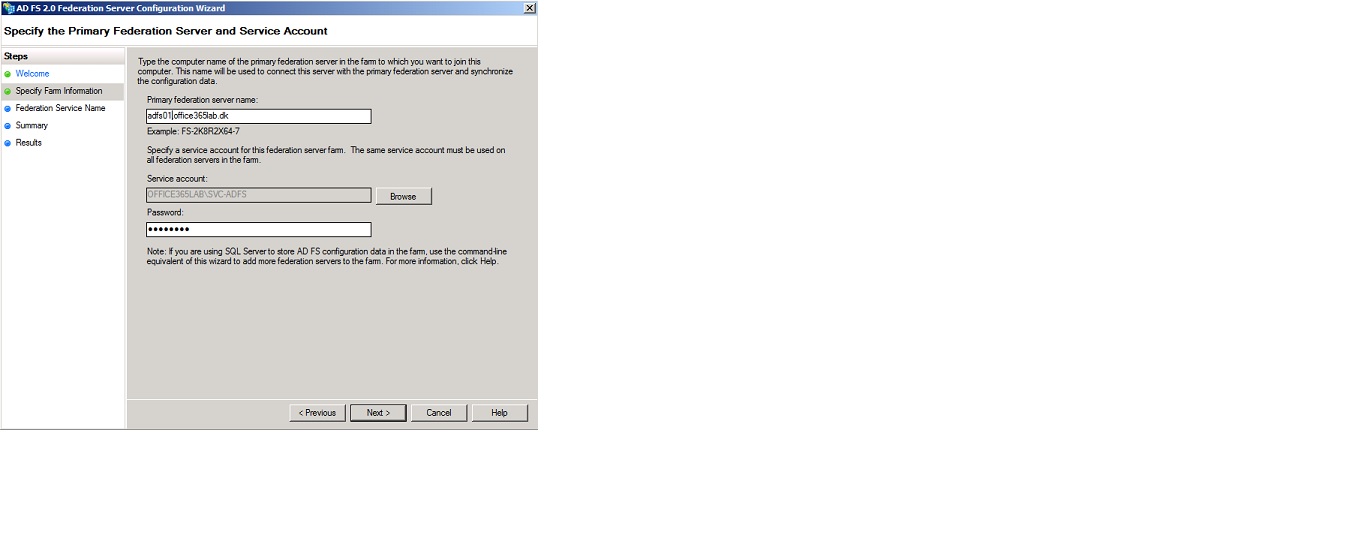
On the “Specify the Primary Federation Server and Service Account” page, enter the “adfs01.office365lab.dk” (or whatever the server FQDN name is for the primary ADFS server in your environment) and then enter the credentials for the federation server farm service account followed by clicking “Next”.
**
**
Make sure the server certificate is selected and the correct federation service FQDN is configured and then click “Next”.
**
**
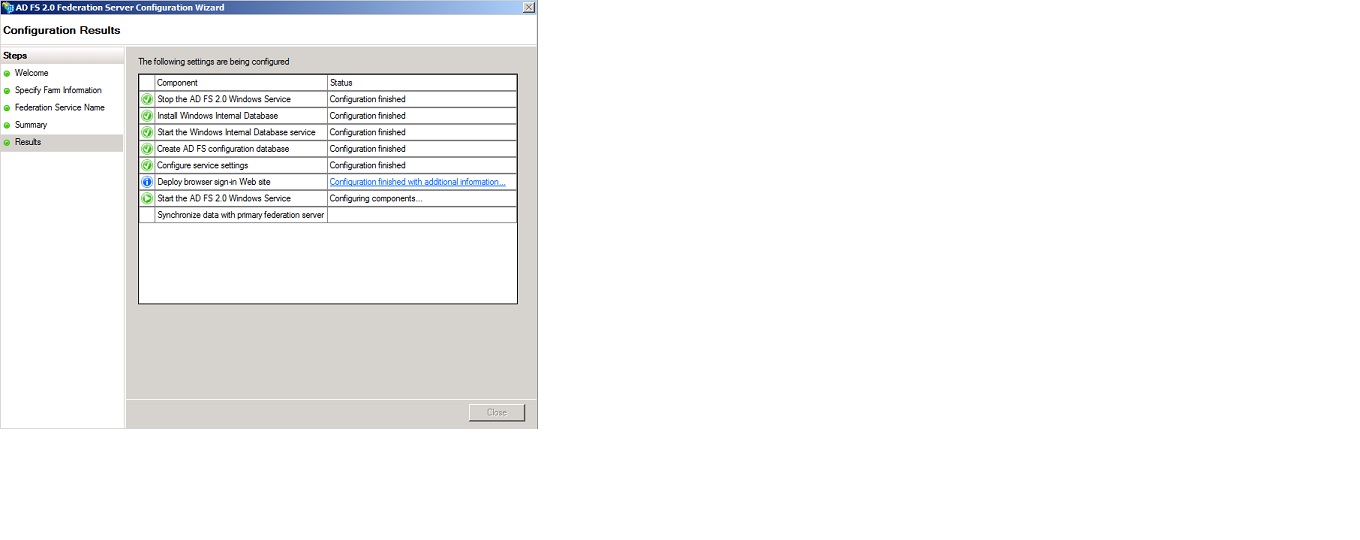
Once again we’re now ready to apply the settings, so click “Next”.
**
**
On the configuration results page, click “Close” when all components have been configured successfully.
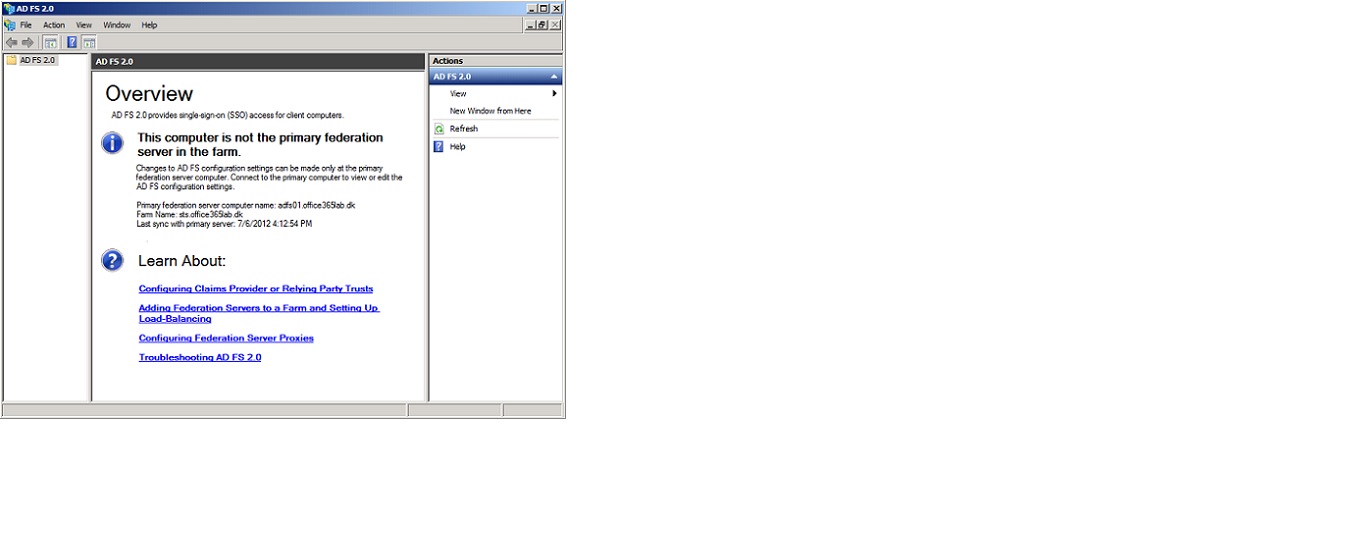
You will now see in the AD FS 2.0 management console that this server is not the primary federation server in the farm and that you must perform configuration changes on the primary ADFS server.
We have now configured the federation server farm.
Verifying the Federation Server farm is working properly
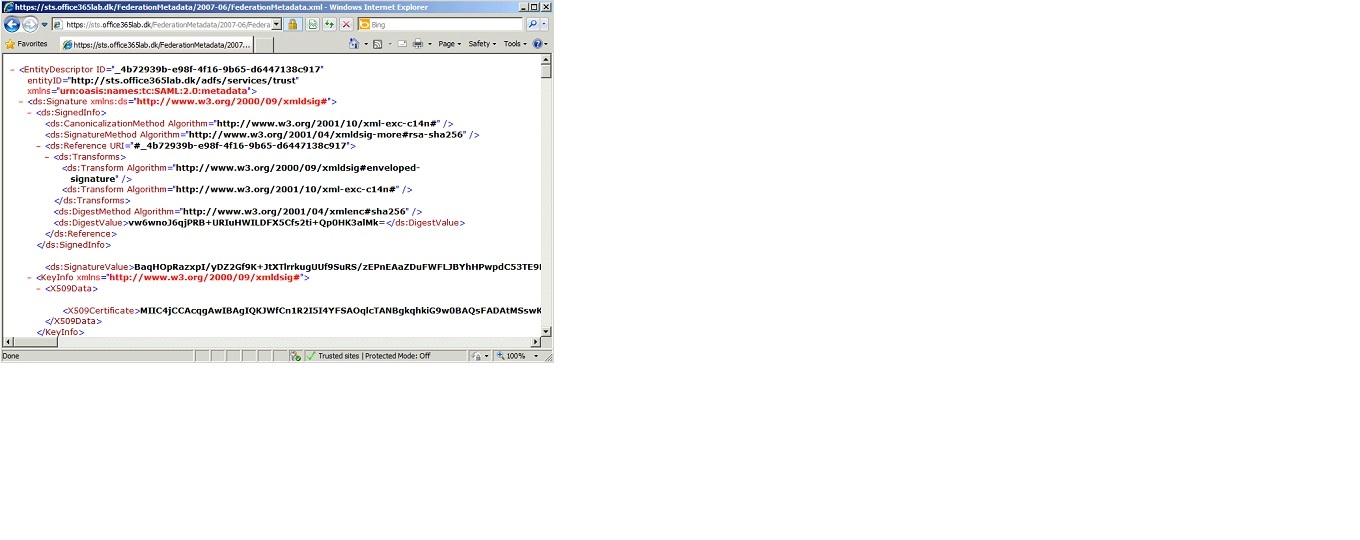
With the federation server farm configured, let’s check that it behaves as expected. First let’s try to see if we can reach the XML with the service description document. To do so, open a browser on a client located in the same AD forest as the ADFS server and enter (replace the ADFS server FQDN with the one in your environment):
https://ADFS01.fabrikam.com/FederationMetadata/2007-06/FederationMetadata.xml
If things work as expected, you should see something similar to **
 **
**
Repeat this step but point to the other ADFS server.
Lastly, try to access the XML service description document using the federation service FQDN (in this case sts.office365lab.dk).**
 **
**
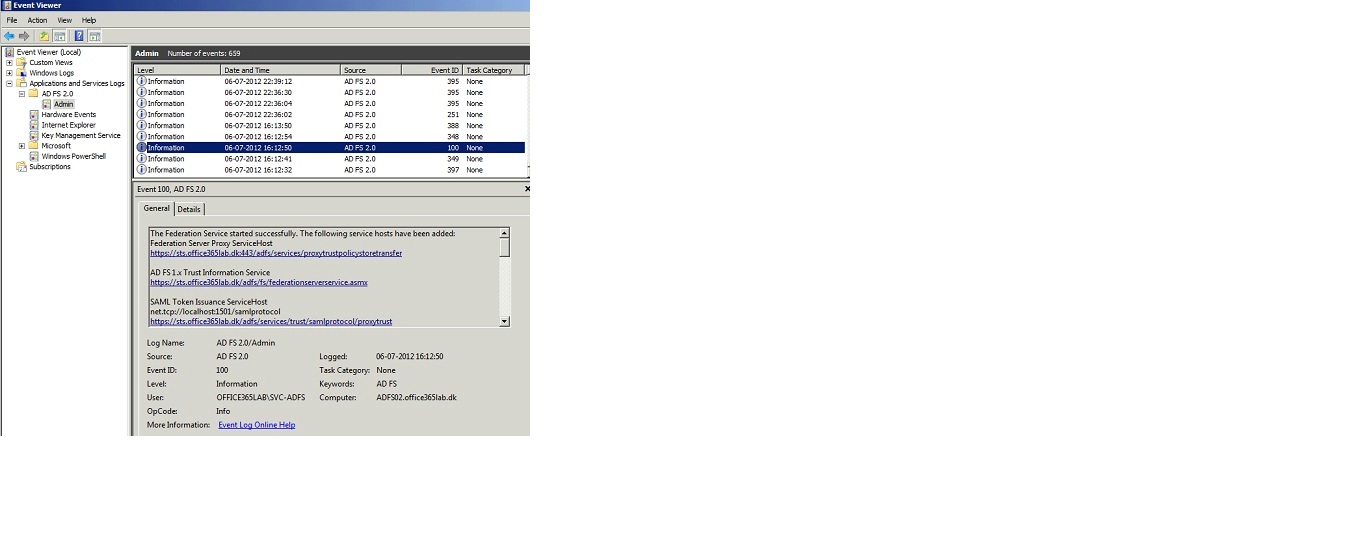
Also open the AD FS 2.0 Admin log and look for event 100. If you see event 100, it means that the federation service were able to communicate with the federation service.**
 **
**
This concludes part three of this multi-part article in which its explained how you configure Exchange hybrid deployment followed by migrating to Office 365 (Exchange Online).
Federation pictorial diagram

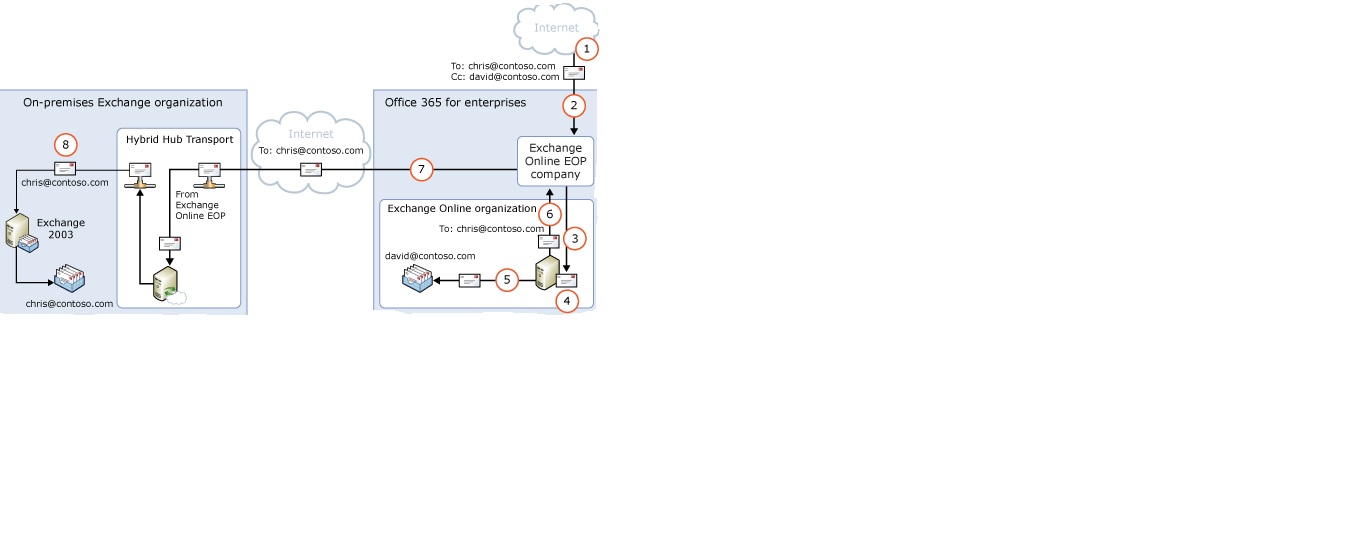
Mail flow diagram