Control to control binding in WPF
In this article I would write and describe how you can bind a control to another control in WPF. Usually, binding is considered to work for just data, such as data coming from database or other stuff. But in real, even properties can be bound to another control's property. What I mean is that you can control (and alter) one control's property (which so ever) based on what other control has in its property.
WPF is a framework used to define graphics and user-interface controls on the screen. WPF provides us with many built-in native (and intuitive) functions that we can use. Data binding is one of them.
Data Binding in WPF
To understand the WPF's data binding, we must first understand what data binding itself is. Data binding is a process in which you bind data to a control. It is similar to creating a connection between the back-end code or model, to the user-interface. Your user-interface thus depicts the actual underlying process or state of the controller or model.
Data binding can be an example of updating the following paragraph with the text as the user types in the value. It also has the example of when you update the combo box to change the sorting type and the underlying list automatically gets updated. Quite other example are also very prominent in this where you get the same functionality, the user-interface changes as you change the state of the application.
In WPF, you get a lot of controls such as,
- TextBox
- TextBlock
- Slider
- ComboBox
Quite a lot of other controls that even if I continue writing them all... It would take a lot of time to explain them. WPF is vast and spreading wider.
For more on references of Data binding in WPF, please read MSDN document also.
A few more stuff before I continue...
Before I continue to the next stage, I must state other few things also and explain what they are in data binding. But they won't be used because we are using Controls to bind other Controls with. We won't be using any data from the model so they don't apply.
First, get a grip of these things...
- Binding Source
Binding source is the actual object that is to be bound. It can be string, integer or even a custom data object such as a class or even a list. - Binding target
Binding target is the control that represents the data on the user-interface. TextBox, TextBlock, ListBox etc. are a few common examples of this type.
1. Data binding direction types
The direction of the data binding is a very important part of this entire phenomenon. It specifies the direction which would be taken by the object to share the data. There are usually three types of directions of data flow.
- One way
- Two way
- One way (to the source)
Now let us consider talking about them in depth.
1. One way
The one way method of data binding only works to get the data from the database. It is similar to extracting the data from the database to view on the screen. Then removing any connection between them both; unbinding them. It is very basic one.
2. Two way
A two way process is the one when you bind the data to the control in a way that they are connected after the rendering also. This helps in maintaining synchronized connection between the data and the control. In this process, the data is downloaded and applied to the control and control (if edited) updates the data (binding source).
3. One way (to the source)
This is similar to the above posted one way, however it is different in a way that it is opposite in direction. You do not get the data from the model to your control, instead you update the binding source based on the input that user provides in the binding target (control).
Binding a control to another control
Now coming to the actual topic of this article. How to bind a control to another control. In WPF, you can write the application's user-interface in both ways,
- Using code behind
- Using the XAML code for building user-interface
*I won't specify how to do that in this guide. *
I would use the XAML code to bind the controls to each other. You can also do so using the code-behind in your own favorite language, C# or VB.NET.
Creating the controls
As I have already said that the controls can be written in XAML and so can their properties be. XAML provides a very intuitive function to write the code to set the data binding in WPF applications. The property or attribute of the control, which you want to bind has a separate type of value inside the attribute. Something like this,
<TextBox Text="{Binding Name}"/>
Above control is now bound to the member "Name" of the object specified in the DataContext of the control or the parent control (maybe a Window).
Example being used
In this article, I would show you how you can bind three controls to each other. We will use,
- TextBox
- TextBlock
- Slider
These are three different type of controls with different working rules. A text box provides us functionality to input a value, where as text block is a simple text label element and slider is something which has a range of values for the user to select from. We will bind them all in a way that they are connected to each other's properties and share the value that user provides.
The code is as following,
<Window x:Class="WpfDataBindingInControls.TextBsAndSlider"
        xmlns="http://schemas.microsoft.com/winfx/2006/xaml/presentation"
        xmlns:x="http://schemas.microsoft.com/winfx/2006/xaml"
        Title="TextBsAndSlider" Height="300" Width="300">
    <Grid>
        <Slider HorizontalAlignment="Left" Margin="10,71,0,0"
                Name="slider" VerticalAlignment="Top" Width="272"
                Value="{Binding ElementName=textBox, Path=Text}"
                Minimum="10" Maximum="20"/>

        <TextBlock HorizontalAlignment="Left" Margin="10,107,0,0"
                   TextWrapping="Wrap" Text="Eminem" VerticalAlignment="Top" Width="272" Height="152" Name="textBlock"
                   FontSize="{Binding ElementName=slider, Path=Value}"/>

        <TextBox HorizontalAlignment="Left" Height="23" Margin="10,26,0,0" Name="textBox"
                 TextWrapping="Wrap" VerticalAlignment="Top" Width="272"
                 Text="{Binding ElementName=slider, Path=Value}"/>
    </Grid>
</Window>
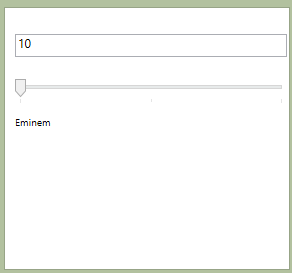
In our above example, we are having three different controls. Each of them has either one of their property bound to other control. It happens like this,
- Slider's Value (Binding Target) is bound to TextBox's Text property (Binding Source)
- TextBox's Text (Binding Target) is bound to Slider's Value (Binding Source)
The above are an example of Two way data flow direction. - TextBlock's FontSize (Binding Target) is bound to the Slider's Value property (Binding Source)
A one way binding* perhaps**?*
If you run the above code, you will see that the code works as required. You are provided with a Slider, a TextBox and the TextBlock. We can edit the properties and get the result on the user-interface.
Working example
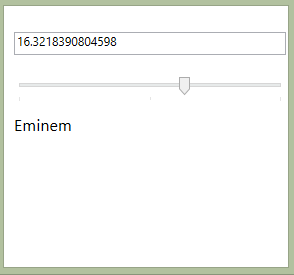
After altering the values a little bit,
So, that is all for now folks. I hope I helped someone out with this post. :-)