Troubleshooting remote desktop connection after failover using Azure Site Recovery
Connection Pre-requisites and troubleshooting
This document gives the pre-requisites that you can use to setup RDP for your virtual machines. If it does not work you can use the troubleshooting guide to enable the RDP.
Connect to a windows machine using RDP
To connect to a windows virtual machine you can use the remote desktop protocol to login to the VM remotely.
Pre-requisites to enable RDP Before Failover
When I recover the VM – I will RDP into the VM over the internet
When I recover the VM – I will RDP into the VM over the private LAN setup using S2S
Enable RDP on the virtual machine for RDP over Internet
Turn on remote desktop on the virtual machine.
Ensure that TCP and UDP rules are added for Public profile.
Ensure that the Allowed applications specify RDP enabled for all profiles.
All security precautions apply. Use strong passwords and only enable over internet if you need it.
After failover add the endpoint to the VM.
Enable RDP on the virtual machine for RDP over S2S network
Turn ON remote desktop on the Virtual machine.
Ensure that the RDP is allowed over Domain/Private networks.
After failover add the endpoint to the VM.
On the failed over VM Enable RDP endpoint
Click on the failed over virtual machine instance in Azure page.
Go to the section called as Endpoints.
Add a new endpoint to the virtual machine using the +Add
- Select the remote desktop protocol
Go to the dashboard section on the virtual machine page.
Click Connect on the task bar and wait for the RDP file to download.
Click the RDP file and it would launch the Remote desktop connection.
Click connect and wait for the credentials screen to pop-up.
Enter the credentials and login.
If the connection failed follow the troubleshooting steps to get access back.
Troubleshooting steps
While connecting to the virtual machine over RDP the dialog can fail at various steps. Use the following steps to diagnose the issue and gain access to the virtual machine.
Ensure that the VM is running
On the dashboard check for the following items
Ensure that the VM is running. |
Host name is populated. If not the VM might not be running. |
Ensure that there is recent activity on the Dashboard. If not – the VM might not be running or might have hanged. |
In case of one of the above symptoms – the VM might not be running because the failover must have failed or the VM hanged.
If the VM is running and RDP failed, it check the stage in which it failed. Click at the below stage to troubleshoot.
Initiating remote connection
Securing remote connection
Initiating remote connection
Check connectivity over the internet
If you get this do the following to diagnose the problem cause.
On a powershell prompt (Win8.1 or above), run
tnc yourserver.yourdomain.com RDP -informationlevel detailed |
Since you are going over the internet – note that the NetworkIsolationContext is the Internet.
If the TcpTestSucceeded is False –
RDP may not be enabled inside the Virtual machine
Firewall rules are blocking the VM to be reached
Always do a test failover before Planned failover so that you can eliminate all issues when you do the real failover. If you have done a test failover, you can go back to on-premises VM and ensure that the Virtual machine RDP is enabled and the VM has the necessary firewall rules added. If you have done a planned failover, you can either failback to correct the settings and the failover back to Azure once more or follow the steps below. |
Configure the VM for RDP Over local network
I can reach the VM using Site 2 Site network
If you have set up a site to site VPN and have provided the VM with an IP address which is local to your organization network you should be able to ping the virtual machine from another machine on the same network which is on-premises. If you are able to reach the VM then attempt these steps.
I don’t have a site 2 site network
Is the recovered VM failed over to an Azure Network? |
|
Yes |
No |
|
|
Preferably use the WS 2012R2 VM from the gallery to create the new VM.
Ensure that the new VM gets created on the same subnet as the recovered VM.
Next, try the below steps**.**
Try connecting to the VM over local network
Got into the new VM created and try out the following operations.
Ping the recovered VM
ping IP-Address |
Where IP-Address is the internal IP address of the VM
If Ping is not successful, the VM RDPVM may not be on the right network. Ensure that it is in the right subnet. The next set of steps might not work.
The recovered VM may also be configured to refuse Ping connections. If you think this is true then you can ignore this step and go ahead.
Check TCP Connection
On a powershell prompt (Win8.1 or above), run
tnc IP-Address RDP -informationlevel detailed |
Note that the NetworkIsolationContext is PrivateNetwork.
If the TCPTestSucceeded is false then you cannot RDP into the machine because either the RDP is not enabled or Firewall is blocking it. Try to use the remote powershell and enable the correct properties.
If the TcpTestSuceeded then you can try to begin RDPing into the machine.
Try RDP into the machine
Use MSTSC to log into the VM.
Use the recovered VMs internal IP address to connect.
If the connection failed at “Securing remote connection”- look at the section below to see which username password you can use.
remote powershell to set right properties
Since the virtual machine is not accessible over Ping and RDP, either the RDP is not turned ON or the firewall is blocking its connections. We need to turn on the settings and the only way is to use remote powershell. Use the Following steps to enter the machine over remote powershell.
- Test WSMan connection to the virtual machine
Test-wsman IP-Address If this succeeds go to the next step. If this fails, fix the WSMAN errors and retry. If this does not succeed anyhow you have no way to enable RDP on the VM. You can
|
- Add recovered host to Trusted Hosts of the machine
Set-Item wsman:\localhost\Client\TrustedHosts -value 172.16.0.5 |
- Enter a PS session to the remote computer
New-PSSession -ComputerName 172.16.0.5 -credential administrator |
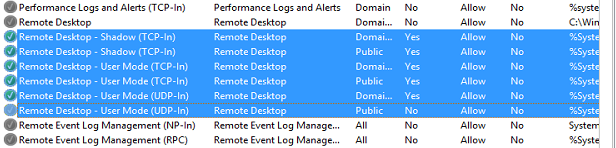
- Enable RDP and firewall
set-ItemProperty -Path 'HKLM:\System\CurrentControlSet\Control\Terminal Server'-name "fDenyTSConnections" -Value 0 Enable-NetFirewallRule -DisplayGroup "Remote Desktop" set-ItemProperty -Path 'HKLM:\System\CurrentControlSet\Control\Terminal Server\WinStations\RDP-Tcp' -name "UserAuthentication" -Value 1 |
After this try connecting to the VM again using RDP over the local network.
Securing remote connection
If the authentication failed while connecting to the virtual machine then some of the reasons it could fail are below
Wrong username password
Domain level username and password not working
If the username and password is wrong then there is no way you can log in to the virtual machine. Get the correct username and password to login. You can also use the machines local administrator to login.
If domain level credentials are not working, it is because the virtual machine’s RDP server is not able to reach the Domain controller. If this is true, use the local machine username and password to login.