Office 365: Enable Message Encryption
About Office 365 Message Encryption
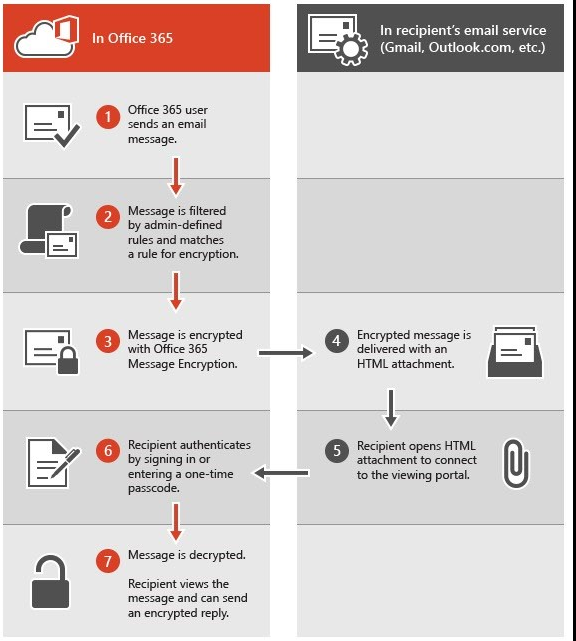
Office 365 Message Encryption is an online service that’s built on Microsoft Azure Rights Management (Azure RMS). With Azure RMS set up for an organization, administrators can enable message encryption by defining transport rules that determine the conditions for encryption. A rule can require the encryption of all messages addressed to a specific recipient, for example.
When a user sends an email message in Exchange Online that matches an encryption rule, the message is sent out with an HTML attachment. The recipient opens the HTML attachment in the email message, recognizes a familiar brand if that’s present, and follows the embedded instructions to view the encrypted message on the Office 365 Message Encryption portal. The recipient can choose to view the message by signing in with a Microsoft account or a work account associated with Office 365, or by using a one-time passcode. Both options help ensure that only the intended recipient can view the encrypted message.
The following diagram summarizes the passage of an email message through the encryption and decryption process.
To start using the message service today, you need to purchase a subscription for Windows Azure Right Management (RMS), which also includes Information Right Management capabilites, giving you a comprehensive solutions to help protect your internal and external communications. Windows Azure Right Management is already included with Office 365 E3 and E4 licences. If you are licenced for one of these plans, you will automiatcally have access to office 365 Message Encryption. Users who have an existing subscription to Office 365 E3, Office 365 E4, or Windows Azure Rights Management will begin to see the Message Encryption service ready to go.
If you’re using Exchange Server 2013, you’ll be able to access Office 365 Message Encryption, too, either by using Exchange Online Protection (EOP) or by using hybrid mail-flow.
Preparing for Office 365 Message Encryption
Office 365 Message Encryption requires that you have an Exchange Online or Exchange Online Protection (EOP) subscription and that you’ve set up Azure Rights Management. If your setup meets these requirements, all you need to do to enable Office 365 Message Encryption is define rules that trigger encryption
If you need to set up Azure Rights Management, you have two options:
Set up Azure Rights Management for Office 365 Message Encryption, but prevent IRM templates from being available to users by disabling them in Microsoft Outlook Web App and Microsoft Outlook. For step-by step procedures, see Set up Microsoft Azure Rights Management for Office 365 Message Encryption.
Or
Set up Azure Rights Management for Office 365 Message Encryption and enable IRM templates so they’re available to users in OWA and Outlook. For step-by step procedures, see Configure IRM to use Microsoft Azure Rights Management.
Configure IRM to use Azure Rights Management
Information Rights Management (IRM) in Exchange Online uses Active Directory Rights Management Services (AD RMS), an information protection technology in Windows Server 2008 and later and Microsoft Azure Rights Management service in Office 365. IRM protection is applied to email by applying an AD RMS rights policy template to an email message. Usage rights are attached to the message itself so that protection occurs online and offline and inside and outside of your organization’s firewall.
How do you do this?
Step 1: Use the Office 365 Admin Center to activate Azure Rights Management
By default, Azure Rights Management is disabled. To enable IRM features in Exchange Online, you need to activate it by using the Rights Management settings within the Office 365 administrative portal
Step 2: Connect to office 365 Tenant using powershell.
With the Office 365 lab tenant setup, I now need to activate Azure Rights Management for the Office 365 Message Encryption service. To do this, I first need to make a PowerShell connection to our Office 365 tenant, which I can perform via the following steps. Note that I’m not including using the Connect-MsolService cmdlet below to run cmdlets such as Get-MsolUser, since I don’t need such specific cmdlets for this article.
- Launch PowerShell on the workstation used to manage Office 365
- Run the following PowerShell command: $cred = Get-Credential. This command will simply prompt for the Office 365 administrator credentials and store them in a variable named $cred
- In the resulting window, enter the username and password of the Office 365 administrator account. .
http://cdn.techgenix.com/media/upls/image002_300.jpg
- Next run the following command: $Session = New-PSSession -ConfigurationName Microsoft.Exchange -ConnectionUri https://outlook.office365.com/powershell-liveid/ -Credential $cred -Authentication Basic –AllowRedirection. This creates a session with Office 365 PowerShell via the $Session variable
- Now run the following command: Import-PSSession $Session. This command imports the session just created into the local session and so here I will see the various cmdlets available to be imported into my session
- If these commands are successful, the screen then looks like the one shown in Figure 1-2. At this point, I now have a PowerShell connection to my Office 365 lab tenant for administering Exchange Online.
http://cdn.techgenix.com/media/upls/image004_265.jpg
Step 3: Use the PowerShell to configure the RMS Online key sharing location in Exchange Online
With a successful connection made to the Office 365 tenant, the next step is to use the Set-IRMConfiguration cmdlet. This cmdlet is used to configure Information Rights Management (IRM) settings and in this particular case I will use it to configure the Rights Management Service online key-sharing location first of all. This location is a URL which varies depending on geographical location. The following list details the geographical locations and the corresponding online key-sharing location, as provided by Microsoft at the time of writing this article.
- For Europe, the URL is https://sp-rms.eu.aadrm.com/TenantManagement/ServicePartner.svc
- For North America, the URL is https://sp-rms.na.aadrm.com/TenantManagement/ServicePartner.svc
- For South America, the URL is https://sp-rms.sa.aadrm.com/TenantManagement/ServicePartner.svc
- For Asia, the URL is https://sp-rms.ap.aadrm.com/TenantManagement/ServicePartner.svc
The URL specifies where the Trusted Publishing Domain (TPD) is to be found; the TPD will be discussed next, but for now the command to run in PowerShell to set the online key-sharing URL in my example for Europe is:
Set-IRMConfiguration –RMSOnlineKeySharingLocation “https://sp-rms.eu.aadrm.com/TenantManagement/ServicePartner.svc”
http://cdn.techgenix.com/media/upls/image006_209.jpg
Next, I use the Import-RMSTrustedPublishingDomain cmdlet. This is used to import what is known as a Trusted Publishing Domain (TPD), which contains feature settings, into the Exchange Online organization. In fact, the Import-RMSTrustedPublishingDomain command can also be used to import the TPD from an on-premises Active Directory Rights Management Service deployment, where the on-premises TPD is exported to XML file format before importing it in using this command. However, the command I will run is a little more straightforward than the one used to reference an on-premises deployment, since I am importing the TPD from the Rights Management Services Online service. The command I run is:
Import-RMSTrustedPublishingDomain –RMSOnline –Name “RMS Online”
Here you can see I used the –RMSOnline parameter with the command. It is this parameter that instructs the command to import the TPD from the online service, not the on-premises service, using the URL I specified with the –RMSOnlineKeySharingLocation parameter previously.
At this point, I can use the Get-IRMConfiguration cmdlet to check various configuration settings associated with Information Rights Management. For example, I can check here that the –RMSOnlineKeySharingLocation parameter has been set with the correct URL. Also, one of the key parameters to note is the InternalLicensingEnabled parameter, which is currently set to False in this tenant. This is something I will set to True for using Office 365 Message Encryption. To do this, I run the following command:
Set-IRMConfiguration –InternalLicensingEnabled $true
Why did I set this parameter to True? The answer to this is that the transport rules that I will create later to provide message encryption have a dependency on this parameter being set to true. We can see this dependency by attempting to set this parameter back to false when I have already created transport rules for message encryption features.
http://cdn.techgenix.com/media/upls/image008_178.jpg
How do you know this task worked?
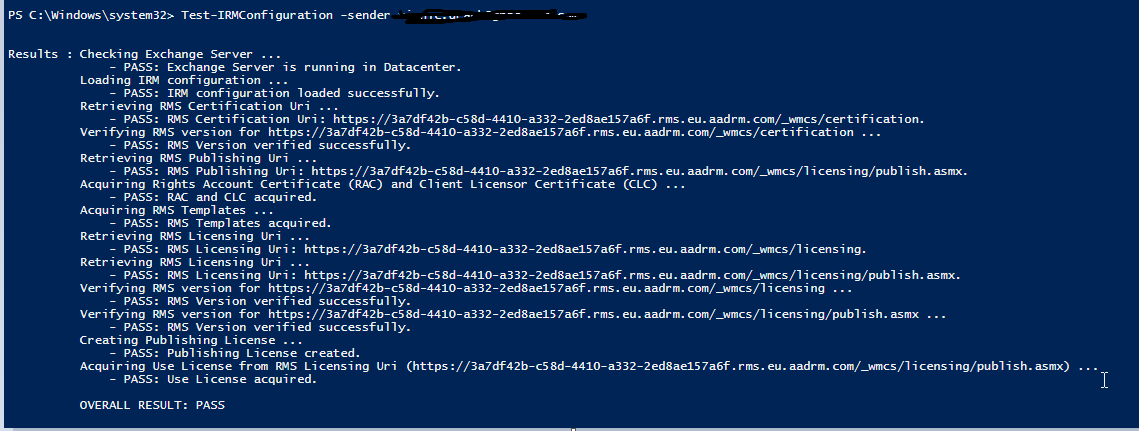
if I don’t want the IRM templates to be available to the clients such as Outlook Web App, I will set the –ClientAccessServerEnabled parameter to $false. Once I’ve configured the InternalLicensingEnabled parameter and any other parameters as desired, I can now use the Test-IRMConfiguration cmdlet to test the overall IRM configuration. Since I am using the online service, I need to use the –RMSOnline parameter with this command. The command to run is therefore:
Test-IRMConfiguration –RMSOnline
It looks like everything is good to go, as the overall result is a ‘pass’.
http://cdn.techgenix.com/media/upls/image010_145.jpg
Test-IRMConfiguration
This example tests the IRM configuration for messages sent from the sender adams@contoso.com.
Customizing encrypted messages with Office 365 Message Encryption
To customize encryption email messages and the encryption portal with your organization’s brand
| To customize this feature of the encryption experience | Use these Windows PowerShell commands |
|---|---|
Default text that accompanies encrypted email messages The default text appears above the instructions for viewing encrypted messages |
Example: |
Disclaimer statement in the email that contains the encrypted message |
Example: |
Text that appears at the top of the encrypted mail viewing portal |
Example: |
Logo |
Example: Supported file formats: .png, .jpg, .bmp, or .tiff Optimal size of logo file: less than 40 KB Optimal size of logo image: 170x70 pixels |
Sending, viewing, and replying to encrypted email messages
Encrypt email messages
You can define transport rules for triggering email message encryption by using the EAC or Windows PowerShell cmdlets for Exchange Online.
To create a rule for encrypting email messages by using the EAC
- From the EAC, go to mail flow > rules > New. If you need help to become familiar with the EAC, see Exchange Admin Center in Exchange Online.
- Select + > Create a new rule.
- In Name, type a name for the rule, such as Encrypt mail for DrToniRamos@hotmail.com.
- In Apply this rule if select a condition, and enter a value if necessary. For example, to encrypt messages going to DrToniRamos@hotmail.com:
In Apply this rule if, select the recipient is.
Select an existing name from the contact list or type a new email address in the check names box.
To select an existing name, select it from the list and then click OK.
To enter a new name, type an email address in the check names box and then select check names > add > OK.
- To add more conditions, select add condition and select from the list. For example, to specify that the previous rule applies only if the recipient is outside your organization:
- Select add condition and then select The recipient is located > Outside the organization.
- Select OK.
- To enable encryption, in Do the following, select Modify the message security > Apply Office 365 Message Encryption, as shown below, and then select Save. You can select add action if you want to specify another action.https://i-technet.sec.s-msft.com/dynimg/IC705949.gif
To create a rule for encrypting email messages by using PowerShell cmdlets
Connect to Office 365 using Remote PowerShell, as described in Connect to Exchange Online using Remote PowerShell.
Define a rule with the ApplyOME attribute set to True. For example, to require that all email messages that are addressed to drToniramos@hotmail.com must be encrypted, type:
New-TransportRule "Encrypt rule for drtoniramos" -SentTo "drtoniRamos@hotmail.com" -SentToScope "NotInOrganization" -ApplyOME $true
Remove encryption from email replies
When your email users send encrypted messages, recipients of those messages can respond with encrypted replies. You can create transport rules to automatically remove encryption from replies so email users in your organization don’t have to sign in to the encryption portal to view them. You can use the EAC or Windows PowerShell cmdlets to define those rules. You can only decrypt messages that are either sent from within your organization or messages that are replies to messages sent from within your organization. Encrypted messages originating from outside of your organization cannot be decrypted.
To create a rule for removing encryption from email replies by using the EAC
- From the EAC, go to Mail flow > + > Create a new rule.
- In Name, type a name for the rule, such as Remove encryption from incoming mail.
- In Apply this rule if, select the conditions where encryption should be removed from messages, such as The recipient is located > Inside the organization.
- In Do the following, select Modify the message security > Remove Office 365 Message Encryption.
- Select Save.
To create a rule to remove encryption from email replies by using PowerShell cmdlets
Connect to Exchange Online using Remote PowerShell.
Define a rule with the RemoveOME parameter. For example:
New-transportrule -name "Remove encryption from incoming mail" -SentToScope "InOrganization" -RemoveOME $true
A message that is encrypted by Office 365 Message Encryption is delivered to a recipient’s inbox just like any other email message, but it contains an HTML file attachment. After opening the attachment, the recipient can sign in or use a one-time passcode to view the message on the Office 365 Message Encryption portal. The email includes instructions for viewing the encrypted message, as in the following example (the attachment is highlighted):
An administrator can set a rule to automatically decrypt replies. This means that the recipients of your reply don’t have to sign in to the encryption portal to view the message. To learn about setting this rule, go to Define rules to encrypt or decrypt email messages.
To view an encrypted message using a Microsoft account
Follow the instructions in the email message to save the attachment.
Open the message.html file and select Sign in.
Sign in to the encryption portal with a Microsoft account, as instructed in the message. If you don’t have a Microsoft account, you can choose the option to create one associated with your email address. (You’ll have to fill out a form and complete a verification step.) In order to view the encrypted message, he email address for the Microsoft account must match the address to which the encrypted message was sent.
If you’re already signed in, you won’t have to sign in again.
After signing in, you can view the contents of the encrypted message.
To reply to an encrypted message
- Choose Reply or Reply All.
- On the page that appears, type a reply and choose Send. An encrypted copy of your reply message is sent to you.
References
- https://technet.microsoft.com/en-us/library/dn569286.aspx
- https://technet.microsoft.com/library/dn655136.aspx#BKMK_ClientCapabilities
- https://technet.microsoft.com/en-us/jj585005
- https://technet.microsoft.com/library/dn151475(v=exchg.150).aspx
- https://technet.microsoft.com/library/jj658941