Installing/Uninstalling MSI using PowerShell or C#
Installing/Uninstalling MSI - An alternate approach!
Summary
We have 15 employees testing a Custom SharePoint Application which requires a third party MSI tool to export the contents of a Document Library as a pre-designed template. The MSI tool is under development and will be released after every minor change. After the release, we need to send the package to employees and install it by removing the older version.
Requirement
Since this is in test phase and internal test process we can't opt for SCCM. We have instruction manuals in the portal so employees can do it themselves. However, we are looking for an automation. The solution should remove the older version and install the new version.
Solution
Let's start from here!
| help Get-WmiObject -Detailed help Get-WmiObject -Parameter Class help Get-WmiObject -Parameter Filter |
We need to install a product! Win32_Product is the class we need. Look at the methods below:
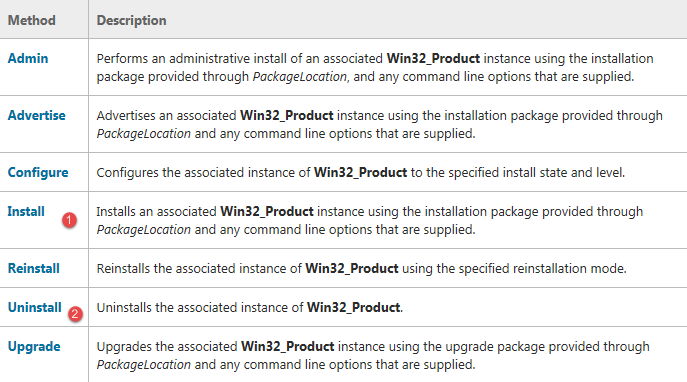
- Install
- Uninstall
Note: We will ignore the upgrade method! Since we are not sure about the third party package. We will simply remove any versions installed in the system and install the new version. For this, we need a package source. What do we do?
- Upload the MSI in your SharePoint document library
- Download it using WebClient Class Download Method
- Install using WmiObject - (Considering PowerShell Version 2.0)
Code
| $Portal = "http://www.contoso.com/site/Documents/Version/Product.msi" $WebClient = New-Object System.Net.WebClient $WebClient.UseDefaultCredentials = $true $WebClient.DownloadFile($Portal , "C:\Temp\doRHSetup.msi") $Product = Get-WmiObject -Class Win32_Product -Filter "Name='Product Name'" if($Product) { Write-Host "Removing the older version..." -ForegroundColor Yellow $Product.Uninstall() Write-Host "Successfully removed the older version" -ForegroundColor Yellow } else { $arguments = "/i C:\Temp\doRHSetup.msi /quiet" Start-Process -FilePath C:\Windows\System32\msiexec.exe -ArgumentList $arguments } |
We can compile this as an executable and share it with employees. So, we can upload the newer version in SharePoint document library and send an email communication to upgrade the product. Alternatively, we can achieve this using a C# Console Application and the below is a sample pseudo code.
| using System; using System.Collections.Generic; using System.Linq; using System.Text; using System.Threading.Tasks; using System.Management; using System.Management.Instrumentation; using System.Net; using System.Diagnostics; namespace PRSExportComponent { class Program { static void Main(string[] args) { ManagementObjectSearcher mos = new ManagementObjectSearcher( "SELECT * FROM Win32_Product WHERE NAME = 'Product Name' AND Version = '1.1.5'" ); foreach(ManagementObject mo in mos.Get()) { try { if(mo["Name"].ToString() == "Product Name") { object uninstall = mo.InvokeMethod("Uninstall", null); } else { //Console.WriteLine = ""; } } catch(Exception ex) { throw ex; } } string url = "http://www.contoso.com/site/Documents/Version/Product.msi"; System.Net.WebClient web = new WebClient(); web.UseDefaultCredentials = true; web.DownloadFile(url, @"C:\Temp\Product.msi"); try { Process pro = new Process(); pro.StartInfo.FileName = "C:\\Windows\\System32\\msiexec.exe"; pro.StartInfo.Arguments = "/i \"C:\\Temp\\Product.msi\" /qn"; pro.Start(); } catch(Exception ex) { throw ex; } } } } |