Benchmark your SQL Server Instance
https://msdnshared.blob.core.windows.net/media/2016/08/0841.NinjaAwardTinySilver.pngSilver Award Winner
GOALS
In the life of your SQL Server instances you will be challenged several time by developers or your management to provide a status regarding the performance level of your SQL instance. To avoid situation where your only available answer would be: “I do not know” or “I am not sure” you can easily baseline your SQL Server instance performance level for current or future comparison.
With the proposed solution you will be able to:
- Assess current performance level of your SQL Server instance, and give accurate values,
- Compare different SQL Server instances performances,
- Evaluate if changes made on the SQL Server instance affected performances of the SQL engine,
WHAT DO YOU NEED?
- Tool: HammerDB, hyperlink,
- SQL Server instance with up to 50 GB of available storage,
- Some SQL Scripts to get DB engine inner stats,
OVERVIEW
PERIMETER
Solution described here allows you to test your SQL Server instance regardless of the initial setup.
This works for SQL Server instances set on physical or virtual servers, having local or iScsi/FC SAN storage, using any version of SQL Server, standalone SQL Server instances, Fail-Over SQL Server instances or SQL Server AlwaysOn cluster.
The HammerDB tools uses your SQL Server instance to simulate specific transactions generating load on your SQL engine.
HammerDB can be set directly on the server housing the SQL Server instance.
Or can be set on any server that can reach the SQL instance through the network. This second setup is more interesting as you can test/benchmark both SQL Server instance and network architecture.
RESULTS
Results of this solution will allow you to get a kind of “scorecard” for your SQL Server instance and values for the common root causes of your SQL Server instance slowness/latency.
Scorecard by itself does not give meaningful result but it allows you to really compare performance of your SQL Server instance over time or against different setup (storage, CPU, memory, specific SQL settings, network settings, etc…).
Note:
The real important matter is to perform test with the same “test setup”.
Because basically you can only compare Apple and Apple. Here you will compare “Granny Smith apple grown in Oregon in 2016” with “Granny Smith apple grown in Oregon in 2016”. Whenever you will run the test in the future you will have to use the same test settings and the same test database.
This is why results of your tests will be accurate and can be compared between them.
STEPS (overview)
- Prepare the test environment
- Run the test
- Record results and collect SQL performance data for future comparison.
SETUP
Two steps:
- HammerDB tool setup.
- HammerDB test database creation on your SQL Server instance.
FIRST STEP: setup
You need: HammerDB installer.
HammerDB can be easily deployed on any server using the installer.
Main executable is hammerDB.bat.
SECOND STEP: Database creation
You need:
- SQL Server instance name.
- A login on the SQL Server instance.
HammerDB tool is going to create the test database on your SQL instance for you.
- Double-click on “SQL Server” menu.

2. In the popup select “MSSQL Server” and keep “TPC-C” option.
Then validate.
A second popup will appear to confirm your choice.

3. Back on the main HammerDB window click on the [+] sign to expand “SQL Server” menu.
Then expand “Schema Build”.
Click twice on “Options”

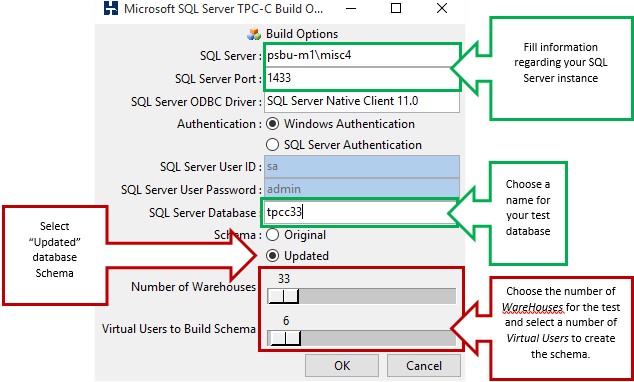
4. The build options menu appears.
You now have to setup SQL Server instance name and TCP port according to your settings.
For the database we have to decide some HammerDB related settings:
- Choose any name for the database.
- Number of Warehouses: choose a rather small value for your first DB. Choose a value between 25 and 30 to begin.
- Virtual Users to Build Schema. Choose any number lower than the number of real CPU core you have on that server.
5. Then you have to click on the “Build” menu to start database creation process on your SQL Server instance.
Simply validate the confirmation popup and database creation process will start immediately.
You can follow creation process on the tool main screen.

6. Main window of the tool is showing database creation process.
Once database is created tool will show “TPCC SCHEMA COMPLETE” message in the “Virtual User 1” sub window.
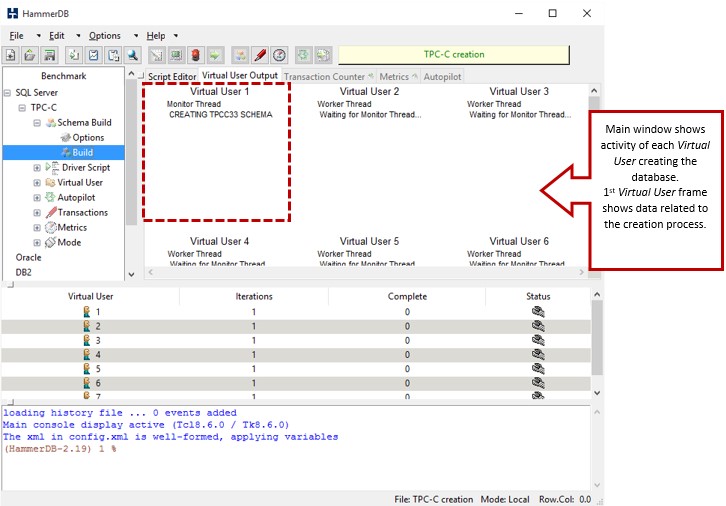
Tip: Creation time can take a lot of time depending on inner performances of your SQL Server instance and the number of “warehouses” you chose in the initial database creation setting. Final size of the database depends on the number of “warehouses” you chose.
- Once the tool created the test database you have to go into your SQL Server Management Studio and change small settings on your newly created database.
According to your settings of your SQL Server instance you could:
- Change your newly created database recovery model from “Full” to “Simple”,
- Go into the “Files” settings of your new database and raise the initial size of your database to a larger value.
- Now you have to change some “advanced” settings on the newly created database.
Use that few lines to do so.
EXEC sp_configure 'show advanced options', '1'
RECONFIGURE WITH OVERRIDE
ALTER DATABASE tpcc33 SET RECOVERY SIMPLE
ALTER DATABASE tpcc33 SET TORN_PAGE_DETECTION OFF
ALTER DATABASE tpcc33 SET PAGE_VERIFY NONE
RECONFIGURE WITH OVERRIDE
Replace the database name “tpcc33” by the real name of your database.
Full details on the HammerDB best practices with SQL Server can be found in that document.
- Now create a SQL backup of the newly created database.
The goal is to have a kind of reference “frozen” database that can be added to any SQL Server instance in future tests.
it is important to keep this database backup safe.
TEST RUN
Through the left menu of the main screen you can access test run settings.
You first need to set required parameters for the test.
How does the test work?
HammerDB tool will simulate “Virtual users” that will perform a specific number of transactions (set to 1000000 by default) in your SQL Server instance. Before running the test you choose the number of these “Virtual Users”.
The tools measures the time taken to perform all actions in the database by all the “Virtual Users”.
At the end of the test run the tool will give you two information:
- The total number of Transactions Per Minute (TPM)
- The Number Of Operations Per Minute (NOPM)
NOPM value is your current SQL Server instance “scorecard”.
Preparation
- Double-click on the Driver Script > Options menu.
- In the “Driver Options” dialog box you have to fill the settings related to your SQL Server instance and database
- Fields highlighted in blue are related to test itself:
- “Checkpoint when complete” checkbox,
- “Minutes of Ramp up” value set here to “1”. This allows some time for the SQL engine to fill some data in its cache.
- “Minutes for test duration”. You can fix how many minutes the test will last.

Validate the options by clicking “OK”.
- You have to double-click on the "Driver script > Load" menu to “load” parameters inside the HammerDB engine.

Virtual Users
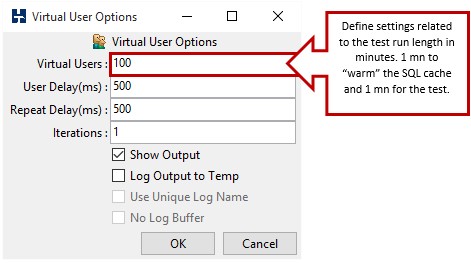
You are almost ready to run the test. The only parameters remaining is to define the number of “Virtual Users” that will perform the test then launch the test.
- Virtual Users settings:
Click on the left “Virtual Users > Options" menu and select the number of Virtual Users for the test.
I usually perform the test with 100 users as this value is not too aggressive for both the server running the HammerDB tool and the SQL Server instance.
Tip: Even if you can tune User Delay and Repeat Delay this is recommended to keep these values at 500 ms.
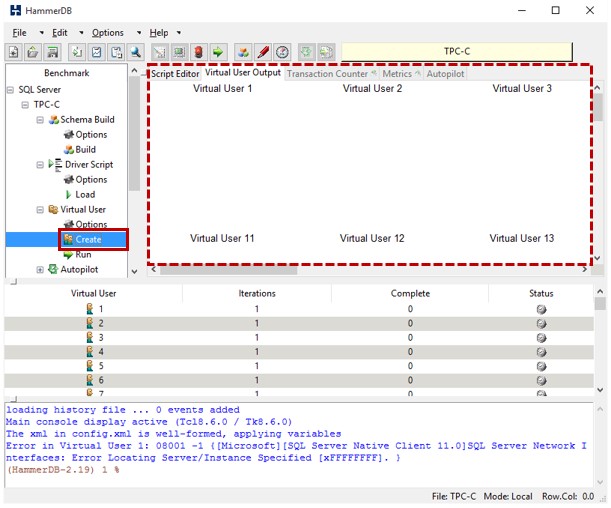
2. Click on the “Virtual User > Create” menu to prepare the tool.
The tool creates the Virtual Users and show an information frame for each created Virtual User.
First frame for “Virtual User 1” is used to show informational messages and above all result of the test.
3. Launch the test by clicking on the “Run” menu.
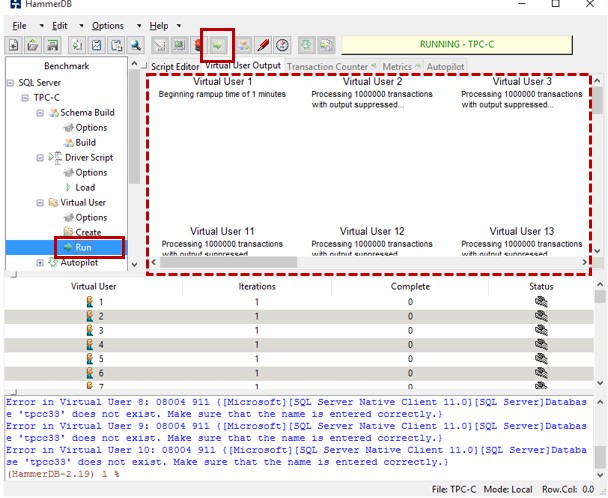
At the end of the test run the tool will show you final results.

SCORECARD
Now the test has ended you have a kind of snapshot scorecard showing performance level of your SQL Server instance during the test run with – of course – the current architecture and SQL engine parameters.
All alone this scorecard does not give you a significant information.
The scorecard value becomes interesting when comparing this result with other test runs performed with different settings or even infrastructure changes.
This is obvious that this scorecard interpretation absolutely depends of:
- current load of this SQL server instance when the test run was performed especially if this instance houses other databases accessed by other systems.
- current load of the underlying infrastructure:
- server resources availability and efficiency,
- network traffic and efficiency between server running the tool and SQL Server instance if the tool was run on a separated server,
- efficiency of the hypervisor host if you are using SQL Server instance hosted on a virtual machine
- current SQL Server engine parameters.
Even minor changes in some SQL Server engine or underlying architecture parameters can have unsuspected results in SQL Server instance overall performance.
Let’s list evident bottlenecks for a SQL Server instance:
> CPU Performance
In an ideal world you can play with the CPU affinity setting of your SQL Server instance and benchmark performance impact of a change. Using the benchmark tool, you can now easily measure impact of this change on overall performances of the SQL engine.
> Memory
You can measure performance changes once memory allocated to the SQL database engine or even changes in startup parameters – related to the page memory management – are performed.
> Storage efficiency
Poor performing storage will almost always result in poor SQL Server performance. By "moving" the HammerDB database to different storage architecture you can foresee benefits of a change.
> Network configuration.
*By design your SQL Server instance has to use storage for its data. When data is stored on a SAN many “network related” parameters have a direct impact on the SQL Server instance efficiency (MTU, protocol, storage adapter, …). Even parameters that might seem "out of your perimeter" i.e. MTU settings might have direct impact on performance of your SQL Server instance.
*
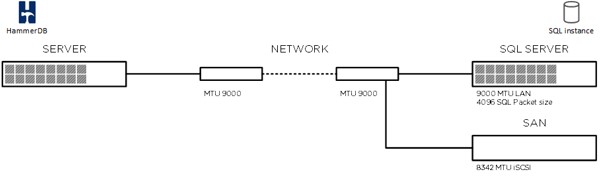
If you perform some tests modifying SQL Server packet size please keep in mind any change could benefit only to the test database you created. Indeed your *real world" database might not benefit at all of modified value for this setting.
What changes could you test?
The quick answer is: many.
Depending of the underlying architecture of your SQL Server instance and the type of this SQL Server instance you can try different architecture setup.
Of course testing a change in a production environment is not a great idea as you are de facto seriously limited.
SQL Engine
Several start parameters are very useful for your SQL Server engine performance. The goal is not to list them here but you could try some changes and measures benefits for your SQL Server instance.
Memory
There are several changes you can perform depending on the architecture of the server housing your SQL Server instance.
Storage
CPU allocation