UWP: How to Use DirectMusic Producer to Create Music for a Video Game
Introduction
DirectMusic Producer is a tool that came along with the Software Development Kit (SDK) for DirectX. The main idea was to "compose" background music at run-time through a procedure generation algorithm based on the random selection of musical patterns. In a nutshell, during the video game development phase, the Composer would use the SDK to define all musical patterns and, when the game was done and deployed, a run-time library would generate background music using these patterns.
With the release of DirectX 11 and its new library "XAudio2", both "DirectMusic" and "DirectSound" libraries reached the end of its development life, thus DirectMusic Producer is no longer included in the latest DirectX SDK. However, that does not mean that your investment in this technology is no longer useful. In fact, this article will show you how to use this tool to create music for your Universal Windows Platform games.
Why Microsoft's DirectMusic Producer?
Nowadays, the price of videogames have dropped so low that it's no longer affordable to hire a band of musicians (let alone a full orchestra) to record a videogame's background music. Moreover, as a Musician, the pay (if any) is more a symbol rather than an actual income. Even as an Engineer, renting a Sound Studio (little sound proof room with a vast array of amplifiers, equalizers, mics and signal mixers) for editing purposes is just out of budget.
To solve this challenge, Microsoft's DirectMusic Producer offers a different approach in which all sound creative processing is done digitally through the use of a single computer's synthesizer features. Although it cannot be compared to the quality acquired by a fully developed orchestra teamed with a high-end recording studio, it can still reach professional levels. There is no need to do a heavy hardware investment, as pretty much every computer sound card has an embedded synthesizer since the late 90's. Ok, granted, the better the sound card, the higher the quality, but still, the price of a sound card is insignificant compared to music edition fees.
The biggest benefit comes after the creative process has been completed: More often than not, variation of the original score are needed for various purposes, like promotional videos, special in-game cinematic clips, "boss fights" and even the development of the "sequel" of the game. Since DirectMusic Producer works with sections or individual "patterns", it is quite easy to edit a song by removing or adding defined sections of the soundtrack. Even changing instruments becomes an easy task, and the best part is that, every time it is edited, all notes sound exactly like if they were played for the first time.
The Creative Process
Since we can no longer invoke at run-time the random generation algorithm, the creative process changes a little bit. For the purposes of this article, this is just going to be a quick overview, focusing on small details that we need to cover in order to create the background music for a UWP game.
Everything starts at the DirectMusic application by going to "File" -> "New" and, in the new window, select "Project": Uncheck the "Use default names" checkbox and give a name to the project. The next window will ask for the file location to use.

![]()
The "Draft" Segment
What I recommend doing is to create a "Draft file" within the project where we can "doodle" with notes and rhythms, experimenting with different instruments, trying to figure out how the final score is going to sound like. This "doodle" file is usually a "Segment" within the DirectMusic Producer Application project.
The Project Tree is on the left of the application. Right-click on the Project's Icon and select "New" on the pull-down menu.

Select "Segment", give it a name so you know this is a "Draft" file and click "Ok".
The next window will ask for the length of the song, in "measures" (ignore the time, for the calculation is usually wrong). Enter the length (I usually go for 60 - 200 in order to have a big area to experiment).

A new segment file is created with only the "Time Signature Track".
Note: A "Track" is a work area where we can tell the computer what to do and, more importantly, when to do it. All tracks in a Segment are played together (another pair of words to describe it would be "executed concurrently"), and the end result is the musical score.
The next screen will ask for new tracks to add. Multiple tracks can be selected with the "Control" key. For the "Draft" segment, the following tracks are needed:
- Tempo: This is how fast the song is played.
- Band: This is the band of instruments to play the song.
- Sequence: This is the music sheet for one musical instrument. Adding a Sequence is not enough: An instrument needs to be associated to the track.
- Pattern: This is also the music sheet for one instrument.
The difference between a "Pattern" and a "Sequence" is that a Pattern repeats itself throughout the entire Segment. For example, the drum set is often modeled as a Pattern so we define the drums' rhythm in one measure, and we let the computer repeat this very same measure throughout the entire Segment.
We can add more tracks to the Segment by pressing "Control" + "Insert" keys on the keyboard, or by right-clicking on the white empty area at the bottom of the application and select "Add Tracks".
![]()
Before adding instruments, a Band needs to be defined.
Click on the very first square in the Band's Track, and press the "Insert" key in the computer's keyboard. A new band appears.
Double-click in the new icon to edit it. On the new window, the list of available channels will appear. There can only be up to 16 instruments, one per channel. Also, channel #10 has been hard-coded as the "Drum Set". This is in accordance to Yamaha's "MIDI" standard.

By default, all channels are disabled when a band is created. To enable, click on one channel and press F11. The "Properties" window will appear.

On the Channel's Properties window, check the "Instrument" checkbox to enable the channel. At this point, you can choose the musical instrument to use.
Once an instrument has been defined, not only the list will become dark and bold, but also the "instrument distribution map" on the right will highlight our channel, remarking the "virtual" position on the stage. At this point, you can relocate the instrument by dragging and dropping its icon on the virtual stage. Although this "virtual stage" is somewhat cool, it is strongly recommended to move all instruments to the top center, regardless if they overlap. Once the song writing process is close to the end, then we can fine-tune individual instrument volume by relocating said instrument within the virtual stage.
To associate a Sequence (or a Pattern) to an instrument, just select the Sequence (or Pattern), press F11 to display the "Properties" window, and select the channel to use, as per the band that was previously defined.

Important: The vertical red line on the main application UI indicates the current position within the Tracks. Some commands done in the application's interface assume that the operation to execute needs to be done at the current position. Therefore, for some operations, it is important to first relocate the red line to the position of interest, and then execute the command.
This note comes right on time, as changing an instrument is assumed to be done at the red line. In other words, if we change an instrument in the middle of the track, DirectMusic Producer will assume that the instrument changes also at the middle of the track. As such, a new "Band" object is created by copying the previous one and applying the change just executed. This feature was meant to overcome the 16 concurrent instrument limitation, but, more often than not, this "feature" gets in the way, for it creates multiple band objects which becomes a pain later on to maintain if we want to change one single instrument for the entire score.
Important: Patterns have these gray buttons on top. Those are for random generation sequences. In order to keep these features muzzled, it is important to keep all these gray buttons "pressed" (except for the big button on the right).

Once the instruments have been defined and the sequences and patterns have been set, notes can be added by clicking on the associated square on the Track's grid and pressing the "Insert" key. A blue square is inserted in the grid. This blue square represents the note to play:
The musical note to play is defined by the vertical position,
The time to play it is defined by the horizontal position,
The duration is defined by the width of the square,
The volume is defined by the height of the square (for some odd reason this is referred as "Velocity"),
Square's position and shape can be modified using a mouse (touch screen is not recommended - some buttons are too small),
Pressing F11 will show the "Properties" window, where we can change these same properties directly.

The mouse can be used to select multiple notes, and copy-paste features work just like any Microsoft's Office document.
There is a "play" and "stop" buttons that can be used to hear how the song is going so far.
An "AudioPath" is a technical term for a set of algorithms that will specify the output of the song as sound. There is a drop-down list that allows us to select the AudioPath to use. It is strongly recommended to use "Standard Stereo" at this stage.
This section has provided enough information for the starting phase of a DirectMusic Producer project. There are many, many, many more features that can be implemented at this point, but they are not relevant to the configuration that complies with the publication of a UWP game. For additional information please consult the help file included in the application.
Assembling the Masterpiece's Parts
At this point the draft of the Music Sheet for all instruments to use is somewhat defined, and there's a clear idea of how the final score is going to sound like: There's probably an Intro, a starting section, a chorus section, some middle sections and the grand finale. All these sections are somewhat similar, and yet they have notorious differences in such a way that having one single, continuous Segment is not quite practical. This is where DirectMusic Producer makes use of "Styles".
Note: Not all compositions require dissection of components. Some Composers are content on using one single Segment, keeping everything in control using copy-paste features. Still, dissecting a song in parts makes any edition task easier down the road, like for example reducing the length of the song to fit best a given game trailer.
On the project tree, right click on the project icon and select "New".
On the new window, select "Style" and give it a name. A tree of new components is created, including a new "Band" and a sample "Pattern".
Note: For the scope of this document, a "Style Pattern" is different from a "Segment Pattern".
Double-click on the new "Band", and add all the musical instruments that are going to be needed. This is going to be the "Official" Band. Once defined, close the band window.
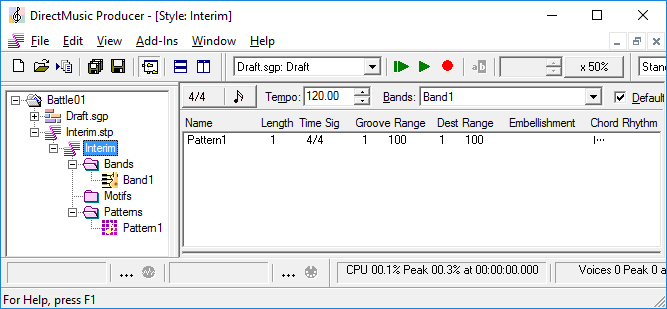
Click on the new "Pattern", and press F11. The "Properties" window will appear. It is in this window where the name can be defined, as well as the length of the Pattern by changing the number of measures.

Of all the settings available, the most important are "Groove Range" (Low and Hi) and "Destination Range" (also Low and Hi). All these four fields must be the same number, and it must be unique within all Style Patterns. This will keep the random generation algorithm under tight control.
Double-click on the new "Pattern" to open it.

Note that there's a "Chord" track by default, set up to Do Major (‘2CM7', or just ‘C' to keep it simple). Also, there's a default "Pattern Part" associated to the musical instrument associated to the first channel, as defined by the Style's Band. This "Pattern Part" represents the Music Sheet for said instrument. Selecting the Pattern Part and pressing F11 will display the "Properties" window, where we can change the instrument (by changing the channel), among other settings.
Add as many "Pattern Parts" as needed to play the assigned section, for the exception of the main tune. An example of the "Pattern Parts" to set are the drum set, the bass and the arpeggio, which are typically the notes repeated on every measure. It is best if these notes are copied from the "Draft Segment" using the copy-paste feature.

Right-click on the "Patterns" folder, and add as many Style Patterns as will be needed (e.g.: Intro, Starting Bar, Chorus Bar, Middle Bar, Grand Finale).
Pattern Parts will also have a set of gray buttons on top. Make sure all gray buttons are set, for the exception of the big one on the right.
The following screenshot is an example of how to dissect a song in Style Patterns. It doesn't have to be that way, as every artist has his/ her own preferences.

- MtIntro: This is just the drums set playing the traditional 1-2-3-4.
- MtIntro2: This pattern has the drums set and the bass, along with an ensemble of strings playing the 'Am' chord
- MtIntro3: This pattern is a copy of MtIntro2 plus a guitar playing the main arpeggio in 'Am' chord.
- MtMainPattern1: I don't quite like how DirectMusic producer handles chord shifting, so this pattern is a copy of MtIntro3 but here I'm handling the arpeggio manually, following the combination of chords 'Am', 'Dm7', 'G', 'C', 'Am', and 'E7'. Later on, when we put everything together, this combination will loop almost through the entire score - that's why Style Patterns are so useful.
- MtMainPattern2: This is a copy of Main01 but with an extra ensemble.
- ... And so on and so forth.
Putting it All Together
At this point, all sections of the song have been defined in "Style Patterns", and now we just need to put everything together in one single Segment.
- On the Project Tree, right click on the project icon and select "New"
- On the new window, select "Segment" and click "Ok". The next window will ask for the size of the Segment. Enter the number of measures needed for the final score (this can be modified later on).
- On the "Add Tracks" window, add the following tracks: "Tempo", "Grooves", "Styles", "Sequence" and "Bands"
- From the Project Tree, drag and drop the Style that was created on the new Segment. Note that the band to use is automatically set.
- On the new Sequence Track, enter the notes to be played by the main instrument. Usually, I select and copy the notes from the "Draft" Segment and paste it in the new Sequence Track, at the right measure.
- On the new Groove Track, click on a cell of the grid and press "Insert" key to add a Groove. A "Groove", for the scope of this article, is a link to a "Style Pattern" to play, linking the Groove's "Groove Level" to the Pattern's "Groove Range" value (that is why this document suggests leaving both "Low" and "Hi" to the same value). Repeat this step for all the Style Patterns to use.

As an example, in the previous screenshot, Groove (11) is MtIntro1 (the 1-2-3-4 with the drum set), Groove (12) is MtIntro2, Groove (13) is MtIntro3, Groove (20) is MtMainPattern with the song chord combination, and that is why the main instrument, modeled by the "(1) Sequence" track, starts playing at that very same measure as well.
There can be as many Segment as "variations" needed of the final score. Following the previous screenshot, there are quite a lot of them defined.
Exporting to WAV file
Once the final score has been assembled, it is time to export it to a format that a UWP game can understand. "XAudio2" is the sound library included in DirectX 11. It is a little bit on the "low level" side: In order to be able to play a sound, we need to load a file into a "Memory Buffer" that will host the digital signal of the sound to play. Based on this, the best file format to use with Xaudio2 is "wav". All other formats require some sort of "uncompressing", which is something we don't want to do for it will cost precious CPU cycles to uncompress data at run-time, which could very likely cause a drop of performance in our game.
On the Project Tree, right click on the project and select "New".
On the new window, select "AudioPath", and provide a name like "ExportToWav".
The next screen will ask the type of AudioPath to create. Select "Empty AudioPath" and click "Ok".

The next screen will ask the channels to export. Click on "Add Next 16" to add the 16 channels used previously, and click "Ok".

The new AudioPath will be shown, along with a list of possible effects to add. Drag the "FileOutput" effect from the "Effect Palette" on the right, and drop it on the "Effect List" of the AudioPath.

At the bottom of the application there're the "Export File" tools. There are two options: wav file (has an icon like a red sound signal) and midi file (has an icon like a drum set). Click on the ellipsis button of the "wav" control and select the name and the path of the file to export.
Double-click on the Segment that has the song to export, so it gets active.
On the AudioPath drop down list (the one that we set as "Standard Stereo" in previous steps), select the AudioPath that was just created, in this example, "ExportToWav"
Before recording, make sure no other application is running.

To start recording, click on the "wav" icon and then the "play" icon immediately (refer to the screenshot shown). Note that the "wav" icon will remain pressed for the entire recording.
To stop recording, click on the "wav" icon and then the "stop" icon immediately. Note that the "wav" icon will no longer be pressed.
The new "wav" file should be located at the destination folder specified previously.
To implement this score in your game using DirectX 11, follow the instructions described in the below hyperlink:
https://msdn.microsoft.com/en-us/library/windows/desktop/ee415787(v=vs.85).aspx
Conclusion
The process described in this document covers two main important areas: the creative phase, and the recording procedure. As a composer, the recording procedure is rather daunting and not at all intuitive. On the other hand, as an Indie developer (we all "wear many hats") the creative phase is so different to other programming tasks that it is not easy to get a clear understanding of what we are supposed to do. In both cases, the help file included is rather cryptic sometimes, and it takes some hands-on experience to get the idea.
This is pretty much why I wanted to write this document: To provide a guide that proposes a low cost, step-by-step process that could help both composers and developers during the musical score writing process for a Universal Windows Platform game.