Convert the IPv6 test lab to IPv6-only
These hands-on exercises are designed for the Microsoft IPv6 course from the Microsoft Virtual Academy. They demonstrate converting the IPv6 test lab, which has been configured to support a dual stack environment (both IPv4 and IPv6), into an IPv6-only environment. You can use this environment to test applications to ensure that they will work properly in an IPv6-only environment.
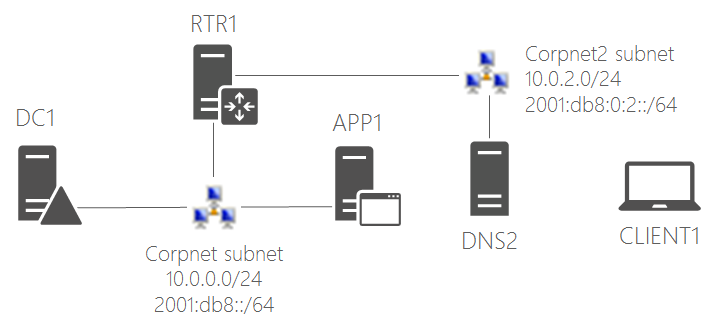
These hands-on exercises assume that you have built the following IPv6 test lab based on the Hands-on exercises for Module 6: DNS for IPv6 article.
To convert the IPv6 test lab to IPv6-only, you disable the Internet Protocol Version 4 (TCP/IPv4) for each network adapter on each virtual machine.
From the Hyper-V manager, connect to DC1, and then sign in with the CORP\User1 account. On DC1, run the following command at an administrator-level Windows PowerShell command prompt:
Disable-NetAdapterBinding -Name Ethernet -DisplayName "Internet Protocol Version 4 (TCP/IPv4)"
From the Hyper-V manager, connect to RTR1, and then sign in with the CORP\User1 account. On RTR1, run the following commands at an administrator-level Windows PowerShell command prompt:
Disable-NetAdapterBinding -Name Corpnet -DisplayName "Internet Protocol Version 4 (TCP/IPv4)"
Disable-NetAdapterBinding -Name Corpnet2 -DisplayName "Internet Protocol Version 4 (TCP/IPv4)"
From the Hyper-V manager, connect to APP1, and then sign in with the CORP\User1 account. On APP1, run the following command at an administrator-level Windows PowerShell command prompt:
Disable-NetAdapterBinding -Name Ethernet -DisplayName "Internet Protocol Version 4 (TCP/IPv4)"
From the Hyper-V manager, connect to DNS2, and then sign in with the CORP\User1 account. On DNS2, run the following command at an administrator-level Windows PowerShell command prompt:
Disable-NetAdapterBinding -Name Ethernet -DisplayName "Internet Protocol Version 4 (TCP/IPv4)"
From the Hyper-V manager, connect to CLIENT1, and then sign in with the CORP\User1 account. On CLIENT1, run the following command at an administrator-level Windows PowerShell command prompt:
Disable-NetAdapterBinding -Name Ethernet -DisplayName "Internet Protocol Version 4 (TCP/IPv4)"
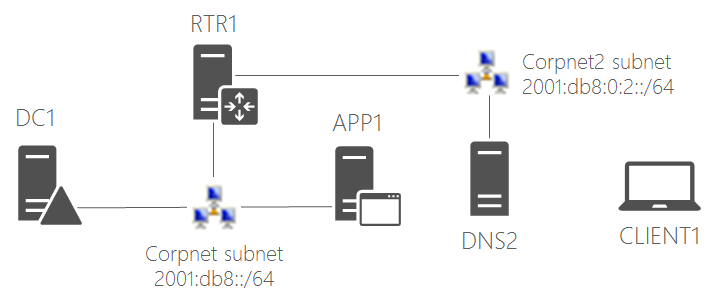
This is your new network configuration.
This procedure verifies Windows-based infrastructure and application services on an IPv6-only network.
- Using the Hyper-V Manager, change CLIENT1's network adapter to use the Corpnet2 virtual switch.
- At the Windows PowerShell command prompt, run ipconfig /renew until you get IPv6 addresses that start with "2001:db8:0:2".
- Run nltest /dsgetdc: /force. Note that the domain controller found is DC1 using its IPv6 address.
- Run ping app1.corp.contoso.com. You should see four successful replies.
- Run Internet Explorer. In the Address bar, type http://app1.corp.contoso.com/, and then press ENTER. You should see the default IIS 7 web page for APP1. Close Internet Explorer.
- Click Start, type \app1\Files, and then press ENTER. You should see a folder window with the contents of the Files shared folder.
- In the Files shared folder window, double-click the Example.txt file. You should see the contents of the Example.txt file. Close the example.txt - Notepad and the Files shared folder windows.
To restore IPv4 in the IPv6 test lab, use these steps.
On DC1, run the following command at an administrator-level Windows PowerShell command prompt:
Enable-NetAdapterBinding -Name Ethernet -DisplayName "Internet Protocol Version 4 (TCP/IPv4)"
On RTR1, run the following commands at an administrator-level Windows PowerShell command prompt:
Enable-NetAdapterBinding -Name Corpnet -DisplayName "Internet Protocol Version 4 (TCP/IPv4)"
Enable-NetAdapterBinding -Name Corpnet2 -DisplayName "Internet Protocol Version 4 (TCP/IPv4)"
On APP1, run the following command at an administrator-level Windows PowerShell command prompt:
Enable-NetAdapterBinding -Name Ethernet -DisplayName "Internet Protocol Version 4 (TCP/IPv4)"
On DNS2, run the following command at an administrator-level Windows PowerShell command prompt:
Enable-NetAdapterBinding -Name Ethernet -DisplayName "Internet Protocol Version 4 (TCP/IPv4)"
On CLIENT1, run the following command at an administrator-level Windows PowerShell command prompt:
Enable-NetAdapterBinding -Name Ethernet -DisplayName "Internet Protocol Version 4 (TCP/IPv4)"
To continue learning about IPv6, see the resources on the IPv6 Survival Guide.