PowerShell: Manage your O365 - Step by Step
In this article, let’s see how we can use PowerShell and start with the scratch in getting into O365.
The scenario that we are talking about assumes that the user has created a tenant in the office 365 environment. No further changes in terms of domain/users etc. has not been performed.
Import PS Module
Import PowerShell Online Module: Before doing any of the below tasks, we need to download the commands and functions. By default, PowerShell doesn’t include the commands. So run the below command which will load the Online command modules;
Import-Module MSOnline
Login
Login to Office 365 tenant: Now after loading the module, we need to connect to the Office 365. The Connect-MsolService cmdlet will initiate a connection with Microsoft Azure Active Directory.
This first command will prompt for the credentials and pass it on in the second command that will authenticate with your tenant.
$msolCredentials = Get-Credential
Connect-MsolService -Credential $msolCredentials

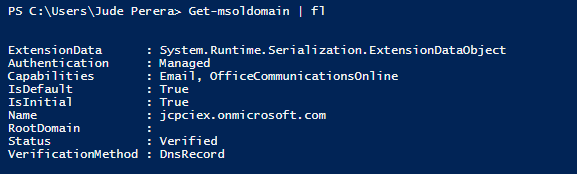
List down authorized Domains:
The below cmdlet is used to retrieve the associated domains under the given tenant. Here we check the existing domains.
Get-msoldomain | fl
Add Domain:
The cmdlet is used to create a new domain object in the given Office 365 tenant environment. Once completed a domain entry will be displayed under the domain list. However, the verification is still under pending.
New-MsolDomain –Authentication Managed –Name scko.info

Domain Verification
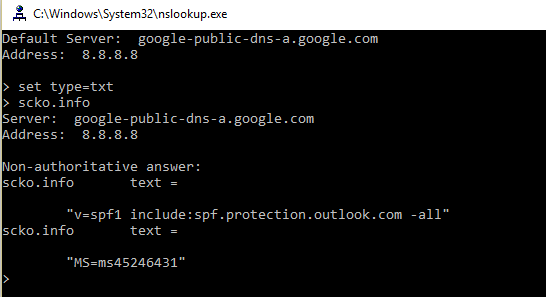
Domain Verification Part 1:
Is used to return the details of the DNS records that need to be set to verify a domain. Values for Mode are DnsMXRecord and DnsTxtRecord where you will use the values in your DNS Registrar.
Get-MsolDomainVerificationDns -DomainName scko.info -Mode DnsTxtRecord

Domain Verification Part 2:
Used to confirm ownership of a domain. Once you have added the above TXT or MX records to your DNS list, you run the below command which will run the verification from Office 365 end to verify and confirm the domain ownership.
Confirm-MsolDomain –DomainName scko.info

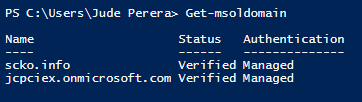
List down authorized Domains:
Now we will use the cmdlet again to retrieve the associated domains.
Get-msoldomain | fl
Note: Please note that after this step, the retrieval of the DNS records associated with Office 365 services (Exchange/SharePoint/S4B etc) needs to be done using the web based Office 365 Admin page. You cannot retrieve the related DNS records through PowerShell.
Note: Adding Licenses needs to be done from the web portal.
Check Office 365 License:
The below cmdlet will list all the SKUs that the tenant owns.
Get-MsolAccountSku

At this point we have finished the following;
Tenant Creation
Domain adding and verification
User creation
In the next step we will look at user creation.
Create Single User:
The cmdlet will create an individual account.
New-MsolUser -UserPrincipalName jude@scko.info -City Colombo -State Western -Country "Sri Lanka" -DisplayName "Jude Perera" -FirstName Jude -LastName Perera -Password admin@123 -UsageLocation LK -LicenseAssignment jcpciex:ENTERPRISEPACK

Note: If the license assignment is done at this point the USAGELOCATION and LICENSEASSIGNMENT parameters are required. The value for the LicenseAssignment can be obtained through the Get-MsolAccountSku cmdlet
Office 365 User Attributes
New-MsolUser -UserPrincipalName -City -Country -Department -DisplayName -FirstName -LastName -MobilePhone -PasswordNeverExpires -State -StreetAddress -Title -UsageLocation -LicenseAssignment
Attribute |
Description |
UserPrincipalName |
This is the account name that's used to sign in to Office 365 services. |
City |
This will include the city |
Country |
The country of the user |
Department |
The department |
DisplayName |
This is the display name that's used in Office 365 services. |
FirstName |
First Name |
LastName |
Last Name |
MobilePhone |
Mobile phone number |
PasswordNeverExpires |
This specifies if the user password is set to expire(false) or not(true) |
Password |
If you don't specify a password, a random password is assigned to the user account, and the password is visible in the results of the command. If you specify a password, it needs to meet the following complexity requirements: · 8 to 16 ASCII text characters. · Characters from any three of the following types: lowercase letters, uppercase letters, numbers, and symbols. |
UsageLocation |
This is a valid ISO 3166-1 alpha-2 country code. For example, US for the United States, and FR for France. It's important to provide this value, because some Office 365 services aren't available in certain countries, so you can't assign a license to a user account unless the account has this value configured. |
LicenseAssignment |
This is the licensing plan (also known as the license plan, Office 365 plan, or SKU) from which an available license is assigned to the user account. The license defines the Office 365 services that are available to account. You don't have to assign a license to a user when you create the account, but the account requires a license to access Office 365 services. |
Get User Details:
The command will retrieve the user information for the given users UPN
Get-MsolUser -UserPrincipalName jude@scko.info |fl

Now that we have learnt how to add a single user and what attributes we can associate it with, lets see how we can do a bulk import. This is especially useful when you are creating the users at first or having to add multiple users at a single time.
In preparation for this task we need create the users and attributes in CSV format. The below table lists sample data and the attributes that will be imported to Office 365.
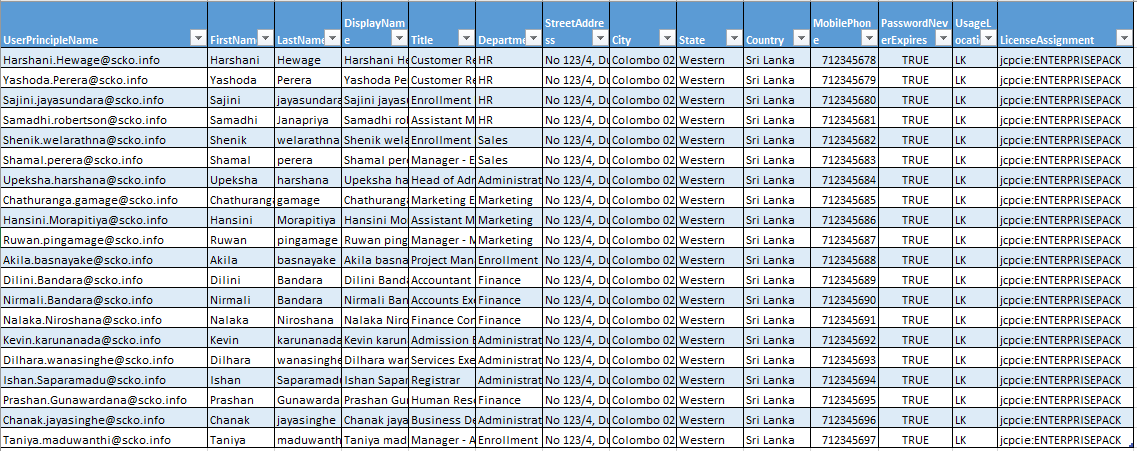
Sample CSV file can be downloaded from here.
Bulk Import:
The below cmdlet will import the users and attributes from the given CSV file
Command 01:
$users = Import-Csv "D:\Demo ITPro\Office365Users.CSV"
Command 02:
$users | ForEach-Object{
New-MsolUser -UserPrincipalName $_. UserPrincipalName -City $_.City -Country $_.Country -Department $_.Department -DisplayName $_.DisplayName -FirstName $_.FirstName -LastName $_.LastName -MobilePhone $_.MobilePhone -State $_.State -StreetAddress $_.StreetAddress -Title $_.Title -UsageLocation $_.UsageLocation -LicenseAssignment $_.LicenseAssignment
}

Password Configuration:
The below command can be used to enable(true) or disable(false) the requirement of Strong Passwords for users
Get-MsolUser | Set-MsolUser -StrongPasswordRequired $false

Password Change:
If you wish to change the passwords of your users in bulk mode, the below import method can be used.
The import method will import a list of users, their UserPrincipleName and the new Password along with the Set-MsolUserPassword cmdlet. You can use a CSV file with below format.
UserPrincipalName |
Password |
User One |
pass@word1 |
User Two |
pass@word2 |
User Three |
pass@word3 |
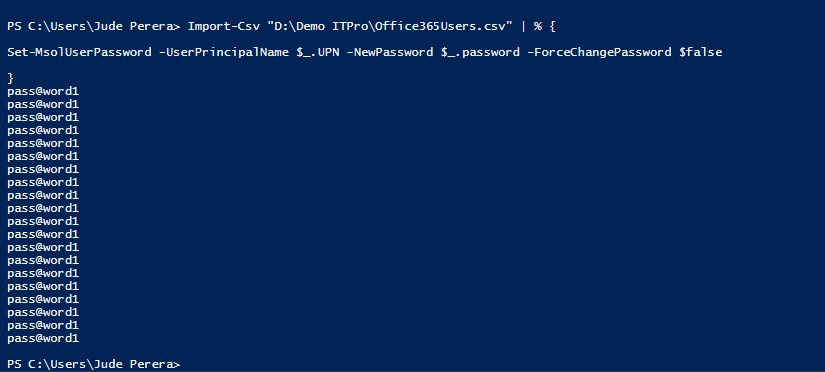
Import-Csv "D:\Demo ITPro\Office365Users.csv" | % {
Set-MsolUserPassword -UserPrincipalName $_.UPN -NewPassword $_.password -ForceChangePassword $false
}
Create Office 365 User Groups:
The New-MsolGroup cmdlet is used to add a new security group to the tenant. Note that creating groups does not mail enable them. Mail enabling a group needs to done with the help of the Microsoft Exchange Online PowerShell module which we will look in a later stage.
New-MsolGroup -DisplayName "Security Group" -Description "Security Group"

View Office 365 Groups:
The below cmdlet will list down with the Groups and all related attributes.
Get-MsolGroup | fl

Adding users to Group: Adding users or members to a group is not simple as the browser based controls. The Add-MsolGroupMember cmdlet is used to add members to a security group. The new members can be either users or other security groups. The group memberships totally depends on Group and User ID’s under the user/group properties.
Add-MsolGroupMember -GroupMemberObjectId <Guid> -GroupObjectId <Guid> [-GroupMemberType <string>] [-TenantId <Guid>] [<CommonParameters>]
-GroupMemberObjectId <Guid>: The object ID of the member (User or Group) to add to the group. The ID of the group to add members to. To get the value, run the Get-MsolUser -UserPrincipalName singleadd@scko.info | fl command. The Users ObjectID is shown in the below screenshot.
**  **
**
**
**
-GroupObjectId <Guid>: The ID of the group to add members to. To get the value, run the Get-MsolGroup | fl command. The Groups ObjectID is shown in the below screenshot.

Now we will combine the above values to add the User “Single Add” to the new group we created earlier.
Add-MsolGroupMember -GroupObjectId 1a3edbb9-ec64-4184-bd22-5df4ae830158 -GroupMemberObjectId 52db4e40-bd95-426b-9c5a-bc752ceb044e
Once the member is added, now we run the below command to check the member adding
Get-MsolGroupMember -GroupObjectId a0b12555-e840-4f53-a857-91e41b69dbf0
Part 1 is done. In the coming days let's see how we can use PowerShell to connect to Exchange Online services and manage things.
Until then, happy (power)shell'ing :-)