CRUD Operation in Elasticsearch using C# and NEST
Introduction
In our previous article.
We have seen in details about:
- What is Elasticsearch
- Configuring Elasticsearch on your machine
- How to create indices and add document
- How to search in Elasticsearch from client application
In this article we will see how to do CRUD (Create/Read/Update and Delete) operation in Elasticsearch using C# and NEST (.NET client for Elasticsearch). The example is made of C# use under WinForm. This article is specially focusing on newcomers and anyone new wants to learn or thinking of using ES in their .NET program. This sample illustrates a way to let user to perform CRUD operation in Elasticsearch from their WinForm app.
In this article we are going to see how we can,
- Create a document in Elasticsearch
- Setup our development enviroment
- How we can Insert data to ES
- How we can Search data in ES
- How we can Update data in ES
- How we can Delete data in ES
Index Creation
First we create an index named "disney" and type "character". Then we have to populate the index with some data, meaning the "Create" of CRUD, or rather, "indexing". Elasticsearch behaves like a REST API, so you can use either the POST or the PUT method to add data to it. The data for the document is sent as a JSON object.
Preparing Document
As discussed in the previous article, For illustrative purposes, first we create a document under type "character" in the index name "disney".
An index is like a ‘database’ in a relational database. It has a mapping which defines multiple types. The easiest and most familiar layout clones what you would expect from a relational database. You can (very roughly) think of an index like a database.
- SQL Server => Databases => Tables => Columns/Rows
- Elasticsearch => Indices => Types => Documents with Properties
An Elasticsearch cluster can contain multiple Indices (databases), which in turn contain multiple Types (tables). These types hold multiple Documents (rows), and each document has Properties or Fields (columns).
Here is a script to create an index and insert couple of data, if you want you could add more by using bulk insert method. Also note that all the document in Elasticsearch are stored in JSON format. So you need to have good grasp on JSON. We are using cURL commands to insert document values in Elasticsearch. (For more information about setting up Elasticsearch see my previous article here)
curl -XPUT "http://localhost:9200/disney/character/1" -d'
{
    "name": "Abby Mallard",
    "original_voice_actor": "Joan Cusack",
    "animated_debut": "Chicken Little"
}'

curl -XPUT "http://localhost:9200/disney/character/2" -d'
{
    "name": "Abigail Gabble",
    "original_voice_actor": "Monica Evans",
    "animated_debut": "The Aristocats"
}'

curl -XPUT "http://localhost:9200/disney/character/3" -d'
{
    "name": "Babyface Beagle",
    "original_voice_actor": "Terry McGovern",
    "animated_debut": "DuckTales"
}'
As we can see from the above data our document has three fields: "name", "original_voice_actor", "animated_debut" these are like the column name in relational database. So, we would retrieve based on these three fields.
Development Setup
Before we start writing code we must to reference NEST in our project, that of making libraries accessible to the solution.
Referencing NEST
First we need to download the .NET client for Elasticsearch which is NEST. To reference NEST within our project,that is make its libraries accessible to the solution, use the Nuget Package Manager Console Window to run the below command to install the NEST client
- PM> Install-Package NEST
When finished, we will see project References included the references those related to NEST.
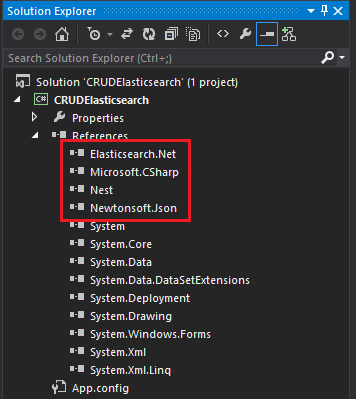
We are now ready to use the Elasticsearch NEST client regarding the development of our CRUD.
Connection String Setup
Connection To Elasticsearch can be done in two way:
- Single node connection
- Multiple node connection for fail over (Cluster address)
See the below code. Here you can see that code for both single and multiple node are written. (Note: Here we put connection string in a separate class "ConnectionToES.cs" and made that class as NEST's ElasticClient typed so that we can access endpoints available in Elasticsearch in other class file.)
public static  ElasticClient EsClient()
{
    ConnectionSettings connectionSettings;
    ElasticClient elasticClient;
    StaticConnectionPool connectionPool;

    //Connection string for Elasticsearch
    /*connectionSettings = new ConnectionSettings(new Uri("http://localhost:9200/")); //local PC
    elasticClient = new ElasticClient(connectionSettings);*/

    //Multiple node for fail over (cluster addresses)
    var nodes = new  Uri[]
    {
        new Uri("http://localhost:9200/"),
        //new Uri("Add server 2 address")   //Add cluster addresses here
        //new Uri("Add server 3 address")
    };

    connectionPool = new  StaticConnectionPool(nodes);
    connectionSettings = new  ConnectionSettings(connectionPool);
    elasticClient = new  ElasticClient(connectionSettings);

    return elasticClient;
}
For our demonstration in this project we are using Multiple node connection code block. (Note: User can change to single node connection string. Just comment one part and uncomment the other)
Code Structure
We need to define the response model of the fields datatype so that our program can recognize which field's data and data type we are getting after making a search query. Remember response model is important, without it data won't get retrieve.
class DocumentAttributes
{
    public string  id { get; set; }
    public string  name { get; set; }
    public string  original_voice_actor { get; set; }
    public string  animated_debut { get; set; }
}
Elasticsearch uses Query DSL based on JSON to define queries (more). So the LINQ query is used to retrieve document value is based on that. See a simple search query to get all data from document.
var response = ConnectionToES.EsClient().Search<DocumentAttributes>(s => s
                .Index("disney")
                .Type("character")
                .From(0)
                .Size(1000)
                .Query(q => q.MatchAll()));
Here you can see that the DocumentAttributes class that we created is set as the parameter in the Search<> API to hold the data that we get after running this query. The result we get from this query is also interesting. Because every result we get from this query is known as Hits in Elasticsearch a property of Search API. So, in order to show the result we need to loop through the Hits (search results) one of the property of "ElasticClient" that we declared above. So, it will be like this:
foreach (var hit in response.Hits)
{
   id = hit.Id.ToString();
   name = hit.Source.name.ToString();
   originalVoiceActor = hit.Source.original_voice_actor.ToString();
   animatedDebut = hit.Source.animated_debut.ToString();
}
That's it this is the main structure in C# for writing code for Elasticsearch.
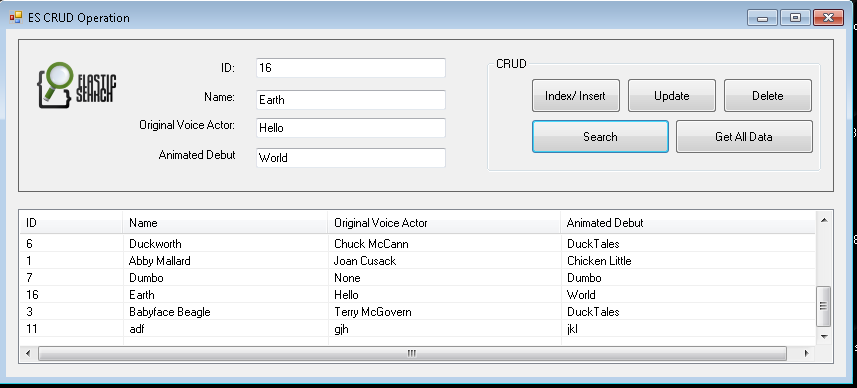
User Interface
Code Part
Here we will see in details about the code structure. We will define CRUD logic implementation in separate “CRUS.cs” file. To learn more about query API here.
Response Model
We need to define the response model of the fields datatype that are stored in Elasticsearch so that our program can recognize which field's data and data type we are getting after executing a query. Response model is important to determine the type response getting from API, without it our won't recognize what type of data we are getting. We will define document's fields type in separate “DocumentAttributes.cs” file.
class DocumentAttributes
{
    public string  id { get; set; }
    public string  name { get; set; }
    public string  original_voice_actor { get; set; }
    public string  animated_debut { get; set; }
}
1. Insert
In Elasticsearch insert is known as Indexing. As we know Elasticsearch uses Query DSL based on JSON to define queries. The LINQ query that is used to insert document data is based on that. That's why when we get data from user interface we need to create query object using C# anonymous type for inserting to ES. So we are creating annonymous type object that will format the data into JSON like.
var myJson = new
{
      name = tbxname,
      original_voice_actor = tbxOriginalVoiceActor,
      animated_debut = tbxAnimatedDebut
};
Now we pass this object with corresponding data to our Index API and insert them under given ID. (more)
var response = ConnectionToES.EsClient().Index(myJson, i => i
      .Index("disney")
      .Type("character")
      .Id(searchID)
      .Refresh());
Now our data is inserted. Here we are using Index API and defining the indices (database) and type (table) to insert typed JSON document (row) in a specific index. Also Index API can also be use to updates document.
2. Search
The search API allows to execute a search query and get back search hits that match the query. To perform search operation we need to define response model in Search<> API. Then we need to specify the Index and Type so that our program can search on that document. We can also specify a field in the document based on which the search query execute. Here we use Term query which finds documents that contain the exact term specified in the index. (more Term level queries) Search is simple as:
var response = ConnectionToES.EsClient().Search<DocumentAttributes>(s => s
      .Index("disney")
      .Type("character")
      .Query(q=>q.Term(t=>t.Field("_id").Value(searchID)))); //Search based on _id

foreach (var hit in response.Hits)
{
    id = hit.Id.ToString();
    name = hit.Source.name.ToString();
    originalVoiceActor = hit.Source.original_voice_actor.ToString();
    animatedDebut = hit.Source.animated_debut.ToString();
}
You might have noticed that the DocumentAttributes class that we created is set as the parameter in the Search<> API (more) to hold the data that we get after running this query. The result we get from this query is also interesting. Because every result we get from this query is known as Hits in Elasticsearch a property of Search API and we need to access the Hits to get our data. So, in order to show the result we need to loop through the Hits one of the property of NEST ElasticCleint that we declared above. So, the foreach loop is doing this task.
3. Update
The update API allows to update a document based on the information provided. The way to update a document is to retrieve it, change it, and then reindex the whole document. Note that the documents are immutable, meaning we cannot replace or change them directly, only replaced. That's why versioning is used to make sure no updates have happened during the "get" and "reindex". Elasticsearch delete the old document automatically and add a new document internally (more). Updating an indexed document can be done in three way:
- Update by Partial Document
- Update by Index Query
- Update by Script
Here we demonstrated Update by Partial Document and Update by Index Query. User can choose any of these from below. Just comment one part and uncomment another.
Update by Partial Document:
We need to refer the UpdateDocumentAttributes class into the Update<> API so that our program recognizes which field's data and the type of data we are updating using the update query.
class UpdateDocumentAttributes
{
   public string  id { get; set; }
   public string  name { get; set; }
   public string  original_voice_actor { get; set; }
   public string  animated_debut { get; set; }
}
Update code below:
var response = ConnectionToES.EsClient().Update<DocumentAttributes, UpdateDocumentAttributes>(searchID, d => d
      .Index("disney")
      .Type("character")
      .Doc(new UpdateDocumentAttributes
      {
         name = tbxname,
         original_voice_actor = tbxOriginalVoiceActor,
         animated_debut = tbxAnimatedDebut
      }));
As you can see that we are passing the response model in the Update<> API but there we are also passing another class. What does this class do? The update API also has a Update<T, K> variant, where T is the document type to update, and K is the partial document to merge (more). So we need to send a partial document with the fields that are going to be updated and UpdateDocumentAttributes response model has those fields.
Update by Index Query:
As discussed in the insert code we could also use the index api to update data in document as well. It first checks that if there is any document in the given id. If the id is available just update it and increment the version number. See the code below same as index query.
var myJson = new
{
   name = tbxname,
   original_voice_actor = tbxOriginalVoiceActor,
   animated_debut = tbxAnimatedDebut
};

var response = ConnectionToES.EsClient().Index(myJson, i => i
      .Index("disney")
      .Type("character")
      .Id(searchID)
      .Refresh());
When we update an existing document then elasticsearch internally marked delete the old document and create a new document.
4. Delete
The delete API allows to delete a typed JSON document from a specific index based on its id (more). The syntax for deleting a document follows the same pattern that we have seen already, but uses the DELETE method. See below code:
var response = ConnectionToES.EsClient().Delete<DocumentAttributes>(searchID, d => d
      .Index("disney")
      .Type("character"));
We are referring the response model class passing the id, index and type to delete data. Simple as is calling just delete.
Reference
- More about Elasticsearch visit website
- Elasticsearch Reference here
- Information about Query DSL here
- Elasticsearch Clients here
- Download Package Manager NEST NuGet
- Download Package Manager Elasticsearch.NET NuGet
- Elasticsearch.Net and NEST: the .NET clients here
- Elasticsearch.Net and NEST github repository here
- NEST implementation of the query DSL endpoints available in Elasticsearch here
- Official Resources and Training here
See Also
Download
You can download the Source Code used in the example from this link Download Source Code