Demystifying Azure ARM VNET Peering and using it with Azure ADDS
Background
In the last article, we have seen the details of Azure Active Directory Domain Services and we also saw how to set it up. As mentioned currently ADDS only supports classic virtual networks and so only machines provisioned in the classic virtual network can communicate to the Azure AD domain controller.
What if one wants to establish communication between ARM VMs and ADDS? Well, workarounds are always there, scenario above could be achieved through either of the solutions below
- Establish VNET to VNET connectivity between ARM VNET and ADDS classic VNET
- Use Azure VNET Peering between ARM VNET and ADDS classic VNET
(Note - this article assumes that you are aware of two different deployment models of Azure i.e. ASM and ARM if you are not then it is highly recommended that you go through this MSDN link before going through this article.)
Solution 1 is very well explained in the mentioned link. We will be mostly focusing on the other solution i.e. using Azure ARM VNET Peering concept which is currently is in Preview.
Before we move ahead and get into the real action of setting up peering between our classic VNET and new ARM VNET for our ARM VMs, let’s first understand the concept of peering and see some details of it.
VNET Peering Concept
Directory meaning of peering is a connection between two entities for communication and so now you can easily guess the meaning of VNET peering. VNET peering is a way of establishing a connection between two virtual networks so that resources provisioned in one VNET will be able to communicate to resources provisioned in other VNET by using their private IP addresses.
There are some pre-requisite to setup peering between any two VNETs
- Both VNETs should be provisioned in the same location, no matter what deployment model of Azure they follow.
- Both VNETs should not contain any overlapping IP addresses space
Once the networks peer, they appear as one network and all the VNET to VNET communication between both will happen over Azure internal network and not over the internet which could be a big plus for some of the organizations who does not want to take the risk of transferring data over the internet.

What are the possible ways to set up peering?
- Using Azure portal
- Using PowerShell
- Using ARM Templates
Which two VNETs can be peered?
- VNETs in same Azure subscription
- VNETs in different Azure subscriptions
VNET peering does not support cascading of networks i.e. suppose VNET A peers with VNET B which again is peered with VNET C then this does not mean that VNET A peers with VNET C.
All right with all this information, let’s go ahead with our scenario of creating ARM VM and joining it to the domain created in the previous article.
Hands-On
To create ARM VM, the pre-requisite is to have the VNET and that too deployed in resource manager mode.
In ARM mode, everything has to be created inside a resource group so we will also create our resource group and name it as ‘AlphaCorpRG’.
Next, create ARM VNET in the same location as that of our classic VNET i.e. AlphaCorpVNET which contains ADDS DNS. You can create this new network in advance before creating VM or choose new network creation option while creating VM.

Click ok and ARM VNET i.e. AlphaCorpARMVnet will be provisioned for you.
Next, create Windows Server 2012 R2 Data Center VM with the name ‘AlphaCorpARMVM1‘and keep it in newly created ARM VNET and resource group.
Let the wizard create VM’s new PIP and NSG.

Within few minutes, the ARM VM will be provisioned and ready.
Now let’s peer our ARM VNET with the classic VNET containing ADDS DNS address. To do that, browse to the ARM VNET which we just created and click on peerings option.

Currently, this VNET is not integrated with other VNETs through peering so we see no entry here, let’s add new peering connection by clicking on Add button at the top.
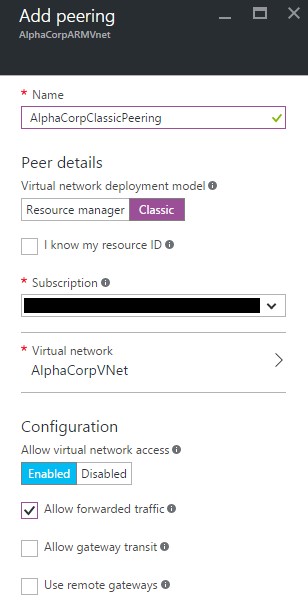
Give peering suitable name and choose the option whether your target network is based on ASM or ARM mode of deployment, for us we know that it is ASM so we have selected classic mode.
Next, select your target virtual network. Note that you will be only shown networks to select which are created in same region as of your source ARM VNET. We have selected our classic ‘AlphaCorpVNet’.
Now next is the configuration part, let’s see meaning of each setting in details.
- Allow Forwarded traffic – This allows communication of traffic from/to network virtual appliance in the peered network. Check it if you wish to enable transit routing.
- Allow gateway transit - This setting is to allow peer VNET to use VNET gateway, note that if you select this option then peer VNET cannot have its own gateway.
- Use Remote gateway – Select this if your VNET needs to access peered VNETs gateway.
Once the peering is done successfully, we will try to log in to ARM VM which is in ARM VNET and will try to bring it on Azure AD domain.
Browse to the VM’s NIC and configure DNS server address by selecting custom DNS option.

Save it and restart the virtual machine from the portal.
(Please note that procedure to bring VM on domain remains the same which we have already seen in the last article so this article will not be explaining it again here but just for some understanding will keep it short with few screenshots).
After logging in to ARM VM, open server manager > select local server node from left > click on the workgroup and select change.
Enter domain name as ‘alphacorpinc.onmicrosoft.com’ and you will be asked for domain credentials.

Enter credentials of the user which we added in AAD DC Administrators group.
After entering valid credentials, ARM VM will be joined to the domain and you should see message like this

Once the VM is restarted, you should be able to log in to ARM VM using Azure AD credentials.
Pricing
Currently, VNET Peering feature is in Preview so currently there are no charges for its usage.
References
This article was originally published at Demystifying Azure ARM VNET Peering And Using It With Azure ADDS. This link is external to TechNet Wiki. It will open in a new window. Please feel free to improve this article by adding new missing or important content, fix spell and so on.