Fetching User Profile Information using the SharePoint Framework Client Side Webpart
Introduction
Microsoft made some major announcements on May 2016 regarding the “Future of SharePoint”. This announcement brings a whole lot of new things into the picture around the modern team sites, new publishing pages, new UI for list and libraries, new home page for the sites etc. As a developer, one of the biggest change amongst these new changes is a new development model called the SharePoint Framework. Our focus on this article will be to do some deep dive into this new development model and use it to build a sample client side webpart.
What is SharePoint Framework?
As per Microsoft, “The SharePoint Framework is a page and web model that provides full support for client-side SharePoint development, easy integration with SharePoint data, and support for open source tooling. With SharePoint Framework, you can use modern web technologies and tools in your preferred development environment to build productive experiences and apps that are responsive and mobile-ready from day one. The SharePoint Framework works for SharePoint on-premises and SharePoint Online.”
SharePoint Framework is a new modern and improved development model announced by Microsoft. It is a model that is solely focused on client side development. This new model is pure JavaScript based. This allows developers to use modern JavaScript and web template frameworks to build applications. We don’t even require a SharePoint server to preview our customization. We have the SharePoint Workbench that provides us a test environment on our desktop itself.
With the release of the first developer preview for the SharePoint Framework on August 18, 2016, we can actually do some research and get our hands dirty as to see what this new framework brings for us.
Technologies/Tools/Concepts
We will be making use of the following key concepts/technologies.
- React - The JavaScript Framework
- Yeoman – A scaffolding tool to generate project structure
- Gulp – Build Process task runner
- Workbench – Offline testing environment
- Node.JS – Open Source Cross platform JavaScript based runtime environment
- NPM - Package Manager for JavaScript. This is equivalent to NuGet.
- TypeScript – Superset of JavaScript that compiles into JavaScript. Will be used to build our application.
- Visual Studio Code – Lightweight source code editor.
- Office UI Fabric and React Components for Office UI Fabric
Environment Setup
In order to start working with SharePoint Framework to build client side webparts, you need to follow the steps at the link below to set up the environment.
Having done that we are good to go and start with the actual implementation
Note : The SharePoint Framework is currently in preview and is subject to change.
Scenario
In this article, we will create a client side webpart using SharePoint framework which will fetch the user profile information and display it on the webpart in a contact card like fashion. We will make use of the technology and tool stack listed above to accomplish this.
Implementation
We will first create a new project directory. We will add one at the following location.


Next, we navigate to the project directory.

After that, we make use of Yeoman SharePoint Generator to create a UserProfile webpart. This is a very important step as at the end of this you will see that an entire project structure is ready for you to use. We run the following command from the command prompt.

On running the above command we are presented with the below screen where we can do some sort of configurations for the project. It asks us what should be the name of the solution, where do we want to create the files, what should be the name of the webpart, provide any description to the same and also it asks us to select the framework that we want to use. We can select from the options listed as in the screenshot below.
I have not worked on React in the past so I am selecting React to learn and play around with it.

After you make the selections and press enter, lot of things happen to create the project structure and load the dependencies. It takes some time and if everything works fine then you will be presented with the below screen stating that the solution is ready.

Now let us navigate to the solution and explore what files got created. We will use Visual Studio Code in order to work on these files. In order to directly open the solution in Visual Studio Code from our command prompt simply run the below command. It will open up your solution inside of the Visual Studio Code.

Below is the screenshot of how the solution will look inside of the Visual Studio Code.

Let us explore the files. Navigate to the src > webparts >userProfile and open up "UserProfileWebPart.ts" file. This is how your default webpart file will look.

Let us run this default code in “workbench”. As we know that running a code in workbench does not require a SharePoint environment so we can go ahead and test it.
In order to test it in workbench we will run the command “gulp serve” from the command line.

As a result a gulp task named “serve” will be executed.

It will open a browser window with the workbench page. The URL is shown in the screen above.

Now let us add our client webpart on this page.


If we navigate to the below file we will see the html that gets rendered in the screen above.

Now, let us actually start writing the code to fetch the user profile information. The biggest challenge that comes here is to understand how to start writing the code and what code goes to what file. SharePoint Framework is a new development model and any new model initially involves some learning curve.
I am new to this development model and most of these things are new to me so there might be some code pieces which are buggy and can be replaced with better code. Please feel free to update the code or leave comments wherever appropriate.
Let us first add an interface which will have the list of properties that we want to show for the user. Let us call it “IUserProfile.ts”

Add the following piece of code. If you want to fetch any additional attribute for the user, you can update the code accordingly.
export interface  IUserProfile {
  firstName: string;
  lastName: string;
  UserProfileProperties: Array<any>;
  Email: string;
  WorkPhone: string;
  DisplayName: string;
  Department: string;
  PictureURL: string;
  Title: string;
}
Update the “IUserProfileWebPartProps.ts” file to include the following code. We will be using the current logged in user’s username to fetch the profile information.
import { IWebPartContext } from '@microsoft/sp-client-preview';

export interface  IUserProfileWebPartProps {
  description: string;
  userLoginName: string;
  context: IWebPartContext;
}
Next, we need to update the “UserProfileWebPart.ts” file to include the changes that we did above. If we look at the code below, in the render method, we are setting the value for the userLoginName as the current logged in user.
public render(): void {
    const element: React.ReactElement<IUserProfileProps> = React.createElement(UserProfile, {
      description: this.properties.description,
      userLoginName: encodeURIComponent('i:0#.f|membership|' + this.context.pageContext.user.loginName),
      context: this.context
    });

    ReactDom.render(element, this.domElement);
  }
Now, let us add a file named “UserProfileService.ts” where we will write logic to make a call to SharePoint User Profile API to fetch user profile properties.

Add the following code.
import { IUserProfile } from './IUserProfile.ts';
import { IWebPartContext } from '@microsoft/sp-client-preview';
import { IUserProfileProps } from './components/UserProfile';

interface IUserProfileService {
  getUserProfileProperties: Promise<IUserProfile>;
  webAbsoluteUrl: string;
  userLoginName: string;
  context: IWebPartContext;
}

export class  UserProfileService {

  private context: IWebPartContext;
  private props: IUserProfileProps;

  constructor(_props: IUserProfileProps) {
    this.props = _props;
    this.context = _props.context;
  }

  public getUserProfileProperties(): Promise<IUserProfile> {

      return this.context.httpClient.get(`${this.context.pageContext.web.absoluteUrl}/_api/SP.UserProfiles.PeopleManager/
      getmyproperties`).then((response: Response) => {

        return response.json();
      });
  }
}
If we look at the code above, we have created a class named “UserProfileService”. In this class, we have created a method named “getUserProfileProperties”. This method makes the call to the SharePoint User Profile API to fetch the profile properties for the logged in user. This method returns a promise.
Now, with the service class ready to fetch the properties, we now need to write the logic where these properties will be rendered.
If you recall, initially in the workbench we were able to render some default sample HTML. We will be updating the same HTML to include the profile properties.
In order to do that, let us jump into the "UserProfile.tsx" file located under the components section and locate the render method.
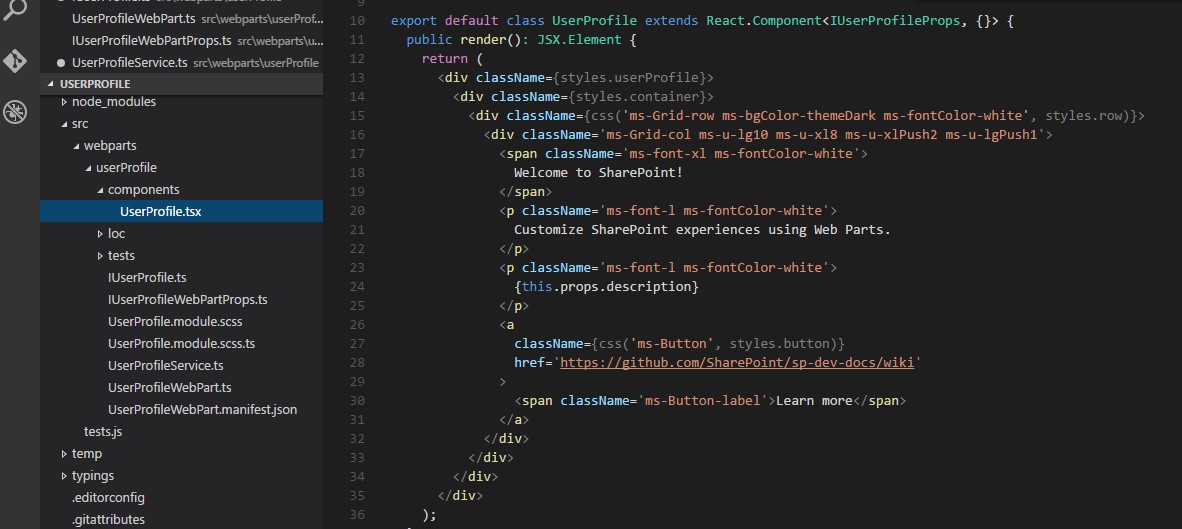
We need to update this method with the html that we want to have to include the user profile properties. Also as we mentioned earlier, we will be making use of react components for office ui fabric to render our html. We will make use of PersonaCard component to render a card like html for our user.
Let us first create an interface that will hold all the attributes that we want to use in our html. We don’t have to create a separate file for this interface and can simply use the .tsx file to store the interface definition.
export interface  IUserProfileWebPartState {

  firstName?: string;
  lastname?: string;
  userProfileProperties?: any[];
  isFirstName?: boolean;
  isLastName?: boolean;
  email?: string;
  isWorkPhone?: boolean;
  isDepartment?: boolean;
  displayName?: string;
  pictureUrl?: string;
  workPhone?: string;
  department?: string;
  isPictureUrl?: boolean;
  title?: string;
  office?: string;
  isOffice?: boolean;
}
Now, we need to implement this interface in our class “UserProfile”. Firstly we will extend the class to inherit from this interface and set the default values in the constructor.
export default  class UserProfile extends React.Component<IUserProfileProps, IUserProfileWebPartState> {

  constructor(props: IUserProfileProps) {
    super(props);
    this.state = {
      firstName: "",
      lastname: "",
      userProfileProperties: [],
      isFirstName: false,
      isLastName: false,
      email: "",
      workPhone: "",
      department: "",
      pictureUrl: "",
      isPictureUrl: false,
      title: "",
      office: "",
      isOffice: false
    };
  }
Next, we need to set these values. If you recall we have written a “getUserProfileProperties” method in our UserProfileService file. We will make a call to this method which in turn will make REST call to SharePoint User Profile service to fetch the user attributes.
So let us jump into the code to fetch the user profile properties.
private _getProperties(): void {

    const userProfileService: UserProfileService = new UserProfileService(this.props);

    userProfileService.getUserProfileProperties().then((response) => {

      this.setState({ userProfileProperties: response.UserProfileProperties });
      this.setState({ email: response.Email });
      this.setState({ displayName: response.DisplayName });
      this.setState({ title: response.Title });

      for (let i: number = 0; i < this.state.userProfileProperties.length; i++) {

        if (this.state.isFirstName == false  || this.state.isLastName == false  || this.state.isDepartment == false  || this.state.isWorkPhone == false  || this.state.isPictureUrl == false  || this.state.isOffice == false) {

          if (this.state.userProfileProperties[i].Key == "FirstName") {
            this.state.isFirstName = true;
            this.setState({ firstName: this.state.userProfileProperties[i].Value });
          }
          if (this.state.userProfileProperties[i].Key == "LastName") {
            this.state.isLastName = true;
            this.setState({ lastname: this.state.userProfileProperties[i].Value });
          }
          if (this.state.userProfileProperties[i].Key == "WorkPhone") {
            this.state.isWorkPhone = true;
            this.setState({ workPhone: this.state.userProfileProperties[i].Value });
          }
          if (this.state.userProfileProperties[i].Key == "Department") {
            this.state.isDepartment = true;
            this.setState({ department: this.state.userProfileProperties[i].Value });
          }
          if (this.state.userProfileProperties[i].Key == "Office") {
            this.state.isOffice = true;
            this.setState({ office: this.state.userProfileProperties[i].Value });
          }
          if (this.state.userProfileProperties[i].Key == "PictureURL") {
            this.state.isPictureUrl = true;
            this.setState({ pictureUrl: this.state.userProfileProperties[i].Value });
          }

        }

      }


    });

  }
We will make use of the following method to call the above function.
public componentDidMount(): void {

    this._getProperties();
  }
Also, include the below code to include jquery and javascript reference.
public componentWillMount(): void {

    ModuleLoader.loadScript('https://code.jquery.com/jquery-2.1.1.min.js', 'jQuery').then(($: any): void  => {

      ModuleLoader.loadScript('https://<your_sharepoint _tenant>.sharepoint.com/sites/dev/Shared%20Documents/personacard.js', 'jQuery').then((): void  => {

      });
    });

  }
With all this in place, let us dive into the render method.
public render(): JSX.Element {
    return (
      <div className={css('ms-PersonaCard')}>
                <div className={css('ms-PersonaCard-persona')}>
                  <div className={css('ms-Persona ms-Persona--xl')}>
                    <div className={css('ms-Persona-imageArea')}>
                      <div className={css('ms-Persona-imageCircle')}>
                        <img className={css('ms-Persona-image')} src={this.state.pictureUrl}></img>
                      </div>

                    </div>
                    <div className={css('ms-Persona-details')}>
                      <div className={css('ms-Persona-primaryText')} title={this.state.displayName}>{this.state.displayName}</div>
                      <div className={css('ms-Persona-secondaryText')}>{this.state.title}</div>
                      <div className={css('ms-Persona-tertiaryText')}>{this.state.office}</div>
                    </div>
                  </div>
                </div>
                <ul className={css('ms-PersonaCard-actions')}>
                  <li id="chat" className={css('ms-PersonaCard-action is-active')}><i className={css('ms-Icon ms-Icon--chat')}></i></li>
                  <li id="phone" className={css('ms-PersonaCard-action')}><i className={css('ms-Icon ms-Icon--phone')}></i></li>
                  <li id="video" className={css('ms-PersonaCard-action')}><i className={css('ms-Icon ms-Icon--video')}></i></li>
                  <li id="mail" className={css('ms-PersonaCard-action')}><i className={css('ms-Icon ms-Icon--mail')}></i></li>
                </ul>
                <div className={css('ms-PersonaCard-actionDetailBox')}>
                  <ul id="detailList" className={css('ms-PersonaCard-detailChat')}>
                    <li id="chat" className={css('ms-PersonaCard-actionDetails detail-1')}>
                      <div className={css('ms-PersonaCard-detailLine')}><span className={css('ms-PersonaCard-detailLabel')}>Skype: </span> <a className={css('ms-Link')} href="#">Start an IM chat</a></div>
                    </li>
                    <li id="phone" className={css('ms-PersonaCard-actionDetails detail-2')}>

                      <div className={css('ms-PersonaCard-detailLine')}><span className={css('ms-PersonaCard-detailLabel')}>Work: </span>{this.state.workPhone}</div>
                    </li>
                    <li id="video" className={css('ms-PersonaCard-actionDetails detail-3')}>
                      <div className={css('ms-PersonaCard-detailLine')}><span className={css('ms-PersonaCard-detailLabel')}>Skype: </span> <a className={css('ms-Link')} href="#">Start a video call</a></div>
                    </li>
                    <li id="mail" className={css('ms-PersonaCard-actionDetails detail-4')}>

                      <div className={css('ms-PersonaCard-detailLine')}><span className={css('ms-PersonaCard-detailLabel')}>Work: </span> <a className={css('ms-Link')} href="mailto:{this.state.email}">{this.state.email}</a></div>
                    </li>
                  </ul>
                </div>
              </div>
    );
  }
In the above code snippet, we have made use of the styles from the Office UI Fabric PersonaCard component. You can find more details on this from the reference section.
In the above code snippet we have made use of the {this.state.<propertyname>} tags to fetch the value.
Next, we will load the css file for the office fabric ui. In order to do this, navigate to the "UserProfileWebPart.ts" file. Locate the class for "UserProfileWebPart" and in the constructor of the class, add the following code to load your css files.
public constructor(context: IWebPartContext) {
    super(context);
    ModuleLoader.loadCss('https://appsforoffice.microsoft.com/fabric/2.0.1/fabric.min.css');
    ModuleLoader.loadCss('https://appsforoffice.microsoft.com/fabric/2.0.1/fabric.components.min.css');

 }
After this again do a gulp serve.

The error stating that missing combokeys module. To fix this run the following command
“tsd install combokeys --savedev”

For the other error regarding unused variable “styles” simply navigate to the “UserProfile.tsx” file and comment out
import styles from '../UserProfile.module.scss';
Do a gulp serve again
It will run successfully and open the workbench again. Follow the steps that you did earlier to add the UserProfile webpart to the page. You will get the below screen.
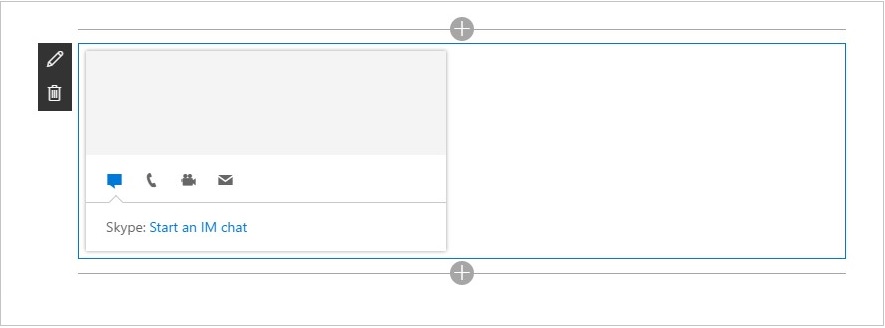
Please note that the above look and feel we were able to achieve using the office ui fabric Persona Card component.
Next, we will upload the package to the App Catalog.
For creating the package run the gulp package-solution command.
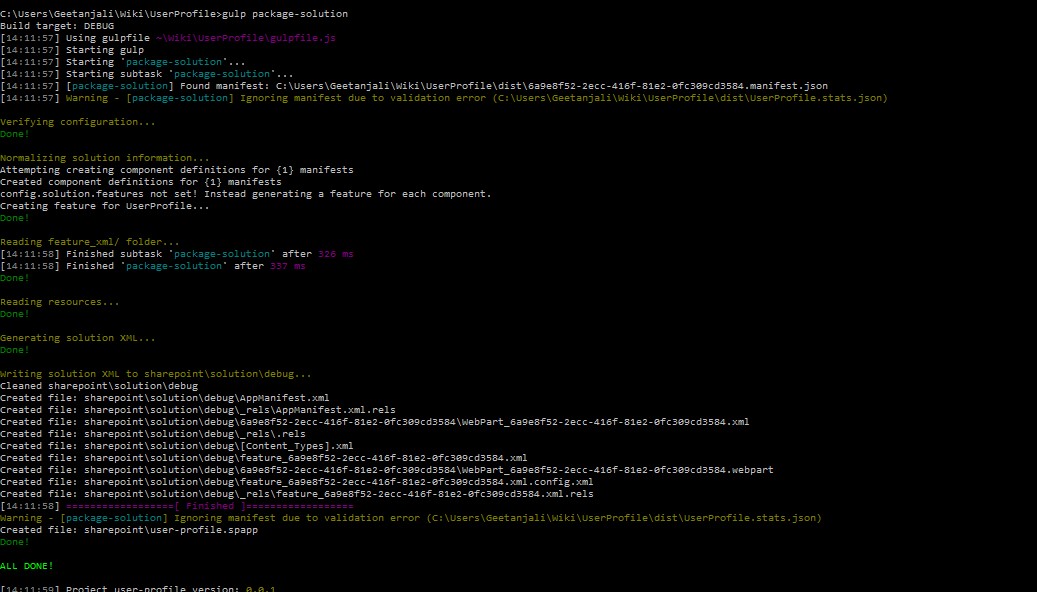
Once the package is created, navigate to the App Catalog site and upload the “.spapp” file. You can find that inside the SharePoint folder of your client side webpart.

After you have deployed the file to the App Catalog site, navigate to your developer site collection.
Go to site contents > Add an App and search for your client side webpart there.
Add your client webpart.

Now create any page on the site and add your client webpart on that page. You can find your webpart in the Custom group.
After that in your command line run gulp serve --nobrowser command.

Navigate back to the page where you have added the client side webpart. You will see the webpart rendered like below.
It is making use of Persona Card Office UI Component to render its look and feel. The values of these properties are coming from the User Profile.

Click on each icon to see the respective values.


Conclusion
A lot of new things are coming into the picture with the announcements made by Microsoft about the "Future of SharePoint". We have a new development model i.e. the SharePoint Framework which is solely focused on client side development. In this article, we used Yeoman SharePoint generator to create a project structure. We used React as a framework for writing the code inside of Visual Studio Code. We saw how we can create a simple SharePoint Framework client side webpart and make use of the SharePoint Workbench for our initial level of testing or preview. We also saw how we can add this client webpart to SharePoint page and test it.
In the nutshell, SharePoint Framework is a new modern and improved development model announced by Microsoft. This new model is pure JavaScript based. This allows developers to use modern JavaScript and web template frameworks to build applications.
References
- http://dev.office.com/sharepoint/docs/spfx/sharepoint-framework-overview
- https://github.com/SharePoint/sp-dev-docs/wiki
- https://blogs.technet.microsoft.com/stefan_gossner/2016/05/04/sharepoint-developer-announcement-the-sharepoint-framework-an-open-and-connected-platform/
- https://channel9.msdn.com/blogs/OfficeDevPnP/PnP-Web-Cast-Getting-started-with-SharePoint-Framework
Gallery
You can download the entire solution from the TechNet Gallery at https://gallery.technet.microsoft.com/Fetching-User-Profile-66ee57e4