Getting Started with ASP.NET Core, EF Core using SQL Server on Windows
In this article, we will discuss how we can develop the user management application using ASP.Net Core with Entity Framework Core in Windows.
In this article, we will discuss in detail steps:
- Setting up the Environment (or) Prerequisite
- Create an ASP.NET Core Web Application on Windows
- How to install the Entity Framework Core
- How to add Entity Framework Core package to project.json file
- Create a model class
- How to register your context with dependency injection
- How to create our database
- How to create our controller
- How to create view
- How to run the user management application
Prerequisite
- Visual Studio 2015
- .NET Core 1.0
You want to download and install the free community edition of Visual Studio 2015. You can download from the Visual Studio. Furthermore, you can download .NET Core 1.0 for windows platform from .Net website.
Create an ASP.NET Core Web Application on Windows
Open Visual Studio 2015. Go to File menu, point to new and click new project. New Project Window will open, you can select an installed template like “.NET Core” in Visual C# Template and then select the Asp.Net Core Web Application (.NET Core) and type Project Name ASP.NETCoreWithEFCore. Choose the project location path and click OK button.

You can select a template “Web Application” and click OK button

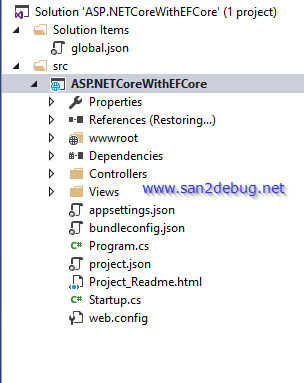
Now, you can see ASP.NETCoreWithEFCore project structure, as shown in the screenshot, given below
How to install the Entity Framework Core
We are going to use EF Core and install the package for the database provider from NuGet Package Manager Console in Visual Studio 2015. We will see in detail how to install EF Core for SQL Server database using the command as below steps.
- Go to Visual Studio Tools, point to NuGet Package Manager and then click Package Manager Console menu
- After sometimes, Successfully Package Console Manager which is ready
- Type Install-Package Microsoft.EntityFrameworkCore.SqlServer and Enter
- After sometimes, Successfully installed Microsoft.EntityFrameworkCore.Sqlserver 1.0.1 Then, we have to wait sometimes for restoring the packages.

- Type Install-Package Microsoft.EntityFrameworkCore.Tools –Pre and Enter
- After sometimes, Successfully installed Microsoft.EntityFrameworkCore.Tool 1.0.0-preview2-final. Then, we have to wait sometimes for restoring the packages.

How to add Entity Framework Core package to project.json file
Now, you can see in detail how to configure the entity framework core package in project.json file.
- Go to Solution Explorer and then open project.json file
- Now you can verify the tools section whether if already entity framework core package configured or not and if it is not configured the particular package.
- Now you can add the “Microsoft.EntityFrameworkCore.Tools”: “1.0.0-preview2-final”

Create a model class
We have to create a models folder in the project. After, you can add the model class and context class under a models folder as below given steps.
Go to the Models folder, right-click the Models folder and point to Add, followed by clicking the Class. You can select a class and type class name as UserContext and click Add button.
Similarly, you can add User and Role classes under the Models folder in project
User.cs
using System;
using System.Collections.Generic;

namespace ASP.NETCoreWithEFCore.Models
{
    public class User
    {
        public int UserId { get; set; }
        public string Name { get; set; }
        public string Location { get; set; }

        public List<Role> Roles { get; set; }
    }
}
Role.cs
using System;

namespace ASP.NETCoreWithEFCore.Models
{
    public class Role
    {
        public int RoleId { get; set; }
        public RoleType RoleTyp { get; set; }

        public int UserId { get; set; }
        public User User { get; set; }
    }

    public enum RoleType
    {
        Admin,
        User
    }
}
UserContext.cs
using System;
using Microsoft.EntityFrameworkCore;

namespace ASP.NETCoreWithEFCore.Models
{
    public class UserContext:DbContext
    {
        public UserContext(DbContextOptions<UserContext> dbcontextoption)
            :base(dbcontextoption)
        { }

        public DbSet<User> Users { get; set; }
        public DbSet<Role> Roles { get; set; }
    }
}
How to register our context class with dependency injection
You can see in detail how to register our context class with dependency injection running application startup in the startup class.
- Go to Solution Explorer, Open Startup.cs class and add following namespaces and register context class
Startup.cs
using Microsoft.AspNetCore.Builder;
using Microsoft.AspNetCore.Hosting;
using Microsoft.Extensions.Configuration;
using Microsoft.Extensions.DependencyInjection;
using Microsoft.Extensions.Logging;
using ASP.NETCoreWithEFCore.Models;
using Microsoft.EntityFrameworkCore;

namespace ASP.NETCoreWithEFCore
{
    public class Startup
    {
        public Startup(IHostingEnvironment env)
        {
            var builder = new ConfigurationBuilder()
                .SetBasePath(env.ContentRootPath)
                .AddJsonFile("appsettings.json", optional: true, reloadOnChange: true)
                .AddJsonFile($"appsettings.{env.EnvironmentName}.json", optional: true)
                .AddEnvironmentVariables();

            if (env.IsDevelopment())
            {
                // This will push telemetry data through Application Insights pipeline faster, allowing you to view results immediately.
                builder.AddApplicationInsightsSettings(developerMode: true);
            }
            Configuration = builder.Build();
        }

        public IConfigurationRoot Configuration { get; }

        // This method gets called by the runtime. Use this method to add services to the container.
        public void ConfigureServices(IServiceCollection services)
        {
            // Add framework services.
            services.AddApplicationInsightsTelemetry(Configuration);
            services.AddMvc();

            var sqlconnection = @"Server=DESKTOP-2MS3DR5\SANLAB;Database=Lab;userid=sa;password=;";
            services.AddDbContext<UserContext>(dbcontextoption => dbcontextoption.UseSqlServer(sqlconnection));
        }

        // This method gets called by the runtime. Use this method to configure the HTTP request pipeline.
        public void Configure(IApplicationBuilder app, IHostingEnvironment env, ILoggerFactory loggerFactory)
        {
            loggerFactory.AddConsole(Configuration.GetSection("Logging"));
            loggerFactory.AddDebug();

            app.UseApplicationInsightsRequestTelemetry();

            if (env.IsDevelopment())
            {
                app.UseDeveloperExceptionPage();
                app.UseBrowserLink();
            }
            else
            {
                app.UseExceptionHandler("/Home/Error");
            }

            app.UseApplicationInsightsExceptionTelemetry();

            app.UseStaticFiles();

            app.UseMvc(routes =>
            {
                routes.MapRoute(
                    name: "default",
                    template: "{controller=Home}/{action=Index}/{id?}");
            });
        }
    }
}
How to create our database
We are going to create our database and create the tables for our models.
- Go to Visual Studio Tools, point to NuGet Package Manager and then click Package Manager Console menu
- After sometimes, Successfully Package Console Manager which is ready
- Type Add-Migration MyFirstMigration and Enter

If you have received an error like “the term ‘Add-Migration’ is not recognized as the name of a cmdlet, then close and reopen the visual studio.
- Type Update-Database and Enter

**How to create our controller **
Go to the Controllers folder, right-click the Controllers folder and point to Add, followed by clicking the New Item. You can select an MVC Controller class and type class name as UserController and click Add button.
UserController.cs
using Microsoft.AspNetCore.Mvc;
using ASP.NETCoreWithEFCore.Models;
using System.Linq;
// For more information on enabling MVC for empty projects, visit http://go.microsoft.com/fwlink/?LinkID=397860

namespace ASP.NETCoreWithEFCore.Controllers
{
    public class UserController : Controller
    {
        private UserContext usercontext;

        public UserController(UserContext context)
        {
            usercontext = context;
        }


        // GET: /<controller>/
        public IActionResult Index()
        {
            return View(usercontext.Users.ToList());
        }

        public IActionResult Create()
        {
            return View();
        }

        [HttpPost]
        [ValidateAntiForgeryToken]
        public IActionResult Create(User user)
        {
            if (ModelState.IsValid)
            {
                usercontext.Users.Add(user);
                usercontext.SaveChanges();
                return RedirectToAction("Index");
            }
            return View(user);
        }
    }
}
How to create view
We have to create a user folder in Views folder. After, you can add the view page under the views folder as below given steps.
Go to the User folder, right-click the User folder and point to Add, followed by clicking the New Item. You can select an MVC View page and type file name as Index and click Add button.
**Index.cshtml
**
@model IEnumerable<ASP.NETCoreWithEFCore.Models.User>

@{
    ViewBag.Title = "User Page";
}

<h2 class="panel-heading">User Dashboard</h2>

<p>
    <a asp-controller="User" asp-action="Create">New User</a>
</p>

<table class="table table-responsive">
    <tr>
        <th>User Id</th>
        <th>Name</th>
        <th>Location</th>
    </tr>
    @foreach (var item in Model)
    {
        <tr>
            <td>
               @Html.DisplayFor(modelItem=> item.UserId)
            </td>
            <td>
                @Html.DisplayFor(modelItem => item.Name)
            </td>
            <td>
                @Html.DisplayFor(modelItem => item.Location)
            </td>
        </tr>
    }

</table>
Go to the User folder, right-click the User folder and point to Add, followed by clicking the New Item. You can select an MVC View page and type file name as Create and click Add button.
Create.cshtml
@model ASP.NETCoreWithEFCore.Models.User

@{
    ViewBag.Title = "New User";
}

<h2>@ViewData["Title"]</h2>

<form asp-controller="User" asp-action="Create" method="post" class="form-horizontal" role="form">
    <div class="form-horizontal">
        <div asp-validation-summary="All" class="text-danger"></div>
        <div class="form-group">
            <label asp-for="Name" class="col-md-2 control-label"></label>
            <div class="col-md-10">
                <input asp-for="Name" class="form-control" />
                <span asp-validation-for="Name" class="text-danger"></span>
            </div>
        </div>
        <div class="form-group">
        <label asp-for="Location" class="col-md-2 control-label"></label>
        <div class="col-md-10">
            <input asp-for="Location" class="form-control" />
            <span asp-validation-for="Location" class="text-danger"></span>
        </div>
    </div>

    <div class="form-group">
        <div class="col-md-offset-2 col-md-10">
            <input type="submit" value="Create" class="btn btn-default" />
        </div>
    </div>
 </div>

</form>
How to Run the User Management application
You can now run the user management application and it will build and open in the browser.


Reference
Conclusion
We hope you understood developing the ASP.Net Core Web application using EF Core on Windows and run on it. We have covered all the required things. If you find anything that we missed in this article, please let me know. Please share your valuable feedback or suggestions.