Consuming Microsoft ASP.NET Webhooks Receivers
Download complete application: Bitbucket Activity Dashboard
Introduction
We will create an application which will listen to our BitBucket repository to get notifications. Our application will then:
- Receive notification using handler class
- Store received data
- Display data using Web API
Previous write-ups
There is a series of articles on Microsoft ASP.NET WebHooks. I recommend go-through all previous write-ups:
Prerequisite
Before continuing with the sample application, we will discuss the required prerequisites:
- Basic knowledge of ASP.NET Webhooks (including WebHook receivers, Handlers etc.)
- Visual Studio 2015
- Basic knowledge of MVC5 , WebAPI, JQuery
- SQL Server 2008 R2 or later
- A valid Azure subscription
- Basic knowledge of AngularJS
- Basic knowledge of Bootstrap
- Basic knowledge of Entity Framework
Application : Architecture and Design
In this section we will discuss the architecture and design of the application How our application will interact with BitBucket repository and what technologies/frameworks we are going to use in this application.
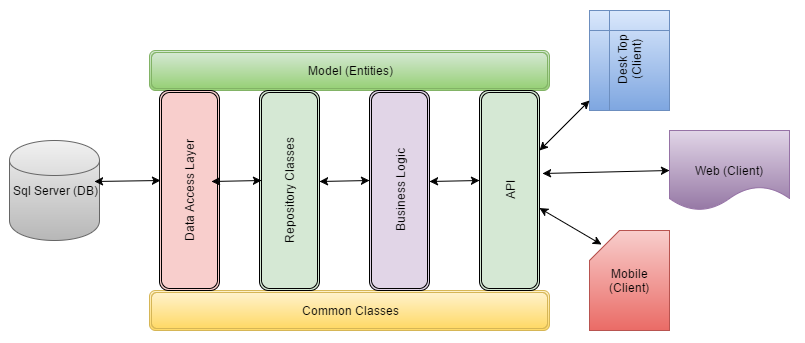
Preceding image is showing an overview of our application. Our main application will contain Restfull APIs (Web API) and will be hosted on Azure as App Services. This API application will talk with SQL Server Database hosted on Azure itself. These APIs can then be consumed by any client (Desktop, Web or Mobile).
"In this sample, we are only going to develop Web Client using AngularJS."
Let's discuss architecture (shown in preceding image) in details. We can divide preceding image into three parts:
Database
This part of the application is important to persist all the application activities. Here we will be using SQL Server database hosted on Azure. Furthermore, our Database will be:
- Named: Activity (you can choose name of your choice)
- Having Table : ActivityModel (you can choose name of your choice)
Database will be used to persist and retrieve all data, received from Bitbucket repository.
API
This is the main part of our application. To make it simple and more flexible we are using WebAPI2.0 and it is further divided into
- Data Access Layer
- Business Layer
- Repository classes
- Common classes
- Model entities
User Interface (UI )
This part represents a client application which will be consuming these APIs. Our client can be one of the following:
- Desktop application
- Web Application
- Mobile Application
To make our sample application simple, we will create a Web Application using MVC5 and AngularJS.
Creating the Sample Application
In the previous post, we created a sample application of BitbucketWebHook Receiver, where we discussed how our WebHook receiver receives the data from Bitbucket repository. Scope for that application was just to showcase that the data was finally received.
In this section, we will discuss all the steps required to create a production application and take it one step further.
New Web application
In order to get started with this application just create a simple WebAPI project using Visual Studio. You can also refer to the previous post for this part of creating WebAPI project.
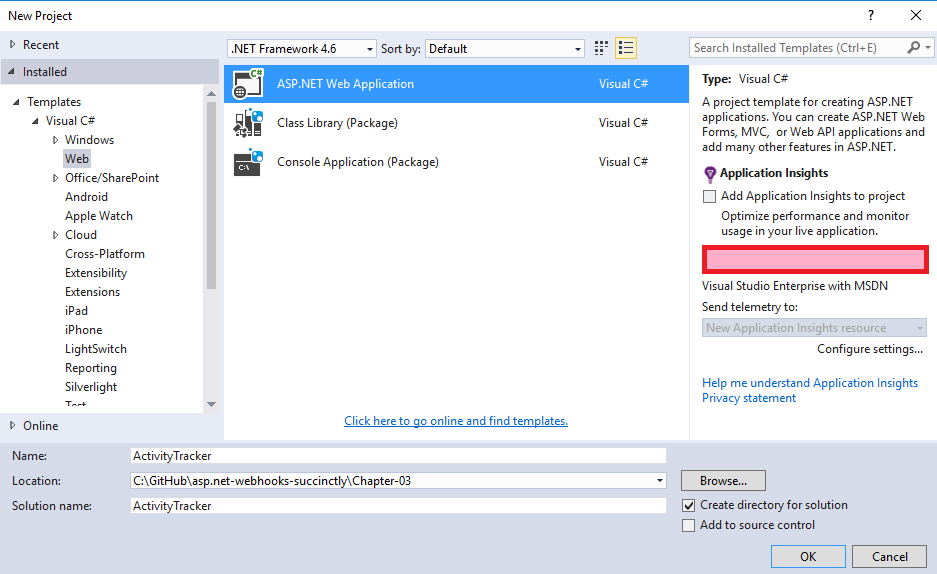
We will name our new project as ‘ActivityTracker’, select a location and provide a suitable Solution name. Click Ok once done with this.
Select Template
From next screen, select an empty template and check Web API checkbox.
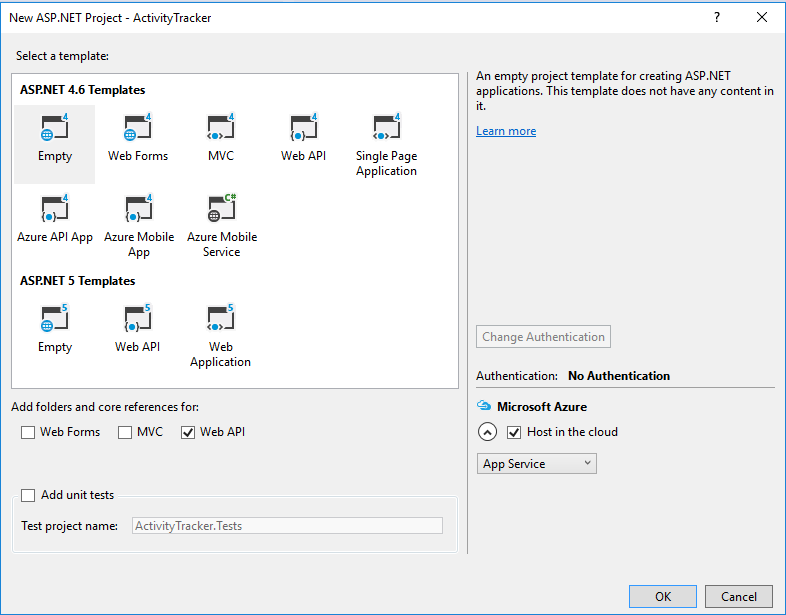
As we will be deploying this app to Azure, it’s good if you check the option ‘Host in the cloud’ under ‘Microsoft Azure’ section. If you select this option, you will be get prompted to select an Azure App name and location. Please follow all the steps. You can just click on cancel if you don’t want to do this at the moment (we can publish it later).
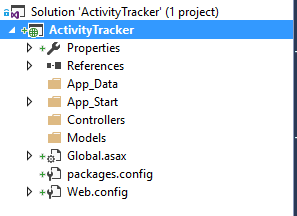
Visual studio will create an empty project and it looks like as shown in preceding image.
Adding support of BitBucket Webhook receiver
We have created an empty project and now we need to add support for our Bibucket WebHook receiver to start collecting the data sent by Bitbucket.
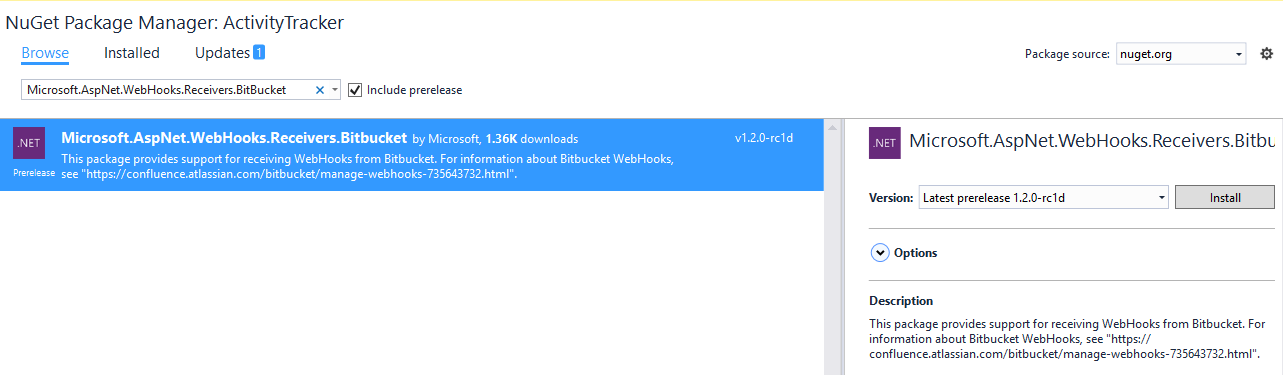
Open Nuget Package Manager and under ‘Browse’ tab enter Microsoft.AspNet.WebHooks.Receivers.BitBucket. Do not forget to check ‘Include prerelease’ option and then install the NuGet package.
Adding Entity Framework support
We are using Entity Framework to support our persistence models. Now, in NuGet Package Manage dialog enter ‘EntityFramework’ do not forget to uncheck option ‘Include prerelease’.
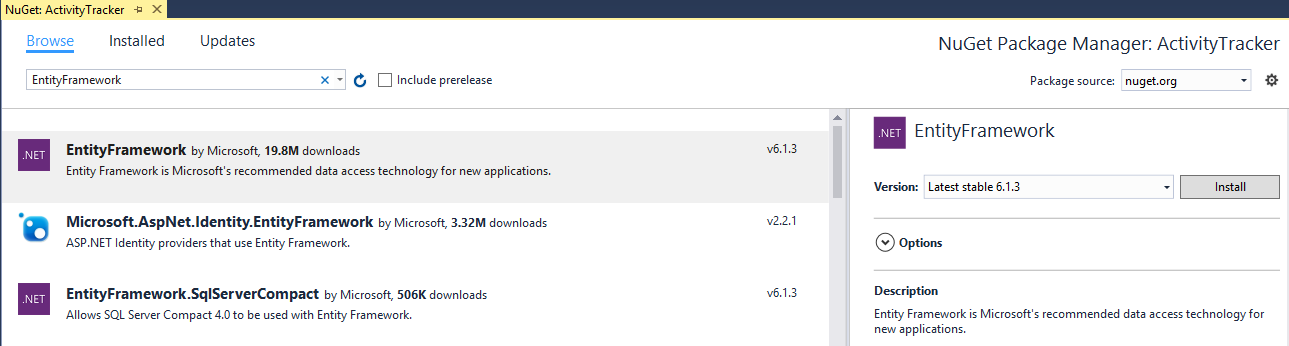
Click on install and it will install EF6.1.3 to the project.
Now we are ready to write our code as we have met all basic framework requirements for our project.
*We created an application and named it ‘ActivityTracker’. This application will show us our all activities (what we have configured for WebHook).
*
Start writing Handler class
Let us start to write code to our sample application.
From your visual studio open ‘Solution Explorer’ and new folder WebHooks. Add a BitBucketWebhookHandler class to the application under newly created folder. This class should inherit an abstract class WebHookHandler.

Add required namespace (Microsoft.AspNet.Webhooks) and implement its method (ExecuteAsync).
“In the previous post, we have already discussed ExecuteAsync method.”
Implement ExecuteAsync method to receive data from Bitbucket repository, parameter WebHookhandlerContext contains all actions occurring during an operation. The action is a list of string. Always get the First action and then grab the data.
public class  BitBucketWebHookHandler : WebHookHandler
{
   public override  Task ExecuteAsync(string receiver, WebHookHandlerContext context)
  {
    if (Common.IsBitBucketReceiver(receiver))
    {
      var dataJObject = context.GetDataOrDefault<JObject>();
      var action = context.Actions.First();
      switch (action)
     {
       case "repo:push":
                //do something
                break;
       case "repo:fork":
               //do something
               break;
       case "repo:updated":
             //do something
             break;
      default:
             var data = dataJObject.ToString();
             break;
          }
       }
       return Task.FromResult(true);
    }
}
In preceding code-listing, we are just evaluating ‘action’ and implementing code based upon its value. BitBucket has these pre-defined actions like repo:fork, repo:updated and so on. Based upon the value of ‘action’ received by us – we will perform some specific operations and if does not match any of these conditions, then we will simply get the data and store it in a var data type.
Sometimes it can be erroneous when comparing hard coded strings. As humans we can somehow add spaces or truncate some words eg. “repo:fork” could be “ repo:fork” or “rep : fork”.
To overcome scenarios where we can meet some unwanted situation for creating errors, we can go with:
- constants
- enums
If we go with constants then we can have a constant class which can look something like this:
public class  BitBucketRepoAction
{
   //Refer to: https://confluence.atlassian.com/bitbucket/event-payloads-740262817.html#EventPayloads-RepositoryEvents

   public const  string Push = "repo:push";
   public const  string Fork = "repo:fork";
   public const  string Updated = "repo:updated";
   public const  string CommitCommentCreated = "repo:commit_comment_created";
   public const  string CommitStatusCreated = "repo:commit_status_created";
   public const  string CommitStatusUpdated = "repo:commit_status_updated";
}
With the use of constants, ExecuteAsync method of our BitBucketWebHookHandler class would look like:
public override  Task ExecuteAsync(string receiver, WebHookHandlerContext context)

{

if (Common.IsBitBucketReceiver(receiver))

{

var dataJObject = context.GetDataOrDefault<JObject>();

var action = context.Actions.First();

switch (action)

{

case BitBucketRepoAction.Push:

//do something

break;

case BitBucketRepoAction.Fork:

//do something

break;

case BitBucketRepoAction.Updated:

//do something

break;

case BitBucketRepoAction.CommitCommentCreated:

//do something

break;

case BitBucketRepoAction.CommitStatusCreated:

//do something

break;

case BitBucketRepoAction.CommitStatusUpdated:

//do something

break;

default:

var data = dataJObject.ToString();

break;

}

}

return Task.FromResult(true);

}
If we go with enum then we can have an enum declaration which goes something like this:
namespace ActivityTracker.Enums
{
   public enum  EnumRepository
   {
     [EnumDisplayName("Changes pushed to remote")]
     [EnumDisplayCode("repo:push")]
     push,
     [EnumDisplayName("Fork")]
     [EnumDisplayCode("repo:fork")]
     fork,
     [EnumDisplayName("Updated")]
     [EnumDisplayCode("repo:updated")]
     updated,
     [EnumDisplayName("Commit comment created")]
     [EnumDisplayCode("repo:commit_comment_created")]
     commitcommentcreated,
     [EnumDisplayName("Commit status created")]
     [EnumDisplayCode("repo:commit_status_created")]
     commitstatuscreated,
     [EnumDisplayName("Commit status updated")]
     [EnumDisplayCode("repo:commit_status_updated")]
     commitstatusupdated
   }
}
In preceding code-listing we have created EnumRepository and declared all possible enums which fall in BitBucket Repository Events.
Detail of Bitbucket Repository Events can be found here: https://confluence.atlassian.com/bitbucket/event-payloads-740262817.html#EventPayloads-RepositoryEvents
We have created two custom attributes EnumDisplayName and EnumDisplayCode, which are representing a short description of enum and an action of Bitbucket repository event. We will use these EnumDisplayCode to analyze WebHookHandlerContext action.
In proceeding code-listing, we will see how these attributes look like and how we can get the values of these attributes.
namespace ActivityTracker.Attributes

{

/// <summary>

/// A custom attribute used to associate a display name with an enum

/// value

/// </summary>

[AttributeUsage(AttributeTargets.All)]

public class  EnumDisplayNameAttribute : Attribute

{

/// <summary>

/// initializes an instance of the <see cref="EnumDisplayNameAttribute" />

/// custom attribute with the specified displayName

/// </summary>

/// <param name="displayName">

/// the displayName to associate with the

/// custom attribute

/// </param>

public EnumDisplayNameAttribute(string displayName)

{

DisplayName = displayName;

}

/// <summary>

/// gets the displayName property for the <see cref="EnumDisplayNameAttribute" />

/// custom attribute

/// </summary>

public string  DisplayName { get; }

}

}

namespace ActivityTracker.Attributes

{

/// <summary>

/// A custom attribute used to associate a display code with an enum

/// value

/// </summary>

[AttributeUsage(AttributeTargets.All)]

public class  EnumDisplayCodeAttribute : Attribute

{

/// <summary>

/// initializes an instance of <see cref="EnumDisplayCodeAttribute"/>

/// custom attribute with the specified displaycode

/// </summary>

/// <param name="displayCode">

/// the displayCode to associate with the

/// custome attribute

/// </param>

public EnumDisplayCodeAttribute(string displayCode)

{

DisplayCode = displayCode;

}

/// <summary>

/// Gets the displaycode property for the <see cref="EnumDisplayCodeAttribute"/>

/// custome attribute

/// </summary>

public string  DisplayCode { get; }

}

}
***For more details regarding attributes refer to: https://msdn.microsoft.com/en-us/library/aa288454(v=vs.71).aspx ***
These custom attribute classes simply contain properties DisplayName and DisplayCode. Both classes are inherited from System.Attribute and their usage is set to for all targets.
We have created custom attributes but to access these attributes we need to write a custom code. Our best bet to access attribute values is by using reflection. To achieve this, I have written a helper class. As per our requirements to access attribute values we would have two methods one is to access DisplayName and another to access DisplayCode.
We are not going to discuss complete class code here, but we have to understand how it works. So, let us discuss these methods in details.
“Complete source code is available at: Real time application using Microsoft ASP.NET WebHooks”
/// <summary>
/// Retrieves the display name (specified in the <see cref="EnumDisplayNameAttribute" />
/// custom attribute) for the passed in <see cref="System.Enum" /> instance.
/// </summary>
/// <param name="enumeratedValue"></param>
/// <param name="enumProp"></param>
/// <returns>the display name for the specified enum</returns>
/// <remarks>
/// The enum specified must implement the <see cref="EnumDisplayNameAttribute" />
/// custom attribute. If it does not, an empty string is returned
/// </remarks>

public static  string GetEnumDisplayName(System.Enum enumeratedValue, EnumProp enumProp)
{
   var fieldInfo = enumeratedValue.GetType().GetField(enumeratedValue.ToString());
   var attribArray = GetCustomAttributes(fieldInfo, enumProp);
   return attribArray.Length == 0 ? string.Empty : GetEnumDisplay(enumProp, attribArray);
}
This method is accepting enumeratedValue and enumProp and find the custom attribute and then call another method GetEnumDisplay(enumProp, attribArray) to display value.
public enum  EnumProp
{
   /// <summary>
   /// display name custom property
   /// </summary>
   DisplayName,

   /// <summary>
   /// display code custom property
   /// </summary>
   DisplayCode
}
EnumProp is nothing but another enum which contains two enums DisplayName and DisplayCode.
private static  object[] GetCustomAttributes(FieldInfo fieldInfo, EnumProp enumProp)
{
   return enumProp == EnumProp.DisplayName
      ? fieldInfo.GetCustomAttributes(typeof(EnumDisplayNameAttribute), false)
      : fieldInfo.GetCustomAttributes(typeof(EnumDisplayCodeAttribute), false);
}
GetCustomAttributes() first locates the value of DisplayName and if it is not found then gets the custom attribute using reflection method GetCustomAttributes() and return object array.
private static  string GetEnumDisplay(EnumProp enumProp,  object[] attribArray)
{
   switch (enumProp)
   {
     case EnumProp.DisplayName:
     {
        var attrib = attribArray[0] as  EnumDisplayNameAttribute;
        return attrib != null ? attrib.DisplayName : string.Empty;
     }
     case EnumProp.DisplayCode:
     {
        var attrib = attribArray[0] as  EnumDisplayCodeAttribute;
        return attrib != null ? attrib.DisplayCode : string.Empty;
     }
     default:
        return string.Empty;
  }
}
GetEnumDisplay() method is getting a DisplayName or a DisplayCode as per enumProp, it returns an empty string in case of no match. There might be cases where provided custom attribute name is actually not available, in such conditions we will get an empty string which is by design.
We have seen that it will make our code better to understand and readable if we go either with constant or with an enum.
In our application, I will go with enum – the reason I prefer to go with enum is our customized attribute will give us more facility while we will work with either action or dataobject in our BitBucketWebHookHandler, with the help of helper class and extension methods we can easily access custom attribute as per our need.
Our BitBucketWebHookhandler class would look like when we are using this for ‘Repository events’.
There might be different approaches to achieve this, we will discuss few in coming sections.*
**
public class  BitBucketWebHookHandler : WebHookHandler
{
public override  Task ExecuteAsync(string receiver, WebHookHandlerContext context)
{
if (Common.IsBitBucketReceiver(receiver))
{
var dataJObject = context.GetDataOrDefault<JObject>();
var action = context.Actions.First();
var enumAction = EnumHelper.GetEnumValue<EnumRepository>(action,
EnumProp.DisplayCode, false);
switch (enumAction)
{
case EnumRepository.push:
//do something
break;
case EnumRepository.fork:
//do something
break;
case EnumRepository.updated:
//do something
break;
case EnumRepository.commitcommentcreated:
//do something
break;
case EnumRepository.commitstatuscreated:
//do something
break;
case EnumRepository.commitstatusupdated:
//do something
break;
default:
var data = dataJObject.ToString();
break;
}
}
return Task.FromResult(true);
}
}
Now, our BitBucketWebHookHandler class looks neat and clean and we can easily go to an enum and read its description. In every case, we can also use our EnumHelper class for various operations.
Before step further, let us draft out what we want to do with the data? Our data is nothing but some information that our WebHook received via WebHookHandlerContext.
Entity framework – using code first approach
We have already added Entity framework support to our project now the only thing remaining is that we add few models, mapping and Persistence classes.
Under folder ‘Models’ add a new class with the name ‘ActivityModel’. The model class looks like:
public class  ActivityModel
{
[Key]
public int ActivityId { get; set; }

[MaxLength(10)]
public string  Activity { get; set; }

[MaxLength(25)]
public string  Action { get; set; }

[MaxLength(65)]
public string  Description { get; set; }

public string  Data { get; set; }
}
Setting up the repository
Before writing code for our repository which will enforce code first approach, let’s add a connection string in the webconfig file. From solution explorer open web.config file and add connection string.
<connectionStrings>
<add name="ActivityDBConnectionString" connectionString="data source=.\sqlexpress;initial catalog=Activity;integrated security=True;MultipleActiveResultSets=True;App=EntityFramework" providerName="System.Data.SqlClient"/>
</connectionStrings>
Now, we are ready to write our repository classes. Open ‘Solution Explorer’ and add new folder ‘Persistance’. Add new class ‘ActivityContext’ which should inherit from ‘DbContext’ and our context class would look like:
public class  ActivityContext : DbContext
{
   public ActivityContext() : base("name=ActivityDBConnectionString") { }
   public DbSet<ActivityModel> ActivityTrackers { get; set; }
}
In our context, we passed the connection string to let Dbcontext know about our database. We have also added one DbSet of our ActivityModel class.
To complete our repository classes, we also added IActivityRepository interface and a class ActivityRepository which implements the interface.
Re-writing BitBucketWebHookHandler class
Our handler class is not persisting data. Let us re-write our BitBucketWebHookhandler class so it would start persisting our data received from BitBucket repository.
New code would look like:
public class  BitBucketWebHookHandler : WebHookHandler
{
public BitBucketWebHookHandler()
{
}
public override  Task ExecuteAsync(string receiver, WebHookHandlerContext context)
{
if (Common.IsBitBucketReceiver(receiver))
{
var dataJObject = context.GetDataOrDefault<JObject>();
var action = context.Actions.First();
var processActivities = new  ProcessActivities(dataJObject, action);
processActivities.Process();
}
return Task.FromResult(true);
}
}
In our new code we have introduced a new class ‘ProcessActivities’ and upon calling ‘Process’ method, our data will be persisted in our SQL Database.
public void  Process()
{
var firstPart = _action.Split(':');
if (firstPart[0].ToLower() == "repository")
ProcessRepository();
else if (firstPart[0].ToLower() == "pullrequest")
ProcessPullRequest();
else if (firstPart[0].ToLower() == "issue")
ProcessIssue();
else
throw new System.Exception("UnIdentified action!");
}
Our ‘Process’ method further call a method which actually saved the data to database, as per ‘action’.
Write APIController
Next step to add write our WebAPI controller (TrackerController) code to complete Web API.
public class  TrackerController : ApiController
{
private readonly  IActivityRepository _activityRepository;
public TrackerController()
{
_activityRepository = new  ActivityRepository();
}

public TrackerController(IActivityRepository activityRepository)
{
_activityRepository = activityRepository;
}

// GET api/<controller>
public IEnumerable<ActivityModel> Get()
{
return _activityRepository.GetAll();
}

// GET api/<controller>/5
public ActivityModel Get(int activityId)
{
return _activityRepository.GetBy(activityId);
}
}
We are ready with two GET resources. One retrieves complete records from the database while another fetch records of a particular ActivityId.
We are done, with our Web API, now the next step is to create a client, as we discussed above that we are going to create a Web Client using MVC5 and AngularJS. To achieve the same we need to follow these steps:
Wire up API using AngularJS
Now, we are ready to write our AngularJS stuff
Add MVC controller
Open solution explorer and right click on folder ‘controllers’ and add new MVC controller ‘DashboardController’. This task will add MVC5 support to our project. Now we just need to add following code-snippet to our config file.
public class  WebApiApplication : HttpApplication

{

protected void  Application_Start()

{

GlobalConfiguration.Configure(WebApiConfig.Register);

//Add these lines, after adding MVC5 Controller

AreaRegistration.RegisterAllAreas();

RouteConfig.RegisterRoutes(RouteTable.Routes);

FilterConfig.RegisterGlobalFilters(GlobalFilters.Filters);

BundleConfig.RegisterBundles(BundleTable.Bundles);

}

}
Add AngularJS references
To start with angularjs , open NuGet Package manager and add AngularJS Nuget packages:
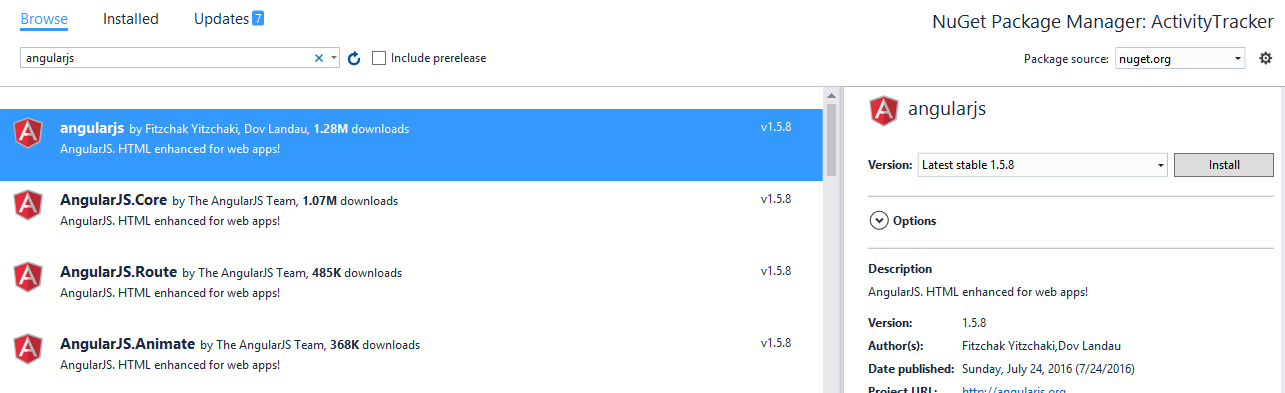
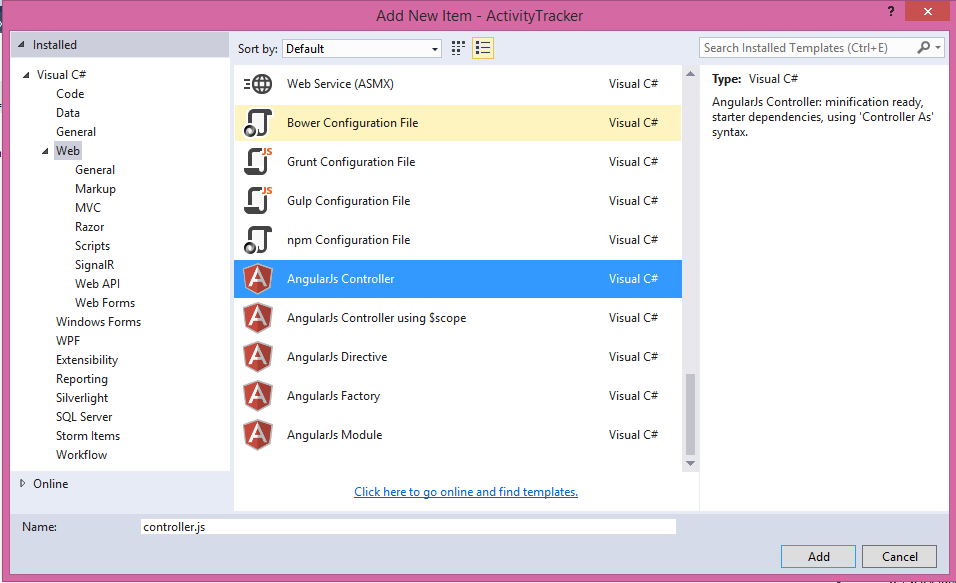
Open solution explorer and new folder ‘app’ under folder ‘scripts’, right click and add new item from new item dialog box select angularjs controller
Wire up the API call
Now add AngularJs services and name it as ‘service.js’. And then add this code to the js file:
app.service("activityService", function($http) {
'use strict';

//Get Activities
this.getAll = function() {
return $http.get("api/Tracker");
};

//Get single activity
this.getActivity = function(activityId) {
return $http.get("api/Tracker/" + activityId);
};
});
In our ‘service.js’ we are just wrapping up our API calls in such a way that our function getAll will use Web API resource ‘api/Tracker’ .
Now, get back to our AngularJs controller and add code so, we can use it in our View.
app.controller('activityController', function($scope, $log, activityService) {

refreshGrid();

function refreshGrid() {

activityService.getAll().then(function(promise) { $scope.Activities = promise.data },

function(err) {

$log.error('error while connecting API', err);

});

};

$scope.get = function(activityId) {

activityService.get(activityId).then(function(promise) {

$scope.Id = promise.ActivityId;

$scope.Activity = promise.Activity;

$scope.Action = promise.Action;

$scope.Description = promise.Description;

$scope.Data = promise.Data;

},

function(err) {

$log.error('error while connecting API', err);

});

};

});
In ‘controller.js’ we are calling refreshGrid() function, which would fetch complete data from our database, as soon as our application initiated.
Add View
Add razor view by right click on the ‘Index’ action method of ‘DashboardController’, select blank view, it adds ‘Index.cshtml’ view under folder ‘Dashboard’ of ‘Views’ folder. Add the following code to our view to initiate the data:
<div ng-app="activityModule">
<div class="container" ng-controller="activityController">
<h2>Activity Dashboard</h2>
<p>Glimpse of all activities of Bitbucket repository <c>repository name</c></p>
<table class="table">
<thead>
<tr>
<th>Activity</th>
<th>Action</th>
<th>Description</th>
<th>Data</th>
</tr>
</thead>
@{ int count = 0;}
<tbody ng-repeat="activity in Activities">
@{ count++;}
<tr ng-class-odd="'warning'" ng-class-even="'success'">
<td>{{activity.Activity}}</td>
<td>{{activity.Action}}</td>
<td>{{activity.Description}}</td>
@*<td>{{activity.Data}}</td>*@
<td ng-click="getActivity({{activity.ActivityId}})">View Details</td>
</tr>
</tbody>
</table>
</div>
</div>
Our view represents a simple table, we are using ‘ng-repeat’ to bind our table with whole data.
Initialize WebHook controller
Open WebAPIconfig.cs and add the following code:
// Initialize Bitbucket WebHook receiver
 config.InitializeReceiveBitbucketWebHooks();
It will initialize our Bitbucket WebHook receiver.
Please make sure, you have configured Bitbucket repository to receive notifications and added a secret key to your web.config file.
Deploying to Azure
We have already explained to publish application over Azure.
Perform operation and validate results
Go to your Bitbucket repository and perform few actions to push changes, create issue etc. If you have configured everything correctly you will get the result on your index page.

Conclusion
In this post we have gone through the detailed process to develop a real-time application using BitBucket Webhook Receiver. There is no limit to enhance the application. To make a simpler, we just save data to database and display in a table using MVC5 and AngularJs.
See also
Thanks to Ronen who suggested me to add this section. I added more reading of the concepts used in this article (will add more).