Xamarin + Azure: The Basics (Part 1)
Scope
The following article covers a presentation and demo at Xamarin Dev Days in Mauritius. The article demonstrates how to get started with Azure Mobile Apps and benefit the powers of the cloud in terms of Scalability, Offline Sync and Data Analytics.
This is the first part of the series where the basics of Azure App service is demonstrated.
Introduction
Xamarin is a cross-platform implementation of the Common Language Infrastructure (CLI) and Common Language Specifications (often called Microsoft .NET). With a C#-shared code base, developers can use Xamarin tools to write native Android, iOS, and Windows apps with native user interfaces and share code across multiple platforms.

However, today, mobile apps can’t run stand-alone. The data need to be stored where it can be shared and the application should be able to scale as required. This is where the cloud helps us.
Azure App Service
App Service is a platform-as-a-service (PaaS) offering of Microsoft Azure to create web and mobile apps for any platform/any device. Azure App Service runs your apps on fully managed virtual machines (VMs), with your choice of shared VM resources or dedicated VMs. App Service includes the web and mobile capabilities that we previously delivered separately as Azure Websites and Azure Mobile Services. It also includes new capabilities for automating business processes and hosting cloud APIs.
Creating an Azure App Service Account
1. Go to https://portal.azure.com/
2. Click on New > Web + Mobile > Mobile App

3. Enter the App Name, Resource Group, Subscription, select pin to dashboard and hit create

4. The deployment progress will be displayed in the top right section. This will take 2-3 minutes following which you’ll see the new service on your dashboard.

Examine the Quick Start Projects
Once the service is deployed, open the App Service and click on Quick Start. This will bring you to sample projects that will help you get started with the server-side code and the client rapidly. For this demo, click on Quick Create and the select Xamarin.Forms. The Portal will then guide you through three steps as below.

Connect to a database
a. Add a data connection

b. Select Database
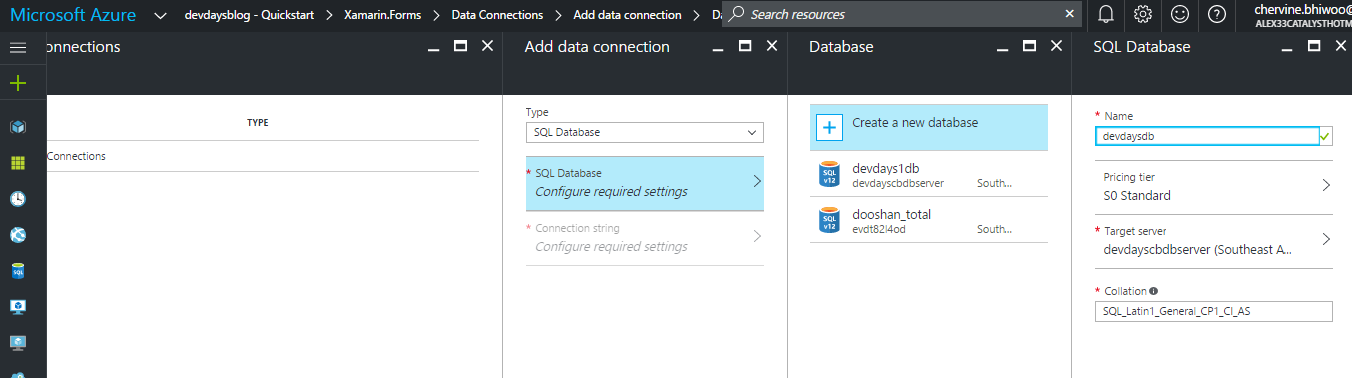
c. Select Database Server
In this example, an existing SQL Server database shall be used.

d. The next step is to configure the connection string

e. The new database will now be deployed and will be ready after some minutes


Create the Table API
The Table API is the backend code that will be used by the mobile app. Microsoft Azure App Service allows supports two languages, namely, NodeJS and C#.
In this example, C# code shall be used.

a. The sample can now be downloaded and opened with Visual Studio
b. Once you open the solution, build it to restore the NuGet packages
c. The three important sections to note are:
i. The Data Object
In this example, the class TodoItem represents the data object, which will be used by Entity Framework to do the Object Relational Mapping.
public class TodoItem : EntityData
{
``public string Text { get``; ``set``; }
``public bool Complete { get``; ``set``; }
}
ii. The Controller
The controller has all the CRUD methods that will interact with the database.
The addition of a new controller shall be demonstrated in the next article of the series.
iii. The Web.Config File
The connection string to the SQL Server database created previously has already been added here.
<``add name``=``"MS_TableConnectionString" connectionString``=``"Data Source=(localdb)\MSSQLLocalDB;AttachDbFilename=|DataDirectory|\aspnet-devdaysblogService-20161116032732.mdf;Initial Catalog=aspnet-devdaysblogService-20161116032732;Integrated Security=True;MultipleActiveResultSets=True``providerName``=``"System.Data.SqlClient" />
d. Now that the major components have been examined, we may now deploy the App to Azure App Service.
i. Right-click on the project and click Publish
ii. Select Azure App Service
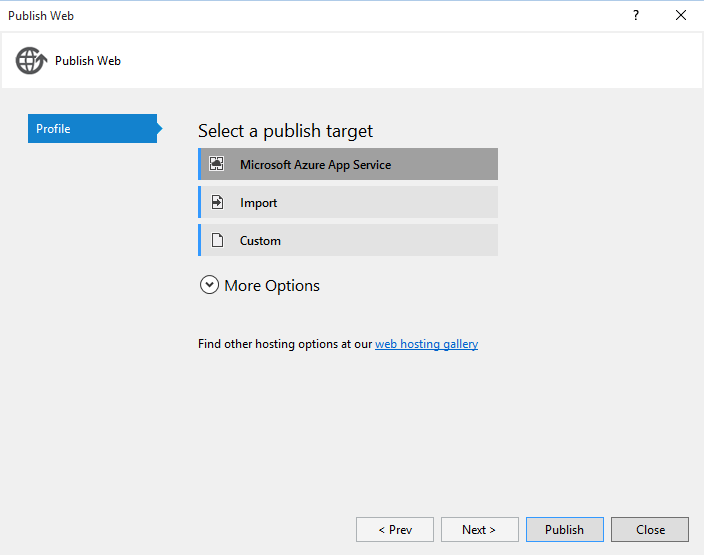
iii. Select the Resource Group and click Publish

iv. Click Publish and after a few minutes, the back end code will be deployed.

Consume the Back End code from the Client
Now that the back-end codes have been deployed, we may now connect it to the mobile clients. In this example, we’ll use a Xamarin.Forms project.
From the portal, click “Download” in the “create a new app” tab.

i. Open the Application in Visual Studio 2015, build the project to restore the NuGet packages.
ii. All the codes will be in the Portable Project which will be used in the Android, IOS and Windows projects.
iii. The constants.cs file contains the references to the back-end mobile app service URI
public static string ApplicationURL @"https://devdaysblog.azurewebsites.net";
iv. The TodoItem.cs class contains the data model that will be used in the application.
v. The TodoItemManager.cs class is the class that will be used by the client to communicate with the Cloud Backend.
This will be further discussed in the next article.
vi. You can now run the application

4. View the Database
i. To view the connection string, in the Azure portal “all resources” and select the server that you created above

Select the database and click show database connection strings


ii. In SQL Server Management Studio, input the server name, Login and Password

iii. Examine the tables
As you shown below, the cloud backend automatically created the tables and all the data have been inserted.

Conclusion
In this article, the basics of Azure App Service was demonstrated and in 3 simple steps, the SQL Server, the Cloud Backend and the Client were deployed. In the next article, this sample shall be extended to add custom classes and logic.