Azure Automation : Create and Invoke Azure Runbook using Webhooks from Client Applications
Azure Automation
Azure Automation enables users to automate tasks that are manual and repetitive in nature by using Runbooks. Runbooks are nothing but a set of tasks that perform some automated implementation in Azure Automation.
Runbooks in Azure Automation are based on Windows PowerShell or Windows PowerShell Workflow. We can code and implement the logic that we want to automate using PowerShell. Once the runbook has been created and the implementation logic is added to it, we can invoke and run it from the client applications by issuing a POST request using Webhook. To put it simply, a webhook allows us to start a particular runbook in Azure Automation through a single HTTP request. The entire flow has been summarized below :

Image Source : docs.Microsoft.com
Overview
This article is divided into the following major sections.
- Create Azure Automation Account
- Create and Test Azure Runbook that contains implementation logic created using PowerShell
- Create a Webhook to invoke and run the Azure Runbook using Azure Jobs
- Issue Webhook Post Request from Client Applications
Azure Automation Accounts
Before getting started with Azure Automation, we have to create Automation Accounts which will be used to authenticate the runbooks. When we create a new Automation account in the Azure portal, it automatically creates a Run As Account and a Classic Run As Account.
Create Automation Accounts
We can create the Automation accounts by going to the new Azure Management Portal. From Developer tools, select ‘Automation’.

This will open up the Azure Automation Account creation page. Specify the below parameters which will be used to create the Azure Automation Account:
- Name : The name of the Azure Automation Account
- Subscription: Specify the name of the subscription. If we have any free subscriptions, we can chose that as well. Check here to get a free 12 months Azure Subscription credits under Developer Program Benefit scheme.
- Resource Group: Either create a new resource group or choose an existing one we have already created.
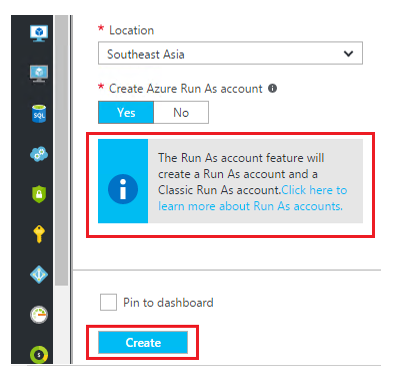
- Location : Specify Azure datacentre Location.
- Select ‘Yes’ for ‘Create Azure Run as Account’
Finally, after filling up all the details, click on Create.

This will create an Azure Automation Account as shown below. As part of the Azure Automation Account, we will have a Run as Account as well as a Classic Run as Account created. Each of these accounts will have few resources allocated by default which includes default runbooks.

Clicking on it will take us inside the automation account.

Before moving ahead we have to see if the accounts (Run As Account and Classic Run as Account) can successfully authenticate. In order to check it click on Runbooks tile.

Test Run As Account
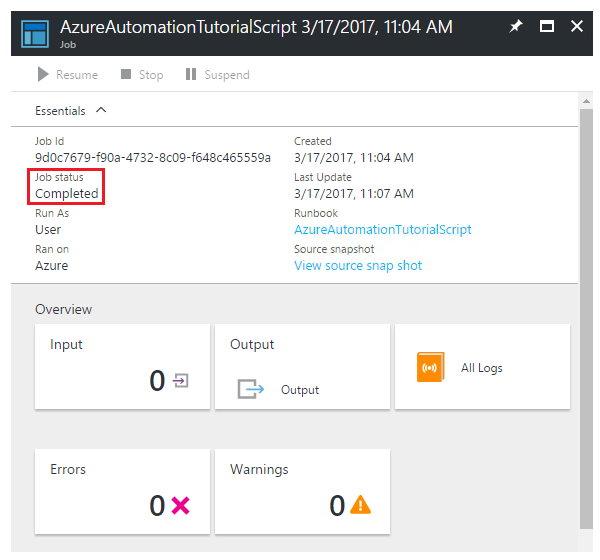
We will test the authentication of Run As account using the below runbook. Click on the Azure ‘AutomationTutorialScript’.

Click Start to run the runbook.

Initially, the runbook will be queued which indicates that it is waiting for a runbook worker in the cloud.

It will change to the Running state when the runbook has actually started running.

Finally it will show the completed message indicating successful completion if there are no errors. We can check the Output by going to the Output tile.
We can see the result by clicking on the Output Tile. The runbook basically shows the resources in the Azure Resource Group

Test Classic Run As Account
We will test the Classic Run As account just like how we tested the Run As Account. The only difference is that we will be using the runbook – ‘AzureClassicAutomationTutorialScript’

Click Start to run the runbook

It has successfully run to completion.
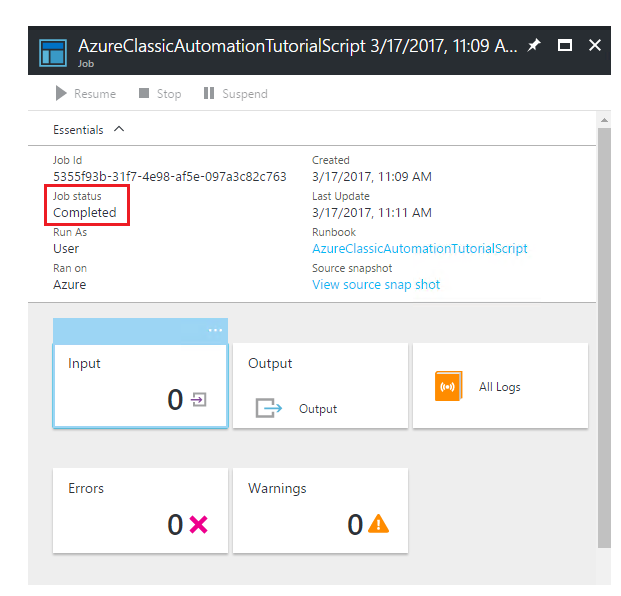
We can click the Output tile to see the Output after running the runbook. It shows the status of the Azure Virtual Machines.

Azure Runbook
Runbooks in Azure Automation is based on Windows PowerShell or Windows PowerShell Workflow. We can code and implement the logic that we want to automate using PowerShell.
Create a Sample Runbook
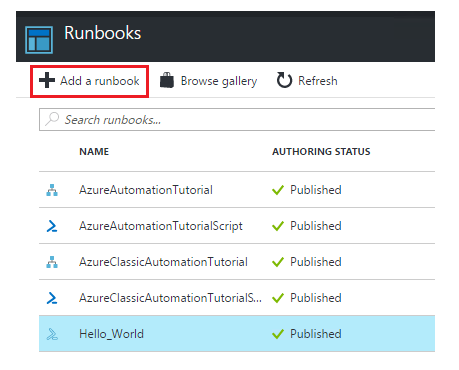
We will see how to create a sample runbook that will be used to automate tasks or implement some logic on behalf of the user. Click the Runbooks tile to create a new runbook.

Select ‘Add a runbook’ so as to create a new one. Before diving into complex runbooks, we will first create a sample Hello World runbook that displays a text ‘hello world’ when run.

Specify the Runbook name and the runbook type. We will see ‘PowerShell Workflow’ to implement the logic. Click Create to provision the runbook.

Thus we have created a sample hello world runbook.

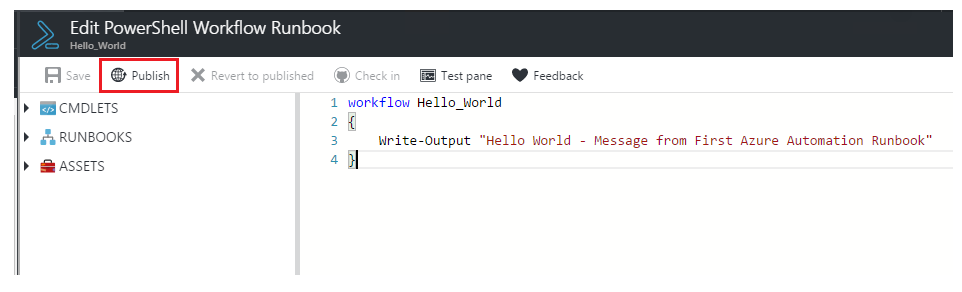
Click Edit to modify the runbook and add some logic to it.

By default, it will be empty. Let’s add the below output code to the main function.
workflow Hello_World
{
    Write-Output "Hello World - Message from First Azure Automation Runbook"
}

When we Save it, it will still be in the Draft state.

Test and Publish the Runbook
Before publishing it we can test it by selecting the ‘Test pane’ option.

Click Start to test and run the runbook. As we can see upper pane shows the run status and lower pane shows the output from the runbook.

Thus we have successfully validated the runbook. Now we can finally Publish it as shown below.
It will be listed along with all other runbooks in the automation account.

We can start the published runbook from here.

Once completed, we can click the Output Tile to see the output.

Thus we have seen a sample Hello World runbook in action. Now we will see a real-world example in the next session.

Real World Runbook Example - Retrieve REST Service Data and Send mail to user
We will explore a real-time example where runbook can be used to implement a logic on behalf of the user. We will using PowerShell to fetch JSON data from a REST Service endpoint and mail the data to the business users. Let’s get started by creating the runbook.
Specify the Name and we have selected the Runbook type as ‘PowerShell Workflow’. Click Create.

Let edit the runbook which is currently empty.

We will be adding the below PowerShell code which uses the ‘Invoke-WebRequest’ command to call the REST Endpoint and get the JSON data. Once the JSON data has been retrieved, we will use ‘ConvertFrom-Json’ to convert the data from JSON to PowerShell Custom Objects. After that we will use ‘ConvertTo-HTML’ to convert the data to HTML format which will be used as the mail body.
Since we have to mail the data retrieved from REST endpoint to the users, we will be using Office 365 SMTP to relay the mail. Once the parameters are entered we will use the ‘Send-MailMessage’ command to E-mail the data retrieved from REST endpoint to the business users. Once the mail has been send a custom message indicating successful mail delivery will be shown in the output pane.
Runbook Code
workflow FetchRESTData_MailToUsers
{

    $request = 'http://services.groupkt.com/state/get/USA/all'
    $result = Invoke-WebRequest $request -UseBasicParsing
    $JSONResult = $result | ConvertFrom-Json  | select -expand RestResponse | select -expand result
    $Body = $JSONResult | Select country,name,capital,largest_city| Sort-Object name | ConvertTo-HTML
    $SmtpServer = 'smtp.office365.com'
    $SmtpUser = 'Priyaranjan@SharePointChronicle.com'
    $smtpPassword = '<Input Office 365 Password Here>'
    $MailtTo = 'kspriyaranjan@gmail.com'
    $MailFrom = 'Priyaranjan@SharePointChronicle.com'
    $MailSubject = "Test using $SmtpServer"

    $Credentials = New-Object System.Management.Automation.PSCredential -ArgumentList $SmtpUser, $($smtpPassword | ConvertTo-SecureString -AsPlainText -Force)

    Send-MailMessage -To "$MailtTo" -from "$MailFrom" -Subject $MailSubject -Body "$Body" -SmtpServer $SmtpServer -BodyAsHtml -UseSsl -Credential $Credentials

   write-Output "Custom Message : REST Service JSON Data parsed and Email Sent to Business Users"
}
Test and Publish the Runbook

On running the above command in the Test Pane we can see the custom message that is shown after the mail delivery indicating a successful runbook run.

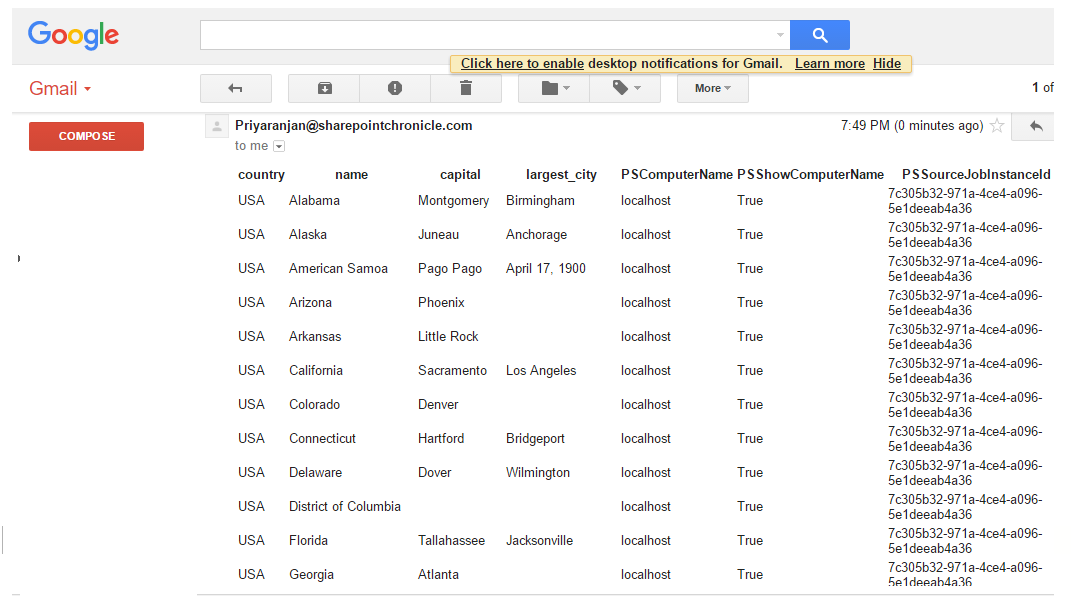
We have also received the data retrieved from the REST endpoint in the mail box as shown below.
Since we have successfully tested the runbook, let’s publish it.

Webhooks in Azure
A webhook allows us to start a runbook that we have created in Azure Automation using a single HTTP request. We can use the webhook from a variety of external services like GitHub, Visual Studio Team Services, and custom applications from which we can start Azure runbooks that helps us run some predefined logic. An overall webhook flow is shown in the below image.

Image Source : docs.Microsoft.com
Create a Webhook
We have already covered how to create the runbook in Azure and saw how to retrieve JSON Data from REST Endpoint and mail it to business users. Now we need a method to invoke the runbook remotely from our client application. We will be using Webhook for this purpose.
We can create a webhook from the Runbook page of the Azure Automation Account. Thus we can say that the webhook is hooked to a runbook upon its creation. Select the ‘Webhook’ option as shown below:

This will open up the page where we have to specify the below parameters that will be used to create the webhook:
- Name: Specify a name for the webhook
- Enabled: By default, it is enabled. If we disable it, we cannot access it from client applications. We can enable/disable it even after webhook creation.
- Expires: Every webhook comes with an expiration date beyond which it cannot be used. We can change once the webhook is created.
- URL : This is an important property of the webhook as we will be using this URL to issue the POST HTTP request. The URL cannot be changed and contains an security token that enables the HTTP request to issue the call without any further authentication.
Note: We should note down the URL securely as it serves the purpose of a password. Any user having this URL can issue an HTTP POST request and run the runbook without any further authentication due to the presence of the security token in the URL. Moreover, we can see this URL only during the webhook creation time.
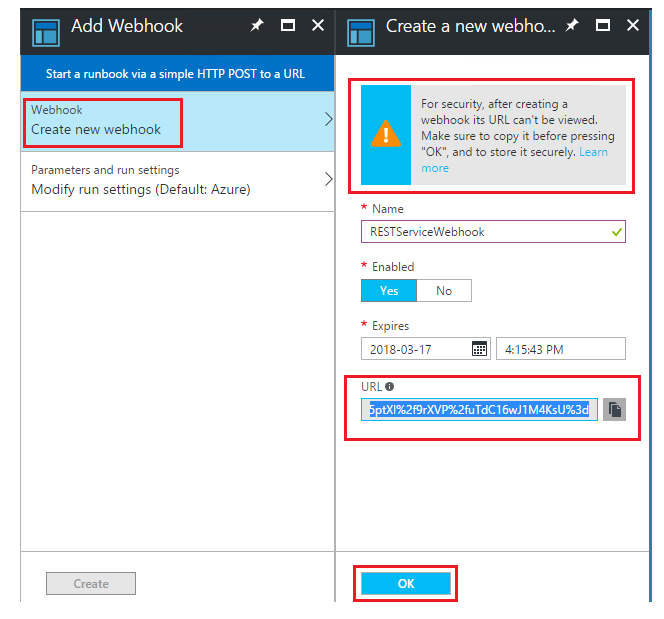
Click OK to save the webhook parameters. The Webhook URL looks like below :
https://s3events.azure-automation.net/webhooks?token=GpU3Gd4E86eBzboUC5ptXl%2f9rXVP%2fuTdC16wJ1M4KsU%3d
Click Create to provision the runbook webhook.

Going to the runbook page, we can see that the webhook has been created.

Invoke the Runbook using Webhook from Client Applications
We can invoke a runbook using the webbook by issuing an HTTP Post request of the Webhook URL that we received while webhook creation. We can invoke the URL from a variety of client applications. We will see few examples in this section.
Invoke Runbook using Webhook from PowerShell
We can invoke the Azure Runbook Webhook from the local machine using PowerShell. Ensure that we are using PowerShell 3.0 or above as ‘Invoke-RestMethod’ command is available only in the higher versions.

$request = 'https://s3events.azure-automation.net/webhooks?token=GpU3Gd4E86eBzboUC5ptXl%2f9rXVP%2fuTdC16wJ1M4KsU%3d'

$result = Invoke-RestMethod -Method Post -Uri $request
On running the above script from PowerShell we have invoked the webhook which triggered the runbook that get JSON Data from a REST endpoint and have mailed it to business user. The email screenshot is shown below:

Invoke Runbook using Webhook from C#
Similarly we can invoke the runbook from a Windows Application using C# Code. We will be making use of the HttpWebRequest object to issue the POST request. The URL used will be the webhook URL we received when we created it. The code block to issue an HTTP request to invoke the web request is shown below.
try
{
 string uri = "https://s3events.azure-automation.net/webhooks?token=GpU3Gd4E86eBzboUC5ptXl%2f9rXVP%2fuTdC16wJ1M4KsU%3d";

 HttpWebRequest request = (HttpWebRequest) HttpWebRequest.Create(uri);
 string data = string.Empty;
 request.Method = "POST";
 request.ContentType = "text/plain;charset=utf-8";
 System.Text.UTF8Encoding encoding = new System.Text.UTF8Encoding();
 byte[] bytes = encoding.GetBytes(data);

 request.ContentLength = bytes.Length;
 using(Stream requestStream = request.GetRequestStream())
 {
  requestStream.Write(bytes, 0, bytes.Length);
 }

 request.BeginGetResponse((x) =>
  {
   using(HttpWebResponse response = (HttpWebResponse) request.EndGetResponse(x))
   {
    using(Stream stream = response.GetResponseStream())
    {
     StreamReader reader = new StreamReader(stream, Encoding.UTF8);
     String responseString = reader.ReadToEnd();
     MessageBox.Show("Webhook Triggered at " + System.DateTime.Now + " \n Job Details : " + responseString);
    }
   }
  }, null);
} catch (Exception ex)
{
 throw ex;
}
Upon running the code we have received the data returned from the POST Success method which shows the Job ID as well as the run time of the application.
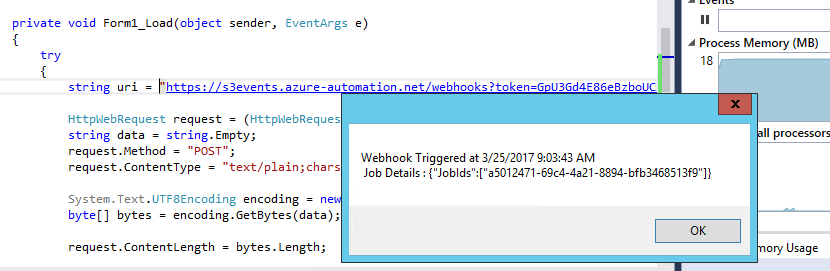
Heading over to the Azure portal we can see that the runbook has been triggered at the same time as shown in the application message box.

Now lets go ahead and see the Job that is responsible for running the runbook. We can see the Job section by selecting the runbook as shown below:
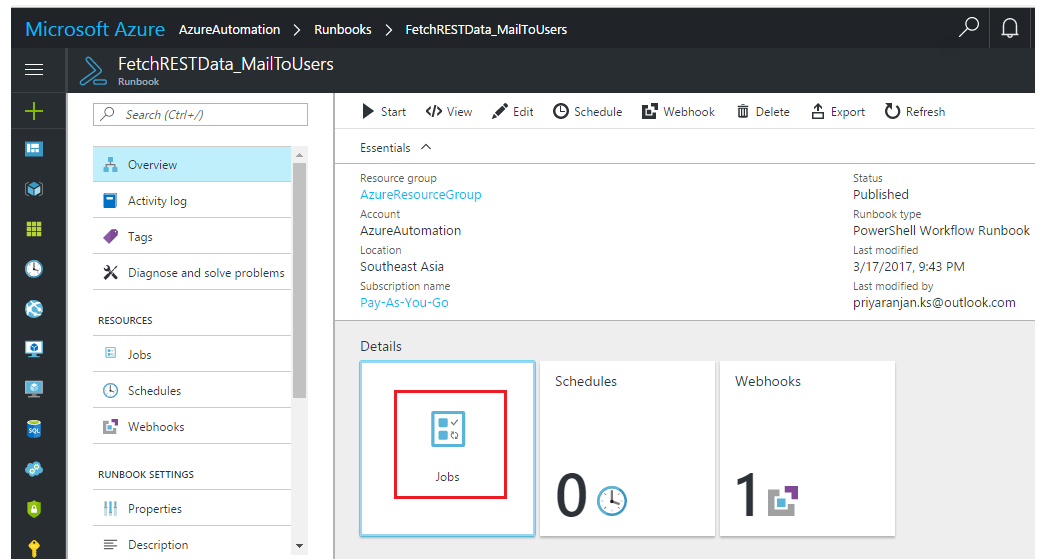
Click Jobs to see the list of completed and running jobs. As we can see the first job that is shown in the list has the same ID as shown in the Client Application message box. Its status has gone to ‘Completed’ indicating a successful run of the runbook.

The runbook has retrieved the results from the REST endpoint and has sent a mail to the specified user along with the data as shown below.

Invoke Runbook using Webhook from Jquery
We can also invoke the runbook by issuing a POST HTTP request from the client side code using Jquery. This is fairly simple as we just have to use the $.post shorthand to issue the Ajax post requests using the Webhook URL. We have used JSFiddle to test it out.

$.post( "https://s3events.azure-automation.net/webhooks?token=GpU3Gd4E86eBzboUC5ptXl%2f9rXVP%2fuTdC16wJ1M4KsU%3d", function( data ) {
  alert('Webhook Triggered !')
});
Upon running the above JSFiddle code, we can see that the job status has become ‘Running’ in the Azure Portal.

It will soon go to ‘Completed’ Status and we will receive the email which contains the data retrieved from the REST endpoint . We can modify the code in the runbook to implement any other requirement logic. Updated code will be reflected when the runbook is ‘Published’

Summary
Thus we saw how to automate a business process by creating an Azure Runbook and how to invoke the runbook using Webhooks from a client application.
Reference
Few good references that give detailed information about runbooks are :