Mailing Logic App Run History Using Azure PowerShell Module
What Are Logic Apps?
Logic Apps are a piece of integration workflow hosted on Azure which are used to create scale-able integrations between various systems. These are very easy to design and provide connectivity between various disparate systems using many out of the box connectors as well as with the facility to design custom connectors for specific purposes. This makes integration easier than ever as the design aspect of the earlier complex integrations is made easy with minimum steps required to get a workflow in place and get it running.
Problem Scenario
Whenever Logic Apps are Hosted onto the Microsoft Azure Platform for integrating various business flows, it becomes imperative that the Logic App run is monitored on a daily basis to check if there were any errors or so in the execution of the logic Apps. It can be seen as analogous to the checking of the Windows event log for monitoring the health of a BizTalk on-prem app. Having an idea of the run history enables the azure administrator to have a knowledge about the health of the Logic App and if the things are progressing or not as per the expectation on Azure.
Solution
One way of checking Logic App run history is to check the run history by Manually navigating to the diagnostics section and checking the history. A sample screenshot of this manual process is shown below.

As evident from the sample screenshot above, the process is manual and will require the administrator to move to each of the logic apps in each of the resources group and check the run history manually. If the number of the logic Apps and the Resource groups is more then it becomes cumbersome to check the logic app run history manually. Hence to overcome the issue, PowerShell can be utilized to automate the check process. A script can be designed which connects to the Azure account and then fetches the logic app run history for the administrator and the necessary business owners to have a look at from a metric and health point of view.
Implementation
Installation OF Azure PowerShell Module
The first step of business is to set up the Azure PowerShell module on the machine which will run the PowerShell script to query the azure logic apps run history. Following Microsoft documentation provides a complete walkthrough for the download and installation of the Azure Powershell Module.
How to: Install the Windows Azure Cmdlets Module
Setting Up Automatic Login To Azure Environment
The main issue with using the Azure Powershell Module To perform Azure related operations, the user needs to login into the Azure portal for other cmdlets to run. The command to do so is
Login-AzureRmAccount
Once this cmdlet is encountered, the Powershell script will open up a window which will require the username and password to the Azure account. The window popping up after above command is shown below.
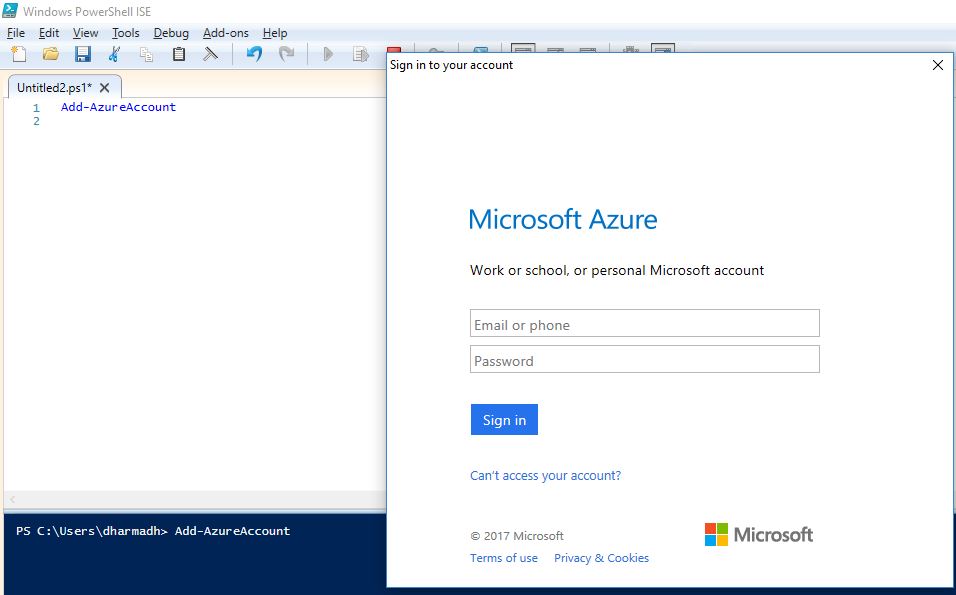
Once the user enters the details, other Azure-related cmdlets will execute successfully or else they will throw an error.
To automate this login process there are certain steps that need to be done as a one-time activity, post which the PowerShell script will be able to Login Automatically and fetch the Azure details.
The administrator needs to execute following commands from the Powershell ISE or PowerShell Console.
Login-AzureRmAccount
$azureAdApplication = New-AzureRmADApplication -DisplayName "AzureAutomationApp" -HomePage "https://www.myapp.org/" -IdentifierUris "https://www.myApp.org/azureAutomationApp" -Password '<Password Goes Here>'


New-AzureRmADServicePrincipal -ApplicationId $azureAdApplication.ApplicationId


New-AzureRmRoleAssignment -ServicePrincipalName $azureAdApplication.ApplicationId.Guid -RoleDefinitionName Contributor
To read in detail about the commands used above, refer to the See Also section.
Once the above set of commands is run, following output is obtained as a result.

As highlighted in Red rectangle, the ApplicationId along with the provided password above will be used to log on to the Azure Environment through the PowerShell script from here forward.
To save the password as an encrypted string, following command needs to be used from the PowerShell ISE or PowerShell Console.
read-host -assecurestring | convertfrom-securestring | out-file <SomePhysicalPath>\cred.txt
Once the command is invoked, it will pop up a dialog box, where the password which was provided earlier needs to be entered.
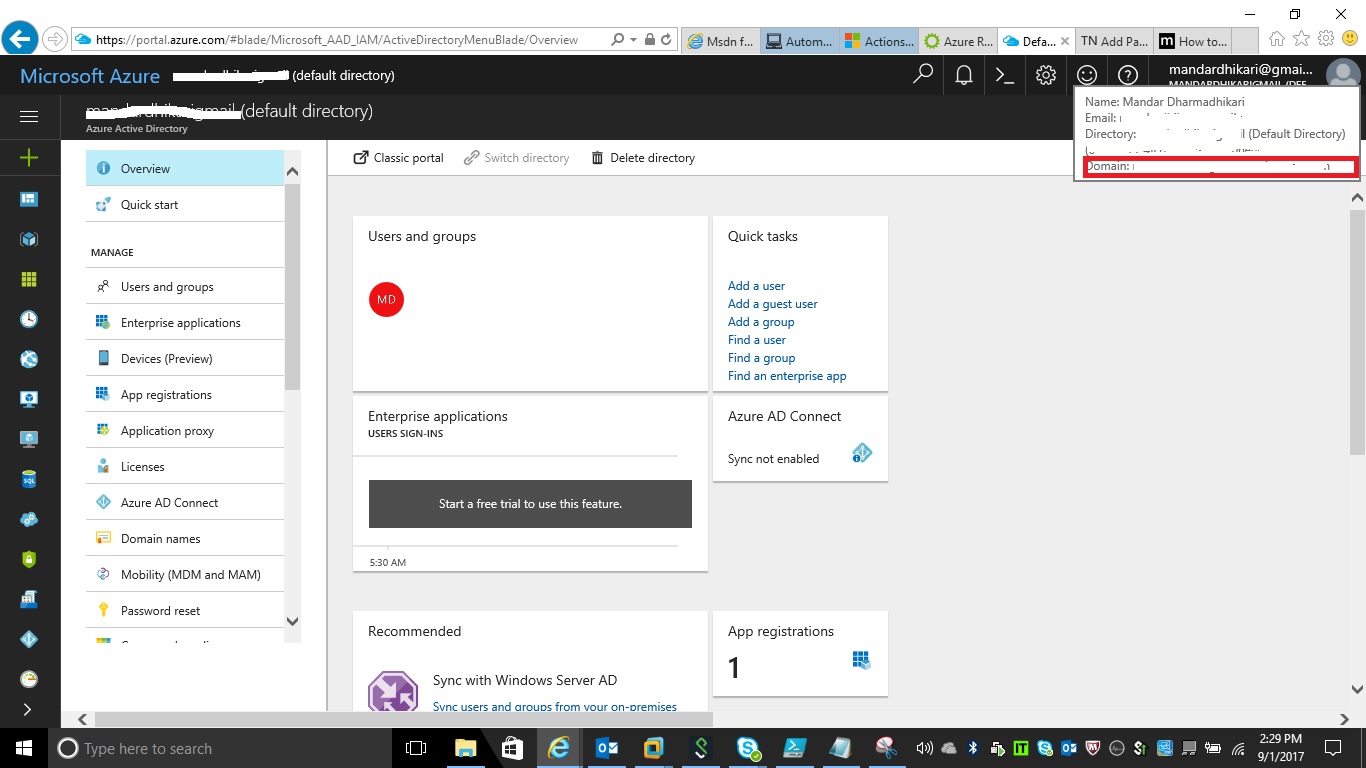
Tenant Id is also required to automate the login process for the script. In addition to this, the Administrator needs to have the domain name of the Azure Directory. It can be found in the Azure portal. Refer the red box in the following screenshot.

PowerShell Script
The PowerShell Script uses a configuration XML file which contains details related to the Azure subscription and the Resource Group and Logic Apps in that resource group. A sample configuration file is shown below.
<Config>
<AzureUser>
<Name>ApplicationId Noted in Previous step@ADDomainName</Name>
<TenantUser>Tenant Id Noted in Previous Step</TenantUser>
</AzureUser>
  <Subscription>
    <Name>abc@pqr.com</Name>
    <ResourceGroup>
      <Name>AzureStudyGroup</Name>
       <LogicApps>
      <LogicApp>
    <Name>AzureTestLogicApp</Name>
    </LogicApp>
    </LogicApps>
    </ResourceGroup>
  </Subscription>
</Config>
The PowerShell Script accepts two parameters:
- The Physical Path the configuration File Shown above
- The Physical Path to the Encrypted Password file created as a part of the one time set up activity.
The script is as shown below -
function MailLogicAppRunHistory
{
param
(
$ConfigFilepath ,
$CredFilePath
)

if(Test-Path $ConfigFilepath)
{
cls
[xml] $config = Get-Content "$ConfigFilepath\Config.xml"


$subcriptionDetails = $config.Config.Subscription
$Name = $subcriptionDetails.Name

$ResourceGroups = $subcriptionDetails.ResourceGroup

[string]$azureUser = $config.Config.AzureUser.Name

# Read the Password From the encrypted Credentials txt file created as a part of one time set up activity
$password = Get-Content $CredFilePath\cred.txt |convertto-securestring


#Set the Credential PowerShell object
$cred = New-Object -TypeName System.Management.Automation.PSCredential($azureUser ,$password)


#Log On to the Azure Environment
Login-AzureRmAccount -Credential $cred -TenantId $tenantUser -ServicePrincipal

$MailMessage = "Hi OpsTeam, <br/><br/> Please find below the details of Resource Group Wise Status of Logic App Run history.
<br/> <b>Subscription Name</b>: $Name<br/>"

foreach($ResourceGroup in $ResourceGroups)
{
$grpName = $ResourceGroup.Name
$logicApps = $ResourceGroup.LogicApps.LogicApp

$MailMessage =$MailMessage + "<b>ResourceGroupName</b>: $grpName <br/>"

foreach($logicApp in $logicApps)
{
$body = '<body>
  <style>BODY{background-color:white;}TABLE{border-width: 1px;border-style: solid;border-color: black;border-collapse: collapse; }TH{border-width: 1px;padding: 0px;border-style: solid;border-color: black;background-color:#63cff5 }TD{border-width: 1px;padding: 0px;border-style: solid;border-color: black;background-color:white}</style>
  <table>
    <colgroup>
      <col />
      <col />
      <col />
      <col />
      <col />
    </colgroup>
    <tr>
      <th>StartTime</th>
      <th>EndTime</th>
      <th>Succeeded</th>
      <th>Code</th>
      <th>Error</th>
    </tr>'
    $logicAppName = $logicApp.Name
    $MailMessage = $MailMessage + "<b>Logic App Name</b>: $logicAppName <br/> Run History is as per below table."

    #Query the Logic App Run History.

    $hisEntry = Get-AzureRmLogicAppRunHistory -ResourceGroupName $grpName -Name $logicApp.Name
    foreach($his in $hisEntry)
    {
    [string]$StartTime = $his.StartTime
    [string]$EndTime = $his.EndTime
    [string]$Status = $his.Status
    if($Status.ToUpper() -eq "SUCCEEDED")
    {
    $Status = "<p style='color:green;'>$Status</p>"
    }
    else
    {
    $Status = "<p style='color:red;'>$Status</p>"
    }
    [string]$Code = $his.Code
    [string]$Error= $his.Error
    $Row =  $Row + "<tr>
      <td>$StartTime</td>
      <td>$EndTime</td>
      <td>$Status</td>
      <td>$Code</td>
      <td>$Error</td>
    </tr>"

    }
    $body= $body +$Row +"
  </table>
</body>"
$MailMessage = $MailMessage + $body

}


}
$EMailMessage = $MailMessage + "<br/> Thanks, <br/> LA support Team."

[string]$Subject= "Logic App Run History"
[string[]]$users = "abc@pqr.com"
[string]$fromemail = "def@xyz.com"
[string]$server = 'smtp.gmail.com'
$port     = '587'

send-mailmessage -from $fromemail -to $users -subject $Subject -BodyAsHTML $EMailMessage -priority High -smtpServer $server
Write-Host "Mail Sent successfully...!!!"

}
else
{
write-Host("Invalid Path provided")
}
}
The PowerShell Script can be scheduled to run using a Batch File. The Code for the batch file is as following -
powershell -command "&{. .\SendLogicAppRunHistory.ps1; MailLogicAppRunHistory 'Config File Path' , 'Credential File Path'}"
@pause
Sample Mail
A sample mail generated by the above script is as shown below.

Conclusion
As evident from above process it becomes very easy to use the Azure PowerShell Module to set up script to get the Azure Logic App history as compared to checking the history manually. The script requires some initial set up time and effort but once it is setup, it can run like a champion and save future time engagements on a daily task.
See Also
To learn in detail about the commands used in this script. Visit following links.
Download
The script can be downloaded from the following link.
Mail LogicAppRunHistory Using Azure PowerShell Module
Steps To get the Script Working.
- Open the SaveEncryptedPassword.ps1 provide the path where the encrypted password(to be provided in the SetAutomaticLogin.ps1) can be stored in the cred.txt file and run the script to save the password (This is one-time step)
- Open the SetAutomaticLogin.ps1 and point to the cred.txt created in above step. Run the script and note down ApplicationId, Tenant id (This is one-time step)
- Set These values in the config File under the AzureUser Record for Name and TenantUser respectively
- Set other details in the config file.
- Configure the SendLogicAppRunHistory.bat file to point to the config file and cred.txt files
- Schedule the SendLogicAppRunHistory.bat file to get the email updates for the logic app run history.