SharePoint Server 2016: Exploring Client Side Webparts Development using Angular, Knockout, React JS and Kendo UI
Introduction
With the advent of SharePoint Framework (SPFx) the development has taken a massive traction towards client-side development. Angular, Knockout and React are the prime candidates when it comes to a client-side framework of choice. In this article, we will see how we can develop client-side webparts using Angular, Knockout and React. We will be primarily creating the webparts using the client side JS framework and REST API. The article is divided primarily into 3 sections.
- Implementing SharePoint CRUD functionality using Angular .
**  **
**
- Implementing SharePoint CRUD functionality using Knockout JS.
**  **
**
**
**
- Retrieve and Develop Client Side Grid Web part using REST API and React JS .
**  **
**
- As a bonus, we will also cover how to create client-side webpart using Kendo UI.
**  **
**
**
**
Implement CRUD Client Webparts in SharePoint using Angular** **
In the first section, we will see how to implement Angular Client Webparts for SharePoint. But To get started with Angular JS in SharePoint we will get to know some useful Angular terms.
Angular Modules
Angular Modules define the application. The Modules will contain Controllers that control the data flow.
The module is created by using the AngularJS function angular.module.
<div ng-app="mySPJourneyApp">
</div>

<script>
var app = angular.module("mySPJourneyApp", []);
</script>
Thus mySPJourneyApp is the HTML Div element within which the angular app will be run.
Angular Controllers
The Controllers control the data flow.We can add them to Angular Application by including them within the Angular Module named "mySPJourneyApp" which we had defined earlier.We can define a controller using ng-controller Angular Directive. Within this div, we will be showing the data that is defined within the controller Javascript function "spJourneyController".The Controller div acts as the view and the JavaScript Object acts as the Controller in MVC.AngularJS will invoke the controller with a $scope object which is accessible from both the view and the controller. This way variables defined within the controller can be accessed from the view in the HTML.
This way When we add properties technology & title properties to the $scope object in the controller, we can access it from the view as {{technology}}
Thus looking at it from the MVC perspective :
Model - Current data that is available in the View -> {{technology + " " + title}}
View - The HTML View defined by ng-app directive -> <div ng-app="mySPJourneyApp" >
Controller - The JavaScript object that controls the data -> app.controller('spJourneyController', function($scope)
<html>
<script src="https://ajax.googleapis.com/ajax/libs/angularjs/1.6.4/angular.min.js"></script>
<body>

<div ng-app="mySPJourneyApp" >
 <div ng-controller="spJourneyController">
       SiteName: {{technology + " " + title}}
 </div>
</div>

<script>

var app = angular.module('mySPJourneyApp', []);
app.controller('spJourneyController', function($scope) {
    $scope.technology = "SharePoint";
    $scope.title = "Journey";
});

</script>
</body>
</html>

Angular Model Directive
We will be using the Angular Model Directive to bind the value of Input field in the HTML View to a variable. In the previous section we used {{technology}} to show the value of technology property that defined in a controller within the HTML View. Now we will see how to bind the technology property using ng-model directive as shown below:
<html>
<script src="https://ajax.googleapis.com/ajax/libs/angularjs/1.6.4/angular.min.js"></script>
<body>

<div ng-app="mySPJourneyApp" ng-controller="spJourneyController">
<input ng-model="siteName">
<h1>Site Name : {{siteName}}</h1>
</div>

<script>
var app = angular.module('mySPJourneyApp', []);
app.controller('spJourneyController', function($scope) {
    $scope.siteName = "";
});

</script>
</body>
</html>

More examples can be tried out in the W3Schools Editor . We will cover the CRUD functionality using Angular and SharePoint in the coming section.
Retrieve and Display Items from SharePoint
The view and controller sections interact with each other to achieve the data retrieval and display functionality. The view is defined as below using the div and the corresponding controller is mentioned in the div using the angular directive ng-controller=”ControllerName”.
<div ng-controller="spCustomerController"  >
    <table>
            <tr >
               <th>ID</th>
               <th>Employee</th>
               <th>Company</th>
               <th>Experience</th>
               <th>Technology</th>
            </tr>
            <tr ng-repeat="customer in customers" >
               <td>{{customer.ID}}</td>
               <td>{{customer.Employee}}</td>
               <td>{{customer.Company}}</td>
               <td>{{customer.Experience}}</td>
               <td>{{customer.Technology}}</td>
            </tr>
    </table>

 </div>
On Page load the view invokes the controller with the name spCustomController and makes the HTTP call with REST API GET URL that points to the SharePoint list. The HTTP call has the construct :
$http({

}).then(onSuccess Function){ Do something when the http call succeeds}

.catch(onFailure Function){ Do something when the http call fails }
We will assign the retrieved values customers attribute of the $scope variable so that it get iterated and populated in the view as shown below.
var myAngApp = angular.module('SharePointAngApp', [])
      myAngApp .controller('spCustomerController', function  ($scope, $http) {
          $http({
              method: 'GET',
              url: _spPageContextInfo.webAbsoluteUrl + "/_api/web/lists/getByTitle('Employee')/items?$select=Title,Employee,Company,Technology,Experience,ID",
              headers: { "Accept":  "application/json;odata=verbose"  }
          }).then(function onSuccess(response) {
            var data = response.data;
            $scope.customers = data.d.results;
         }).catch(function onError(response) {
            alert("Error occured during data fetch");
           });
       })
The connection between the controller and the view for getting list items functionality is shown below :

Retrieve Item Demo
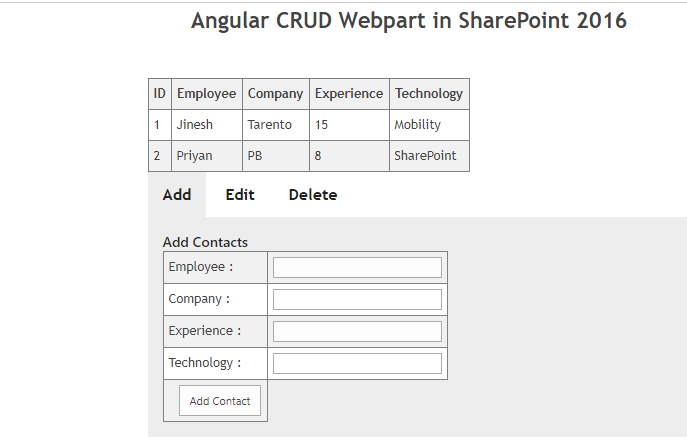
Add Item to SharePoint using Angular Controller
So as to add an item to SharePoint from the Angular View , we can define a POST method within the controller that will be invoked when we click on the Add Item button. The view of the Add Item section will look like below. The employee information fields will be defined using the angular directive ng-model, so that we can access these using the $scope object from the respective controller.
      <div ng-controller=    "addItemsController" id="tab-1"  class="tab-content current">
                         <h3 class=      "SubHeading"      >Add Contacts</h3>
                         <table>
                            <tr>
                               <td>
                                  Employee :
                               </td>
                               <td>
                                  <input type=      "text" id="AddEmployee" ng-model="Employee" />
                               </td>
                            </tr>
                            <tr>
                               <td>
                                  Company :
                               </td>
                               <td>
                                  <input type=      "text" id="AddCompany" ng-model="Company" />
                               </td>
                            </tr>
                            <tr>
                               <td>
                                  Experience :
                               </td>
                               <td>
                                  <input type=      "text" id="AddExperience" ng-model="Experience" />
                               </td>
                            </tr>
                            <tr>
                               <td>
                                  Technology :
                               </td>
                               <td>
                                  <input type=      "text" id="AddTechnology" ng-model="Technology" />
                               </td>
                            </tr>
                            <tr>
                               <td>
                                  <input type=      "button" id="btnAddContact" value="Add Contact" ng-click="addContact()" />
                               </td>
                            </tr>
                         </table>
                      </div>
The AddContact button has an ng-click directive that invokes the addContact() method defined in the controller. The controller is defined as shown below :
myAngApp.controller("addItemsController", function  ($scope, $http) {
    var url = _spPageContextInfo.webAbsoluteUrl + "/_api/web/lists/getByTitle('Employee')/items";
    var scopeObj = $scope;

    scopeObj.addContact = function  () {
    return $http({
                  headers: {
                   "Content-Type" : "application/json;odata=verbose",
                   "Accept": "application/json;odata=verbose",
                   "X-RequestDigest": $("#__REQUESTDIGEST").val()
                   },
                   method: "POST",
                   url: url,
                   data:{
                               __metadata: { type: 'SP.Data.EmployeeListItem'  },
                        Employee: scopeObj.Employee,
                        Company:scopeObj.Company,
                        Technology:scopeObj.Technology,
                        Experience:scopeObj.Experience

                    }
                })
                .then(function onSuccess(response) {
                     var data = response.data;
                     $scope.customers = data.d.results;
                     alert("New item added successfully !");
                }).catch(function onError(response) {
                     alert("addContact() error: " + message);
                   );
               }

     });
The connection between the controller and the View is shown below :

Add Item Demo

Edit Item Controller
Like Add item functionality we can implement the edit function of SharePoint List item using Angular controller by making changes to the HTTP Call we are issuing. We will be using the MERGE method to update the existing item in the controller that will be invoked when we click on the Edit Item button. The view of the Edit Item section will look like below . The employee information fields that containts the data to be updated will be defined using the angular directive ng-model, so that we can access these using the $scope object from the respective controller to fill the MERGE method header. The view is defined as shown below :
<div ng-controller="editItemsController" id="tab-2"  class="tab-content">
         <h3 class="SubHeading">Edit Contacts</h3>
         <table>
            <tr>
               <td>
                  Employee ID :
               </td>
               <td>
                  <input type="text" id="EditEmployeeID" ng-model="EmployeeID" />
               </td>
            </tr>
            <tr>
               <td>
                  Employee :
               </td>
               <td>
                  <input type="text" id="EditEmployee" ng-model="Employee" />
               </td>
            </tr>
            <tr>
               <td>
                  Company :
                </td>
               <td>
                  <input type="text" id="EditCompany" ng-model="Company" />
               </td>
            </tr>
            <tr>
               <td>
                  Experience :
               </td>
               <td>
                  <input type="text" id="EditExperience" ng-model="Experience" />
               </td>
            </tr>
            <tr>
               <td>
                   Technology :
               </td>
               <td>
                  <input type="text" id="EditTechnology" ng-model="Technology" />
               </td>
            </tr>
            <tr>
               <td>
                  <input type="button" id="btnEditContact" value="Edit Contact" ng-click="editContact()" />
               </td>
            </tr>
         </table>
      </div>
The EditContact button has an ng-click directive that invokes the editContact() method defined in the controller. The controller is defined as shown below . We will be making use of the REST API that points to the Employee list. We will get the specific list item to be updated using the list item id in the REST URL.
myAngApp.controller("editItemsController", function  ($scope, $http) {
                       var scopeObj = $scope;
                       scopeObj.editContact = function  () {
                          var employeeID = $scope.EmployeeID;
              var url = _spPageContextInfo.webAbsoluteUrl + "/_api/web/lists/getByTitle('Employee')/items("+employeeID+")";
                          var item = {
                           "__metadata": { "type":  "SP.Data.EmployeeListItem"  },
                               Employee: scopeObj.Employee,
                                       Company:scopeObj.Company,
                                       Technology:scopeObj.Technology,
                                       Experience:scopeObj.Experience
                          };

                          return $http({
                              headers: {
                             "Content-Type" : "application/json;odata=verbose",
                             "Accept": "application/json;odata=verbose",
                             "X-HTTP-Method": "MERGE",
                    "Content-Length": item.length,
                             "X-RequestDigest": $("#__REQUESTDIGEST").val() ,
                              "IF-MATCH": "*"
                             },
                              method: "POST",
                              url: url,
                              data: item
                             })
                          .then(function onSuccess(response) {
                var data = response.data;
                $scope.customers = data.d.results;
                                alert("Item Updated successfully !");
                           }).catch(function onError(response) {
                               alert("editContact() error: " + message);
                          });
                      }
                  });

Edit Item Demo

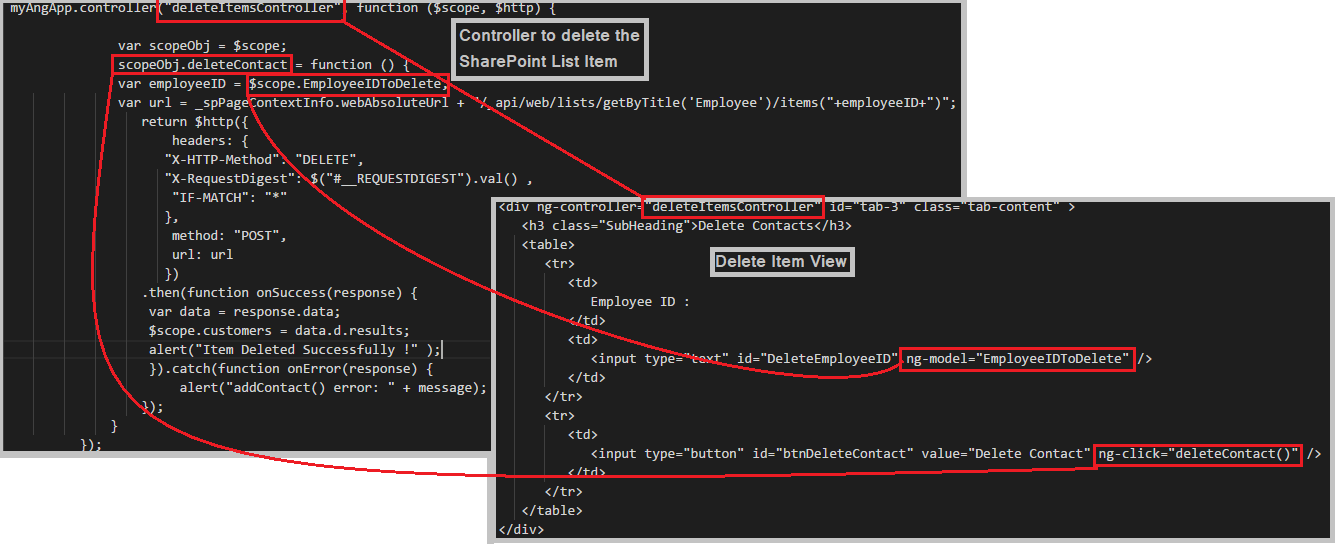
Delete SharePoint List Items using Angular
Finally, let's see how to delete the SharePoint list item using Angular Controller by invoking the Delete method defined within the controller when we click on the Delete Button in the View. We will be using the Delete method while issuing the HTTP REST API call. The view of the delete Item section will look like below. The employee Id field that contains the list item id to be deleted will be defined using the angular directive ng-model, so that we can access these using the $scope object from the respective controller to fill the Delete method header. The view is defined as shown below :
<div ng-controller="deleteItemsController" id="tab-3"  class="tab-content"  >
         <h3 class="SubHeading">Delete Contacts</h3>
         <table>
            <tr>
               <td>
                  Employee ID :
               </td>
               <td>
                  <input type="text" id="DeleteEmployeeID" ng-model="EmployeeIDToDelete" />
               </td>
            </tr>
            <tr>
               <td>
                  <input type="button" id="btnDeleteContact" value="Delete Contact" ng-click="deleteContact()" />
               </td>
            </tr>
         </table>
      </div>
The delete button has the click event handler registered using the ng-click angular directive.this method will be defined within the delete controller as shown below. We will make use of the REST API to delete the specific list item.
myAngApp.controller("deleteItemsController", function  ($scope, $http) {

                       var scopeObj = $scope;
                       scopeObj.deleteContact = function  () {
                       var employeeID = $scope.EmployeeIDToDelete;
                       var url = _spPageContextInfo.webAbsoluteUrl + "/_api/web/lists/getByTitle('Employee')/items("+employeeID+")";
                          return $http({
                              headers: {
                             "X-HTTP-Method": "DELETE",
                             "X-RequestDigest": $("#__REQUESTDIGEST").val() ,
                              "IF-MATCH": "*"
                             },
                              method: "POST",
                              url: url
                             })
                          .then(function onSuccess(response) {
                var data = response.data;
                $scope.customers = data.d.results;
                                alert("Item Deleted Successfully !" );
                           }).catch(function onError(response) {
                               alert("addContact() error: " + message);
                          });
                      }
                  });
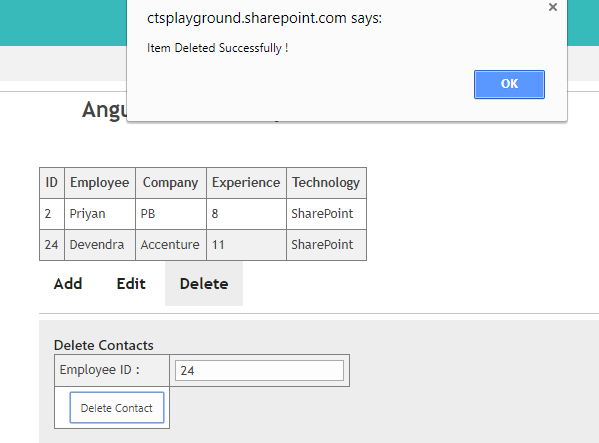
The connection between the Controller and the view for the delete list item is shown below. The employeeID to delete is accepted as input form the view using input text box and bound to the variable using the ng-model directive. We can use this id to create the Delete REST API url from within the controller by accessing it using the $scope variable.
Delete item Demo
Working with KnockOut in SharePoint Server 2016
In the previous session, we saw how to work with Angular in SharePoint. Now let's see how we can implement Knockout webparts in SharePoint 2016.
KnockOut Working and Basics
Knockout is based on Model-View-ViewModel which is derived from the MVC pattern. MVVM can be described more as
“The view classes do not know that Model and ViewModel classes exist, also Model and ViewModel does not know that View exists. Model is also unaware that ViewModel and View exists.”
We will cover the below concepts that are used in our SharePoint implementation
Observables
Observables are declared in the ViewModel and any property that is declared as Observable has the benefit of auto refresh. Ie: any modification to the property will automatically be reflected in all places the data is used.
Syntax : self.CarName = ko.observableArray();
This way we will be declaring the carName as an Observable.
Data Binding
We will be using the data-bind attribute to bind the value of the input text box to the view model.
Syntax :
View Model :
self.CarName = ko.observableArray();
View :
<input data-bind="value: CarName, attr: {'value': CarName}"/>
This will bind the value we input in the view to the View Model property, CarName.
Example :
We can test out KnockOut basics in real-time from here http://knockoutjs.com/
View :
<p>Car name: <input data-bind = "value: Carname"  /></p>
<p>Last name:<input data-bind = "value: Make"  /></p>
<p><strong data-bind = "text: Carname"></strong> <strong data-bind = "text: Make"></strong></p>
View Model :
function CarSalesViewModel() {
    var self = this;
    self.Carname = ko.observable('');
    self.Make = ko.observable('');

}
$(document).ready(function () {
 IntializeViewModel();
}
);

function IntializeViewModel() {
var viewModel = new CarSalesViewModel();

// Activates knockout.js
ko.applyBindings(viewModel);
}
Control Flow
When the $(document).ready is called, It will first invoke the View Model. So we have to define all the Observable properties that we have to use within the code here.
In this example, we are doing this within CarSalesViewModel (). We will now initialize the view model to instantiate the observables using the constructor :
var viewModel = new CarSalesViewModel();
The View Model is now initialized and we can use the ko.applyBindings to activate knockout bypassing in the view model as the parameter.
ko.applyBindings(viewModel);
Now in the view we have input fields where the data-bind attribute is used to assign value to the observable properties(Carname and Make). When we add values to these input fields, the corresponding Observable properties are populated with values and they are concatenated and shown as output in real time as shown below :
<p><strong data-bind = "text: Carname"></strong> <strong data-bind = "text: Make"></strong></p>

Working with Knockout in SharePoint 2016
We will sequentially work through the code we have used in the CRUD implementation
The below code block will act as the main starting point of the code.
      completeCarSalesData =     new CarSalesViewModel();
      GetSPListData();
      ko.applyBindings(completeCarSalesData);
completeCarSalesData = new CarSalesViewModel(); will load the ViewModel using the new constructor call. This will initialize all the observable arrays that we will use within the code as well as the defined Add/Edit/Delete methods. Once the View model is initialized we will fetch the data from SharePoint list and load this into the observable array. GetSPListData() has the below implementation
      function GetSPListData()
                  {
                    itemsArray = [];
                    $.ajax
                    ({
                        url: _spPageContextInfo.webAbsoluteUrl +       "/_api/web/lists/GetByTitle('ProductSales')/items"      ,
                        headers:
                        {
                            "Accept"      :       "application/json;odata=verbose"      ,
                            "Content-Type"      :       "application/json;odata=verbose"      ,
                            "X-RequestDigest"      : $(      "#__REQUESTDIGEST"      ).val(),
                            "IF-MATCH"      :       "*"      ,
                            "X-HTTP-Method"      :       null
                        },
                        success:       function      (data)
                        {
                            $(      "#ResultDiv"      ).empty();
                            for (var i = 0; i < data.d.results.length; i++)
                            {

                               var item = data.d.results[i];
                               completeCarSalesData.AddCarSalesData(item.ID,item.CarName, item.Quarter1, item.Quarter2, item.Quarter3,item.Quarter4);
                            }
                            $(      '#CarSalesData'      ).DataTable();
                        },
                        error:       function      (data)
                        {
                            $(      "#ResultDiv"      ).empty().text(data.responseJSON.error);
                        }
                    });
      }
As we can see we are making use of REST API to get list data from ProductSales list in SharePoint. We will be issuing a simple Ajax GET request.The returned data is then iterated and data is pushed into the KO Observable array using the below statement.
completeCarSalesData.AddCarSalesData(item.ID,item.CarName, item.Quarter1, item.Quarter2, item.Quarter3,item.Quarter4);
Within the view model below, we have the code that will push the above data into the Observable array.
      function AddtoKOArray(ID,CarName, Quarter1, Quarter2, Quarter3,Quarter4) {

                        var self = this;
                        self.ID = ID;
                        self.CarName = CarName;
                        self.Quarter1 = Quarter1;
                        self.Quarter2 = Quarter2;
                        self.Quarter3 = Quarter3;
                        self.Quarter4 = Quarter4;
                    }

                 function CarSalesViewModel() {
                        var self = this;
                        self.MasterCarSales = ko.observableArray([]);
                        self.ID  = ko.observableArray();
                        self.CarName  = ko.observableArray();
                        self.Quarter1 = ko.observableArray();
                        self.Quarter2 = ko.observableArray();
                        self.Quarter3 = ko.observableArray();
                        self.Quarter4 = ko.observableArray();
                        self.AddCarSalesData =       function  (ID,CarName, Quarter1, Quarter2, Quarter3,Quarter4) {
                            self.MasterCarSales.push(      new AddtoKOArray(ID,CarName, Quarter1, Quarter2, Quarter3,Quarter4));
      }
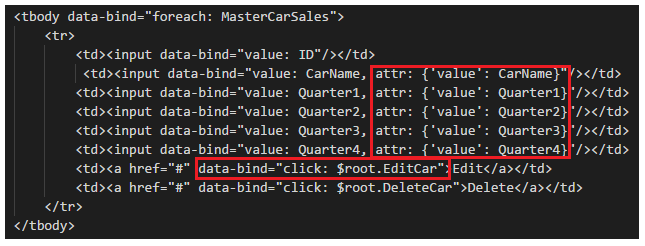
Once the loop is completed, the KO array – MasterCarSalesData will contain the entire SharePoint List data. We will then use this array to bind the data to the view using the data-bind attribute as shown below:
<tbody data-bind="foreach: MasterCarSales">
            <tr>
                <td><input data-bind="value: ID"/></td>
                 <td><input data-bind="value: CarName, attr: {'value': CarName}"/></td>
                <td><input data-bind="value: Quarter1, attr: {'value': Quarter1}"/></td>
                <td><input data-bind="value: Quarter2, attr: {'value': Quarter2}"/></td>
                <td><input data-bind="value: Quarter3, attr: {'value': Quarter3}"/></td>
                <td><input data-bind="value: Quarter4, attr: {'value': Quarter4}"/></td>
                <td><a href="#" data-bind="click: $root.EditCar">Edit</a></td>
                <td><a href="#" data-bind="click: $root.DeleteCar">Delete</a></td>
            </tr>
 </tbody>
The control flow for data retrieval and data binding is shown below:

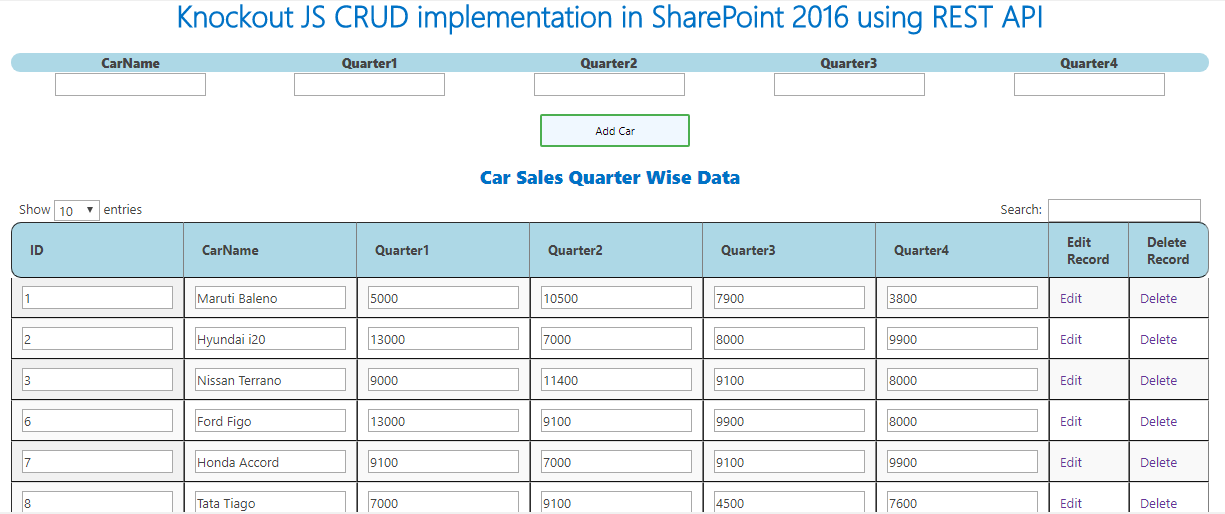
Knockout Data Retrieval and Display Demo

Add item to SharePoint Using Knockout and REST API
Now we will see how to add a new list item to SharePoint from the UI. We have defined the View as shown below :

Here the data-bind attribute will assign the value we input into the variable CarName,Quarter1/2/3/4. We also have a button with an attached event receiver that invokes the AddCar() in the ViewController.

Implementation
Once we have added the data in the input fields and click on the Add Car button. This will call the AddCar() Event handler defined in the View Model as shown below :

Within the function, we can get the values of the input using the Self object. Once we have created the data payload, we will use the REST API URL to add SharePoint list item and issue a POST ajax call as shown below :

Thus adding the data to SharePoint is relatively easy as we use the usual REST endpoint and pass in the data from the KO View using the Self object.
self.AddCar = function () {

            var item = {
                "__metadata": { "type": "SP.Data.ProductSalesListItem" },
                  CarName: self.CarName(),
                          Quarter1:self.Quarter1(),
                          Quarter2:self.Quarter2(),
                          Quarter3:self.Quarter3(),
                          Quarter4:self.Quarter4 ()
                 };
          $.ajax({
           type: "POST",
           url: _spPageContextInfo.webAbsoluteUrl + "/_api/web/lists/GetByTitle('ProductSales')/items",
           headers:
           {
             "Content-Type" : "application/json;odata=verbose",
             "Accept": "application/json;odata=verbose",
             "X-RequestDigest": $("#__REQUESTDIGEST").val(),
             "IF-MATCH": "*"

           },
            data: JSON.stringify(item),
           success: function (result) {
               alert("The Car Sales Data for "+self.CarName()+" has been Added!");
           },
           error: function (err) {
               alert(err.status + " - " + err.statusText);
           }
         });

       };
Item Adding in action

Edit Item using REST API and Knock Out
Now we will see how to add a new list item to SharePoint from the UI. We have defined the View as shown below :
Here the data-bind attribute will assign the value we input into the attributes CarName,Quarter1/2/3/4. We also have a button with an attached event receiver that invoke the EditCar() in the View Model.

Implementation
Once we have added the data to be updated in the input fields and click on the Edit button. This will call the EditCar() Event handler defined in the View Model as shown below :
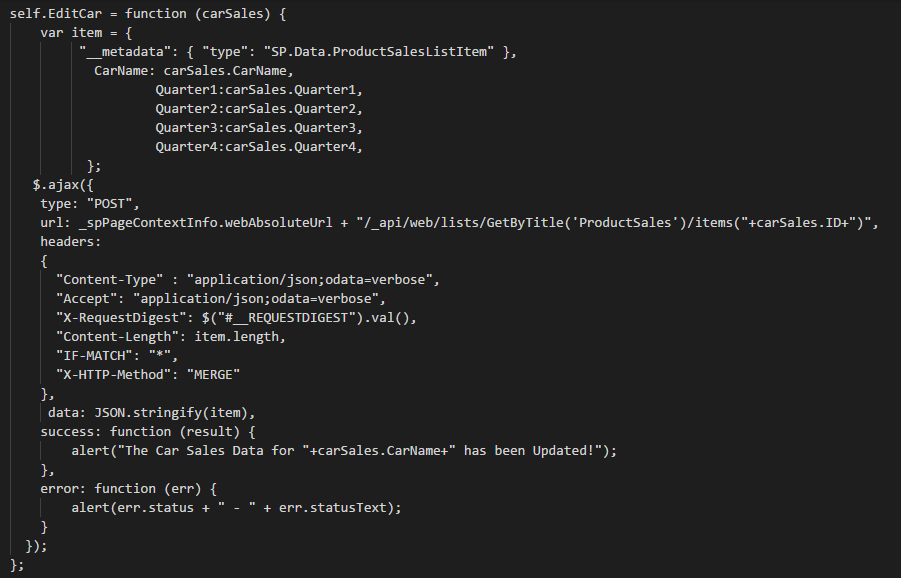
Within the function, we can get the values of the input using the carSale object which we have passed in the from the View. This object will contain all the information of the specific car sales row and we can access it from . We are more concerned about getting the list item ID as we have to create the REST URL based on the specific list item ID. The REST Endpoint will look like :
/_api/web/lists/GetByTitle('ProductSales')/items("+carSales.ID+")
Once we have created the data payload, we will use the REST API URL to update the specific SharePoint list item and issue a MERGE ajax call. This will update the information to SharePoint list
self.EditCar = function (carSales) {
            var item = {
                 "__metadata": { "type": "SP.Data.ProductSalesListItem" },
                   CarName: carSales.CarName,
                           Quarter1:carSales.Quarter1,
                           Quarter2:carSales.Quarter2,
                           Quarter3:carSales.Quarter3,
                           Quarter4:carSales.Quarter4,
                  };
           $.ajax({
            type: "POST",
            url: _spPageContextInfo.webAbsoluteUrl + "/_api/web/lists/GetByTitle('ProductSales')/items("+carSales.ID+")",
            headers:
            {
              "Content-Type" : "application/json;odata=verbose",
              "Accept": "application/json;odata=verbose",
              "X-RequestDigest": $("#__REQUESTDIGEST").val(),
              "Content-Length": item.length,
              "IF-MATCH": "*",
              "X-HTTP-Method": "MERGE"
            },
             data: JSON.stringify(item),
            success: function (result) {
                alert("The Car Sales Data for "+carSales.CarName+" has been Updated!");
            },
            error: function (err) {
                alert(err.status + " - " + err.statusText);
            }
          });
        };

    }
Item Editing in Action

Delete Item from SharePoint using REST API and KnockOut
Now we will see how to delete a list item in SharePoint from KnockOut View. We have defined the View as shown below :

Here the data-bind attribute has already bound the ID of list items to the ID attribute when the page loaded. We also have a button against each car record with an attached event receiver that invoke the DeleteCar() in the ViewController.

Implementation
Once we click on the delete button, this will call the DeleteCar() Event handler defined in the View Model as shown below :

Within the function we can get the value of the list item id in the View using the carSale object which we have passed in the from the View. This object will contain all the information of the specific car sales row and we can access the ID from it . We are more concerned about getting the list item ID as we must create the REST URL based on the specific list item ID. The REST Endpoint will look like :
/_api/web/lists/GetByTitle('ProductSales')/items("+carSales.ID+")
Once we have created the data payload, we will use the REST API URL to update the specific SharePoint list item and issue a Delete ajax call. This will delete the record from the SharePoint list.
self.DeleteCar = function (carSales) {
          $.ajax({
           type: "POST",
           url: _spPageContextInfo.webAbsoluteUrl + "/_api/web/lists/GetByTitle('ProductSales')/items("+carSales.ID+")",
           headers:
           {
             "X-RequestDigest": $("#__REQUESTDIGEST").val(),
             "IF-MATCH": "*",
             "X-HTTP-Method": "DELETE"
           },
           success: function (result) {
               alert("The Car Sales Data for "+carSales.CarName+" has been removed!");
           },
           error: function (err) {
               alert(err.status + " - " + err.statusText);
           }
         });
       };
Item Deletion in Action

Implementation : Full Code Base to perform CRUD using Knockout and REST
The below code has been tested in both SharePoint 2016 and SharePoint Online.
<script src="https://ajax.googleapis.com/ajax/libs/jquery/3.2.1/jquery.min.js"></script>
<script src="https://cdnjs.cloudflare.com/ajax/libs/knockout/3.4.2/knockout-min.js"></script>
<script src="https://ctsplayground.sharepoint.com/sites/Playground/SiteAssets/ko.sp-1.0.min.js"></script>

<script src="https://cdn.datatables.net/1.10.15/js/jquery.dataTables.min.js"></script>
<script src="https://cdn.datatables.net/1.10.15/js/dataTables.jqueryui.min.js"></script>


<link rel = "stylesheet"   type = "text/css"    href = "code.jquery.com/ui/1.11.4/themes/smoothness/jquery-ui.css" />
<link rel = "stylesheet"   type = "text/css"    href = "https://cdn.datatables.net/1.10.15/css/dataTables.jqueryui.min.css" />

<style>

table th {
background-color: lightblue;
}
table th:first-child{
  border-radius:10px 0 0 10px;
}

table th:last-child{
  border-radius:0 10px 10px 0;
}
#AddCarSalesData td{
text-align:center;
}
#AddCarSalesData th{
text-align:center;
font-weight:800;
}
.addButton {
    background-color: aliceblue;
    color: black;
    border: 2px solid #4CAF50;
    border-radius: 2px;
}
</style>

<script>


$( document ).ready(function() {
     ExecuteOrDelayUntilScriptLoaded(GetSPData, "sp.js");
});


    var completeCarSalesData = null;


    function AddtoKOArray(ID,CarName, Quarter1, Quarter2, Quarter3,Quarter4) {
        var self = this;
        self.ID = ID;
        self.CarName = CarName;
        self.Quarter1 = Quarter1;
        self.Quarter2 = Quarter2;
        self.Quarter3 = Quarter3;
        self.Quarter4 = Quarter4;

    }


    function CarSalesViewModel() {
        var self = this;
        self.MasterCarSales = ko.observableArray([]);
        self.ID  = ko.observableArray();
        self.CarName  = ko.observableArray();
        self.Quarter1 = ko.observableArray();
        self.Quarter2 = ko.observableArray();
        self.Quarter3 = ko.observableArray();
        self.Quarter4 = ko.observableArray();

        self.AddCarSalesData = function (ID,CarName, Quarter1, Quarter2, Quarter3,Quarter4) {
            self.MasterCarSales.push(new AddtoKOArray(ID,CarName, Quarter1, Quarter2, Quarter3,Quarter4));
        }

         self.AddCar = function () {

             var item = {
                 "__metadata": { "type": "SP.Data.ProductSalesListItem" },
                   CarName: self.CarName(),
                           Quarter1:self.Quarter1(),
                           Quarter2:self.Quarter2(),
                           Quarter3:self.Quarter3(),
                           Quarter4:self.Quarter4 ()
                  };
           $.ajax({
            type: "POST",
            url: _spPageContextInfo.webAbsoluteUrl + "/_api/web/lists/GetByTitle('ProductSales')/items",
            headers:
            {
              "Content-Type" : "application/json;odata=verbose",
              "Accept": "application/json;odata=verbose",
              "X-RequestDigest": $("#__REQUESTDIGEST").val(),
              "IF-MATCH": "*"

            },
             data: JSON.stringify(item),
            success: function (result) {
                alert("The Car Sales Data for "+self.CarName()+" has been Added!");
            },
            error: function (err) {
                alert(err.status + " - " + err.statusText);
            }
          });

        };

         self.DeleteCar = function (carSales) {
           $.ajax({
            type: "POST",
            url: _spPageContextInfo.webAbsoluteUrl + "/_api/web/lists/GetByTitle('ProductSales')/items("+carSales.ID+")",
            headers:
            {
              "X-RequestDigest": $("#__REQUESTDIGEST").val(),
              "IF-MATCH": "*",
              "X-HTTP-Method": "DELETE"
            },
            success: function (result) {
                alert("The Car Sales Data for "+carSales.CarName+" has been removed!");
            },
            error: function (err) {
                alert(err.status + " - " + err.statusText);
            }
          });
        };


        self.EditCar = function (carSales) {
            var item = {
                 "__metadata": { "type": "SP.Data.ProductSalesListItem" },
                   CarName: carSales.CarName,
                           Quarter1:carSales.Quarter1,
                           Quarter2:carSales.Quarter2,
                           Quarter3:carSales.Quarter3,
                           Quarter4:carSales.Quarter4,
                  };
           $.ajax({
            type: "POST",
            url: _spPageContextInfo.webAbsoluteUrl + "/_api/web/lists/GetByTitle('ProductSales')/items("+carSales.ID+")",
            headers:
            {
              "Content-Type" : "application/json;odata=verbose",
              "Accept": "application/json;odata=verbose",
              "X-RequestDigest": $("#__REQUESTDIGEST").val(),
              "Content-Length": item.length,
              "IF-MATCH": "*",
              "X-HTTP-Method": "MERGE"
            },
             data: JSON.stringify(item),
            success: function (result) {
                alert("The Car Sales Data for "+carSales.CarName+" has been Updated!");
            },
            error: function (err) {
                alert(err.status + " - " + err.statusText);
            }
          });
        };

    }

    function GetSPData() {
        completeCarSalesData = new CarSalesViewModel();

        GetSPListData();
        ko.applyBindings(completeCarSalesData);
    }

  function GetSPListData()
  {
    itemsArray = [];
    $.ajax
    ({
        url: _spPageContextInfo.webAbsoluteUrl + "/_api/web/lists/GetByTitle('ProductSales')/items",
        headers:
        {
            "Accept": "application/json;odata=verbose",
            "Content-Type": "application/json;odata=verbose",
            "X-RequestDigest": $("#__REQUESTDIGEST").val(),
            "IF-MATCH": "*",
            "X-HTTP-Method": null
        },
        success: function(data)
        {
            $("#ResultDiv").empty();
            for (var i = 0; i < data.d.results.length; i++)
            {

               var item =  data.d.results[i];
               completeCarSalesData.AddCarSalesData(item.ID,item.CarName, item.Quarter1, item.Quarter2, item.Quarter3,item.Quarter4);
            }
            $('#CarSalesData').DataTable();
        },
        error: function(data)
        {
            $("#ResultDiv").empty().text(data.responseJSON.error);
        }
    });
}


</script>


<div id="divCarSales">

     <h1 style="width:100%;text-align:center;font-weight:800;">Knockout JS CRUD implementation in SharePoint 2016 using REST API</h1>
    <br />
    <table id="AddCarSalesData" class="display" border="0" cellspacing="0" width="100%" >
             <tr>
                <th>CarName</th>
                <th>Quarter1</th>
                <th>Quarter2</th>
                <th>Quarter3</th>
                <th>Quarter4</th>
            </th>
              <tr>
                <td><input data-bind="value: CarName"/></td>
                <td><input data-bind="value: Quarter1"/></td>
                <td><input data-bind="value: Quarter2"/></td>
                <td><input data-bind="value: Quarter3"/></td>
                <td><input data-bind="value: Quarter4"/></td>
            </tr>
     </table>
     </br>
     <div style="text-align:center;"><button style="width:150px;" class="addButton" type="button" data-bind="click: AddCar">Add Car</button></div>
     </br>
     <h2 style="width:100%;text-align:center;font-weight:800;">Car Sales Quarter Wise Data</h2>
    <table id="CarSalesData" class="display" border="1" cellspacing="0" width="100%"  >
        <thead >
            <tr>
                <th>ID</th>
                <th>CarName</th>
                <th>Quarter1</th>
                <th>Quarter2</th>
                <th>Quarter3</th>
        <th>Quarter4</th>
                <th>Edit Record</th>
                <th>Delete Record</th>
            </tr>
        </thead>

        <tbody data-bind="foreach: MasterCarSales">
            <tr>
                <td><input data-bind="value: ID"/></td>
                 <td><input data-bind="value: CarName, attr: {'value': CarName}"/></td>
                <td><input data-bind="value: Quarter1, attr: {'value': Quarter1}"/></td>
                <td><input data-bind="value: Quarter2, attr: {'value': Quarter2}"/></td>
                <td><input data-bind="value: Quarter3, attr: {'value': Quarter3}"/></td>
                <td><input data-bind="value: Quarter4, attr: {'value': Quarter4}"/></td>
                <td><a href="#" data-bind="click: $root.EditCar">Edit</a></td>
                <td><a href="#" data-bind="click: $root.DeleteCar">Delete</a></td>
            </tr>
        </tbody>
    </table>
</div>
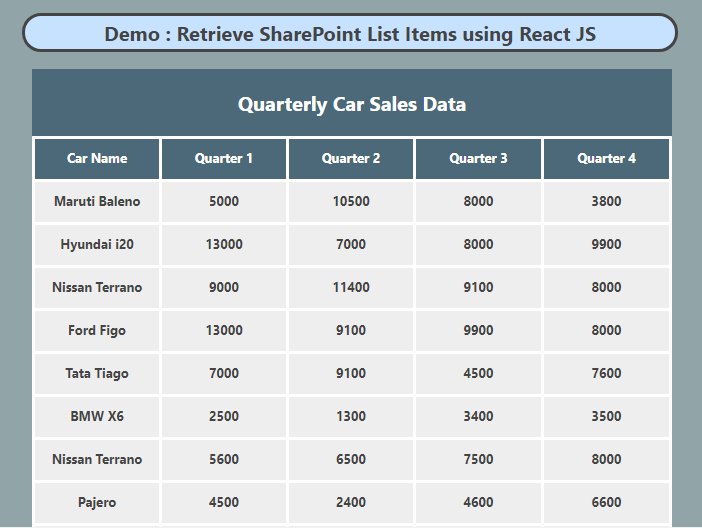
Retrieve and display SharePoint List items using REST API and React JS
React makes it easy to create interactive UIs. It helps us to create simple views for each state in our application, efficiently update and render the right components when our data changes. In this section, we will make use of React and REST API to retrieve list items from SharePoint and display them using Content Editor webpart.
Retrieve SharePoint List data using REST API and display using Content Editor Webpart
Elements are the smallest building blocks of React apps.It describes what we want to see on the UI Say :
const element = <h1>Display me at root node</h1>;
reactdom.render is the starting point of the React component. Let's say we have a <div> somewhere in our HTML file:
<div id="root"></div>
so as to render our React element into the above root DOM node,we will pass both to ReactDOM.render() as :
const element = <h1>Display me at root node</h1>;

ReactDOM.render(

  element,

  document.getElementById('root')

);
This will display the message at root div.In our case we will be displaying the data retrieved from 'ProductSales' list in the div named 'CarSalesData'.
ReactDOM.render(<ReactSP />, document.getElementById('CarSalesData'));
ReactSP represents the component that will be rendered at the CarSalesData div. ReactSP which is the component name is defined as plain javascript class which extends React.Component abstract class.We will also define at least one render method within it and will be defining the UI within this render method.
Within the class we will also have a constructor which is the right place to initialize state. We will
update this state with SharePoint data at a later point in the react lifecycle. If we don't have to initialize state and we are not binding any methods, we don't need to implement a constructor for our React component.
Each component has several "lifecycle methods" that we can override to run code at a particular time of the process. Methods that are prefixed with 'will' are called just before some event happens, and methods prefixed with 'did' are called just after an event happens. We will be making use of the 'componentDidMount' method to fetch data from SharePoint List and we will update the state with this data. In the render method, we will then read the state data and display it in the UI.

REACT and REST API script to display SharePoint data as Grid
The code can be saved as a text file and added to the Content Editor Webpart to display the grid webpart.
<script src="https://cdnjs.cloudflare.com/ajax/libs/react/15.5.4/react.js Jump "></script>
<script src="https://cdnjs.cloudflare.com/ajax/libs/react/15.5.4/react-dom.min.js Jump "></script>
<script src="https://cdnjs.cloudflare.com/ajax/libs/babel-standalone/6.24.0/babel.min.js Jump "></script>
<div id="CarSalesData"></div>

<script type="text/babel">

   var tableStyle  =    {
          display: "table",
          marginLeft : "40px"
      }

   var panelStyle  =    {
         background: "#91A4A7"
      }


   var divStyle = {
    background: "#eee",
    padding: "20px",
    margin: "20px"
   };


   var headerCaptionStyle = {
    background: "#4B6978",
     display: "table-cell",
          border: "solid",
          textAlign : "center",
          width : "500px",
          height : "30px",
          paddingTop : "3px",
          color : "white",
          marginLeft : "80px",
          display : "block"
   };


   var headerStyle = {
    background: "#4B6978",
     display: "table-cell",
          border: "solid",
          textAlign : "center",
          width : "100px",
          height : "30px",
          paddingTop : "10px",
          color : "white"
   };


   var tableCaptionStyle = {
   background: "#c6e2ff",
     display: "block",
     fontSize : "20px",
     fontWeight: "bold",
          border: "solid",
          textAlign : "center",
          width : "650px",
          height : "30px",
          paddingTop : "3px",
          borderRadius: "25px",
          marginLeft : "30px",
          marginTop : "20px"
   }


   var rowCaptionStyle = {
    width : "600px",
    display :  "table-caption",
    background: "#4B6978",
    textAlign : "center",
    padding: "20px",
     fontSize : "20px",
    fontWeight :"bold",
    color : "white"
   };


   var rowStyle = {
    display :  "table-row",
    background: "#eee",
    padding: "20px",
    margin: "20px",
    fontWeight :"bold"
   };


   var CellStyle  =    {

          display: "table-cell",
          border: "solid",
           borderColor : "white",
          textAlign : "center",
          width : "100px",
          height : "30px",
          paddingTop : "10px"
      }


      class ReactSP extends React.Component{
          constructor(){
              super();
                this.state = {
        items: [
          {
            "CarName": "",
            "Quarter1": "",
            "Quarter2":"",
            "Quarter3": "",
            "Quarter4":""
          }
        ]
      };
     }


          componentDidMount() {

             this.RetrieveSPData();

          }

          RetrieveSPData(){

              var reactHandler = this;
              var spRequest = new XMLHttpRequest();
              spRequest.open('GET', "/sites/playground/_api/web/lists/getbytitle('ProductSales')/items",true);
              spRequest.setRequestHeader("Accept","application/json");
              spRequest.onreadystatechange = function(){

                  if (spRequest.readyState === 4 && spRequest.status === 200){
                      var result = JSON.parse(spRequest.responseText);

                      reactHandler.setState({
                          items: result.value
                      });
                  }

                  else if  (spRequest.readyState === 4 && spRequest.status !== 200){
                      console.log('Error Occured !');
                  }
              };

              spRequest.send();
          }


          render(){
             return (
        <div style={panelStyle}>
          <br></br>
          <br></br>
          <div style={tableCaptionStyle} > Demo : Retrieve SharePoint List Items using React JS  </div>
          <br></br>


          <div style={tableStyle} >
             <div style={rowCaptionStyle} > Quarterly Car Sales Data </div>
            <div style={rowStyle} >
              <div style={headerStyle}>Car Name</div>
              <div style={headerStyle}>Quarter 1 </div>
              <div style={headerStyle}>Quarter 2</div>
             <div style={headerStyle}>Quarter 3</div>
              <div style={headerStyle}>Quarter 4</div>
            </div>

              {this.state.items.map(function(item,key){
                return (<div style={rowStyle} key={key}>
                    <div style={CellStyle}>{item.CarName}</div>
                    <div style={CellStyle}>{item.Quarter1}</div>
                     <div style={CellStyle}>{item.Quarter2}</div>
           <div style={CellStyle}>{item.Quarter3}</div>
           <div style={CellStyle}>{item.Quarter4}</div>
                  </div>);
              })}

          </div>
        </div>
      );
    }
      }

      ReactDOM.render(<ReactSP />, document.getElementById('CarSalesData'));
Implement Kendo UI Client Webparts for SharePoint Server 2016
Kendo UI provides with an advancaed grid library which can be used o create dnamic client web parts for SharePoint. Though it is a clien side library it is not a replacement to jquery or Angular/Knockout which was discussed in this article. Kendo UI is aimed at improving the productivity of client side development by using it along with jQuery.
We can use Kendo UI in both SharePoint Online as well as SharePoint On Premise. In this article we will see how to implement the data retrieval in SharePoint Server 2016
Implementation
We will be creating the grid in a predefined div :
<div id="Mygrid"></div>
So as to populate the above div using Kendo UI Grid compoenent , we will invoke Kendo UI using the below call and pass in the required parameters.
$("#Mygrid").kendoGrid({ parameters })
Parameters
**DataSource :
**
The data source is the main parameter that contains the URL to which we will issue a GET request. The URL and the type of response expected("application/json; odata=verbose") are specified within the read attribute.
read: {
  url: "https://SP2016:5050/sites/Playground/_api/lists/getbytitle('ProductSales')/items",
           beforeSend: function(xhr) {
                         xhr.setRequestHeader("Accept", "application/json; odata=verbose")
                    }
      }
Upon successful data retrieval the data is returned from the success function as :
schema: {
             data: function(data) {
                     return data.d && data.d.results ? data.d.results : [data.d];
             }
        }
Other Parameters
We can specify additional grouping,sorting and pagination in the below section. We will specify the SharePoint List column to Kendo grid mapping in the columns attribute section.
height: 550,
         groupable: true,
         sortable: true,
         pageable: {
             refresh: true,
             pageSizes: true,
             buttonCount: 5
         },
         columns: [{

             field: "Product",
             title: "Product"
         }, {
             field: "Quarter1",
             title: "Quarter 1"
         }, {
             field: "Quarter2",
             title: "Quarter 2"
         }, {
             field: "Quarter3",
             title: "Quarter 3"

         }, {
             field: "Quarter4",
             title: "Quarter 4"

         }]
     });
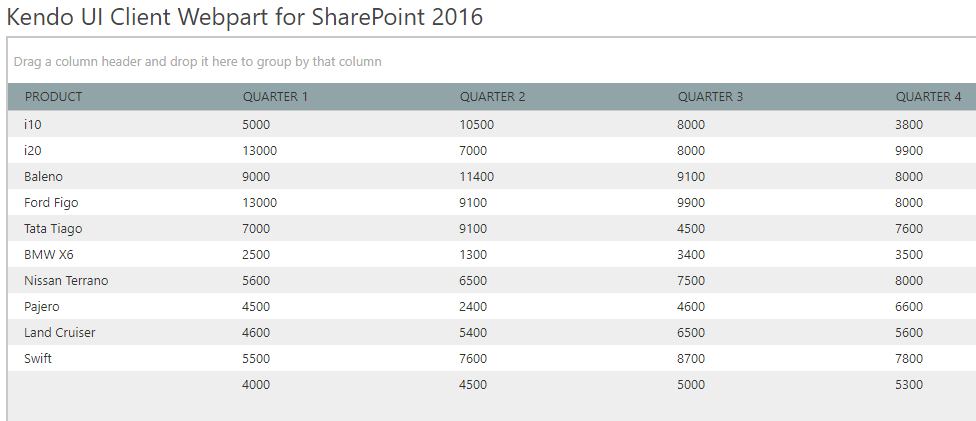
Thus once the data is retrieved using the AJAX call, the returned data is used by the Kendo Grid to create a sortable/filterable dynamic grid as shown below :
Code base for Kendo UI SharePoint 2016 Webpart
<script src="https://ajax.googleapis.com/ajax/libs/jquery/3.2.1/jquery.min.js"></script>

<script src="https://kendo.cdn.telerik.com/2017.1.118/js/kendo.all.min.js"></script>


<link rel="stylesheet" type = "text/css" href = "https://kendo.cdn.telerik.com/2016.1.412/styles/kendo.common-office365.min.css" />
<link rel="stylesheet" type = "text/css" href = "https://kendo.cdn.telerik.com/2016.1.412/styles/kendo.office365.min.css" />
<link rel="stylesheet" type = "text/css" href = "https://kendo.cdn.telerik.com/2016.1.412/styles/kendo.dataviz.min.css" />
<link rel="stylesheet" type = "text/css" href = "https://kendo.cdn.telerik.com/2016.1.412/styles/kendo.dataviz.office365.min.css" />

<style>
div#grid {

background-color : #eee;

}

.k-header{
background-color : #91A4A7 ;
color : white !important;
}

.k-grouping-row{
background-color : lightgrey ;
color : white !important;
}

</style>

<div id="Mygrid"></div>

<script>
    $(document).ready(function () {
        $("#Mygrid").kendoGrid({
           dataSource: {
      type: "json",
      transport: {
      read: {
               url: "https://SP2016:5050/sites/Playground/_api/lists/getbytitle('ProductSales')/items",
          beforeSend: function  (xhr) {
                xhr.setRequestHeader("Accept", "application/json; odata=verbose")
            }
        }
    },
    schema: {
        data: function  (data) {
            return data.d && data.d.results ? data.d.results : [data.d];
        }
    },
    pageSize: 10
},
            height: 700,
            groupable: true,
            sortable: true,
            pageable: {
                refresh: true,
                pageSizes: true,
                buttonCount: 5
            },
            columns: [{

                field: "Product",
                title: "Product"
            }, {
                field: "Quarter1",
                title: "Quarter 1"
            }, {
                field: "Quarter2",
                title: "Quarter 2"
            }, {
                field: "Quarter3",
                title: "Quarter 3"

            }, {
                field: "Quarter4",
                title: "Quarter 4"

            }]
        });
    });

</script>
Summary
Thus we have seen how to implement client side webparts in SharePoint Server 2016 using React,Angular,Knockout and Kendo UI. We will see more examples in the coming article.