Getting Started With Moving SharePoint Server To Another Farm
A SharePoint farm is a set of Servers within a SharePoint Installation that shares a common configuration database (SharePoint_Config). The configuration database will store all the settings and SharePoint configuration data of the farm within SharePoint_Config database. There will only be only configuration database on a farm. SharePoint farm is created while running SharePoint products and configuration wizard for the first time in a SharePoint Server.

If you chose to create a new Server farm, it will create a new configuration database in SQL Server and add the Server to the Farm. If the configuration database has already been created, it means the farm is already set up. The next time, when you want to add a Server to the farm, you will be choosing the option Connect to an existing Server farm.
However, there can be instances, where you have set up multiple SharePoint Farms, each having their own Configuration database and you want to move a Server between the farms. Say, for instance, we have farm 1, which has two SharePoint 2016 Servers – SP2016S1 and SP2016S2

We also have a farm 2, which contains four SharePoint 2016 Servers, each having Mini Roles assigned during Server setup. Now, we want to move SP2016S2 from Farm 1 to Farm 2. We will see how to achieve this in this article.

Move SharePoint 2016 Server across Farms
We will be making use of SharePoint 2016 products configuration wizard to move the Servers. The overall steps done will be, as shown below.
- Disconnect SP2016S1 from Farm 1.
- Add Server SP2016S1 to Farm 2.
Spin up SharePoint 2016 products and configuration wizard.

This will start up the Configuration Wizard. Click Next.

Select Disconnect from this Server farm radio button and click Next.
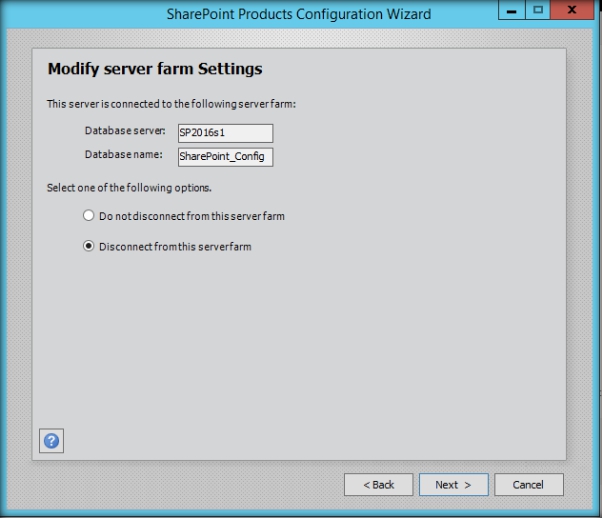
It will pop up a warning that the Server will be removed from the farm. Click Yes to continue.

The Server will now be removed from the farm and will disconnect from the configuration database.

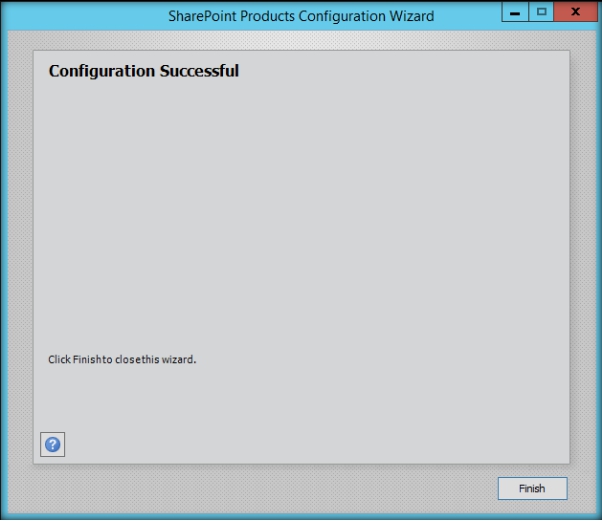
Once the success message comes up, click Finish to close the wizard.
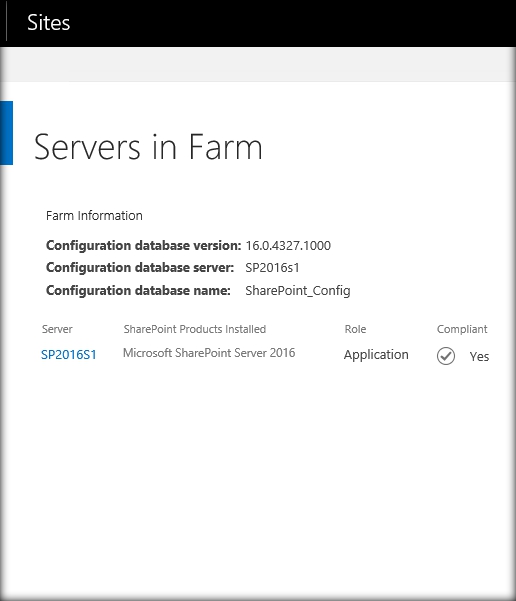
Now, if we head over to the Servers in Farm Central Administration page, we can see that only one Server is listed. Thus, the second Server has been removed from the farm.
Add Server to new Farm
Now, we have to add the Server to the new farm. Run SharePoint 2016 Products Configuration Wizard once again.

Now, select Connect to an existing server farm radio button option and click Next.

Specify the database Server and click Retrieve Database Names button. This will fetch the configuration database of the new farm.

Specify the passphrase, which was entered when the Farm was initially created. The passphrase is required whenever a new Server is joined to the farm. Click Next.

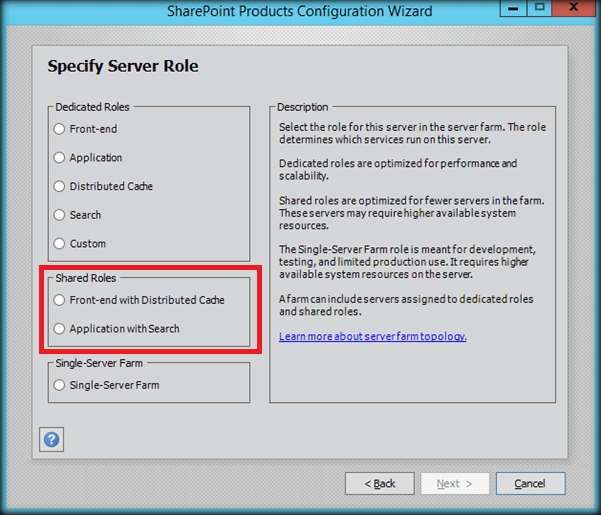
The next page gives us the option to specify the Mini Role associated with the Server. Mini Role is a new feature introduced in SharePoint Server 2016. It optimizes the functioning of the Servers in a SharePoint farm, which is based on the role; they have been assigned. Select the appropriate Mini Role and click Next.

If Feature Pack 1 for SharePoint 2016 has been installed, the page, mentioned above will have two more extra Shared Mini Roles, as shown below.
The next page will summarize the Configuration Database Server Name, Database Name and the Mini Role. This would be the last chance to make any changes.
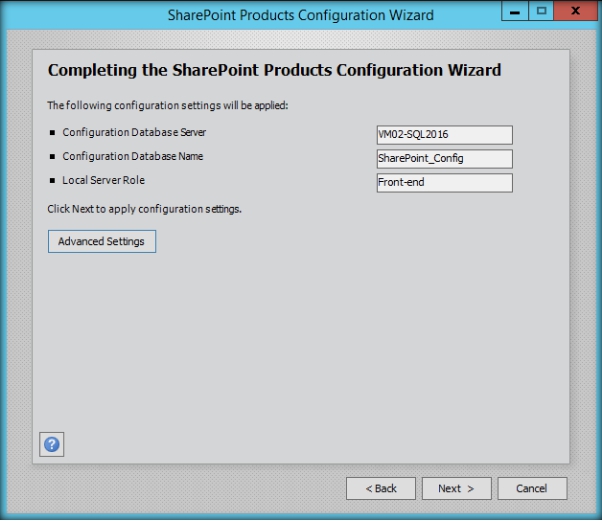
If you click Advanced settings, it gives us the option to choose whether the current Server should Host Central Administration or not.

Click Next to start the configuration of the new Server.

This will take some time to complete and when done, the Server will be added to the new Farm.

Click Finish to close the wizard.

Heading over to the Servers in Farm page of the Farm 2, we can see the Server from Farm 1 has been added to Farm 2 Server’s list.

Summary
Thus, we saw how to remove a SharePoint 2016 Server from a Farm and add it to a new SharePoint 2016 Farm.