Troubleshooting the Master Data Services Add-in for Excel
When using the Master Data Services Add-in for Excel, you may experience issues while installing or working with data. This article contains troubleshooting tips and will be updated over time.
For general tips for working in the Add-in for Excel, see this article.
Downloads and Installation Tips
**
**The download and installation of the MDS add-in is not included on the DVD/ISO for SQL Server 2012.
It is part of the additional Feature-Pack downloads from the Microsoft download website.
- The latest Cumulative Update release after SP1 release of SQL Server 2012 http://www.microsoft.com/en-us/download/details.aspx?id=35581
- Contains CU7 fix as described in http://support.microsoft.com/kb/2885671
- Contains CU4 fix as described in http://support.microsoft.com/kb/2840658
- The SP1 release of MDS SQL Server 2012 - Jun 11, 2012 11.0.3000.0 - since removed and replaced by the latest patch above.
- The RTM release of MDS SQL Server 2012 - Mar 6, 2012 - 11.0.2100.60 - http://go.microsoft.com/fwlink/?LinkID=237667
- Older prerelease beta builds have been removed
- 11.0.1750.32 (November 2011) is SQL Server 2012 "Denali" Release Candidate 0 prerelease trial edition
- 11.0.1440.19 for SQL Server Denali CTP3
Prereqs: Be sure to note the Prerequisites are installed prior to installing the add-in as explained in detail on the download landing page linked above. A few tips:
Your Windows version should be at least the minimum version describe in the prerequisites. Windows Service Pack 2 is a minimum version requirement for Windows 2008 Server and Windows Vista for example.
Your Microsoft Office install should include the Excel features, and can be Office 2007 or Office 2010, 32-bit or 64-bit.
3.. Check which bitness (32-bit or 64-bit) of Office and Excel you have installed. This does not have to match the bitness of Windows itself. 64-bit Windows operating systems can typically run 32-bit or 64-bit Office application.
The bitness of the MDS Add-in for Excel that you download and install needs to match your Excel bitness exactly.
To determine which one you have -
A. Open Excel. Click the File tab on the ribbon. Select the Help page. If you do not see the Help button (Excel 2013 for example) click Account > ? About Excel button.
B.On the right pane note About Microsoft Excel
For example the text Version: 14.0.1760.1000 (32-bit) indicates that the Excel installation is 32-bit.
C. If you install the 32-bit version of Excel, you must download use the 32-bit version of the MDS Add-in. If you install the 64-bit version of Excel, you must use the 64-bit version of the Add-in. The two are not interchangeable.
- ENU\x64\MasterDataServicesExcelAddin.msi == 64-bit MDS Add-in for Excel
- ENU\x86\MasterDataServicesExcelAddin.msi == 32-bit MDS Add-in for Excel
- Most computers will require the additional download and installation of Visual Studio 2010 Tools for Office Runtime http://www.microsoft.com/en-us/download/details.aspx?id=35594
Choose the correct bitness to match your Windows operations system - vstor40_x64.exe for 64-bit Windows computers, and vstor40_x64.exe for 32-bit Windows computers.
- You need SQL Server 2012 Master Data Services installed either on a remote SQL server that is accessible from the client computer, or you can install both MDS and the Excel on the same computer. Without MDS there is little reason to download to have the Add-in for Excel.
Note: The older Master Data Services from SQL Server 2008 R2 release is not supported with the MDS Add-in for Excel, so you cannot connect from Excel to MDS 2008 R2 (versions 10.5.*)
Confirm Installation and Enable the Add-in
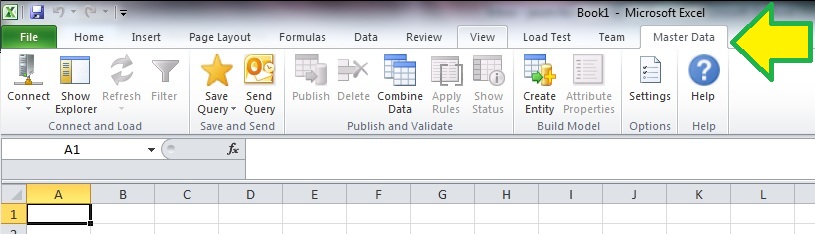
One way to confirm the add-in is present is to open Excel and see if the Master Data ribbon tab is displayed.
Sometimes the add-in can become disabled. To troubleshoot a missing Master Data ribbon or menu follow the steps below:
To determine whether or not the Add-in is installed and enabled, complete the following steps:
1. In Excel 2012, click the File tab. In Excel 2007, click the round Office button in the upper left.
2. Click Options.
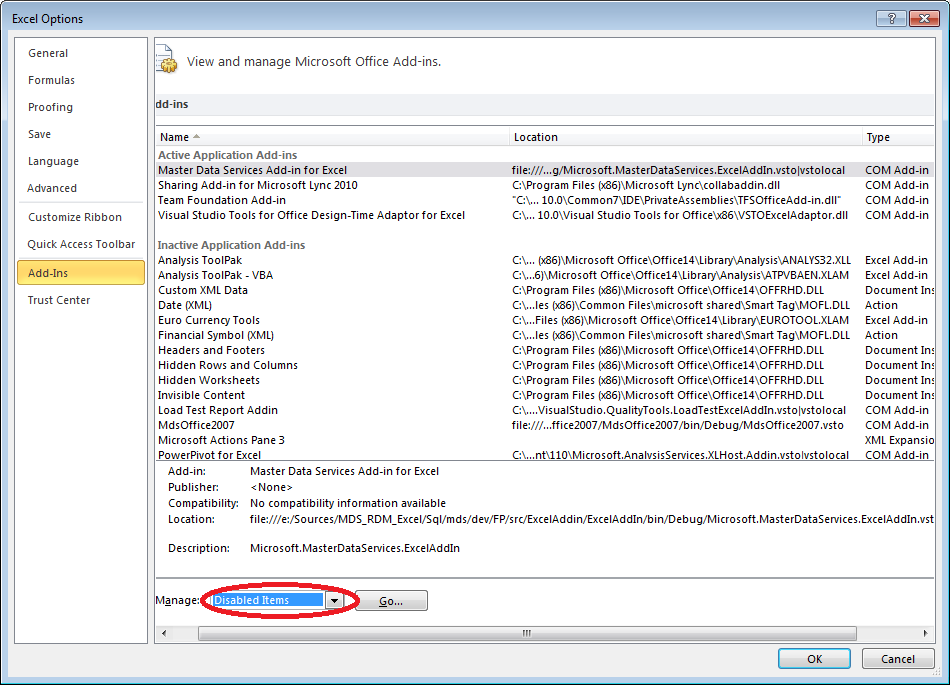
3. Click Add-Ins.
The Master Data Services Add-in for Excel should be listed under the heading Active Application Add-ins as shown here at the top of the listing.
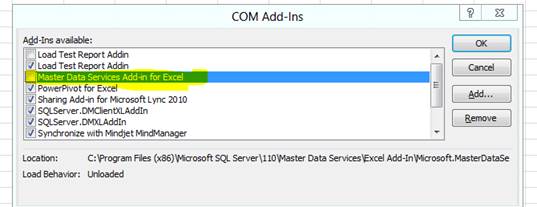
If it appears under the heading of Disabled or Inactive Application Add-ins. If it not, at the bottom of the dialog box, in the Manage list, select Disabled Items or COM Add-ins and click Go. The check box for the Add-in must be selected for the Add-in to be enabled.
In this screenshot the box is unchecked, and you should manually check the box for "Master Data Services Add-in for Excel" to enable it.
To check the version of the MDS Add-in for Excel
During the SQL Server 2012 prerelease time frame, the version of the Master Data Services Addin for Excel should closely match the version of the MDS server installation. For example, you should not use the CTP3 build of the MDS Add-in for Excel to connect to a RC0 MDS Server.
1. Locate the installation folder for the add-in.
- The default installation folder for the 32-bit MDS Add-in for Excel is "C:\Program Files (x86)\Microsoft SQL Server\110\Master Data Services\Excel Add-In\
- The default installation folder for the 64-bit MDS Add-in for Excel is "C:\Program Files\Microsoft SQL Server\110\Master Data Services\Excel Add-In\
2. Locate the two dll files named **Microsoft.MasterDataServices.ExcelAddIn.dll **and file Microsoft.MasterDataServices.ExcelAddInCore.dll
The file version may vary between the two in normal circumstances, so notice the higher version of the two files to indicate the build number.
3. Right click on this file, and view the Properties.
4. On the properties dialogue, click the Details tab.
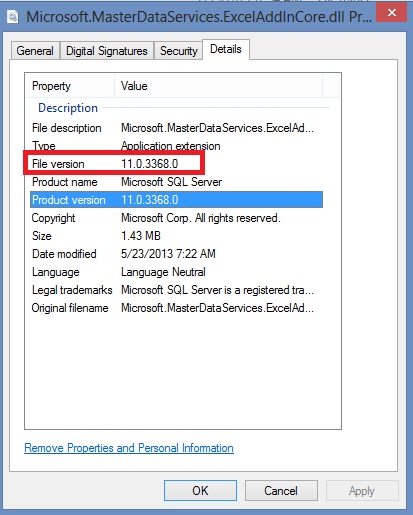
5. Note the File version and the Product version fields.
For example 11.0.2100.60 is the version number for SQL Server 2012 RTM with no patches installed.
And 11.0.3368.0 indicates SQL Server 2012 with Service Pack 1, etc.
**Note: ** Installing a SQL Server Cumulative Update Hotfix or Service Pack does not patch the Master Data Services Excel Add-in, so updates will have to be installed separately as needed on client computers.
Getting Connected by providing the URL to your MDS website
To get connected from your Master Data Services Add-in for Excel to your MDS Server,
- First as a prerequisite make sure your MDS website is operational and working via the Internet Explorer browser. Visit the URL and ensure the site displays correctly. If the website does not display, please troubleshoot the website before continuing to use the MDS Add-in for Excel
Note:* The MDS Add-in for Excel is only compatible with connections to SQL Server 2012 (Denali) server installations of Master Data Services, and cannot connect to SQL Server 2008 R2 Master Data Services server.
Open Excel and open a new or existing Excel file. Click the File tab, Click New, and create a Blank workbook for example.
Click the Master Data tab in the Excel ribbon.
Click the Connect button on the far left of the ribbon. Make a New Connection. Click the New... button.
On the Add New Connection dialogue,
A. Provide a Description as a user friendly label for this connection that you will recognize.
B. Provide the MDS server address website URL. The formatting of the URL is important.
- For the SQL Server Denali CTP3 prerelease builds the URL format should include "service.svc" in the URL suffix. An example URL is http://computer/service.svc for the default MDS web site, or http://computer/site/service.svc for MDS installed as a subsite named site, or http://computer:123/site/service.svc where 123 is a port number.
- For the SQL Server Denali RC0 prerelease builds (November 2011), the site URL with no suffix should be provided. For example http://computer/ or http://computer/site/ or http://computer:123/site/ . Note the suffix services.svc or default.aspx should not be added into the URL in RC0 or later builds or an error will occur.
- Click OK to save the connection.
- Highlight the newly added Existing connection showing the description you provided, and click the Test button. If the test succeeds the information message will be displayed "Connection succeeded."
Common Error: **The Master Data Manager Web Application is Older than the Add-in Version
**You may get the error message:
- The connection failed because the Master Data Manager web application version is older than the Add-in version.
As of September, 2011, this is because the MDS Add-in for Excel works with data in a Denali installation of MDS only. In the future, this error message may also apply to versions of the Add-in. For example, after Denali is released, if the web application is still running CTP3, it must be upgraded before you can work in the Excel Add-in.
This error may also occur if the MDS Server Address provided in the connection string is not accurate. The address should be something similar to http://computer/site. If you enter http://computer/site/default.aspx or a similar string, this error may be displayed.
Common Error: A Formula or Sheet Contains the Name 'Leaf<GUID>'
You may get the error message:
- A formula or sheet you want to move or copy contains the name 'Leaf7859783...', which already exists on the destination worksheet. Do you want to use this version of the name
This issue occurs when you copy and paste MDS-managed data between workbooks. It does not occur when you copy and paste between worksheets in the same workbook. The workaround for this issue is to paste values only.
Tip: When you want to share data with other users, you should publish it to the MDS repository and then share a shortcut query file with the other user. You should not copy and paste MDS-managed data between worksheets.
Enabling Diagnostic Logging for advanced troubleshooting
**
**You can log the client side activities from the MDS Add-in for Excel and also log the server side activity from the MDS web application itself.
Typically both sides of the conversation are necessary to troubleshoot issues with the MDS Add-in for Excel.
A> Follow this KB article to edit the web application .config file to enable the server side logging for your MDS web application.
http://support.microsoft.com/kb/2423478
B> Also enable the logging in the Master Data tab in Excel.
To Enable Logging In SQL Server 2012 Release Candidate 0 (Nov 2011) and later prereleases of the MDS Add-in for Excel, to enable logging complete the following steps:
- Open Excel, and click on the Master Data ribbon tab.
- Click the Settings button
- On the Settings tab check the box "Turn on detailed logging"
- Reproduce the failure or error condition you are troubleshooting.
- Visit the output folder to find the log output using Windows Explorer or My Computer to browse the C drive.
The log output goes to the directory as designated by the user's temp environment variable in Windows.
For example, each user may have a folder such as: C:\Users\username>\AppData\Local\Temp\MDSLogs
If unsure of the temp location, type %temp% in the Explorer window address bar as a wildcard location to find the temp directory for the current user.
- Multiple files may be present in the MDSLogs folder. The file name will include the date and time stamp to help locate the appropriate log file, as well as the Process identifier.
For example file EXCEL.EXE_20111130_163640272_PID3944_MDSLogFile was created on Nov 30, 2011 at 16:36:40pm.
Note: If multiple Excel.exe processes are running at any given time, you can use the PID number to identify each distinct process, and correlate that with the Process tab in Windows Task Manager.
A. Open Task Manager, select the View menu Select Columns... and choose the column PID (Process Identifier).
B. On the Applications tab in Task Manager, highlight the row for the Excel process and workbook which you want to further troubleshoot.
C. Right click on the item and choose Go To Process. Task Manager will jump to the Processes tab**,** and will highlight the matching Excel.exe.
D. On the highlighted process, note the PID value for that row, and correlate this PID number with the number in the log file name.
To Enable Logging for SQL Server 2012 "Denali" Community Technology Preview (CTP3) and prior releases, to get more detailed logging, complete the following steps:
1. Click Start.
2. Right-click Computer and choose Properties.
3. Click Advanced system settings.
4. Click Environment Variables.
5. In the User variables section, click New.
6. In the Variable name box, type VSTO_SUPPRESSDISPLAYALERTS.
7. In the Variable value box, type 0.
8. Click OK.
Restart Excel. The next time you encounter the error, more verbose help will be displayed.