Exchange 2010 DAG Using Server 2008 R2 – Part 1
Now that Exchange Server 2010 is RTM and Server 2008 R2 is RTM, I thought it would be nice to create a multi-part article on how to use create a Database Availability Group (DAG) on two Exchange Server 2010 RTM nodes utilizing Server 2008 R2 as their Operating System. This article is to guide you through the entire process from preparing Server 2008 R2 for Exchange 2010 RTM, installing Exchange 2010 RTM, creating databases, creating a DAG, adding our nodes to the DAG, and then replicating our databases between both servers.
Lab Setup
Guest Virtual Machines
One Server 2008 R2 Enterprise (Standard can be used) RTM x64 Domain Controller.
Two Server 2008 R2 Enterprise (Enterprise Required) RTM x64 (x64 required) Member Servers where Exchange 2010 RTM will be installed with the Mailbox, Client Access Server, and Hub Transport Server roles.
One Server 2008 Enterprise (Standard can be used) RTM x64 server that will be our File Share Witness (FSW) Server. This box will not serve any other purpose in this lab other than FSW.
Assumptions
- You have a domain that contains at least one Server 2003 SP2 Domain Controller (DC).
- You have configured the IP settings accordingly for all servers to be on the same subnet which includes the public NICs for both Failover Cluster nodes. I have provided the IP scheme of my lab below, but this will vary depending on your needs and VMware configuration.
Computer Names
DAG Node 1 – SHUD-EXC01
DAG Node 2 – SHUD-EXC02
Domain Controller – SHUD-DC01
FSW Server – SHUD-OCSFE01
Configuration of Exchange 2010 DAG Nodes
Processor: 4
Memory: 1024MB
Network Type - MAPI NIC (MAPI Network)
Network Type - Replication NIC (Replication Network)
Virtual Disk Type – System Volume (C:\: 50GB Dynamic
Storage Note: In a real-world environment, depending on the needs of the business and environment, it is best practice to install your database and logs on separate disks/spindles; both of which are separate from the spindles that the C:\ partition utilize. We will be installing Exchange 2010 RTM databases/logs on the same disks/spindles for simplicity sakes for this lab. While Exchange 2010 databases move a lot of the IO for databases to sequential IO, there’s still quite a bit of Random IO occurring and is still recommended to place the database and logs on separate spindles.
Network Note: A single NIC DAG is supported. It is still recommended to have at least one dedicated replication network. If using only a single NIC, it is recommended for this network to be redundant as well as gigabit.
Configuration of Domain Controller
Processor: 4
Memory: 512MB
Network Type - External NIC
Virtual Disk Type – System Volume (C:\: 50GB Dynamic
IP Addressing Scheme (Corporate Subnet otherwise known as a MAPI Network to Exchange 2010 DAGs)
IP Address – 192.168.1.x
Subnet Mask – 255.255.255.0
Default Gateway – 192.168.1.1
DNS Server – 192.168.1.150 (IP Address of the Domain Controller/DNS Server)
IP Addressing Scheme (Heartbeat Subnet otherwise known as a Replication Network to Exchange 2010 DAGs)
IP Address – 10.10.10.x
Default Gateway – 10.10.10.x
Subnet Mask – 255.255.255.0
LAB Architecture
http://www.shudnow.net/images/Exchange2010DAG14.jpg
Some notes about this architecture:
- Exchange 2010 DAGs remove the limitation of requiring Mailbox Only Role Servers as existed with Exchange 2007 Clustered Servers
- Exchange 2010 is no longer Cluster Aware and only utilizes very few pieces of the Failover Cluster Services such as Cluster Heartbeat and Cluster Networks. More on this in an upcoming part.
- UM is supported on these two DAG nodes but is recommended to be installed on separate servers
- For HTTP publishing, ISA can be utilized. For RPC Client Access Server publishing (which ISA cannot due as it publishes HTTP traffic only) with CAS Servers on the DAG nodes, you must use a hardware load balancer due to a Windows limitation preventing you from using Windows NLB and Clustering Services on the same Windows box. Alternatively, you can deploy two dedicated CAS Servers and utilize Windows NLB to load balance your RPC Client Access Server traffic.
- Two node DAG requires a witness that is not on a server within the DAG. Unlike Exchange 2007, Exchange 2010 automatically takes care of FSW creation; though you do have to specify the location of the FSW. It is recommended to specify the FSW to be created on a Hub Transport Server. Alternatively, you can put the witness on a non-Exchange Server after some prerequisites have been completed. I will be deploying the FSW on a member server (which happens to be my OCS Server in my lab) and will display the prerequisite process for achieving this.
Preparation of Exchange 2010 RTM DAG Nodes
Network Interface Card (NIC) Configuration
First thing we will want to do is configure the IP Configuration of both the MAPI NIC and the Replication NIC.
We will want to rename our MAPI NIC connection to MAPI and our Replication NIC connection to Replication. To do so, go to Start > Right-Click Network > Properties.
http://www.shudnow.net/images/Exchange2010DAG03.jpg
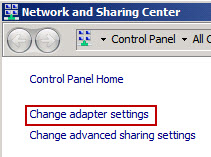
Once in the Control Panel, Choose Change Adapter Settings.
http://www.shudnow.net/images/Exchange2010DAG04.jpg
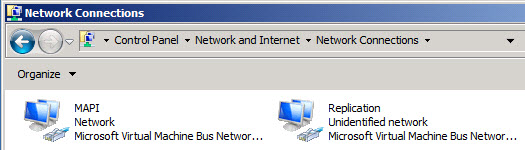
Now you will be presented with the Network Connections window. This is where you can modify the network properties for each NIC in your server. For your Internal Corporate Connection which is also your MAPI Network, rename your Local Area Connection to Internal. Likewise, for your Private Heartbeat Connection which is also your Replication Network, rename your Local Area Connection to Replication. After you have done this, it will look something similar to the following:
http://www.shudnow.net/images/Exchange2010DAG02.jpg
Network Interface Card (NIC) Configuration
First thing we will want to do is configure the IP Configuration of both the MAPI and Replication NIC.
Part of the assumptions earlier in this article as that you have a properly configured TCP/IP Network where all nodes are properly connected to the TCP/IP Network. Because of this, I will skip the Public TCP/IP Configuration and proceed to configuring the Private Heartbeat NIC.
Important: When configuring the MAPI NIC, you can leave IPv6 enabled if you are using Server 2008 R2. There is an issue with Server 2008 (still exists in SP2) that prevents IPv6 from listening on port 6004 that prevents Outlook Anywhere from working. You can read more about that here. Again, Server 2008 R2 does not have this issue. So if you happen to be installing Exchange 2010 on Server 2008, disable IPv6 as discussed below. If using Server 2008 R2, feel free to leave IPv6 enabled.
http://www.shudnow.net/images/Exchange2010DAG05.jpg
Note: You can, if you’d like, disable File and Printer Sharing for Microsoft Networks. In Exchange 2007 SP1, Microsoft provided the ability to allow for continuous replication to occur over the private network. Because Exchange 2007 utilizes SMB for log shipping, it is required to have the File and Printer Sharing enabled. Exchange 2010 no longer utilizes SMB and now utilizes TCP. More on this later in an upcoming Part.
In addition to disabling IPv6 from the NIC Properties, I would follow these instructions here to fully disable IPv6 on your Exchange 2010 system as disabling it on the NIC itself doesn’t fully disable IPv6. While the article is based on Exchange 2007, it’s a Windows based modification and will apply to a system running Exchange 2010 as well.
Double-Click or Right-Click > Properties on the Replication NIC to begin configuration.
Uncheck the following:
- Internet Protocol Version 6 (TCP /IPv6) – Disable IPv6 in the registry as well as noted above.
Select Internet-Protocol Version 4 (TCP /IPv4) and press the Properties button. For NodeA, the only TCP/IP configuration we will need, is the IP Address and Subnet Mask. NodeA’s IP configuration will be 10.10.10.152/24 while NodeB’s IP configuration will be 10.10.10.153/24.
http://www.shudnow.net/images/Exchange2010DAG06.jpg
Go into the Advanced NIC configuration settings by clicking the Advanced button. From there, you will navigate to DNS tab and de-select “Register this connection’s addresses in DNS.”
http://www.shudnow.net/images/Exchange2010DAG07.jpg
Select the WINS tab and de-select “Enable LMHOSTS lookup” and configure the NetBIOS setting to “Disable NetBIOS over TCP/IP.”
http://www.shudnow.net/images/Exchange2010DAG08.jpg
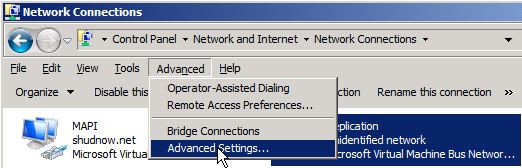
Once you are done configuring the Advanced settings, press OK three times and you will be back at the Network Connections screen. From here, choose Advanced and select Advanced Settings…
http://www.shudnow.net/images/Exchange2010DAG09.jpg
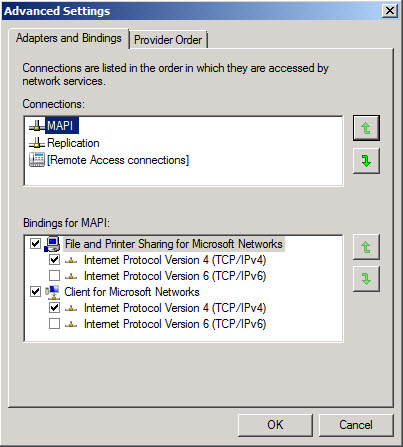
You will be presented with the Binding Order for your current NICs. Ensure that the MAPI NIC is on top by selecting MAPI and pressing the green up arrow key on the right-hand side of the dialog.
http://www.shudnow.net/images/Exchange2010DAG10.jpg
Exchange 2010 Operating System Prerequisites
Server 2008 SP2 and Server 2008 R2 prerequisites are quite different. Because our servers are going to be deployed on Server 2008 R2, we will follow the guidance for deploying on Server 2008 R2. You can see the prerequisite requirements here.
We will be doing our prerequsite installations via PowerShell. You can open PowerShell by going to Start > Run > PowerShell.
http://www.shudnow.net/images/Exchange2010DAG11.jpg
You will first have to import the module for ServerManager. Afterwards, depending on the roles that are installed, different prerequisites are required. Because we are going to be installing HUB/CAS/MBX, the command we would run is the following:
Add-WindowsFeature NET-Framework,RSAT-ADDS,Web-Server,Web-Basic-Auth,Web-Windows-Auth,Web-Metabase,Web-Net-Ext,Web-Lgcy-Mgmt-Console,WAS-Process-Model,RSAT-Web-Server,Web-ISAPI-Ext,Web-Digest-Auth,Web-Dyn-Compression,NET-HTTP-Activation,RPC-Over-HTTP-Proxy,Failover-Clustering -Restart
http://www.shudnow.net/images/Exchange2010DAG12.jpg
Note: The installation documentation does not have you include Failover-Clustering in the above command. I add it anyways since we’ll be using it for the DAG. I you don’t add it in the above command, you can just add it below when you enable the NetTcpPortSharing. If you don’t add it below, when you add the first node to the DAG, Failover Clustering will be installed anyways. I like to install it beforehand though.
Finally, we’ll want to modify the NetTcpPortSharing service to start automatically.
http://www.shudnow.net/images/Exchange2010DAG13.jpg
Summary
Well folks, that is all for Part 1 of this article. For Part 2, I will go through the installation process of one our DAG nodes that will contain the Client Access Server, Hub Transport Server, as well as Mailbox Server roles.
font: http://spott.tk/