BizTalk Server: Creating and Deploying BizTalk HTTP Receive Locations using BTDF framework
Problem Statement
When a BizTalk application need to implement the HTTP adapter to receive messages to BizTalk, there are different steps that the developer/administrator needs to take care for the adapter to function properly.
- Setting up the handling Mapping for the BizTalk HTTP receive location
- Creating an IIS application and binding it to correct app pool
- Creating receive port and receive locations
- Configure the receive location to accept the messages
The process is long and missing a step can result into the rework. If New receive locations are to be configured to work with the HTTP protocol, the developer/administrator needs to go through the same procedure mentioned above.
Possible Solutions
There are multiple ways to create the HTTP receive location, few of them are
- Manually Creating the Receive Location by following all the four steps mentioned above.
- Using PowerShell to automate the task for the four steps mentioned above
- Using BTDF to create the receive location and mappings.
In case of Way 1, the documentation in the references section titled "How to Configure an HTTP Receive Location" can be used.
In case of Way 2, following technet wiki article can be followed to set up the PowerShell Script.
BizTalk: PowerShell Script To Create and Configure HTTP Receive Location
This article aims to discuss the way 3: **To set up the HTTP Receive location of a BizTalk application using BTDF. **
Using BTDF to Create HTTP Receive Location
Introduction To BTDF
BTDF is an open source deployment framework used for deploying BizTalk applications on local dev boxes as well as different environments. It provides many facilities that can be used to club together the task that require to be performed pre and post deployment of the BizTalk deployment e.g restarting of the concerned Host Instances, IIS reset etc. Another advantage of BTDF is that it is very flexible and can be configured to do a lot of tasks before, during and after the deployment of BizTalk application. All these tasks can be packaged up as a single msi file and can be installed on the target environment. It also provides facility to define the variables related to different environments in a spreadsheet which simplifies the task of manually maintaining the binding files for the BizTalk application for Multiple environment. These are some of the features of BTDF. BTDF has proven to be a very reliable tool for creating build msi for BizTalk. It is a necessary weapon in the arsenal of a professional working on BizTalk platform.
This article uses the latest version 5.7 that is released. To learn more about the installation of the btdf and step by step guide for configuring the BTDF, refer following link. The link discusses the steps taken for BizTalk 2016 and Visual Studio 2015 , but same can be followed for other versions of BizTalk.
Following steps are required to set up the HTTP Receive Location for a BizTalk app using BTDF.
- Setting Up Initial Properties
- Create Application Pool to Process the Requests received
- Create the IIS application
- Configure the Receive Location in the Port Bindings Master.
Setting Up Initial Properties
In order to create the IIS application and reset the application pool after the deployment , following properties need to be set under the <PropertyGroup> record in the btdf project file.
<IncludeVirtualDirectories>True</IncludeVirtualDirectories>
<SkipIISReset>False</SkipIISReset>
In case if the IISReset is not required, the the <SkipIISReset> property can be set to **True **
Create Application Pool
In order to create the application pool to process the request received at IIS, an <ItemGroup> has to be added to the btdf project file. BTDF gives the flexibility to the developers to deploy their application from Visual Studio also and by creating a build server msi. So two different setting need to be made based upon the method of deployment. The main difference between the two settings is the way they read the user ID and password for the identity to be set up for the application pool. In case of the Visual studio deployment the user Id and password can be configured in the item group itself while in case of server deploy using msi it can be asked from the administrator installing the msi.
Deploying from Visual Studio.
Following are the properties that need to be set up in the item group.
<ItemGroup>
       <IISAppPool Include="BTSHTTPReceiveAppPool" Condition="'$(Configuration)' != 'Server'">
       <DeployAction>Create</DeployAction>
       <DotNetFrameworkVersion>v4.0</DotNetFrameworkVersion>
       <IdentityType>SpecificUser</IdentityType>
       <UserName>hostname\localUserAddedToIsolatedHostUsersGroup</UserName>
       <Password>password</Password>
       <PipelineMode>Integrated</PipelineMode>
       <UndeployAction>Delete</UndeployAction>
     </IISAppPool>
   </ItemGroup>
Deploying on Server using MSI
Following are the properties that need to be set up in the item group.
<ItemGroup>
     <IISAppPool Include="BTSHTTPReceiveAppPool" Condition="'$(Configuration)' == 'Server'">
       <DeployAction>Create</DeployAction>
       <DotNetFrameworkVersion>v4.0</DotNetFrameworkVersion>
       <IdentityType>SpecificUser</IdentityType>
       <UserName>$(IsolatedHostUserName)</UserName>
       <Password>$(IsolatedHostUserPassword)</Password>
       <PipelineMode>Integrated</PipelineMode>
       <UndeployAction>Delete</UndeployAction>
     </IISAppPool>
</ItemGroup>
The $(IsolatedHostUserName) and $(IsolatedHostUserPassword) are the environment variables that need to be configured in the InstallWizard.xml file . A typical InstallWizard.xml file would look like below.
<?xml version="1.0" encoding="utf-8" ?>
<!--
    Deployment Framework for BizTalk
    Copyright (C) 2008-14 Thomas F. Abraham, 2004-08 Scott Colestock
-->
<!-- Each SetEnvUIConfigItem element defines a single page in the wizard that appears during a server deployment. -->
<!-- The EnvironmentVarName element specifies the name of an environment variable that will contain the value of the -->
<!-- user's selection. Each environment variable automatically becomes an MSBuild property that you may reference in -->
<!-- your .btdfproj file. -->
<SetEnvUIConfig xmlns:xsd="http://www.w3.org/2001/XMLSchema" xmlns:xsi="http://www.w3.org/2001/XMLSchema-instance">
   <DialogCaption>ConfigureHTTPReceiveUsingBTDF</DialogCaption>
  <SetEnvUIConfigItem>
    <PromptText>Select the XML file that contains configuration information specific to this environment:</PromptText>
    <PromptValue></PromptValue>
    <ValueType>FileSelect</ValueType>
    <EnvironmentVarName>ENV_SETTINGS</EnvironmentVarName>
  </SetEnvUIConfigItem>
  <SetEnvUIConfigItem>
    <PromptText>Enter the domain qualified username for the IIS app pool</PromptText>
    <PromptValue></PromptValue>
    <ValueType>Text</ValueType>
    <EnvironmentVarName>IsolatedHostUserName</EnvironmentVarName>
  </SetEnvUIConfigItem>
  <SetEnvUIConfigItem>
    <PromptText>Enter the Password for the Username entered in previous step</PromptText>
    <PromptValue></PromptValue>
    <ValueType>Password</ValueType>
    <EnvironmentVarName>IsolatedHostUserPassword</EnvironmentVarName>
  </SetEnvUIConfigItem>

  <SetEnvUIConfigItem>
      <PromptText>Is this the LAST server in the BizTalk Group you are deploying to?

If so, BizTalk assemblies will be deployed to the BizTalk Management Database.</PromptText>
      <Caption>This is the LAST server in the BizTalk Group</Caption>
      <PromptValue>true</PromptValue>
      <ValueType>Checkbox</ValueType>
      <EnvironmentVarName>BT_DEPLOY_MGMT_DB</EnvironmentVarName>
   </SetEnvUIConfigItem>
</SetEnvUIConfig>
Creating IIS application
In order to create an IIS application to house the BTSHTTPReceive.dll, following<ItemGroup> needs to be added to the btdf project file.
<ItemGroup>
  <IISApp Include="BTSHTTPReceiveDemo" >
    <AppPoolName>BTSHTTPReceiveAppPool</AppPoolName>
    <DeployAction>Create</DeployAction>
    <SiteName>Default Web Site</SiteName>
    <PhysicalPath>C:\Program Files (x86)\Microsoft BizTalk Server 2016\HttpReceive64</PhysicalPath>
    <VirtualPath>/BTSHTTPReceiveDemo</VirtualPath>
    <IsapiFileName>BTSHTTPReceive.dll</IsapiFileName>
    <UndeployAction>Delete</UndeployAction>
  </IISApp>
</ItemGroup>
Above settings will ensure that the IIS app will be created while deployment and will be deleted when doing an undeployment.
The <IsapiFileName> creates the handler mapping required to process the request received on the IIS app.
Configure the Receive Location in the Port Bindings Master
A typical entry for a receive location will look like following.
<ReceivePort Name="HTTPReceivePort" IsTwoWay="true" BindingOption="1" AnalyticsEnabled="false">
      <Description xsi:nil="true" />
      <ReceiveLocations>
        <ReceiveLocation Name="HTTPReceiveLocation">
          <Description xsi:nil="true" />
          <Address>/${HTTPReceiveIISAppName}/BTSHTTPReceive.dll</Address>
          <PublicAddress>http://localhost//${HTTPReceiveIISAppName}</PublicAddress>
          <Primary>true</Primary>
          <ReceiveLocationServiceWindowEnabled>false</ReceiveLocationServiceWindowEnabled>
          <ReceiveLocationFromTime>2017-11-21T00:00:00</ReceiveLocationFromTime>
          <ReceiveLocationToTime>2017-11-21T23:59:59</ReceiveLocationToTime>
          <ReceiveLocationStartDateEnabled>false</ReceiveLocationStartDateEnabled>
          <ReceiveLocationStartDate>2017-11-21T00:00:00</ReceiveLocationStartDate>
          <ReceiveLocationEndDateEnabled>false</ReceiveLocationEndDateEnabled>
          <ReceiveLocationEndDate>2017-11-22T00:00:00</ReceiveLocationEndDate>
          <ReceiveLocationTransportType Name="HTTP" Capabilities="387" ConfigurationClsid="1c56d157-0553-4345-8a1f-55d2d1a3ffb6" />
          <ReceiveLocationTransportTypeData><CustomProps><SuspendFailedRequests vt="11">0</SuspendFailedRequests><LoopBack vt="11">0</LoopBack><UseSSO vt="11">0</UseSSO><ResponseContentType vt="8">application/xml</ResponseContentType><ReturnCorrelationHandle vt="11">-1</ReturnCorrelationHandle></CustomProps></ReceiveLocationTransportTypeData>
          <ReceivePipeline Name="Microsoft.BizTalk.DefaultPipelines.XMLReceive" FullyQualifiedName="Microsoft.BizTalk.DefaultPipelines.XMLReceive, Microsoft.BizTalk.DefaultPipelines, Version=3.0.1.0, Culture=neutral, PublicKeyToken=31bf3856ad364e35" Type="1" TrackingOption="None" Description="" />
          <ReceivePipelineData xsi:nil="true" />
          <SendPipeline Name="Microsoft.BizTalk.DefaultPipelines.PassThruTransmit" FullyQualifiedName="Microsoft.BizTalk.DefaultPipelines.PassThruTransmit, Microsoft.BizTalk.DefaultPipelines, Version=3.0.1.0, Culture=neutral, PublicKeyToken=31bf3856ad364e35" Type="2" TrackingOption="None" Description="" />
          <SendPipelineData xsi:nil="true" />
          <Enable>true</Enable>
          <ReceiveHandler Name="${IsolatedHostInstance}" HostTrusted="false">
            <TransportType Name="HTTP" Capabilities="387" ConfigurationClsid="1c56d157-0553-4345-8a1f-55d2d1a3ffb6" />
          </ReceiveHandler>
          <ScheduleRecurrenceType>None</ScheduleRecurrenceType>
          <ScheduleRecurenceFrom>2017-11-21T00:00:00</ScheduleRecurenceFrom>
          <ScheduleRecurrenceInterval>1</ScheduleRecurrenceInterval>
          <ScheduleDaysOfWeek>None</ScheduleDaysOfWeek>
          <ScheduleMonths>None</ScheduleMonths>
          <ScheduleMonthDays>None</ScheduleMonthDays>
          <ScheduleOrdinalDayOfWeek>None</ScheduleOrdinalDayOfWeek>
          <ScheduleOrdinalType>None</ScheduleOrdinalType>
          <ScheduleIsOrdinal>false</ScheduleIsOrdinal>
          <ScheduleLastDayOfMonth>false</ScheduleLastDayOfMonth>
          <ScheduleAutoAdjustToDaylightSaving>true</ScheduleAutoAdjustToDaylightSaving>
          <ScheduleTimeZone>UTC</ScheduleTimeZone>
        </ReceiveLocation>
      </ReceiveLocations>
      <SendPipelineData xsi:nil="true" />
      <Authentication>0</Authentication>
      <Tracking>0</Tracking>
      <Transforms />
      <OutboundTransforms />
      <RouteFailedMessage>false</RouteFailedMessage>
      <ApplicationName>ConfigureHTTPReceiveUsingBTDF</ApplicationName>
    </ReceivePort>
The variables ${HTTPReceiveIISAppName} and ${IsolatedHostInstance} need to be stored in the Environment SettingsFileGenerator file.
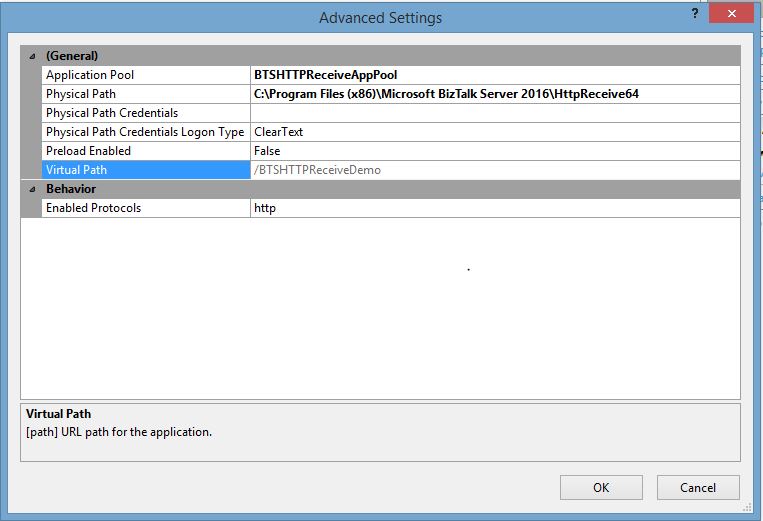
Verification Of Deployment
Following screenshots depict the artifacts created post the deployment.
Application Pool


IIS Application

BizTalk Receive Location


Sample Test Run done from SOAP UI

Conclusion
As clear from the creation of the app pool, IIS app and BizTalk Receive Location along with a successful test from the SOAP UI, it can be concluded that BTDF can be used to simplify the creation and deployment of the HTTP Receive Location.
Sample Code
The sample code to implement this concept in BizTalk 2016 can be found at following link of technet gallery. The deployment project can be copied and edited for other versions of BizTalk as required.
Sample Code for Creating and Deploying BizTalk HTTP Receive Locations using BTDF
See Also
- Step by Step Guide For Installation and Configuration of BTDF for BizTalk 2016 and Visual Studio 2015
- Deploying web services with BizTalk Deployment Framework
- BizTalk: PowerShell Script To Create and Configure HTTP Receive Location
An important place to find a huge amount of BizTalk related articles is the TechNet Wiki itself. The best entry point is BizTalk Server Resources on Technet Wiki
References
Following articles were referred while writing this article
- Introduction To Basics of BTDF : Deployment Framework for BizTalk Server
- How To Manually Configure HTTP Receive Location : How to Configure an HTTP Receive Location