.NET Core 2.0: Creating First Console Application using Command Prompt
Introduction
In this post, we will create our very first console application in .NET Core. We will see how we can build .NET Core based applications without using any IDE like Visual Studio. We will be using Command Line to create, build, and run the application. If we don’t need all the fancy features that Visual Studio and Visual Studio Code offer, then we can build a .NET Core application with just a Notepad. The only thing we would need is .NET Core SDK installed on the machine, and all other actions that we do with Visual Studio can be invoked using the CLI which we will see in here.
Checking .NET Core Installation
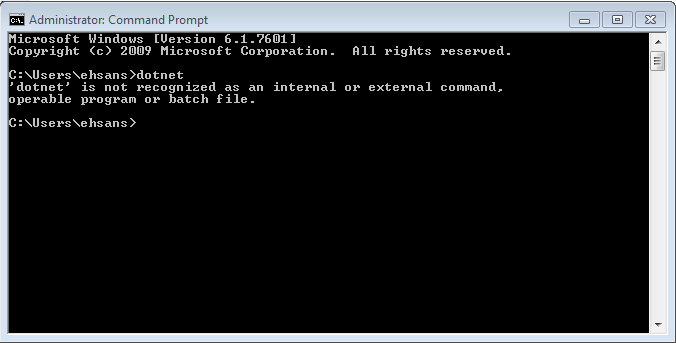
Before creating the .NET Core project, it is obvious to have .NET Core installed on our machine which can be checked by opening a Command Prompt window or PowerShell window and typing in it the "dotnet" command. If the .NET Core is not already installed on the machine, we will get an error as it will not be able to recognize the command.
Installing .NET Core SDK on Windows
As .NET Core is all about cross-platform, the SDK is available for different platforms which include Windows 32-bit and 64-bit, MacOS, and Linux. If we go to the official download link, we can see multiple options available from which can choose the desired one as per our need or convenience.
The following is the list taken from official .NET Core download link.

We will be creating the application using Windows, so let’s download the SDK Installer executable for Windows. I have downloaded the Installer of Windows (x64) as on my machine I have 64-bit Windows installed.

After downloading the installer, proceed to install the SDK.


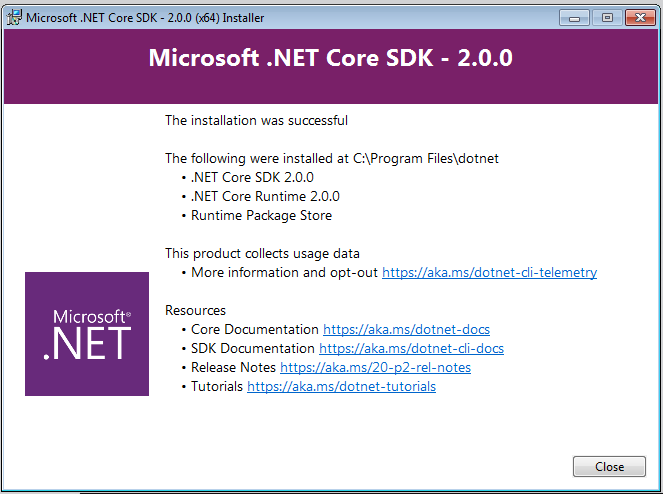
This installer will install all the necessary components needed to develop .NET Core application and to run it, including .NET Core RunTime, SDK, and other things as well. The installation will take 2 - 3 minutes and if all the things go right in installation, you will see the following window acknowledging the successful installation.
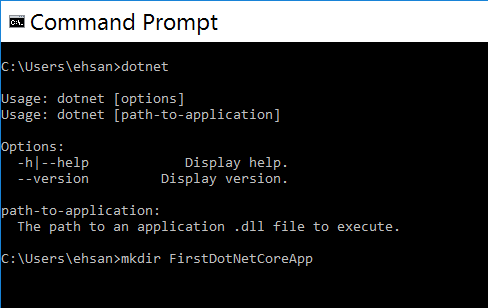
As we were able to install the SDK successfully, now open the command prompt again and type dotnet command again. I am using PowerShell for this. Executing the command gives you back some output that means .NET Core is being set up correctly.

.NET Core CLI provides different commands to create new project, build, clean and all other commands that we normally invoke using Visual Studio. There is a complete list of commands documented on the official documentation page on Microsoft website and all the commands can be seen there in detail.
Creating Console Application
Now, let’s create the simplest famous "Hello World" console application using command prompt in .NET Core. If all the previous steps have been completed correctly, open the Command Prompt and create a new directory which will contain the source code for the application.
Write the following command on cmd to create the directory.
*** mkdir First DotNetCoreApp***
Now, open the directory using the following command.
cd First DotNetCoreApp

From the above image, we can verify that we have opened the correct directory.
Adding Project Template
.NET Core comes with its own CLI tools enabled to create new project using commands in Command Prompt or PowerShell, without even opening up the IDE either Visual Studio or VS Code.
We will type dotnet new on command line and press Enter, which will list down all the templates that can be created using this command.
After running the command, we will see a few things listed which include the different flags available to do different things which are also available within Visual Studio but the support is added via Command Line too which is great.

If we go down a little bit, we can see all the templates listed that are available via CLI tools.

Now, let’s run the command for creating a new console application. So, write dotnet new and press Enter. This will create a new console application project in our working directory.

Our project has been created successfully but to double check and make sure the command worked fine, we can list the directory content and we should be able to see csproj, Program.cs, and other files for the application.

Building and Running the Application
Now, let’s run the application by executing the dotnet run command in cmd.

One thing to remember here is that if you are creating the project using .NET Core 1.0 SDK, then before the dotnet run command, you would need to execute the dotnet restore command which will restore all the NuGet package dependencies of the project, but for .NET Core 2.0, we don’t need to execute this command as calling the dotnet run makes sure to restore the NuGet package dependencies before running the code. In actual, the restore command was called when we execute the command dotnet new and NuGet packages were restored that time, but it is also called on run as well,
Summary
We learned about the .Net Core CLI that how we can use it to build applications without using any IDE using just Command Prompt or PowerShell.