Microsoft Azure: Liquid Templates in Logic Apps
Introduction
Azure Logic Apps supports basic JSON transformations through native data operation actions such as Compose or Parse JSON. For advanced JSON transformations, we can use Liquid templates with our logic apps. Microsoft has released the support of Liquid Templates to transform JSON and XML objects.
Liquid is a templating engine that uses a simple markup language to produce all sorts of output formats, such as HTML, JSON, CSV, etc. More details we can find here. It’s quite easy to use, we just need to get used to the new syntax.

Within Logic Apps, Liquid templates are used as a kind of XSLT for JSON objects. This allows us to create more complex transformations on JSON objects, without the need of introducing a custom Azure Function. Liquid templates are part of the Integration Account. Behind the scenes, DotLiquid is used.
How to Use
Here we will see how to use a Liquid map or template, which supports more complex JSON transformations, such as iterations, control flows, variables, and so on.
Prerequisites
Before we perform a Liquid transformation in a logic app, we must define the mapping from JSON to JSON with a Liquid map and store that map in integration account. And for that we must have prerequisites:
- An Azure subscription.
- Basic knowledge about logic apps
- A basic Integration Account
Demo
Define Liquid template
Create the Liquid template like below. The Liquid template defines how to transform JSON input as described here:
{
   "Employee Name" : "{{ content.FirstName }} {{ content.LastName }}",
   "Company Name" : "{{ content.Company }}",
   "Date Of Joining" : "{{ "now" | Date: "MM/dd/yyyy" }}",
   "Department" : "{{ content.department }}",
   "Technology" : "{{ content.Work | Size }}",
   "Skills" : [
      {% for  Skill in  content.Work %}
      {
         "Name" : "{{ Skill.skil }}",
         "Marks" : {{ Skill.Mark }}
      },
      {% endfor %}
   ]
}
Save above liquid template as "JsonToJsonTemplate.liquid"
Use below sample JSON file as an input for this demo:
{
   "FirstName" : "Kamlesh",
   "LastName" : "Kumar",
   "Company" : "Microsoft",
   "department" : "Interface Technology",
   "Work" : [
      {
         "skil" : "BizTalk Server",
         "Mark" : 95
      },
      {
         "skil" : "Logic Apps",
         "Mark" : 95
      },
      {
         "skil" : "Azure",
         "Mark" : 85
      },
      {
         "skil" : "OMS",
         "Mark" : 80
      },
      {
         "skil" : "Share Points",
         "Mark" : 70
      },
      {
         "skil" : "C Sharp",
         "Mark" : 95
      },
      {
         "skil" : "SQL Server",
         "Mark" : 95
      }
   ]
}
Create / Add Map in Integration Account
Open Azure portal and sing in with your existing account, if you don't have any account on Azure portal, first sing up and then log in to Azure portal.
Click All Resources in left panel menu like below screen shot

You should have your integration account created. In the search box, find and select your integration account like above screen shot.
Once you clicked integration account, you could see some components in the right panel and here you have to click Map.

In new panel, you can find your existing map details or if you are here the first time then you can add map. click Add and provide details for your map like below screen shot:
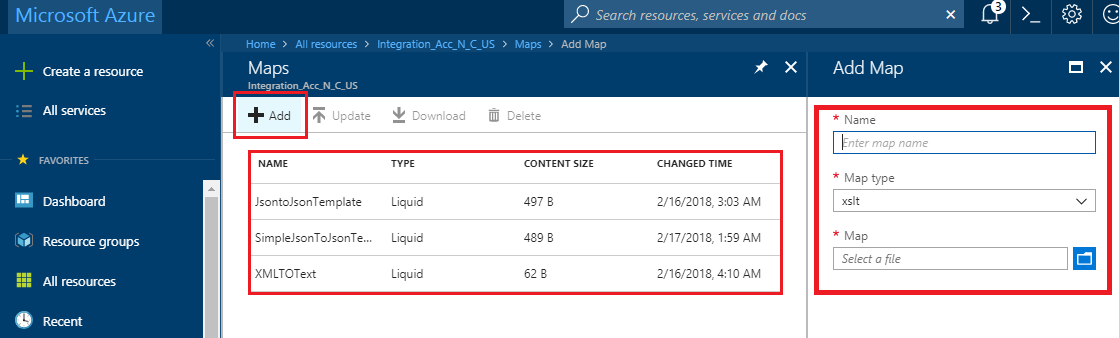
Name: The name for your map, which is "SimpleJsonToJsonTemplate_New" in this example
Map type: The type for your map. For JSON to JSON transformation, you must select liquid.
Map: An existing Liquid template or map file to use for transformation, which is "JsonToJsonTemplate.liquid" in this example. To find this file, you can use the file picker.
Create Logic Apps with JSON transformation
Now here we have to create a logic app which will use in JSON transformation.
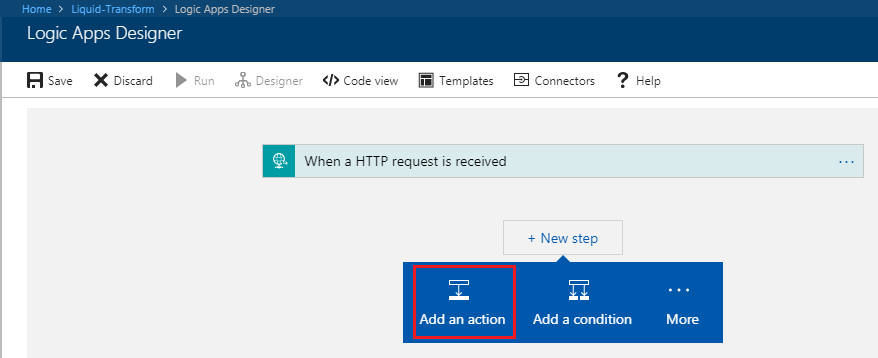
Create a logic app, Add the Request trigger to your logic app.
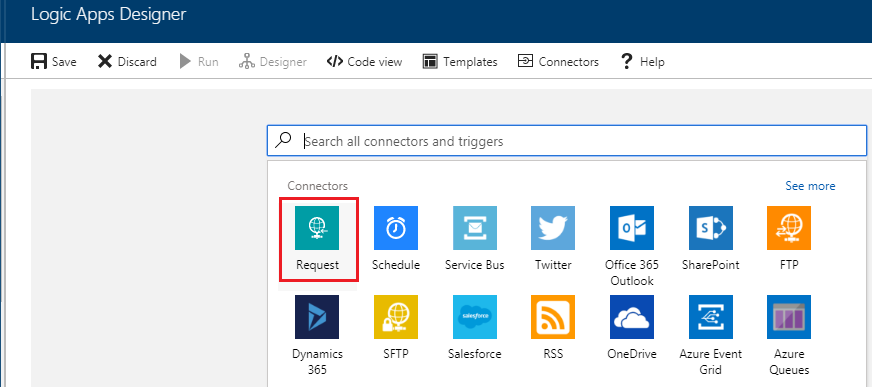

Next step => Add an action like below screen shot
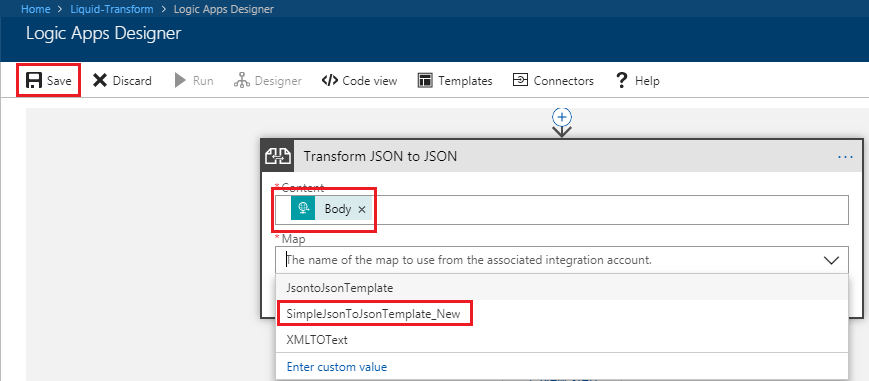
In the search box, type liquid, and select 'Liquid - Transform JSON to JSON'.

In the Content box, select Body from dynamic content list or parameters list, whichever appears. From the Map list, select your Liquid template, which is "SimpleJsonToJsonTemplate_New" in this example.
If the list is empty, your logic app is likely not linked to your integration account. To link your logic app to the integration account that has the Liquid template or map, follow these steps:
Go to your logic app menu, select Workflow settings from Settings section.
Choose your Integration account name from the Select an Integration account list, and click Save. If you still are not able to see your integration account in a list then please make sure your logic app and Integration account should be in the same location.

Test your logic app
It’s time to test your logic app liquid JSON to JSON transformation. Use Postman or a similar tool to post JSON input to your logic app. In this example using postman tool.

The transformed JSON output from your logic app looks like this example:


Summary
In this article, we reviewed how to create a user profile in Logic Apps using Liquid templates. Hope you’ve found this post handy. Feel free to add your comments or ask any questions below. If there's anything specifically that you want to be covered with respect to Liquid transform or Logic Apps please let us know.
See Also
Another important place to find a huge amount of Azure-related articles is the TechNet Wiki itself.