.NET Core: Process a Excel file with Microsoft Graph API & Azure Function
1 Introduction
This article is going to explain how to create a function app on Azure and use Excel API in Microsoft Graph. It shows how to use MS Graph explorer and postman to call function endpoints in Excel API. A demo project is explained how to process an existing excel file, Add a new row to a excel sheet, Calculate total in excel columns, Create a column and pie chart based on excel data.
2 Background
- If you love to start with .NET Core on a Linux server, check what are the basic things you have to do,Install .NETCore in a Linux server
- Say Hello from .NET Core application in a Linux server,.NET Core with a Linux server: Hello World!
- If you are interested in open source platforms and want to try out .NET Core application development in Linux, try with these steps,.NETCore: Create a web application with a Linux server
- If you want to know how to create an ASP.NET Core service application check this article,ASP.NETCore: Create a Web API application
- If you want to show a loading panel on the screen using ASP.NET Core, go through this article, ASP.NET Core : How to show a loading panel in a page
- If you like to use template generators for .NET Core this is the ideal article for you,.NET Core: Create web application with Yeoman template generator
- When you are developing ASP.NET Core web applications, security is a crucial thing, follow this article to know more about it,Secure your .NETCore web applications using IdentityServer 4
- Check how to show a confirmation dialog with jquery from this post,ASP.NET Core : How to show a confirmation dialog with jquery
- If you want to try out advanced features in jquery dialog on top of .NET Core, this will be a great article for you,ASP.NET Core : Advanced JQuery dialog actions
- If you are interested in user authentication & ASP.NET Identity follow this link,ASP.NET Identity: Customize User Authentication
- If you are interested to know about Azure storage, blobs check this article,Send smtp email with Azure blob storage attachments
- We are going to create a Function app and publish that in Azure, if you are curious to know more about Azure functions check this one,Azure Function App: Create a trigger on Cosmos DB
- If you are interested in Microsoft Graph and want to know more about Outlook API, check this article.NET Core: Building Function app with Microsoft Graph API and Azure Functions
3 Get profile information
You should have a Microsoft account to use Microsoft Graph. You can query on top of the data available in MS Graph as your emails, OneDrive files, Calendar events, Tasks etc. At first let's try to get your profile information.
3.1 Microsoft Graph
Microsoft Graph* is the API for Microsoft 365 that provides access to all the data available in Office 365, we can connect to mail, calendar, contacts, documents, directories, users. Microsoft Graph exposes APIs for Azure Active Directory, Office 365 services like Sharepoint, OneDrive, Outlook, Exchange, Microsoft Team services, OneNote, Planner, Excel
3.2 Get profile details using Graph explorer
We can access to all these Office 365 products through a single REST endpoint and manage millions of data in Microsoft Cloud, Let's see how we can view profile information of your Office 365 account using Graph explorer
Navigate to Graph explorer,https://aka.ms/geClick on my profile section in sample queries, you can see profile details of a test account as below

Let's login to your office 365 account and view your profile information,
3.3 Get profile details in Postman
We connected to Graph explorer using Office 365 account and viewed profile information, Let's try to do the same using Postman
Postman is a tool that interacts with http APIs and helps developers to construct http requests and responses in a more easy way with authentication, different type of responses in different environments
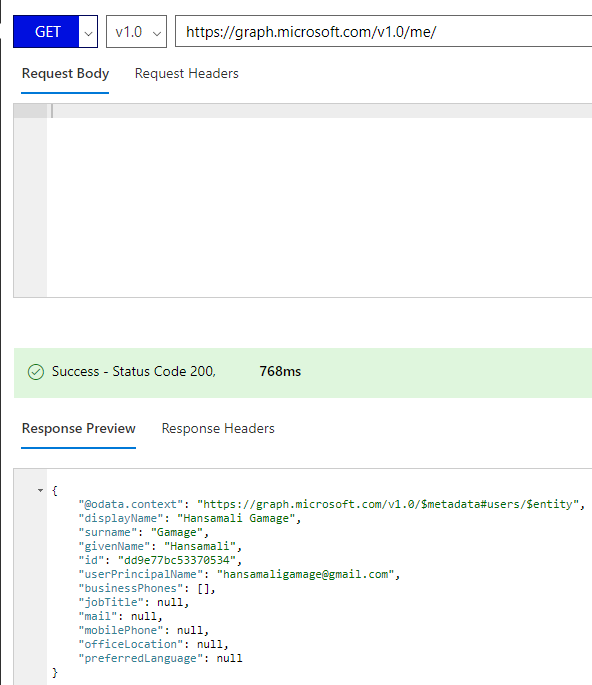
Let's open Postman and try to get profile information, paste url in to the postman like this and click on Send button, https://graph.microsoft.com/v1.0/me/ It tells you Access Token is empty, we have to get a valid access token with required permissions to call graph API,

Let's try to retrieve an access token by connecting to your Office 365 account, Go to Authorization tab in postman and click on available authentication type drop down. Select OAuth 2.0 from the drop down. OAuth 2 is an authorization framework allows third party applications to grant access to an HTTP service. In this case we are requesting access to Office 365 data by passing valid office 365 account details

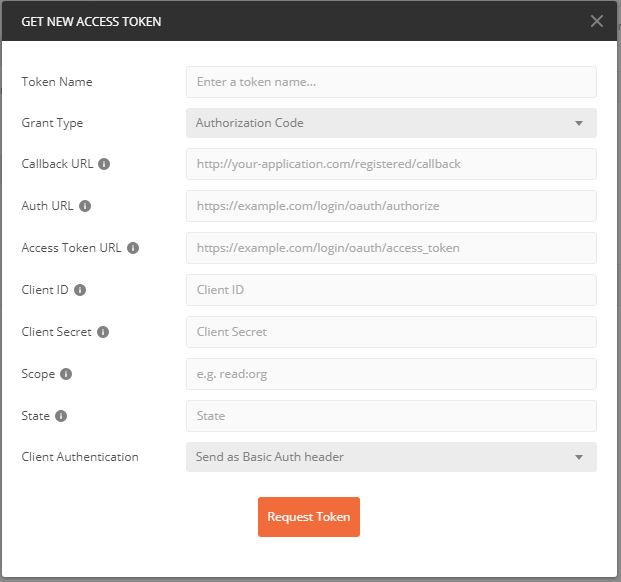
You can see available OAuth 2.0 tokens as below, for our application let's try to get a new access token. Click on Get New Access Token button

You can see a window like this to retrieve an access token, At first we have to create an application in Application Registration portal in Microsoft, that app is going to act as an application layer to access all your Office 365 data. You can get an *access token *by providing application details and your Office 365 account details, let's see how we can do that. We have to give authorization urls and application specific details to get an access token,
We can assign a name for this token, in this example let's say its ProfileToken We have to provide a Authorization server url, url to your Office 365 account *https://login.microsoftonline.com/common/oauth2/v2.0/authorize *and a url to retrieve the access token, https://login.microsoftonline.com/common/oauth2/v2.0/token Then we have to tell about the application details that authorization server is going to give the access
3.4 Register application in Application Management Portal
Let's navigate to *Microsoft Application managemenmt portal *https://apps.dev.microsoft.com/ and will create an application to access Office 365 data using your credentials

Let's try to register a new application, Click on Add an app, you can see a screen like this, specify the application name as sldevforum and click on Create button

You can see detail of the application you created as below, It shows Application Id & ways to generate *Application secrets

*
Let's click on Generate New Password and retrieve a password to access this created application

Let's get back to the authentication token retrieval in Postman, we have registered an application in Microsoft Application registration portal, let's paste the Client ID and Client Secret as below
We have to provide the relevant scopes or permissions we should have in the token we are getting. That token should pass its value to the application name *sldevforum *and access files in your *O365 account, *pass https://graph.microsoft.com/files.read as permission and request the token

You can see the prompt to login to your Microsoft account, click on it

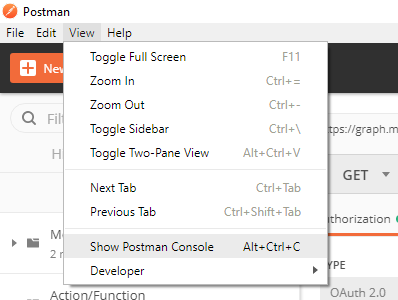
Let's open Postman Console window to check what happens behind the scene
When trying to get the access token, it shows an error message like this, it says *No reply address is registered for the application

*
We haven't specified a reply address to the application, If you check what is the C*allback URL *is, its the url that redirects after application is authorized

Navigate to Application registration portal, go to Platforms section, click on Add platform button,

You will get a screen to select the platform as below, let's go with Web option

You can see web platform section as below, we have to specify the redirect url in here, https://www.getpostman.com/oauth2/callback and save changes

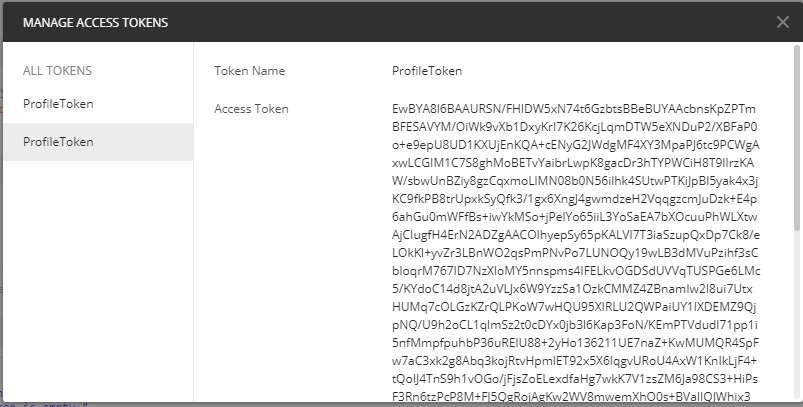
You can see the access token is retrieved as below
Now lets add this token in Request headers, select that option as below

You can see access token is added in headers section with Authorization as the key, click on Send button. You will see the profile information like this

4 View files in your One Drive
Login to https://www.office.comyou can see all the office products as below

Click on OneDrive, you can see available files like this, now lets try to read sldevforum.xlsx file from Graph explorer.

Open *sldevforum.xlsx *file, you can view available table data like this

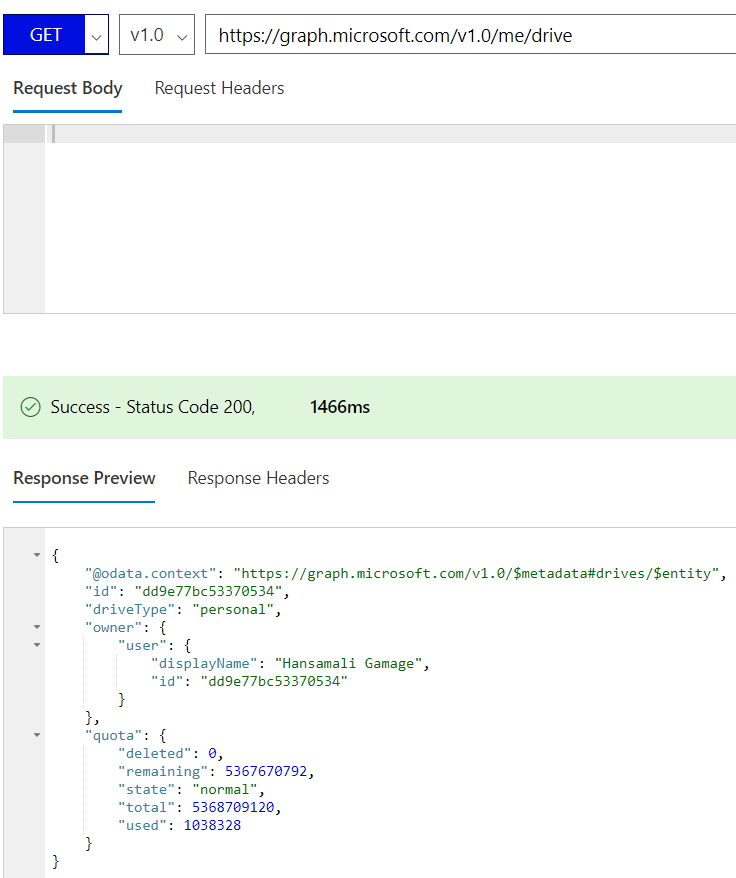
Lets' try to view available files in your OneDrive, you can see details of your drive as below, *https://graph.microsoft.com/v1.0/me/drive
*
You can further query the drive and get more details, no of items in your file system etc, ping to *https://graph.microsoft.com/v1.0/me/drive/root

*
We can call /children endpoint and get children in the root drive

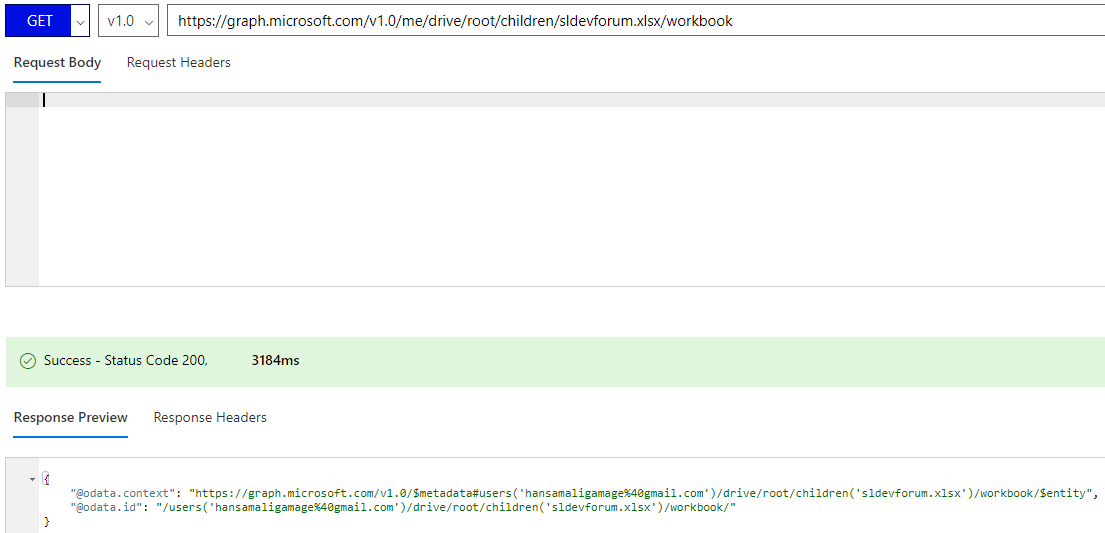
We can pass filename and get file details as below, *https://graph.microsoft.com/v1.0/me/drive/root/children/sldevforum.xlsx
*

You can navigate to /workbook endpoint and view available workbooks, *https://graph.microsoft.com/v1.0/me/drive/root/children/sldevforum.xlsx/workbook
*
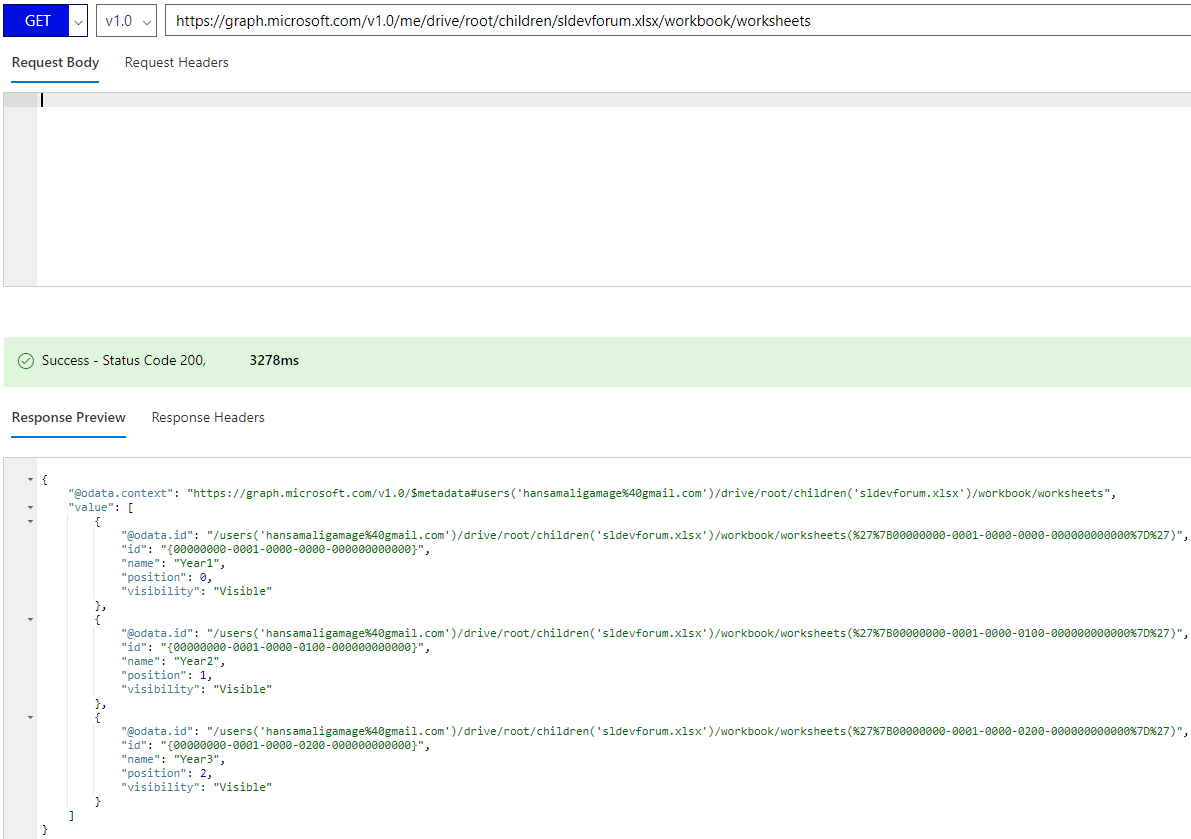
Navigate to /worksheets, you can see 3 worksheets are available *https://graph.microsoft.com/v1.0/me/drive/root/children/sldevforum.xlsx/workbook/worksheets
*
You can retrieve the worksheet by passing the worksheet name as follows *https://graph.microsoft.com/v1.0/me/drive/root/children/sldevforum.xlsx/workbook/worksheets/Year1
*

You can see the tables available in Year1 worksheet, let's try to retrieve this table rows by passing Range parameter,

Pass Range parameter like this, Range(address='Year1!A1:H11') with row and column indexes, from column A to H and row 1 to 11, https://graph.microsoft.com/v1.0/me/drive/root/children/sldevforum.xlsx/workbook/worksheets/Year1/Range(address='Year1!A1:H11')

5 Create Function App
5.1 Create basic solution
Let's create a function App from Visual Studio and try to retrieve table information as we did using Graph explorer
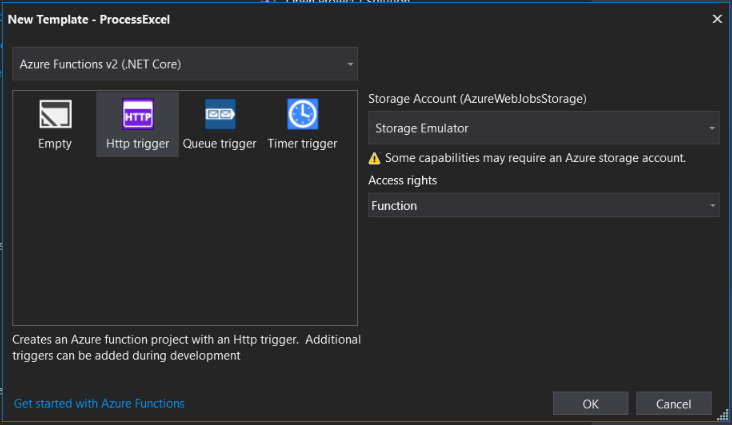
Select Azure Functions v2 template from drop down and select Http trigger from the list, leave everything as it is and click OK
Let's publish this function to Azure, select Create New option to create a new function app in Azure

You can create app service by providing a App name, Azure subscription, Resource group, Hosting plan and Storage account as below, In this example I created a new Resource group, hosting plan and a *storage account
*

When you are publishing function to azure, it asks you to change the function app version to beta, since we used function v2 with .NET Core version

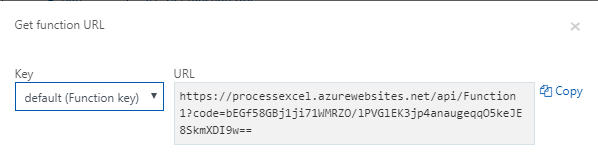
Your function is published to Azure, click on Get Function URL, you can see a window like this with function url, you can see code parameter is appended to your function url since we used function authorization to access the function. If we go with Anonymous authorization level, you dont have to pass a code to access the function
Go to postman and try to call the function, you have to pass name parameter along with the function url as below

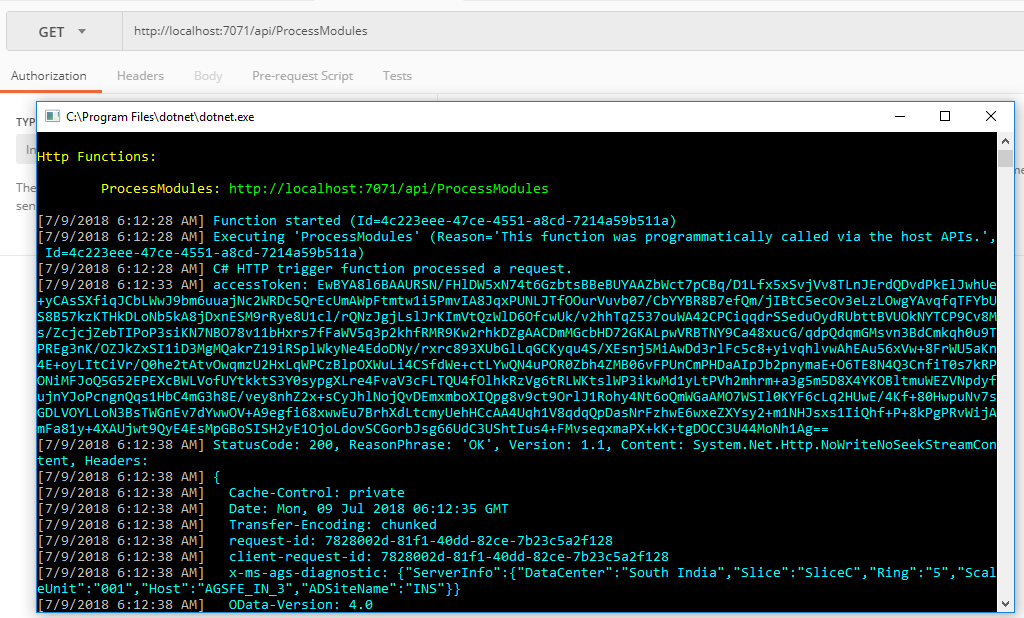
5.2 Debug your function locally
Let's change function to retrieve your profile details in Office 365 account,
Go to configuration file, you can see access token stetting is available as below

Let's run the application, try to access it from postman as below, you can see access token is logged in to the console window like this
You can locally debug the function and check what are the values available for variables like this, you can see API call output as below, it returns profile details like this

Go to Application settings in ProcessExcel function app, add AccessToken setting as below and save changes

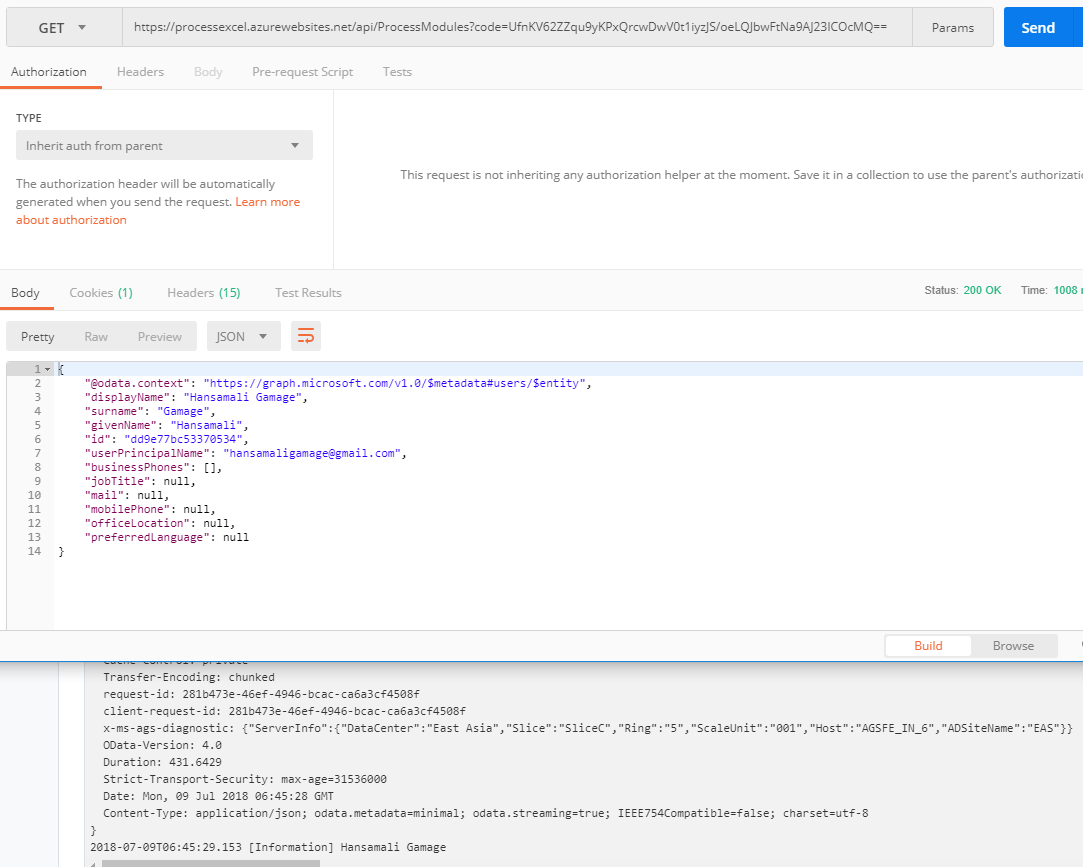
You can call function from postman, you can see following output, it shows your profile details in postman and it shows displayname in function log,
6 View Excel table from function App
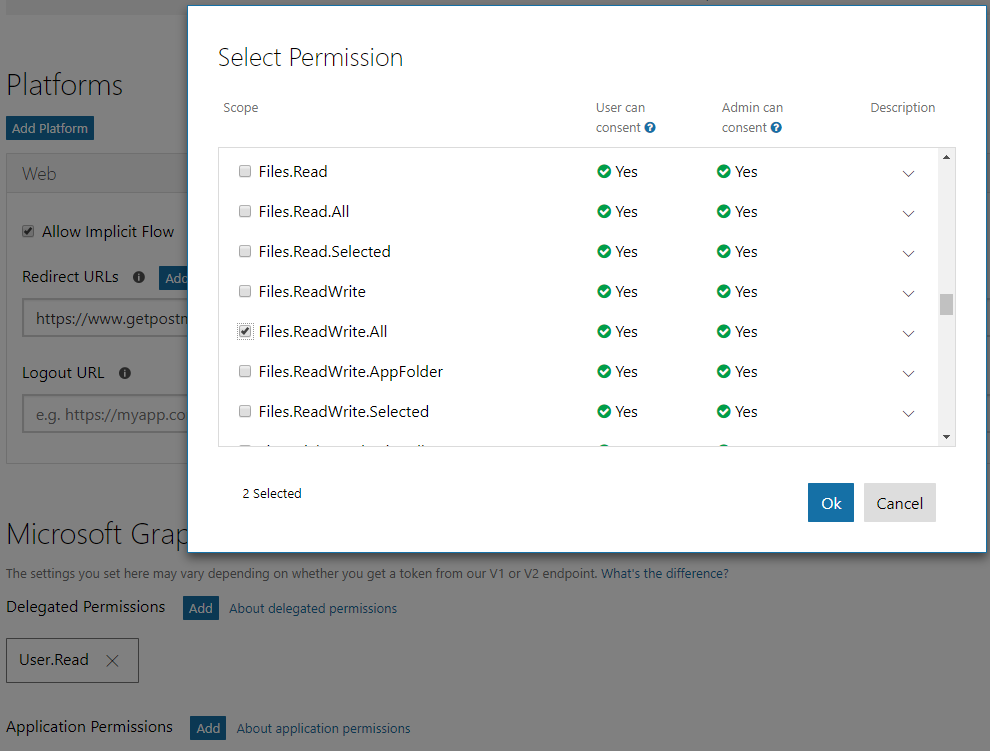
Go to Microsoft application registration portal, https://apps.dev.microsoft.com/#/appList and click on your application, sldevforum & select permission to view and write to files since we want to view content in a excel file and modify it, *Files.ReadWrite.All
*We have to get a new access token since permission is changed, go to postman and change scope value to *https://graph.microsoft.com/files.readwrite

*When you change the application permission, it prompts you to access to new permissions like *file read write

*
Let's navigate to RetrieveFile method and check what happens there, Its going to get the access token from configuration file, then it calls the api method to get file information by passing access token in the header,

[FunctionName("ProcessModules")]
public static  async Task Run([HttpTrigger(AuthorizationLevel.Function, "get", "post", Route = null)]HttpRequest req, TraceWriter log)
{
  int classes;
  int labs;
  string file = "sldevforum.xlsx";
  string worksheet = "Year1";
  string table = "Table2";

  log.Info("C# HTTP trigger function processed a request.");

  ExcelHelper excelHelper = new  ExcelHelper();
  string fileId = excelHelper.RetrieveFiles(file);

  log.Info("RetrieveFiles status from main : " + fileId);

string accessToken = System.Environment.GetEnvironmentVariable("AccessToken", EnvironmentVariableTarget.Process);

string baseurl = "https://graph.microsoft.com/v1.0/";

public string  RetrieveFiles (string file)
{
  string fileId = string.Empty;

  var client = new  RestClient(baseurl + "me/drive/root/children/" + file);

  var request = new  RestRequest(Method.GET);
  request.AddHeader("Authorization", accessToken);


  IRestResponse response = client.Execute(request);

  if (response.IsSuccessful)
  {
    string content = response.Content;
    JObject filedetails = (JObject)JsonConvert.DeserializeObject(content);
    fileId = filedetails["id"].ToString();
  }

 return fileId;

}
We can implement RetrieveTable method to get table information as below, let's pass API endpoint to view excel table with specific row and column

string fileId = excelHelper.RetrieveFiles(file);

log.Info("RetrieveFiles status from main : " + fileId);

if (!string.IsNullOrEmpty(fileId))
{
  string columns = excelHelper.RetrieveTable(fileId, worksheet);

  if (Convert.ToInt32(columns) > 0)
  {
    log.Info("Columns count : " + columns);

public string  RetrieveTable(string  fileId, string  worksheet)
{
  string columnCount = string.Empty;
  string header = "!A1:H1";

  var client = new  RestClient(baseurl + "me/drive/items/"  + fileId + "/workbook/worksheets/"  + worksheet + "/Range(address='"  + worksheet + header + "')");

  var request = new  RestRequest(Method.GET);
  request.AddHeader("Authorization", accessToken);

  IRestResponse response = client.Execute(request);

  if (response.IsSuccessful)
  {
    string content = response.Content;
    JObject obj = (JObject)JsonConvert.DeserializeObject(content);
    columnCount = obj["columnCount"].ToString();
  }

 return columnCount;
 }
7 Modify Excel sheet
7.1 Insert data rows in Excel
We have to get a open session to excel file by calling createSession endpoint with POST action, we should pass request body as below, *https://graph.microsoft.com/v1.0/me/drive/items/DD9E77BC53370534!125/workbook/createsession
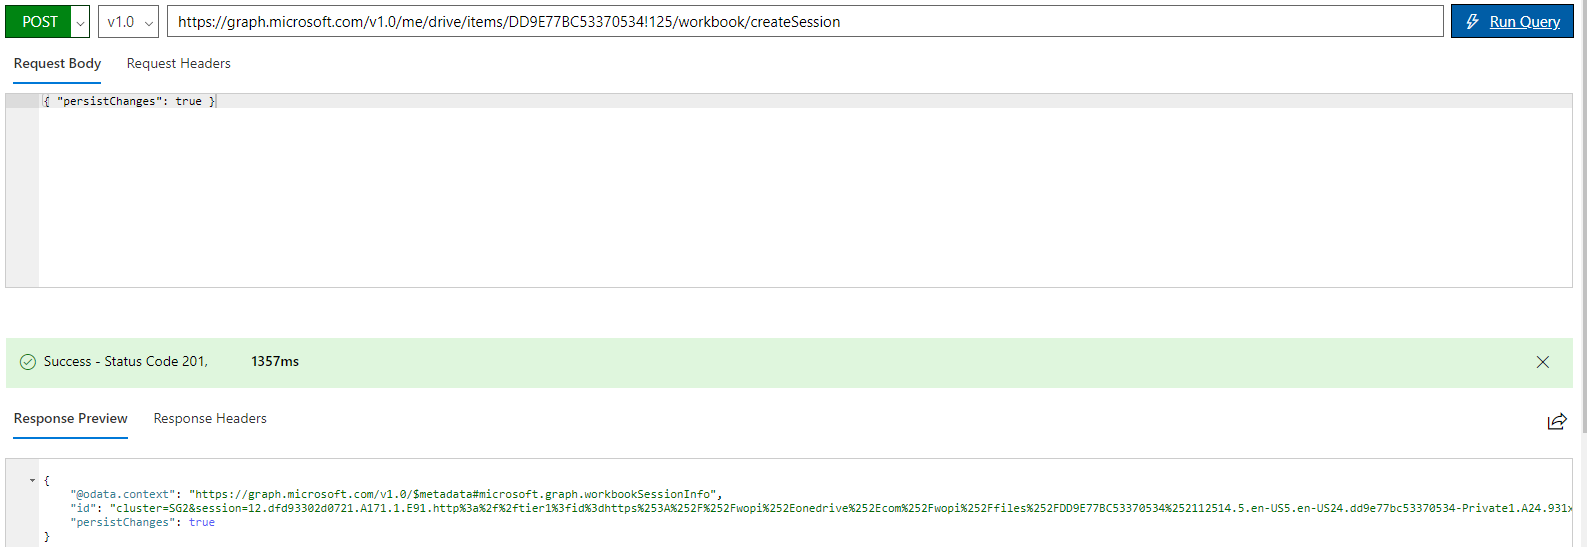
*
Let's call create session to modify the content in the excel file

string columns = excelHelper.RetrieveTable(fileId, worksheet);

if (Convert.ToInt32(columns) > 0)
{
  log.Info("Columns count : " + columns);
  string sessionId = excelHelper.CreateSession(fileId, log);

  if (!string.IsNullOrEmpty(sessionId))
  {
     log.Info("Session ID : " + sessionId);
You can see the implementation of CreateSession method, you have to issue a POST request with two header parameters like this

public string  CreateSession(string  fileId, TraceWriter log)
{

  string sessionId = string.Empty;

  var client = new  RestClient(baseurl + "me/drive/items/"  + fileId + "/workbook/createsession");

  var request = new  RestRequest(Method.POST);
  request.AddHeader("Authorization", accessToken);
  request.AddHeader("persistSession", "true");

  IRestResponse response = client.Execute(request);

  if (response.IsSuccessful)
  {
    string content = response.Content;
    JObject session = (JObject)JsonConvert.DeserializeObject(content);
    sessionId = session["id"].ToString();
  }

  else
  {
    log.Info("ERROR : " + response.ErrorMessage + " : " + response.StatusCode);
  }

  return sessionId;
}
Get available tables in our excel sheet, it shows only one table with id 2, *https://graph.microsoft.com/v1.0/me/drive/items/DD9E77BC53370534!125/workbook/tables
*

We can get all the available rows in the excel sheet by calling /Rows endpoint as below, *https://graph.microsoft.com/v1.0/me/drive/items/DD9E77BC53370534!125/workbook/tables/2/rows
*

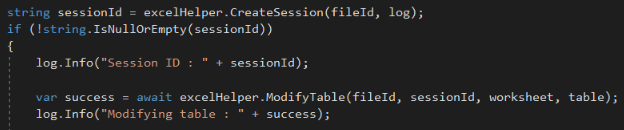
We should pass workbook-session-id in the request header, so we have to pass sessionId as a parameter to ModifyTable method

string sessionId = excelHelper.CreateSession(fileId, log);

if (!string.IsNullOrEmpty(sessionId))
{
  log.Info("Session ID : " + sessionId);

  var success = await excelHelper.ModifyTable(fileId, sessionId, worksheet, table);
  log.Info("Modifying table : " + success);
As we saw earlier, excel sheet contains 8 columns, let's create a class to hold properties of an course object as below, course object represents a row in a excel sheet

public class  CourseModule
{
   public string  Module { get; set; }
   public float  Points { get; set; }
   public int  Classes { get; set; }
   public int  Labs { get; set; }
   public string  Instructor { get; set; }
   public string  StartDate { get; set; }
   public string  EndDate { get; set; }
   public bool? Weekend { get; set; }
}
You can see implementation of ModifyTable method as follows, it passes 3 parameters in the request header, its a *POST *request, we should pass JSON serialized string in the body section. If you check the ModifyTable method we have created a object from TableRequest class and passed index as null since we need to insert a new row to the excel file and the second property is a 2-D array to store table rows
Check ModifyTable implementation as below

public async Task<bool> ModifyTable(string fileId, string sessionId, string worksheet, string table)
{
  var success = false;

  List<CourseModule> modules = ReadJsonFile();

  var client = new  HttpClient();

  var request = new  HttpRequestMessage(HttpMethod.Post, baseurl + "me/drive/items/" + fileId +
                                 "/workbook/worksheets('" + worksheet + "')/Tables('" + table + "')/Rows");
  request.Headers.Authorization = new  AuthenticationHeaderValue("Bearer", accessToken);
  request.Headers.Accept.Add(new MediaTypeWithQualityHeaderValue("application/json"));
  request.Headers.Add("workbook-session-id", sessionId);

  string[] module;
  string[][] modulesArray = new  string[modules.Count][];

  for (int i = 0; i< modules.Count(); i++)
  {
    module = new  string[] { modules[i].Module, modules[i].Classes.ToString(), modules[i].Labs.ToString(),
           modules[i].Points.ToString(), modules[i].Instructor, modules[i].StartDate,                                                              modules[i].EndDate, modules[i].Weekend.ToString() };
    modulesArray[i] = module;
  }

  TableRequest tableRequest = new  TableRequest();
  tableRequest.index = null;
  tableRequest.values = modulesArray;

  string jsonBody = JsonConvert.SerializeObject(tableRequest);
  request.Content = new  StringContent(jsonBody, Encoding.UTF8, "application/json");

  using (var response = await client.SendAsync(request))
  {
    string statusdescription = response.ReasonPhrase;
    success = response.IsSuccessStatusCode;
  }

  return success;
}
We have to pass excel row in a certain format, let's create a class called TableRequest and add properties as below, string value and a 2 dimensional array

public class  TableRequest
{
  public string  index { get; set; }
  public string[][] values { get; set; }
}
We have successfully inserted few rows into the excel sheet, let's try to get total in a excel column, you have to call sum function on the column and pass a cell address to write the value of it.
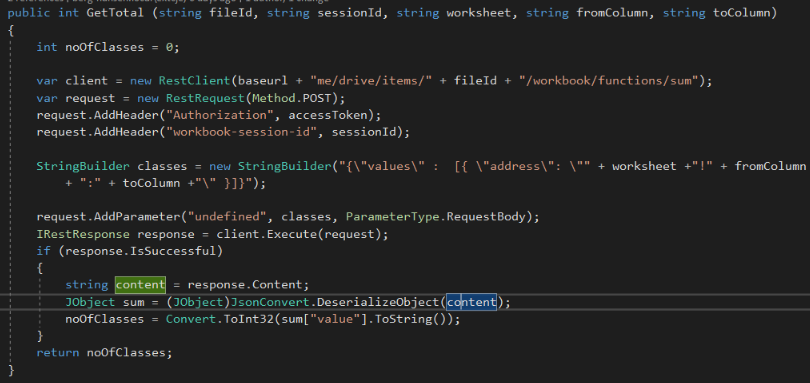
public int  GetTotal (string  fileId, string  sessionId, string  worksheet, string  fromColumn, string  toColumn)
{
int noOfClasses = 0;

var client = new  RestClient(baseurl + "me/drive/items/"  + fileId + "/workbook/functions/sum");

var request = new  RestRequest(Method.POST);
request.AddHeader("Authorization", accessToken);
request.AddHeader("workbook-session-id", sessionId);

StringBuilder classes = new  StringBuilder("{\"values\" : [{ \"address\": \"" + worksheet +"!" + fromColumn + ":" + toColumn +"\" }]}");
request.AddParameter("undefined", classes, ParameterType.RequestBody);

IRestResponse response = client.Execute(request);

if (response.IsSuccessful)
{
  string content = response.Content;
  JObject sum = (JObject)JsonConvert.DeserializeObject(content);
  noOfClasses = Convert.ToInt32(sum["value"].ToString());
}

return noOfClasses;
}
7.2 Create a chart in Excel
Let's create a chart based on excel worksheet data, at first we have to create a class to hold chart parameters as below,
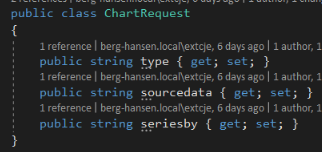
public class  ChartRequest
{
  public string  type { get; set; }
  public string  sourcedata { get; set; }
  public string  seriesby { get; set; }
}
We have to pass type of the chart and column series we want to map in a chart, column series can be written as A2:C21, A2:B7

excelHelper.CreateChart(fileId, worksheet, "columnclustered", "A2:C21");
excelHelper.CreateChart(fileId, worksheet, "pie",  "A2:B7");

public bool  CreateChart (string  fileId, string  worksheet, string  type, string  columnsrange)
{

  var client = new  RestClient(baseurl + "me/drive/items/"  + fileId + "/workbook/worksheets('"  + worksheet + "')/Charts/Add");

  var request = new  RestRequest(Method.POST);
  request.AddHeader("Authorization", accessToken);
  request.AddHeader("Content-Type", "application/json");

  ChartRequest chartRequest = new  ChartRequest { type = type, sourcedata = columnsrange, seriesby = "Auto" };

  string jsonBody = JsonConvert.SerializeObject(chartRequest);
  request.AddParameter("undefined", jsonBody, "application/json", ParameterType.RequestBody);

  IRestResponse response = client.Execute(request);
  return response.IsSuccessful;

}
Let's deploy the function app to azure, Go to solution explorer, click on project and select Publish from the menu.

You can select available publish profile and click on publish, If you check the Output window, you can see application is published with necessary updates

Let's run the function app and check the log window as below, It's not going to retrieve a valid access token as shown in the log.

Open postman and try to get an access token to read files in your outlook account,

You can pass the information required to get an access token as below, we discussed about these parameters in previous sections

When you request the token, you will get a screen like this, select your account and try to login

You can see the excel file with a table as given below, Let's run the function app and see what happens to it

Run the function app again and check the logs window, it shows file id, column count, session id and total of classes and labs columns

You can open the excel sheet and check whether table column has been updated

You can view pie chart and bar chart has been drawn on the other end of the excel sheet

You can programmatically change the content in a excel worksheet using MS Graph Excel API as we discussed above. We used a function app to do this process. You can check the source code of this sample application and extend it to handle more complex scenarios.
8 Download
8.1 TechNet Gallery
Source code can be downloaded from here, msgraph-excel
8.2 GitHub
You can clone the project from github, msgraph-excel
9 Conclusion
In this article we talked about how to access your data in Microsoft account using MS Graph. We described how to modify a excel sheet in your one drive using a Azure function app. We got to see other available apis in Microsoft Graph, how we can use it using Graph Explorer, how to access it using postman and pass a validation token. Now it's your turn to make your apps with MSGraph. If you are interested to know about Outlook API and how to track changes in your emails, you can follow this article, .NET Core: Building Function app with Microsoft Graph API and Azure Functions
10 References
- Azure Functions
- Overview of Microsoft Graph
- Graph Explorer
- Working with Excel in Microsoft Graph
- Work with tables using the Excel JavaScript API
- Using OneDrive and Excel APIs in the Microsoft Graph for App Storage