Power BI Desktop: How To Get Data
Overview
In a previous post we saw a Power BI overview. In this one, we are going to talk with more practical examples in Power BI Desktop tool about Database connectors (SQL Server, IBM Informix, Oracle and MySQL database).
Before we proceed we must make sure that we have installed the latest Power BI Desktop version. We can download the setup from this link.
What are Data Connectors?
Data connectors allow users to connect and access data from several data sources. In this post, we will talk for the most used database connectors in Power BI Desktop App.
File
The simplest way to import data to Power BI Desktop is from a file. A file can be one of the following:
| Type | |
| Excel | |
| Text/CSV | |
| XML | |
| JSON | |
| Folder | |
| Sharepoint |
Excel
Import data from excel is very simple.
In the Power BI Desktop, select
 Get Data > Excel
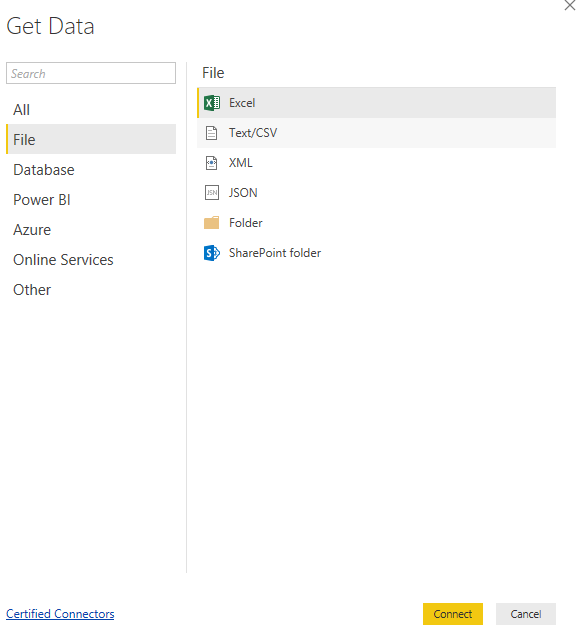
From the Open Dialog select the excel file and click Open.

JSON
What is JSON?
JSON (JavaScript Object Notation) is a lightweight data-interchange format easy for someone to understand.
Select SQL Data As JSON
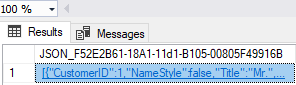
For demo purposes suppose that we don't have any JSON file and we create a new one from a SQL Server database(AdventureWorks). The first thing we must do is to execute the following Select statement to retrieve the data in JSON format by using the switch {FOR JSON AUTO}.
SELECT TOP  10[CustomerID]
 ,[NameStyle]
 ,[Title]
 ,[FirstName]
 ,[MiddleName]
 ,[LastName]
 ,[Suffix]
 ,[CompanyName]
 ,[SalesPerson]
 ,[EmailAddress]
 ,[Phone]
 ,[PasswordHash]
 ,[PasswordSalt]
 ,[rowguid]
 ,[ModifiedDate]
 FROM [SalesLT].[Customer]
 FOR JSON AUTO
In the image below we can see the results from the previous SQL statement. Copy the line No 1 and paste it to a JSON Editor like JSON Editor Online. We can also do the transformation from the SSMS, by using Find & Replace method (CTRL+H) and Regular Expression
 like \n.
Results
Convert To JSON Format
After the file is converted using one of the methods described, the result will be like this:
[
 {
 "CustomerID": 1,
 "NameStyle": false,
 "Title": "Mr.",
 "FirstName": "Orlando",
 "MiddleName": "N.",
 "LastName": "Gee",
 "CompanyName": "A Bike Store",
 "SalesPerson": "adventure-works\\pamela0",
 "EmailAddress": "orlando0@adventure-works.com",
 "Phone": "245-555-0173",
 "PasswordHash": "L/Rlwxzp4w7RWmEgXX+/A7cXaePEPcp+KwQhl2fJL7w=",
 "PasswordSalt": "1KjXYs4=",
 "rowguid": "3F5AE95E-B87D-4AED-95B4-C3797AFCB74F",
 "ModifiedDate": "2005-08-01T00:00:00"
 },
 {
 "CustomerID": 2,
 "NameStyle": false,
 "Title": "Mr.",
 "FirstName": "Keith",
 "LastName": "Harris",
 "CompanyName": "Progressive Sports",
 "SalesPerson": "adventure-works\\david8",
 "EmailAddress": "keith0@adventure-works.com",
 "Phone": "170-555-0127",
 "PasswordHash": "YPdtRdvqeAhj6wyxEsFdshBDNXxkCXn+CRgbvJItknw=",
 "PasswordSalt": "fs1ZGhY=",
 "rowguid": "E552F657-A9AF-4A7D-A645-C429D6E02491",
 "ModifiedDate": "2006-08-01T00:00:00"
 },
 {
 "CustomerID": 3,
 "NameStyle": false,
 "Title": "Ms.",
 "FirstName": "Donna",
 "MiddleName": "F.",
 "LastName": "Carreras",
 "CompanyName": "Advanced Bike Components",
 "SalesPerson": "adventure-works\\jillian0",
 "EmailAddress": "donna0@adventure-works.com",
 "Phone": "279-555-0130",
 "PasswordHash": "LNoK27abGQo48gGue3EBV/UrlYSToV0/s87dCRV7uJk=",
 "PasswordSalt": "YTNH5Rw=",
 "rowguid": "130774B1-DB21-4EF3-98C8-C104BCD6ED6D",
 "ModifiedDate": "2005-09-01T00:00:00"
 },
 {
 "CustomerID": 4,
 "NameStyle": false,
 "Title": "Ms.",
 "FirstName": "Janet",
 "MiddleName": "M.",
 "LastName": "Gates",
 "CompanyName": "Modular Cycle Systems",
 "SalesPerson": "adventure-works\\jillian0",
 "EmailAddress": "janet1@adventure-works.com",
 "Phone": "710-555-0173",
 "PasswordHash": "ElzTpSNbUW1Ut+L5cWlfR7MF6nBZia8WpmGaQPjLOJA=",
 "PasswordSalt": "nm7D5e4=",
 "rowguid": "FF862851-1DAA-4044-BE7C-3E85583C054D",
 "ModifiedDate": "2006-07-01T00:00:00"
 },
 {
 "CustomerID": 5,
 "NameStyle": false,
 "Title": "Mr.",
 "FirstName": "Lucy",
 "LastName": "Harrington",
 "CompanyName": "Metropolitan Sports Supply",
 "SalesPerson": "adventure-works\\shu0",
 "EmailAddress": "lucy0@adventure-works.com",
 "Phone": "828-555-0186",
 "PasswordHash": "KJqV15wsX3PG8TS5GSddp6LFFVdd3CoRftZM/tP0+R4=",
 "PasswordSalt": "cNFKU4w=",
 "rowguid": "83905BDC-6F5E-4F71-B162-C98DA069F38A",
 "ModifiedDate": "2006-09-01T00:00:00"
 },
 {
 "CustomerID": 6,
 "NameStyle": false,
 "Title": "Ms.",
 "FirstName": "Rosmarie",
 "MiddleName": "J.",
 "LastName": "Carroll",
 "CompanyName": "Aerobic Exercise Company",
 "SalesPerson": "adventure-works\\linda3",
 "EmailAddress": "rosmarie0@adventure-works.com",
 "Phone": "244-555-0112",
 "PasswordHash": "OKT0scizCdIzymHHOtyJKQiC/fCILSooSZ8dQ2Y34VM=",
 "PasswordSalt": "ihWf50M=",
 "rowguid": "1A92DF88-BFA2-467D-BD54-FCB9E647FDD7",
 "ModifiedDate": "2007-09-01T00:00:00"
 },
 {
 "CustomerID": 7,
 "NameStyle": false,
 "Title": "Mr.",
 "FirstName": "Dominic",
 "MiddleName": "P.",
 "LastName": "Gash",
 "CompanyName": "Associated Bikes",
 "SalesPerson": "adventure-works\\shu0",
 "EmailAddress": "dominic0@adventure-works.com",
 "Phone": "192-555-0173",
 "PasswordHash": "ZccoP/jZGQm+Xpzc7RKwDhS11YFNybwcPVRYTSNcnSg=",
 "PasswordSalt": "sPoUBSQ=",
 "rowguid": "03E9273E-B193-448E-9823-FE0C44AEED78",
 "ModifiedDate": "2006-07-01T00:00:00"
 },
 {
 "CustomerID": 10,
 "NameStyle": false,
 "Title": "Ms.",
 "FirstName": "Kathleen",
 "MiddleName": "M.",
 "LastName": "Garza",
 "CompanyName": "Rural Cycle Emporium",
 "SalesPerson": "adventure-works\\josé1",
 "EmailAddress": "kathleen0@adventure-works.com",
 "Phone": "150-555-0127",
 "PasswordHash": "Qa3aMCxNbVLGrc0b99KsbQqiVgwYDfHcsK9GZSUxcTM=",
 "PasswordSalt": "Ls05W3g=",
 "rowguid": "CDB6698D-2FF1-4FBA-8F22-60AD1D11DABD",
 "ModifiedDate": "2006-09-01T00:00:00"
 },
 {
 "CustomerID": 11,
 "NameStyle": false,
 "Title": "Ms.",
 "FirstName": "Katherine",
 "LastName": "Harding",
 "CompanyName": "Sharp Bikes",
 "SalesPerson": "adventure-works\\josé1",
 "EmailAddress": "katherine0@adventure-works.com",
 "Phone": "926-555-0159",
 "PasswordHash": "uRlorVzDGNJIX9I+ehTlRK+liT4UKRgWhApJgUMC2d4=",
 "PasswordSalt": "jpHKbqE=",
 "rowguid": "750F3495-59C4-48A0-80E1-E37EC60E77D9",
 "ModifiedDate": "2005-08-01T00:00:00"
 },
 {
 "CustomerID": 12,
 "NameStyle": false,
 "Title": "Mr.",
 "FirstName": "Johnny",
 "MiddleName": "A.",
 "LastName": "Caprio",
 "Suffix": "Jr.",
 "CompanyName": "Bikes and Motorbikes",
 "SalesPerson": "adventure-works\\garrett1",
 "EmailAddress": "johnny0@adventure-works.com",
 "Phone": "112-555-0191",
 "PasswordHash": "jtF9jBoFYeJTaET7x+eJDkd7BzMz15Wo9odbGPBaIak=",
 "PasswordSalt": "wVLnvHo=",
 "rowguid": "947BCAF1-1F32-44F3-B9C3-0011F95FBE54",
 "ModifiedDate": "2006-08-01T00:00:00"
 }
]
Get Data Into Power BI Desktop
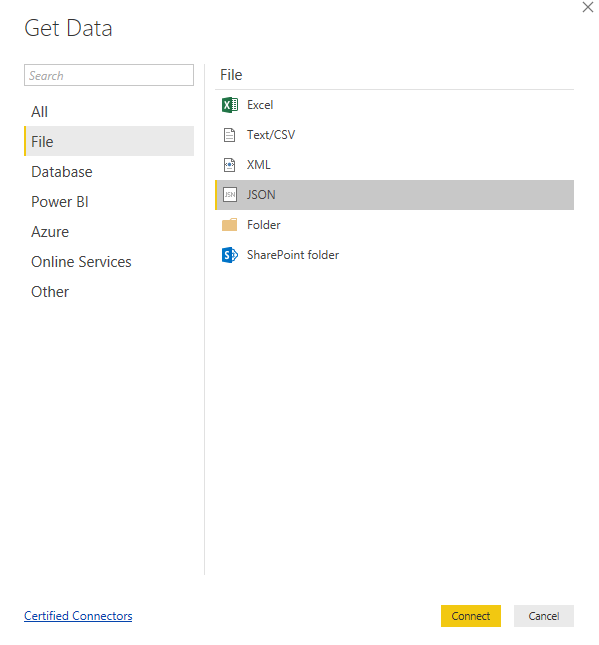
The next step is to import data into Power BI. On the Home tab select
Get Data > More > File> JSON, and click Connect.
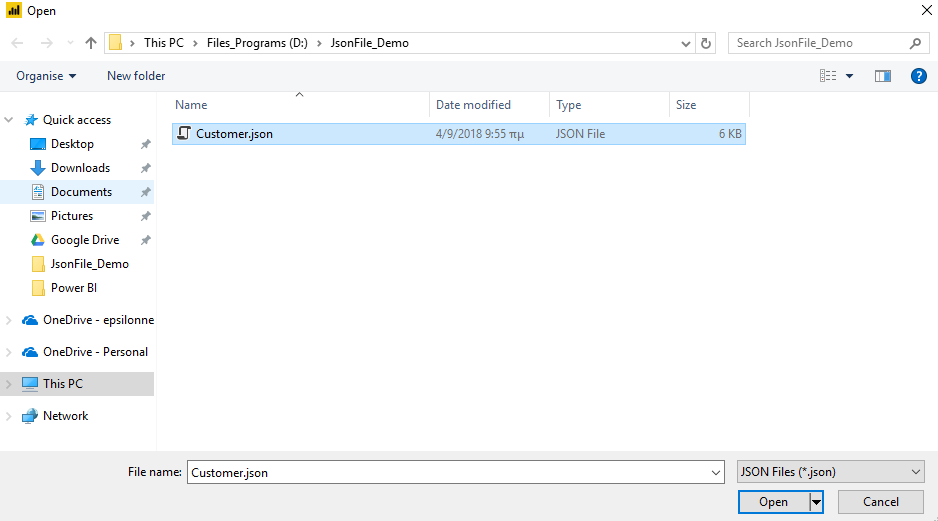
From the dialog, select the JSON file which was created earlier and click Open.
When we import the JSON file we see at the top ribbon the following pop-up message, click the button "Apply changes".

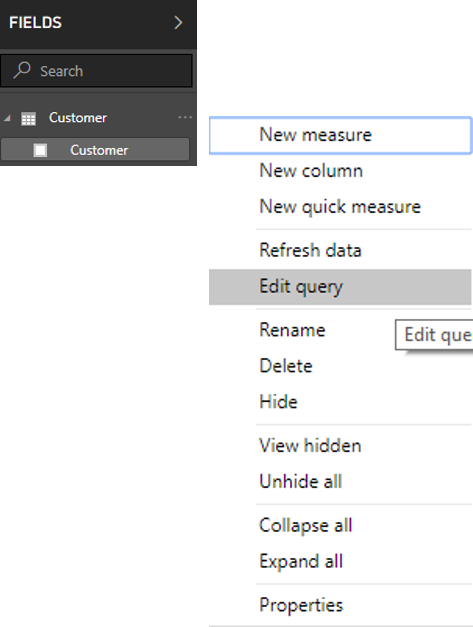
At the next step on the FIELDS blade, we can see the table Customer, click the button ... and select Edit Query.
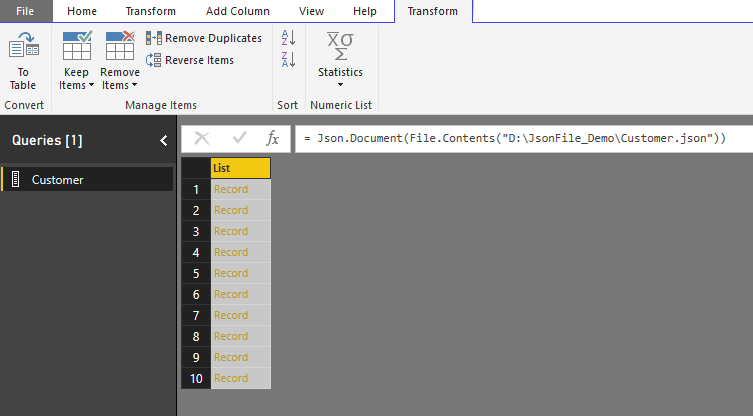
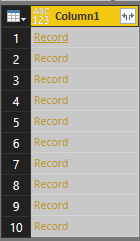
When the data loads, we are not able to see all the data but 10 lines with the word (Record). If we click the Record then it will be drilled down from the top level of the JSON structure.
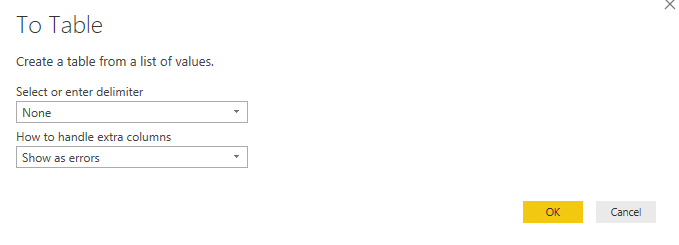
To fix this, click the left top button [To Table], leave the default setting as the image below shows and click OK.
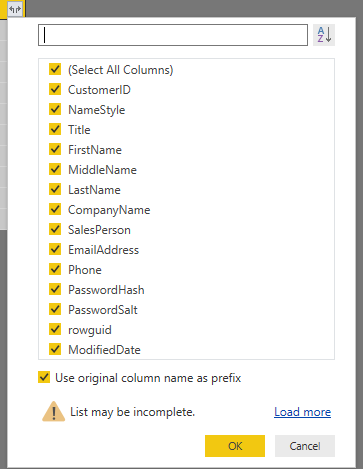
At the next step, we can see the button
 , which allows us to LOAD COLUMN VALUES.
Select the columns that we want to appear, and click OK.
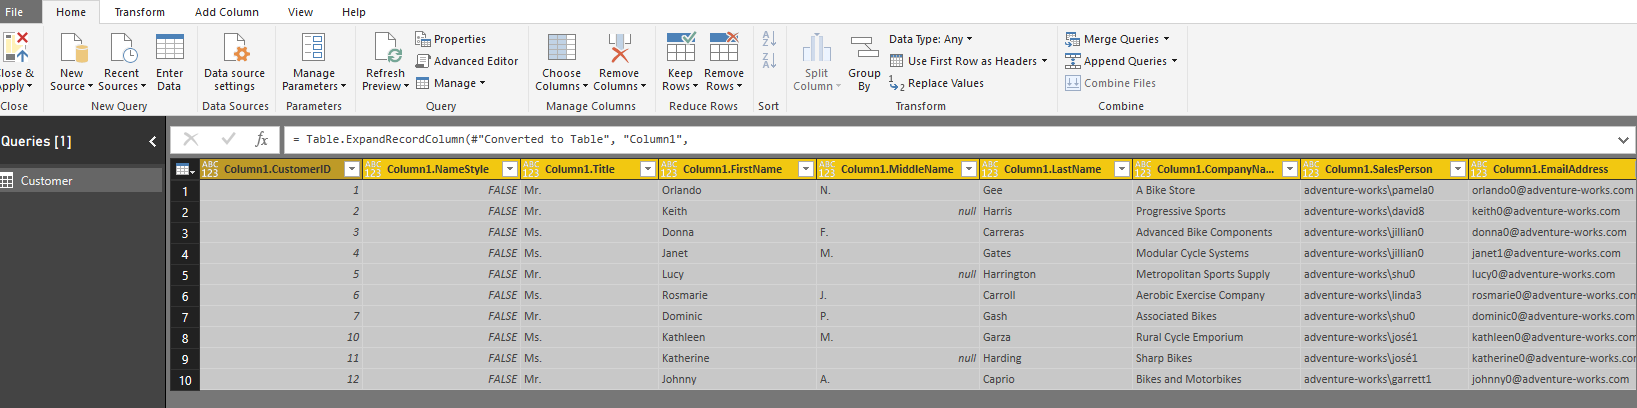
Finally, we can see the data split into different columns, in the left corner of the ribbon, click the button Close & Apply tto return in the main visualization window.
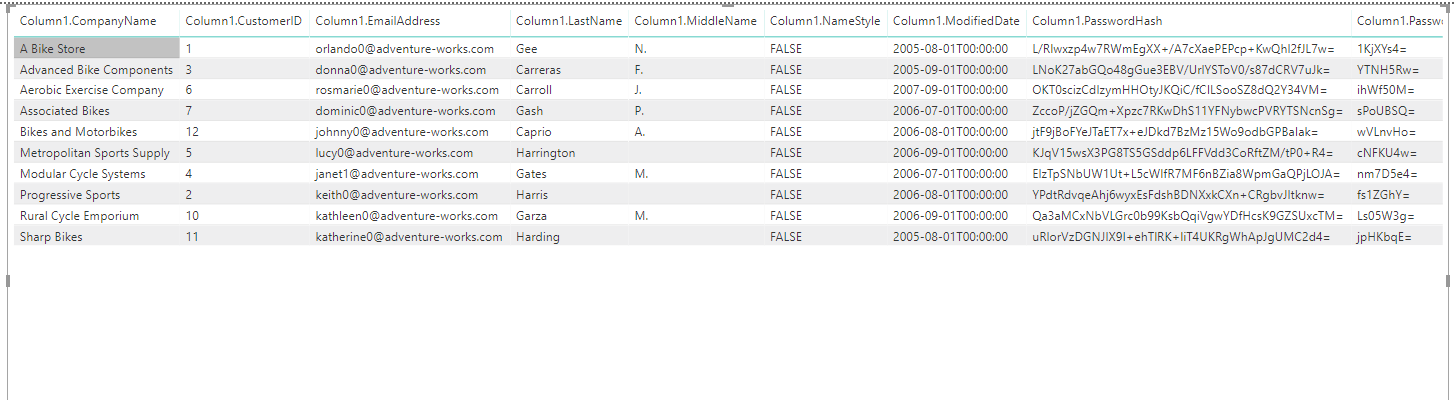
Now, we are able to use the JSON data to create reports and dashboards.
Database
Getting data from databases is quite easy, too. There are a lot of database types that Power BI Desktop can connect and retrieve data from.
At the table below we can see what type of databases Power BI Desktop supports.
| Types | ||
| SQL Server database | SAP Business Warehouse Application Server | Oracle database |
| Access database | SAP Business Warehouse Message Server (Beta) | IBM DB2 database |
| SQL Server Analysis Services database | Amazon Redshift | IBM Informix database (Beta) |
| IBM Netezza | Impala | MySQL database |
| PostgreSQL database | Google BigQuery | Sybase database |
| Teradata database | Snowflake | SAP HANA database |
| Exasol (Beta) | Jethro |
SQL Server Database
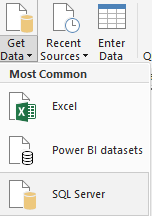
On the Home tab select
Get Data > SQL Server
Fill in the necessary information and click OK.
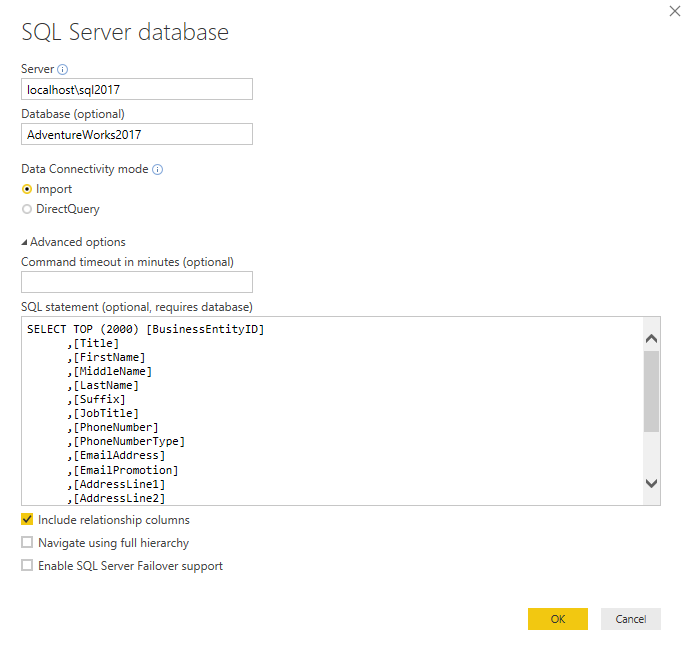
| Setting | Value |
| Server | Type the Database Server Name |
| Database | Type the Database Name |
| Data Connectivity mode | Select the data connectivity mode. Import : Data are imported into .pbix file | DirectQuery : No data is imported into .pbix file, it connects directly to our data source. |
| Advanced Options | |
| Include relationship columns | This option creates automatically relations between tables which they have relational columns. |
| Navigate using full hierarchy | Enable this if need to drill into schema database |
| Enable SQL Server Failover support | This feature works for SQL Server Failover cases. If this enabled, then Power BI moves from one node to another when failover happens. |
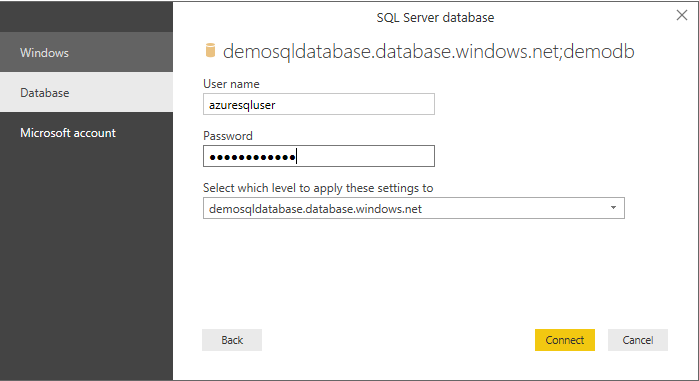
At the image below we can see a connection example to a SQL Server database.

| Setting | Value |
| Windows | Type the Windows credentials to access the database |
| Database | Type the SQL Server login credentials |
| Microsoft account | Type the O365 Microsoft Account |
IBM Informix Database(Beta)
|
|---|
| Before we start the connector configuration we must clarify that the IBM Informix database system uses Distributed Relational Database Architecture (DRDA) protocol. |
 Caution
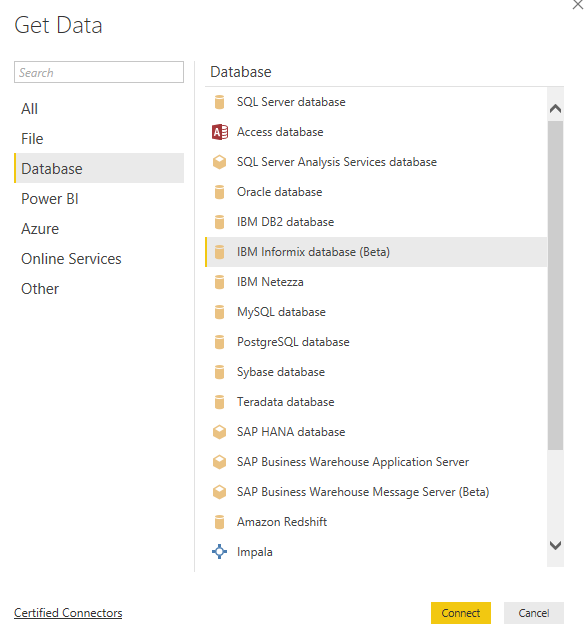
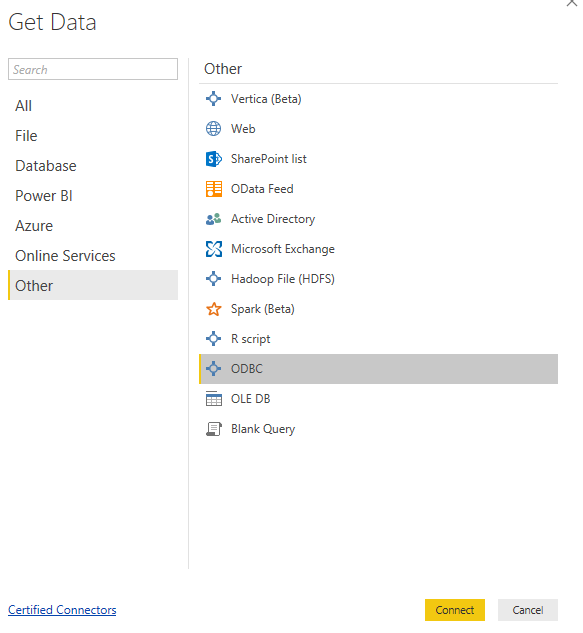
From the Home tab select
Get Data and from the left side select **Other **> ODBC (as the image below shows), and click Connect.
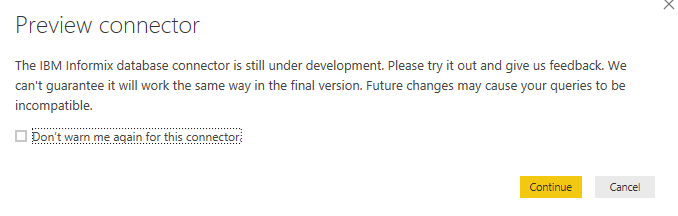
Note
Until the day this post was published the IBM Informix database connector (Power BI Desktop v2.61.5192.601.) was in Preview, as the image below shows.
So, click the button Continue.
At the next step, type the Server Name, Database Name add the SQL statement (this is optional) and click OK.
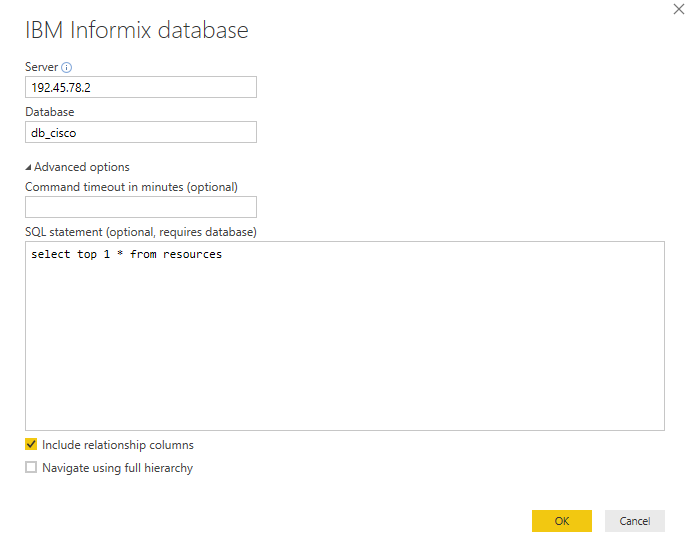
After that, we must type the credentials that are used to connect the Informix database, Username, User Password and click Connect to make the connection.

Oracle Database
We need to install the Oracle Client. For every Power BI desktop version we can download each installer :
- 32-bit Oracle Data Access Client (ODAC) / (ODAC 12c Release 4 and Oracle Developer Tools for Visual Studio (12.1.0.2.4))
- 64-bit Oracle Data Access Client (ODAC) / (64-bit ODAC 12c Release 4 (12.1.0.2.4) for Windows x64)
|
|---|
| If an Oracle account does not exist we MUST create one to log in and download the file. |
From the Home tab select
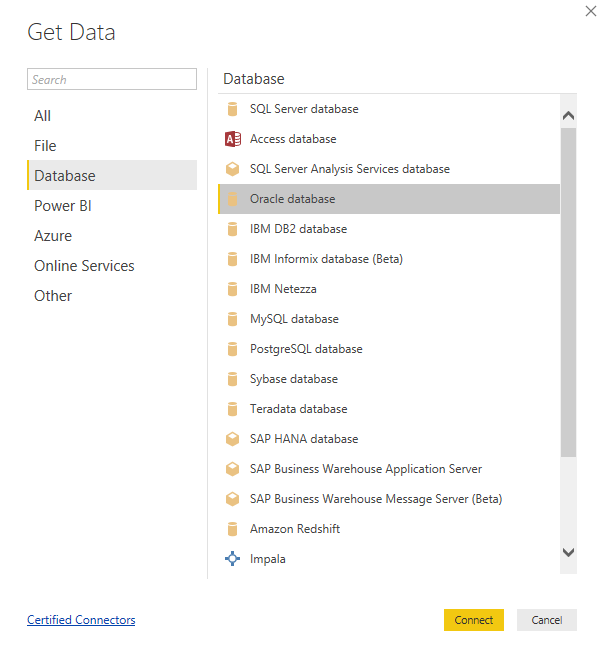
Get Data and from the left side select Database> Oracle Database (as the image below shows ), and click Connect.
In the Oracle Database dialog form, type the Server name, the SQL statement (if available) and click Connect.
Note
If a SID is required, you can specify that using the format: ServerName/SID, where SID is the unique name of the database. If the ServerName/SID format doesn't work, try using ServerName/ServiceName, where ServiceName is the alias used when connecting.
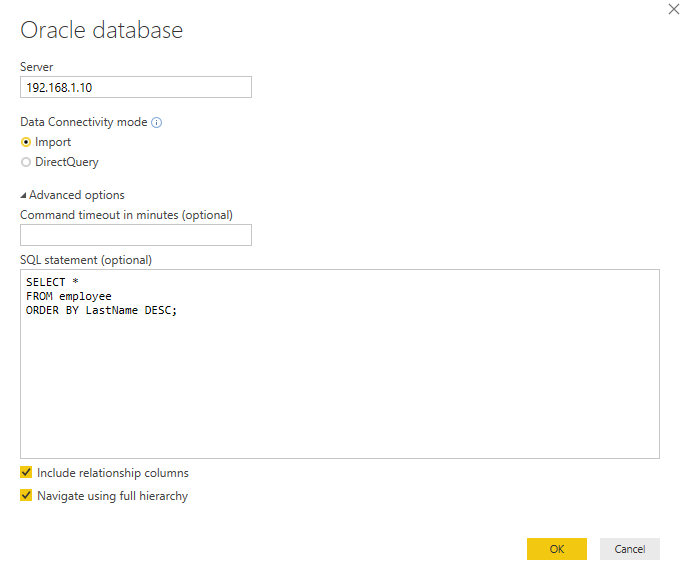
If the Oracle database requires Credentials, then a new dialog shows up and we must type the credentials(Windows / Database) and click Connect...

MySQL Database
For MySQL Database connection we must first download and install MySQL Connector (NET 8.0.12), Windows (x86, 32-bit).
At the next step from Home tab select
Get Data and from the left side select Database> MySQL Database (as the image below shows), and click Connect.

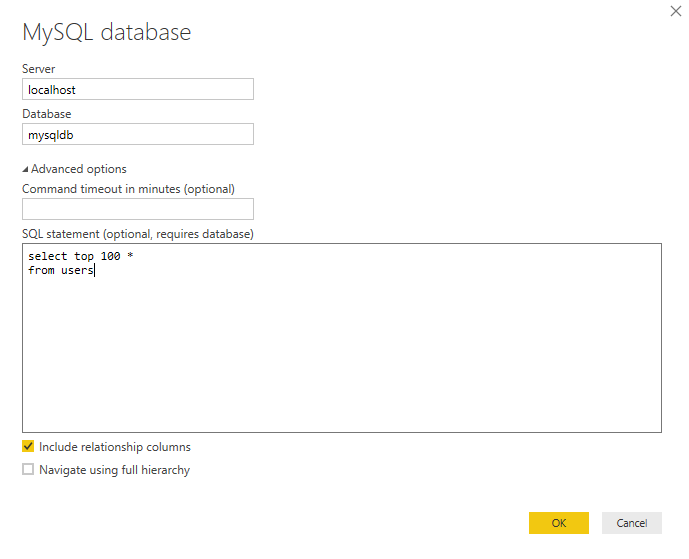
In the MySQL database dialog, type the Server, Database. SQL statement (if this available) and click OK.
Azure
Microsoft Azure services also integrate with Power BI Desktop, we can create dashboards and reports using real-time insights, SQL Azure database data, etc. Until now Power BI supports 11 Azure services which are shown at the next table.
| Azure SQL database | Azure SQL Data Warehouse |
| Azure Analysis Services database | Azure Blob Storage |
| Azure Table Storage | Azure Cosmos DB (Beta) |
| Azure Data Lake Store | Azure HDInsight(HDFS) |
| Azure HDInsight Spark | HDInsight Interactive Query (Beta) |
| Azure KustoDB (Beta) |
Azure SQL Database
Of course Power BI Desktop couldn't skip having a connector with Azure SQL Database. This connector gives the ability for direct connect to Azure SQL Database hosted on Azure.
Prerequisites
- Azure Account with subscription
- Azure SQL Database service
- Power BI Desktop
If all of the above prerequisites are covered, we are ready to begin.
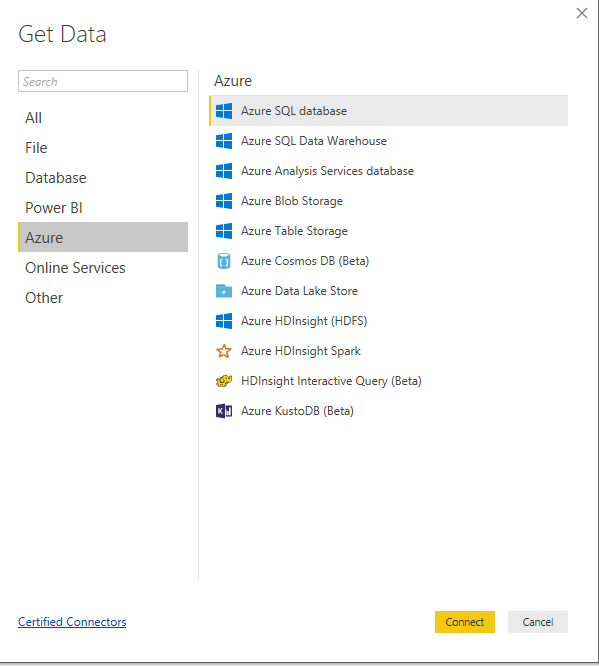
Open Power BI Desktop, and from Home tab select
Get Data and from the left side select **Azure **> Azure SQL Database (as the image below shows), and click Connect.
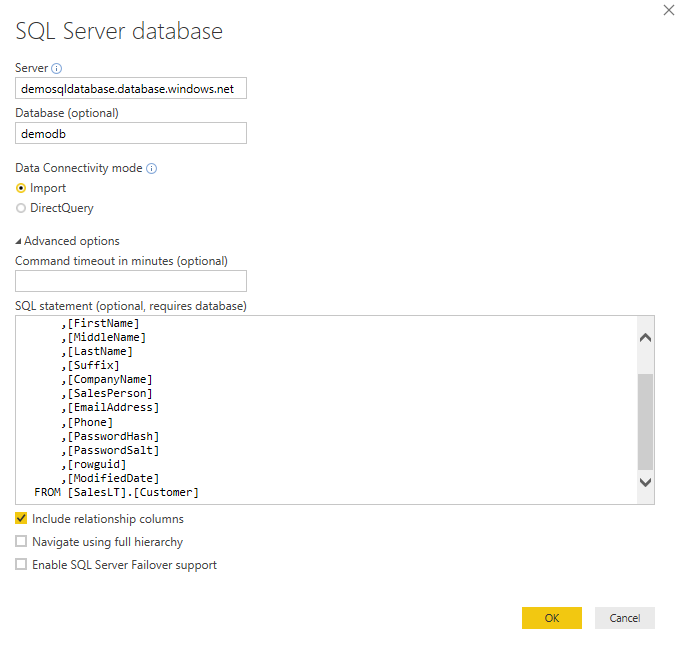
At the next step, we must type in the dialog box, information like, Server, Database (optional), SQL Statement (optional) if exists, and click OK.
If the Azure SQL Database credentials are not saved, we must type them again, Username, Password.
Other
| Vertical (Beta) | Web |
| Sharepoint list | OData Feed |
| Active Directory | Microsoft Exchange |
| Hadoop File (HDFS) | Spark |
| R script | ODBC |
| OLE DB | Blank Query |
Open Database Connectivity (ODBC)
For ODBC connection we will see an example connection on an IBM Informix Cisco database.
Configure The DSN (Data Source Name)
Note
In this example, we use the onsoctcp protocol for Windows OS
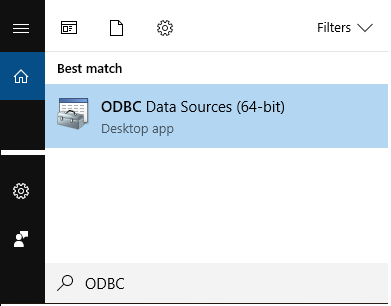
Search for the ODBC (Open Database Connectivity) application, and click on the ODBC Data Sources (64-bit)
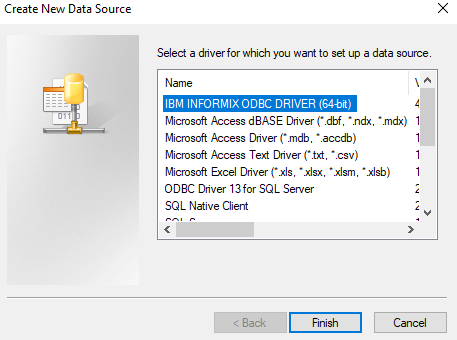
Click the button Add...
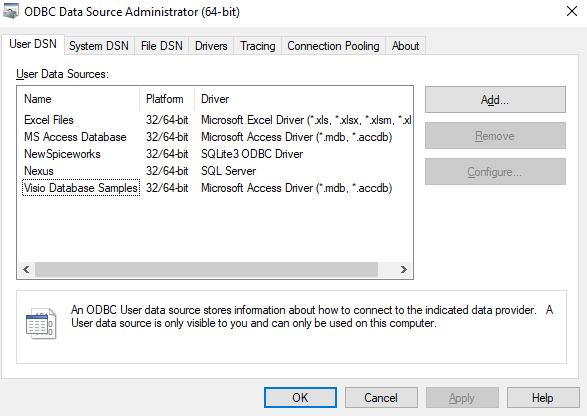
Select "IBM Informix ODBC Driver (64-bit)" and click Finish.
Driver Setup
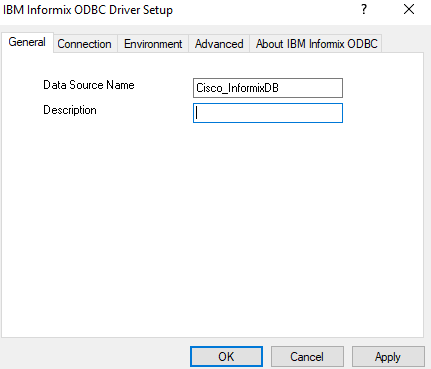
On the **General **tab, type a Data Source Name, e.g Cisco_InformixDB, and move in the next tab
In the Connection tab, fill in all the necessary information, as the image below shows.
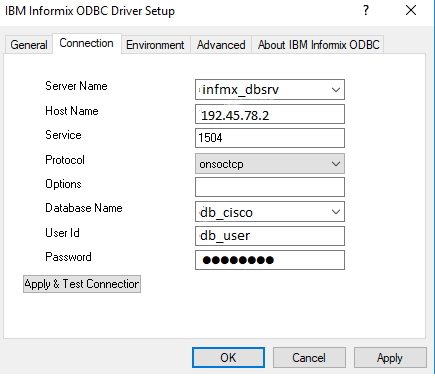
| Setting | Value |
| Server Name | database server name |
| Host Name | IP or Computer Name, that Database Server is hosted |
| Service | IBM Informix database server process that runs on your Host computer |
| Protocol | Select the connectivity protocol for communication with the server |
| Options | |
| Database Name | select the Informix database |
| User Id | User identification or account name for access to the DSN |
| Password | Password for access to the DSN |
At the next step fill in the values in the **Environment **tab, and click OK.
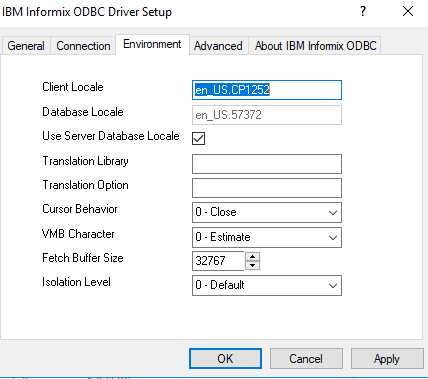
| Setting | Value |
| Client Locale | Default Value: en_US.1252. For the demo purposes, we change it to en_US.CP1252 |
| Database Locale | Default Value: en_US.1252. For the demo purposes, we change it to en_US.57372 |
| Use Server Database Locale | |
| Translation Library | Dynamic linked library (DLL) that performs code-set conversion; |
| Translation Option | Option for a non-IBM Informix translation library
Varying multibyte character length reporting option that specifies how to set pcbValue when rgbValue (the output area) is not large enough for the code-set-converted data Possible values: 0=Estimate 1=Exact |
| Cursor Behavior | Flag for cursor behavior when a commit or rollback transaction is called
Possible values are: 0=close cursor 1=preserve cursor Default Value :0 |
| VMB Character | 0-Estimate |
| Fetch Buffer Size | 32767 |
| Isolation Level | The ISOLATION level supports complete-connection level settings. This means that values in the local session environment at the time of connection are propagated to all new or resumed transactions.
Default Value: 0 |
Get Data Source
From the top ribbon click
Get Data and from the left side select **Other **> ODBC (as the image below shows), and click Connect.
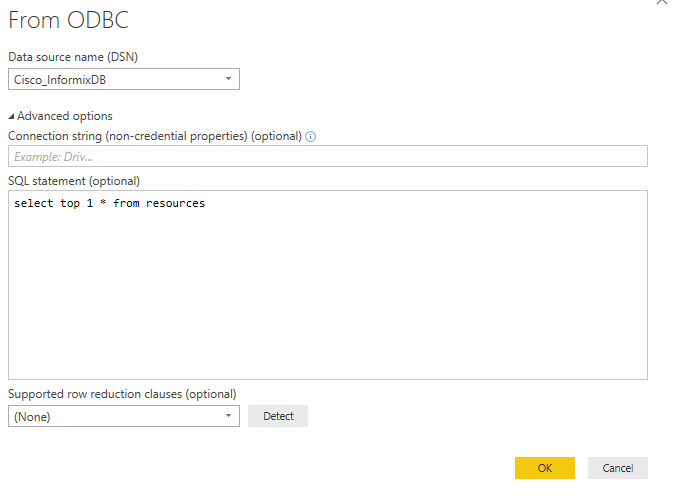
In the next form select the Data Source Name(DSN) which was created in the previous steps, type the SQL statement (this is optional) and click OK.
Conclusion
Power BI Desktop is a tool with high potential for any data analytics team. They are able to use data from different types of exported files and services like JSON, Excel, SQL Server, IBM Informix, Azure SQL, Azure Table Storage, and many others. In this post, we gave emphasis on how to Import data from a JSON file, and IBM Informix database, because the configuration for each of these is more complicated than the others.
References
- Use DirectQuery in Power BI Desktop
- Power BI: Getting Started
- Training Videos (YouTube)
- Power BI Blog
- Power BI Support
- Documentation
- Guided Learning
- Power BI Community
- Samples For Power BI
- Community Galleries
- IBM Connectivity Protocols
- Format Query Results as JSON with FOR JSON (SQL Server)
- JSON Editor On-Line
See Also