SharePoint Online: Working with Lists Using PowerShell
In this article we will discuss SharePoint List operations using PowerShell for SharePoint Online.
To start with this demo, I have created a demo SharePoint Online Site that I will use to perform SharePoint operations in this and few of the upcoming articles in this series.
https://howtodowithsharepoint.files.wordpress.com/2018/02/11.png?w=800
In case you are not aware of on how to start with PowerShell development for SharePoint Online, I would rather recommend you to first go through one of my previous articles. This article will help you to setup development environment and get you started.
SharePoint Online: How To Install SharePoint Online Management Shell
Provide SharePoint Online Site credential when it is asked for
https://howtodowithsharepoint.files.wordpress.com/2018/02/21.png?w=800
Operation: How To Get Lists Collection
https://howtodowithsharepoint.files.wordpress.com/2018/02/31.png?w=800
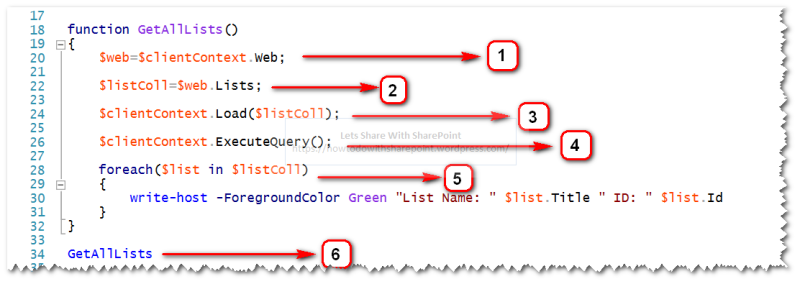
In Step 1 we will initialize Web Object using SharePoint Client Context
In Step 2 we initialize SharePoint Lists Collection
In Step 3 we call the “Load” function to retrieve SharePoint List Collection properties from server
In Step 4 we call “ExecuteQuery” method to send the request to SharePoint Server
In Step 5 we iterate the lists collection returned back from the server and display required list properties as output
In Step 6 we call function that we have explained in Step 1-5
And here is the output for this operation
https://howtodowithsharepoint.files.wordpress.com/2018/02/4-1.png?w=800
Operation: How To Add New List
https://howtodowithsharepoint.files.wordpress.com/2018/02/41.png?w=800
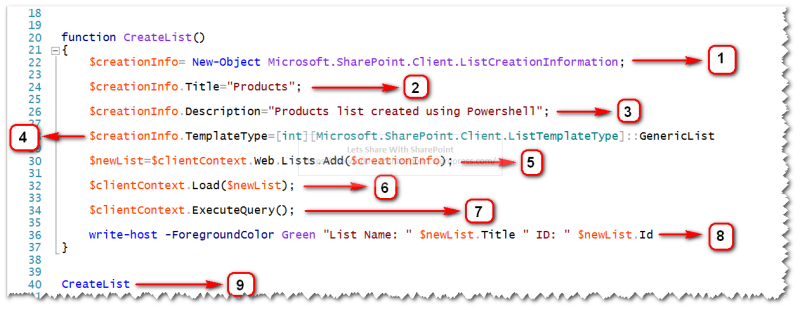
In Step 1 we will initialize “ListCreationInformation” object which allows to specify the metadata details for this new list
In Step 2 we will specify Title for new list
In Step 3 we will specify Description for new list
In Step 4 we will specify List Template for new list. In this example we will use Custom List Template
In Step 5 we will call “Add” method of “Lists” collection for SharePoint Web
In Step 6 we will call “Load” method, to retrieve the properties of list object from Server
In Step 7 we call “ExecuteQuery” method to send the request to SharePoint Server
In Step 8 we call function that we have explained in Step 1-7
On successful execution of Step 1-7 we will get list added to SharePoint and Internal ID of list as Output
And here is the output for this operation
https://howtodowithsharepoint.files.wordpress.com/2018/02/51.png?w=800
We can also see to the SharePoint Site to ensure that a new list has been added
https://howtodowithsharepoint.files.wordpress.com/2018/02/61.png?w=800https://howtodowithsharepoint.files.wordpress.com/2018/02/71.png?w=800
Operation: How To Update Existing List
https://howtodowithsharepoint.files.wordpress.com/2018/02/81.png?w=800
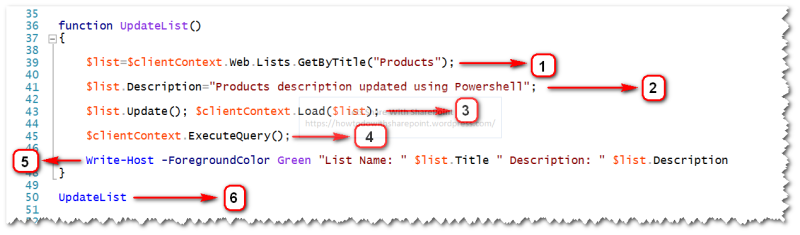
In Step 1 we will initialize “List” object which allows to modify the metadata details for this existing list
In Step 2 we will update the description of the existing list
In Step 3 we will call “Update” function of list object and then call “Load” method, to retrieve the properties of list object from Server
In Step 4 we call “ExecuteQuery” method to send the request to SharePoint Server
In Step 5 we will retrieve the list description to ensure that it is updated successfully
In Step 6 we call function that we have explained in Step 1-6
And here is the output for this operation
https://howtodowithsharepoint.files.wordpress.com/2018/02/91.png?w=800
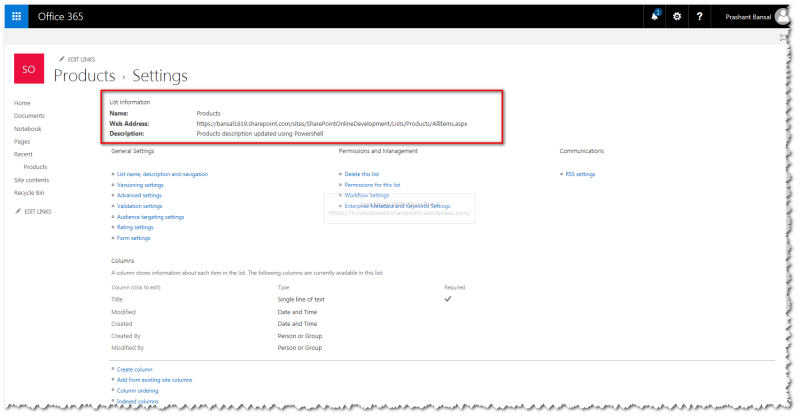
We can also see to the SharePoint Site to ensure that the list description has been updated
https://howtodowithsharepoint.files.wordpress.com/2018/02/10.png?w=800
Operation: How To Delete Existing List
https://howtodowithsharepoint.files.wordpress.com/2018/02/111.png?w=800
In Step 1 we will initialize “List” object by calling a method “GetByTitle” on the Web Object
In Step 2 we will call “DeleteObject” method on List Object that will delete the reference of respective list from lists collection
In Step 3 we call “ExecuteQuery” method to send the request to SharePoint Server
In Step 4 we will display success message to inform successfully deletion of the list
In Step 5 we call function that we have explained in Step 1-4
And here is the output for this operation
https://howtodowithsharepoint.files.wordpress.com/2018/02/12.png?w=800
We can also see to the SharePoint Site to ensure that the list has been deleted successfully from SharePoint
https://howtodowithsharepoint.files.wordpress.com/2018/02/13.png?w=800
That is all for this demo.
Stay tuned for the upcoming articles in this series.