GitHub Pages: Hosting your website free
Step By Step Tutorial for beginners
 Note! On Jun 4, 2018 Microsoft announced an agreement to acquire GitHub, and completed its acquisition of GitHb on Oct 2018. Microsoft TechNet Wiki focuses on articles, which are related to Microsoft products and Microsoft services. This acquisition means that it is time to cover Microsoft "new" service in the TechNet Wiki.
Introduction
What is GitHub Pages?
GitHub Pages is a service at "github.io". Using a tool named jekyll, the service uses files which are stored in GitHub repository in order to build static web pages. jekyll able to process different types of sources including HTML, CSS, JS, JSON, [GitHub Markdown language](https://social.technet.microsoft.com/wiki/contents/articles/52588.github-pages-hosting-your-website-free-step-by-step-tutorial-for-beginners/(https://guides.github.com/features/mastering-markdown/), flat data files, and so on. When we commit changes in the source files in the source repository jekyll build the related web pages.
There are two types of GitHub Pages sites according to the repository which is used to store the source files of the Site: (1) Project Pages sites, where the files live on a branch within the project repository. (2) Account Pages sites (a User or Organization), where the files live in a special repository.
A static web page is a web page which is delivered to the client exactly as stored in the server, in contrast to dynamic web pages which are generated on the server side. As such a website which is based on static pages, is usually much faster and much lower cost, than a dynamic website. A static web page is based on client side code like HTML, CSS, and client side scripts (JS, VBS). GitHub is a code hosting platform for collaboration and version control. Using GitHub Pages, we gain the power of static web site together with versions control and dynamically management of our source.
What this article about?
This article intend to summarize several official documentations together and to provide a first look at GitHub Pages service in a simple step-by-step tutorial. All the information in this article can be found online, and it is recommended to follow the links in the "See Also" section for deeper knowledge and more information.
During this tutorial we will build a simple website using a free GitHub account, and we will see how to use your own domain/sub-domain for the website. We will use only the browser using the GitHub website directly.
Prerequisites: GitHub account
If you do not have a GitHub account yet, then you can choose the GitHub plan which fit your needs directly from the Pricing Page.
For the sake of this tutorial and probably for most Individual users you can use the free account, which provide you unlimited public repositories and unlimited private repositories. Read more about the limitation of the free account here.
Once you have an account sign-in and start the tutorial.
✔Create New Account's Website
As mention in the introduction, there are two types of GitHub Pages sites. in this section we will create an account's site, which can be related to a user or organization. As the name implies, we can create only a single "account's site" for each account, since the service is based on a repository which uses the account name.
Step 1: Create a repository
1.1 Navigate to GitHub home page and sign-in. At the left side, you can see a list of your current repositories.
1.2 Click on the button "New" in order to create a new repository, where you will store the files for your site.

Image 01: Repositories list on GitHub Home Page
1.3 Fill the name of the new repository, according to the following format (the name must be in the following format): "<name>.github.io", where "<name>" is the user-name or the organization-name which own the account, and don't forget to add ".github.io" as part of the name.
Note! for the sake of the demo we will use the user-name "pituach". You should replace this name with your GitHub user-name.

Image 02: Create repository
1.4 Select the option "Public", and do not choose "initializing this repository with a README", as shown in the image above
1.5 Click on "Create repository"
Once your repository is ready, you will be automatically redirected to the new repository, and you will see a page like bellow image:

Image 03: New repository management page
Note! in order to return the repository page from your GitHub home page, you can use the list of repositories on the left (Image 01)
Step 2: Enable GitHub Pages
In order to enable our site we simply need to add a default web page.
Note! Account's site (GitHub User's Pages or Organization's Pages) must store the files in the master branch of the "<name>.github.io" repository.
2.1 Create new file, (2.1.1) click on the link "creating a new file" in the "Quick setup" section, (2.1.2) fill the file name: "index.html", which is the name of the default page in GitHub Pages site, and (2.1.3) add the following content (you can replace the content with any HTML code that you want):
<!DOCTYPE html>
<html>
<head>
<title>Ronen Ariely GitHub Site - Title</title>
</head>
<body>

<h1>GitHub Site - content</h1>
<p>This is a first page.</p>

</body>
</html>

Image 04: Create First Web Page
2.1.4 Click the button "Commit new file" to save your new file to the project, and you are done.
Your New Website is ready to used.
Your new website is ready and you can watch it from anywhere using the URL "https://<name>.github.io/" or in the case of this tutorial since our account user-name was pituach, the website URL is: https://pituach.github.io/

Image 05: First Page
Step 3: Adding files and sub-folders to the Site
Using account's Site all the files of our site must be added into the repository master branch. We can upload files to the repository using any tool that you prefer like Terminal, GitHub desktop app, or browser, or you create new files online using the browser as explained in Step 2.
Using the browser, GitHub does not allows us to create new folders directly since it does not support empty folders. If you do need to create a new folder, then you will need to create a new file, which is located in the new folder (in the path to the new folder). GitHub engine will create the path to the new file by adding the folders automatically.
3.1. Navigate to the repository
3.2 Click on New File
3.3 Type in the name of the folder which you want to create, and add a slash after the folder name

Image 06: Create Sub-Folder
3.4 Add a file name (you must add a file in order to save the changes which will lead to the creation of the new folder/s)
3.5 Save the new file
Note! You can add sub-folders, HTML files. CSS and JavaScript files, and images into your repository master branch and built more complex website. This repository master branch serves as the storage location of your site just like any other storage place for websites.
✔Create Project Website
In addition to Account's Site which we can have only one for each account, there is another type of GitHub Pages sites - a "Project's Site". We can create multiple Project's Sites using multiple repositories. The procedure is almost the same as creating Account's Site, but the names of these repositories are not limited by the user's name or organization's name of the GitHub account. The default URL to the Project's Site will be in the format "https://<name>.github.io/<Repository Name>/".
Step 1: Create a repository
Navigate to the list of your repository and create new repository using any legit name for URL. For the sake of this demo, we will create a repository named "ronen-ariely" and since our account user-name is "pituach", the website URL will be: https://pituach.github.io/ronen-ariely. Once you fill the form as shown in the image bellow, Click on "Create repository"
Note! To create new repository, you can follow the instruction above.

Image 7: Create Project Repository
Step 2: Enable Project's GitHub Pages
In order to enable the Project's Site we need to add content to your repository, as we did in the case of Account's Site, but in this case we we are not limited to store the files in the master branch main folder of the repository.
Navigate to the repository and add new file named "index.html" inside a sub-folder named "docs", and commit the new file.

Image 8: Project Default Page
Navigate to the "Setting"of the new repository and scroll down to the GitHub Pages:
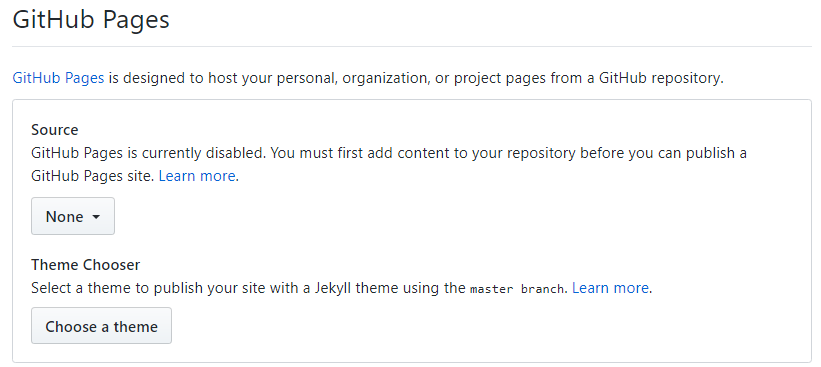
Image 9: Enable Project's Site
Click on first option "Source" in order to select the source folder for our Project's Site.
Note! When we created the "Account's Site" we did't have this option (check Image 13).

Image 10: Select Source Folder
Once GitHub engine finish to create the website (should take less than a second) we will be announced that the site is ready to be published and we will get the URL of our new Project's Site.
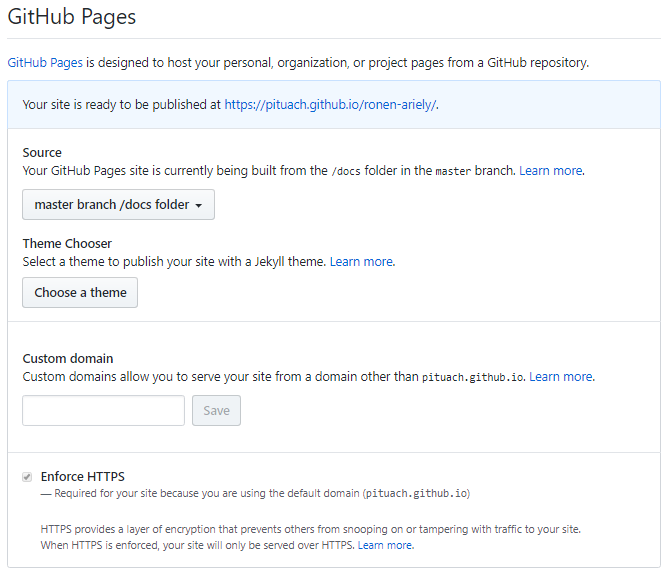
Image 11: Project's Site is ready
Our Project Website is ready to use. You can add more files and create sub-folders.
But what if we want to use more complex website, and we do not have the knowledge (or the time) to built it manually? Keep reading on how you can use built-in templates for our sites (Account's Site and/or Project's Site)
✔Create Website From Template
GitHub Pages Service provides built-in templates which we can use for our Sites. Using a template for Account's Site or using it for a Project's Site is the same procedure. For the sake of this demo, we will use the Account's Site, which we created above in order to deploy a built-in template.
✔Navigate to the management page of the Site's repository on GitHub.
If this is a new clean repository then you should see the same window as in Image 03. If you are using the site which we created above, then you should see a single file named index.html like bellow image:

Image 12: Repository management page
✔Delete the existing files if exists
✔From the new repository page, Click on "Setting" and scroll down to "GitHub Pages"
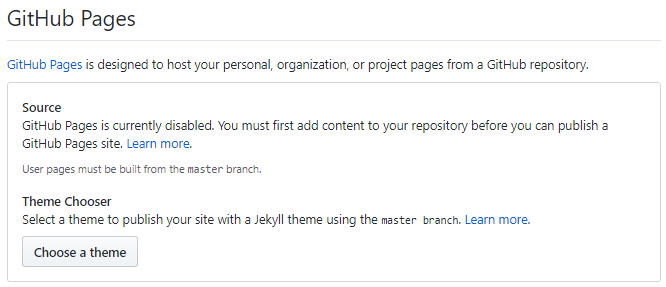
Image 13: setting GitHub Pages for account
✔Click "Choose a theme"
✔In the next window, you can dynamically click on each one of the themes that GitHub provide as built-in themes, and you can watch how it is look like. Once you found the theme which you want to use, click on "Select Theme".
Your new website is ready to use.
Note! If you navigate to the source repository of the Site, then you will notice that we have two pages: (1) "index.md", and (2) "_config.yml".
GitHub Pages based on Jekyll, a popular static site generator, which in addition to supporting regular HTML content it supports CSS, JS, JSON, [GitHub Markdown language](https://social.technet.microsoft.com/wiki/contents/articles/52588.github-pages-hosting-your-website-free-step-by-step-tutorial-for-beginners/(https://guides.github.com/features/mastering-markdown/) (which is our case using the "index.md file"), flat data files, and so on. The GitHub Pages service uses "Jekyll Theme Chooser" in order to create a GitHub Pages site, or to change the theme of your existing GitHub Pages site. It pull the information from your source repository and from Jekyll theme template, and it generate the new web pages. You can configure most Jekyll settings by editing your "_config.yml file". For more information about "Jekyll Theme Chooser" you can go here.
✔Using Our Domain for GitHub Site
If you followed the tutorial to this point, then you already have a working website, which is configured as a sub-domain of "github.io". You can configure both Account's Site and a Project's Site to use your domain if you control the domain DNS. The procedure for both types of Sites is the same, as describe in the following tutorial.
1. Sign in to your GitHub
2. Navigate to the source repository of the Site
3. Click on Setting and scroll down to the GitHub Pages
4. Add the domain name or sub-domain, which you want to use, to the "Custom domain", and click "Save".
5. In your domain DNS provider, configure a new record according to the type of URL you want to use for your site
5.1 In order to use an "apex domain" (a root domain that does not contain a subdomain part), such as "ariely.info", you must configure an ALIAS, ANAME, or A record with your DNS provider.
5.2 To set up a subdomain, such as "github.ariely.info" you must configure a CNAME record.
Summary
This tutorial gave you a starting point on using GitHub Pages. It covered several short tutorials on how to store websites using GitHub free account, based on "GitHub Pages" service. The article includes some basic explanation, but it mostly focuses on step-by-step tutorial for beginners.
Limitations
- GitHub Pages is available in public repositories with GitHub Free, and in public and private repositories with GitHub Pro, GitHub Team, GitHub Enterprise Cloud, and GitHub Enterprise Server.
- Free account is limited to a single site per GitHub account (a user or organization), and unlimited project's sites.
- repositories have a recommended limit of 1GB.
- Published GitHub Pages sites may be no larger than 1 GB.
- GitHub Pages sites are publicly available on the internet, even if their repositories are private.
See Also
Resources
- GitHub Pricing Plans - create account
- GitHub Pages The official GitHub Website, include a nice introduction video.
- What is GitHub Pages? (GitHub Help)
- What is my disk quota? (GitHub Help)
- Using a custom domain with GitHub Pages (GitHub Help)
- Jekyll Home Page
- Configuring Jekyll (GitHub Help)
- Setting up your GitHub Pages site locally with Jekyll (GitHub Help)
- Jekyll Feed plugin to generate an Atom (RSS-like) feed of your Jekyll posts
- Customizing CSS and HTML in your Jekyll theme (GitHub Help)
- Are there any GUI/WYSIWYG CMS editor based on Jekyll?
Related TN Wiki Articles
- <Add here any new GitHub articles>.