Azure Step-By-Step: How to create Azure Active Directory using Portal
Introduction
Azure Active Directory (AAD) is a cloud based service to handle the identity and access management. It has the capabilities like multifactor authentication, self-service password reset, role based access control, security monitoring, managing alerts etc. When user create an AAD directory it automatically links with Azure subscription.
AAD provide easy way to give users single sign-on (SSO) access to various application like office 365, Dropbox, salesforce etc. AAD improve application security with multifactor authentication and conditional access.
AAD can also be integrated with on premise Windows AD using AAD connect which provides organizations to use their existing on premise identity system to manage access to cloud based application.
AAD capabilities comes up in 3 versions Basic, Premium P1 and Premium P2. Paid editions P1 and P2 are built on top of free versions and provide more rich security facilities like monitoring security, self-service password management, privilege identity management etc.
Step by Step
Now, let’s jump on the demo part and learn how to create the active directory.
- Login to Azure Portal (If you don’t have Azure account then you can sign up for Azure free trial)
- From the left side pane, select Azure Active Directory or write it in a search box from the top of Azure dashboard.
- In create directory section, fill out the details like organization name, initial domain name, select country or origin. Initial domain name should be unique else it will throw error if it’s already used by another user.
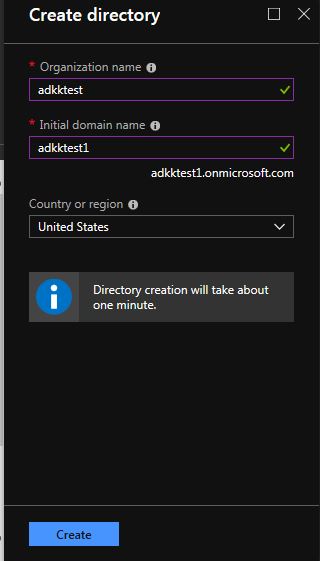
4. Click on ‘Create’ button to create the directory.
5. After successful creation of directory, a new window appears as shown below -

6. Now next step is to create a group in the directory and assign a user to a group.
7. Click on ‘Groups’ tab to create a new Group.
8. Click on ‘New Group’
9. Enter the Group Name as ‘IT’.
10. Click ‘Create’ button.
11. You can see the new group in Group window

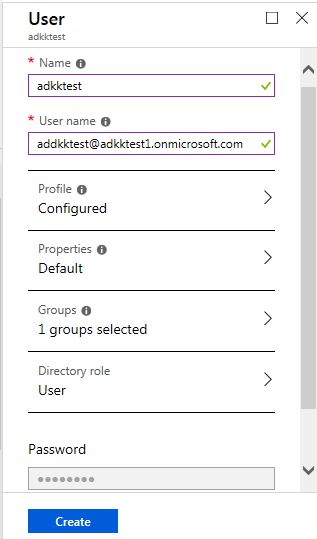
12. Click on ‘Users’ tab to create a new user.
13. Click on ‘Create new user’
14. Fill the details like Name, User name, profile, directory.
15. Enter name ‘adkktest’
16. Enter User Name which user enters to sign in to AAD . You should use the domain that you use at the time of creation of active directory. E.g. addkktest@adkktest1.onmicrosoft.com
You can define the custom domain but for that you need to registered them.
17. Fill the details in Profile section.

18. Select the Group that you have created earlier. E.g. IT
19. Select the Directory Role.
20. Click on ‘Show Password’ and note down the password. You will need it when login with new username.
21. Click ‘Create’
22. New user has been created successfully associated with a group.
So, this is how we can create a new directory and then create a group and assigned users to them.