ASP.NET Core Blazor game development using .Net core 3.0 preview,Web API and VS2019
Introduction

In this article, we will see how to create a simple game development web application using ASP.NET Core Blazor , .Net Core 3.0 Preview and with Visual Studio 2019. Here we will be creating “Odd Image Out Game”, in this game total 5 questions will be asked. In each question we will display 4 sets of Images in that one Image will be different from the other three. User has to pick the odd image from the four images. If the user picks the correct odd image from the question user will get 10 points. If the user selects the wrong answer, then he will get -5 points. After all the 5 questions have been answered by the user the result will be calculated and if the user's points are 50, then the user wins the game and if the user gets points less than 50, then user loses the game.
Prerequisites
- Visual Studio 2019
- .NET Core 3.0 Preview SDK.
- Blazor Extensions.
Visual Studio 2019 :
If you not yet installed Visual Studio 2019 then you can download the Visual Studio 2019 from this link and install it on your computer.
.NET Core 3.0 Preview SDK.
Install the .NET Core 3.0 Preview SDK. (You can find all versions from this link)

Download and install the .NET Core 3.0 Preview.

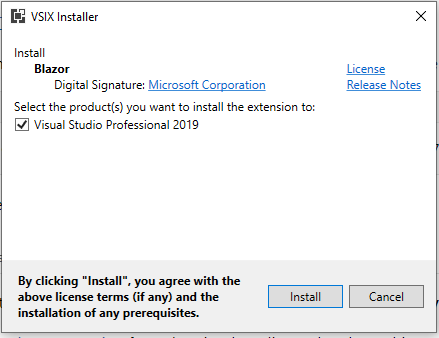
Blazor Extensions
Download the Blazor Extension

Install Blazor Extension to work with your Blazor applications.
Odd Image out Game
First, collect all the images needed to be displayed for the question. Each question carries 4 sets of images and in that one image should be as different. So collect as much possible image to make more questions. We will display the questions randomly from the set of questions to avoid repeated question display. So first we need to make as much of possible questions for the users to not get bored of the game. After downloading all the Images and giving the proper name to each Image and in the Image name itself we have given as answer as O for Ok and N for the Wrong Image. For the sample of this demo, we have created a total of 15 Questions with 15 * 4 images total. You can add more questions to make the game more interesting.
Code Part
Step 1 - Create an ASP.NET Core Blazor Application
After installing all the prerequisites listed above and ASP.NET Core Blazor extension, click Start >> Programs >> Visual Studio 2019 >> Visual Studio 2019 on your desktop. Click New >> Project.

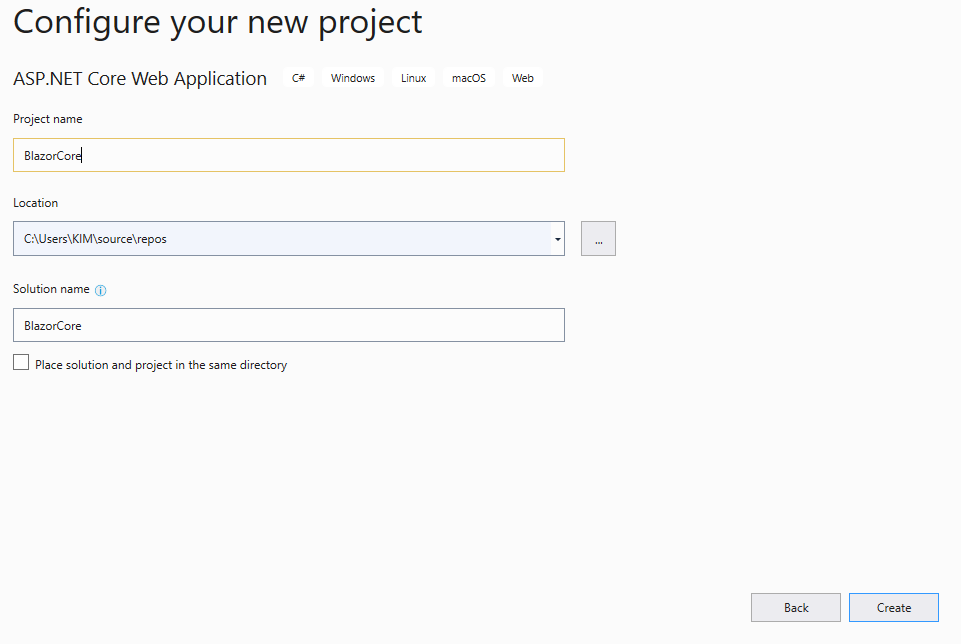
Click on ASP.NET Core Web Application and Click Next.

Enter your project name and click the Create button.
Now we can see as for asp.net Core 3.0 only Blazor Template has been listed . Even if we create the Blazor Project and run it will show the error as “The current .NET SDK does not support targeting .NET Core 3.0. Either target .NET Core 2.2 or lower, or use a version of the .NET SDK that supports .NET Core 3.0. WebApplication2.Server.

To avoid the error and list all the Asp.NET core Template for .Net Core 3.0 Preview we need to enable the “ Use Previews of the .NET Core SDK”.
For this we cancel creating the project and in our Visual Studio 2019 go to Tools and click on Options.

Select Project and Solutions >> Click on .NET Core.

Check the Use Previews of the .NET Core SDK and click ok button.

Now again create the ASP.NET Core Web project. We can see as now all the project template for SAP.NET core is available for the ASP.NET Core 3.0. For us, we select Blazor (ASP.NET Core hosted) project and click on create.

After creating ASP.NET Core Blazor Application, wait for a few seconds. You will see the below structure in solution explorer.

When we create our new ASP.NET Core Blazor application we can see there will be 3 projects that will be automatically created in the Solution Explorer.
Client Project
The first project created as a Client project is our BlazorCore.Client and here, we can see our solution name as “BlazorCore”. This project will be mainly focused on all the client-side views. Here, we will be adding all our page views to be displayed at the client side in the browser.

We can see a few sample pages have been already added here and we can also see a shared folder like our MVC application where we will be having the Shared folder and Layout page for the Master page. Here, in Blazor, we have the MainLayout which will be working like the Master page and NavMenu for the left side menu display.
Server Project
As the name indicates, this project will be used as a Server project. This project is mainly used to create all our Controllers and WEB API Controllers to perform all business logic and perform CRUD operation using WEB API’s. In our demo application, we will be adding a Web API in this Server project and all the WEB API in our Client application. This Server project will be work like getting/set the data from Database and from our Client project we bind or send the result to this server to perform the CRUD operation in the database.

Shared Project
As the name indicating this project work like a shred project. This project works as a Model for our Server project and for the Client project. The Model declared in this Shared project will be used in both the Server and in the Client project. We also install all the packages needed for our project here; for example, to use the Entity Framework, we install all the packages in this Shared project.

Run to test the application
When we run the application, we can see that the left side has navigation and the right side contains the data. We can see as the default sample pages and menus will be displayed in our Blazor web site. We can use the pages or remove it and start with our own page.

Now let’s see how to add new page to create our own Odd Image out game.
Adding Images
First lets add a new folder “Images inside the wwwroot
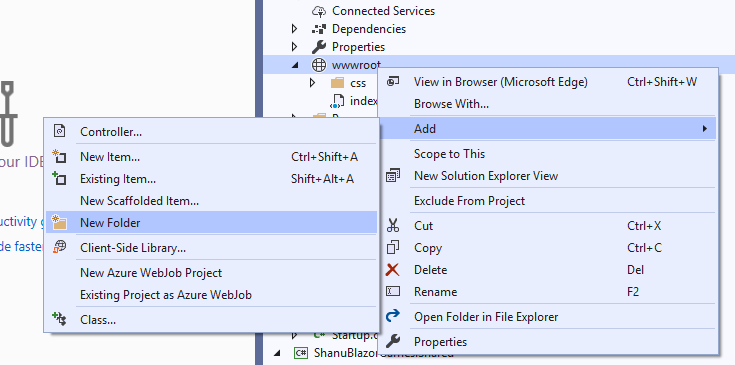
In the newly added Images folder add all our images which we will be using for our game. Here we have added sample 48 images for our 15 questions.

Adding Model class
Now we will create an model class in our shared project for working with WEB API and in our client application for displaying the questions. Right Click Shared project and click on Add New Class.

Here we give the class name as gameImages.cs and click on Add.

In the class declare this property for using in our WEB API controller and in our client application.
public class  gameImages
    {
        public string  id { get; set; }
        public string  Image1 { get; set; }
        public string  Image2 { get; set; }
        public string  Image3 { get; set; }
        public string  Image4 { get; set; }
        public string  Result { get; set; }
 }
**Creating Web API **
To create our WEB API Controller, right click our Server project Controllers folder. Click Add New Controller.

Here we will be creating empty WEB API controller to get only the image details from the list.

Here we have given the WEB API controller name as “GameData” and we can see our new WEB API controller has been created.

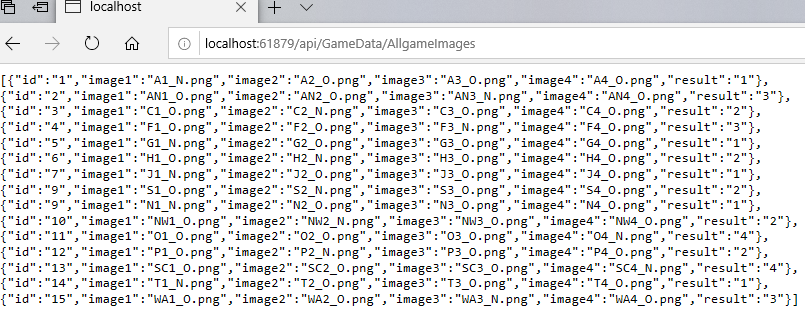
We add the below get method to get all the Game Images ,for this here we not using database and adding all the image details to list and return the list as Enumerable and in our client we will receive the JSON result and display all the game questions and images.
//api/GameData/AllgameImages
        [HttpGet("[action]")]
        public IEnumerable<gameImages> AllgameImages()
        {
            List<gameImages> gamedata = new  List<gameImages>();

            gamedata.Add(new gameImages
            {
                id = "1",
                Image1 = "A1_N.png",
                Image2 = "A2_O.png",
                Image3 = "A3_O.png",
                Image4 = "A4_O.png",
                Result = "1"
            });
            gamedata.Add(new gameImages
            {
                id = "2",
                Image1 = "AN1_O.png",
                Image2 = "AN2_O.png",
                Image3 = "AN3_N.png",
                Image4 = "AN4_O.png",
                Result = "3"
            });
            gamedata.Add(new gameImages
            {
                id = "3",
                Image1 = "C1_O.png",
                Image2 = "C2_N.png",
                Image3 = "C3_O.png",
                Image4 = "C4_O.png",
                Result = "2"
            });
            gamedata.Add(new gameImages
            {
                id = "4",
                Image1 = "F1_O.png",
                Image2 = "F2_O.png",
                Image3 = "F3_N.png",
                Image4 = "F4_O.png",
                Result = "3"
            });
            gamedata.Add(new gameImages
            {
                id = "5",
                Image1 = "G1_N.png",
                Image2 = "G2_O.png",
                Image3 = "G3_O.png",

                Image4 = "G4_O.png",
                Result = "1"
            });
            gamedata.Add(new gameImages
            {
                id = "6",
                Image1 = "H1_O.png",
                Image2 = "H2_N.png",
                Image3 = "H3_O.png",
                Image4 = "H4_O.png",
                Result = "2"
            });
            gamedata.Add(new gameImages
            {
                id = "7",
                Image1 = "J1_N.png",
                Image2 = "J2_O.png",
                Image3 = "J3_O.png",

                Image4 = "J4_O.png",
                Result = "1"
            });
            gamedata.Add(new gameImages
            {
                id = "9",
                Image1 = "S1_O.png",
                Image2 = "S2_N.png",
                Image3 = "S3_O.png",

                Image4 = "S4_O.png",
                Result = "2"
            });
            gamedata.Add(new gameImages
            {
                id = "9",
                Image1 = "N1_N.png",
                Image2 = "N2_O.png",
                Image3 = "N3_O.png",

                Image4 = "N4_O.png",
                Result = "1"
            });
            gamedata.Add(new gameImages
            {
                id = "10",
                Image1 = "NW1_O.png",
                Image2 = "NW2_N.png",
                Image3 = "NW3_O.png",

                Image4 = "NW4_O.png",
                Result = "2"
            });
            gamedata.Add(new gameImages
            {
                id = "11",
                Image1 = "O1_O.png",
                Image2 = "O2_O.png",
                Image3 = "O3_O.png",

                Image4 = "O4_N.png",
                Result = "4"
            });
            gamedata.Add(new gameImages
            {
                id = "12",
                Image1 = "P1_O.png",
                Image2 = "P2_N.png",
                Image3 = "P3_O.png",

                Image4 = "P4_O.png",
                Result = "2"
            });
            gamedata.Add(new gameImages
            {
                id = "13",
                Image1 = "SC1_O.png",
                Image2 = "SC2_O.png",
                Image3 = "SC3_O.png",

                Image4 = "SC4_N.png",
                Result = "4"
            });
            gamedata.Add(new gameImages
            {
                id = "14",
                Image1 = "T1_N.png",
                Image2 = "T2_O.png",
                Image3 = "T3_O.png",

                Image4 = "T4_O.png",
                Result = "1"
            });
            gamedata.Add(new gameImages
            {
                id = "15",
                Image1 = "WA1_O.png",
                Image2 = "WA2_O.png",
                Image3 = "WA3_N.png",

                Image4 = "WA4_O.png",
                Result = "3"
            });
            return gamedata.AsEnumerable();
        }
To test Get Method, we can run our project and copy the GET method API path. Here, we can see our API path to get api/GameData/AllgameImages/
Run the program and paste API path to test our output.
Working with Client Project
Add Razor View
To add the Razor view page right click the Pages folder from the Client project. Click on Add >> New Item
Select Razor View >> Enter your page name,Here we have given the name as games.razor

In Razor view Page we add 3 parts of code. The first is the Import part where we import all the references and models for using in the view, HTML design and data bind part and finally we have the function part to call all the web API to bind in our HTML page and also to perform client-side business logic to be displayed in View page for the game.
Import part
First, we import all the needed support files and references in our Razor View page.Here we have first imported our Model class to be used in our view and also imported HTTPClient for calling the Web API to display the questions and check for the matching answer for calculate the answers.
@page "/games"
@using ShanuGameBlazor.Shared
@inject HttpClient Http
Display New Game Message 
When user clicks on the New Game button we will call the FirstQuestion() method, display and hide the relevant table row for displaying the question. And call the displayQuestion() method to display the first question.
@if (showGameStart == true)
       {

           <tr>
               <td align="center">
                   <h1>
                       Shanu Blazor Odd Image Out Game
                   </h1>
                   <br><br>
                   <button type="submit" class="btn btn-success" onclick=@FirstQuestion style="background-color:#3f9835;color:#FFFFFF;border-color:#f6f803;border-style:dashed;width:220px">Start Game </button>
                   <br><br>

                   Find the Odd Image from the Given four Images.You will be having 5 questions.<br>
                   Answer all the 5 Question .
                   <br>Wrong Answer will get -5 points and correct answer will get 10 Points.<br>
                   If user answer all the 5 Questions correctly then they are the winner.

               </td>
           </tr>
       }
Funciton
In funciotn first we have created the OnInitAsync method,In this method first we get all the WEB API JSON result and store it in array for using in our game
protected override async Task OnInitAsync()
        {
            gamesimg = await Http.GetJsonAsync<gameImages[]>("api/GameData/AllgameImages");
        }
When user clicks on the First Question button then we hide the Game Start Table row and show the game page table rows.
void FirstQuestion() {
        showGameStart = false;
     showGame = true;
     showresult = false;
     displayQuestion();
    }
Display New Game Question.

When user clicks on New Game we will call the displayQuestion() method to select the random question from the set of questions which we have created and displayed each questions image in HTML page.
@if (showGame == true)
        {
            <tr>
                <td align="Center">
                    <table class="table">


                        <tr style="background-color:#336699 ; color:#FFFFFF ;border: solid 1px #659EC7;">
                            <td align="right" colspan="2">
                                <table class="table">
                                    <tr>
                                        <td colspan="4" align="center" style="color:#FFFFFF;"><h1> Shanu Blazor Odd Image Out Game </h1></td>
                                    </tr>
                                    <tr>

                                        <td style="color:#FFFFFF;font-size:x-large">
                                            Question :  @questionCount
                                        </td>
                                        <td style="color:#FFFFFF;font-size:x-large;" colspan="2" align="center">


                                            <img src="Images/coin.png" width="48px" height="48px">

                                        </td>
                                        <td style="color:#FFFFFF;font-size:x-large;">
                                            Total points :  @totalPoints
                                        </td>
                                    </tr>
                                </table>
                            </td>
                        </tr>

                        <tr>
                            <td align="center" style=" background-color:#FFFFFF; border: dashed 2px #e44a10; padding:10px;width:50%;">
                                <img src="Images/@Image1" width="120px" height="120px" onclick=@(() => findAnswer("1")) />

                            </td>
                            <td align="center" style=" background-color:#FFFFFF; border: dashed 2px #e44a10; padding:10px;width:50%;">
                                <img src="Images/@Image2" width="120px" height="120px" onclick=@(() => findAnswer("2")) />
                            </td>
                        </tr>
                        <tr>
                            <td align="center" style=" background-color:#FFFFFF; border: dashed 2px #e44a10; padding:10px;width:50%;">
                                <img src="Images/@Image3" width="120px" height="120px"
                                     onclick=@(() => findAnswer("3")) />
                            </td>
                            <td align="center" style=" background-color:#FFFFFF; border: dashed 2px #e44a10; padding:10px;width:50%;">
                                <img src="Images/@Image4" width="120px" height="120px" onclick=@(() => findAnswer("4")) />
                            </td>
                        </tr>
                    </table>
                </td>
            </tr>
            <tr>
                <td align="center">
                    Find the Odd Image from the Given four Images.You will be having 5 questions.<br>
                    Answer all the 5 Question .
                    <br>Wrong Answer will get -5 points and correct answer will get 10 Points.<br>
                    If user answer all the 5 Questions correctly then they are the winner.

                </td>
            </tr>
        }
void displayQuestion() {
        questionCount =questionCount +1;
        Random random = new  Random();
        int totalcounts = gamesimg.Count();
        randomQuestion=random.Next(1,totalcounts);
        Image1 = gamesimg[randomQuestion].Image1;
        Image2 = gamesimg[randomQuestion].Image2;
        Image3 = gamesimg[randomQuestion].Image3;
        Image4 = gamesimg[randomQuestion].Image4;
        ImageAnswer =gamesimg[randomQuestion].Result;
    }
Find Answer
Now we have displayed the question, so what is next. Yes in each question image click we need to find the correct answers. In each image click event we will call the findAnswer(1) method to check for each question answer and calculate the result and display the points to the user and display the next question. In this method we will pass the argument as 1,2,3,4 for each question clicked by order and in each question answer we will be storing the answers in Number. we will compare both the user clicked image number with each questions answer. If both are matching, then we will add the points as 10 and if the answer is wrong then we will -5 with the total points. Finally, we will display the next question for the user to play.
// to find the Answer
    void findAnswer(string checkvals) {
        if (checkvals == ImageAnswer)
        {

            totalPoints = totalPoints + 10;
        }
        else
        {
            totalPoints = totalPoints-5;
        }
        counterval = counterval + 1;
        if(counterval==5)
        {
            displayResult();
            return;
        }
        displayQuestion();
    }
Here we can see we will calculate the answer and display the next question to user with the total points earned.

In the meantime we will check for questions counter value. If the user answers total 5 questions then we will call the displayResult() method to display the final results to the user.
Display Final result
In this method we will check for the total points of the user and display the result.
void displayResult() {

        if (totalPoints >= 50)
        {
            Resuts = " Wow :) You have answerd all the 5 questions correctly and won the Game.Good Job " ;
            wonImage = "Won.png";
        }
        else
        {
            Resuts = "Sorry You lose the game :( .Your Total points are " + totalPoints + " out of 50 points";
            wonImage = "Lose.png";
        }
        showGameStart = false;
         showGame = false;
        showresult = true;
Won the Game:
If the points are greater than or equal to 50, then we will display the message as user won the game.

Lose the Game:
If the points are lesser than 50, then I will display the message as user lose the game.

Conclusion
In this article we have added game details using static list in web api with fixed 48 images for 15 questions, you can extend this to load from the database for both questions and images .Hope you all like this article and in the next article we will see more examples to work with Blazor. It's really very cool and awesome to work with Blazor.
See Also
- ASP.NET Core Blazor CRUD using Entity Framework and Web API
- ASP.NET Core Blazor Filtering and Sorting using Entity Framework and Web API
- ASP.NET Core Blazor Master Detail Grid with Filtering and Sorting using EF and Web API
- Visual Studio 2019 RC: Getting Started (Part 1)
Download
ASP.NET Core Blazor game development using .Net core 3.0 preview and VS2019