SharePoint Framework: Implement SharePoint List item CRUD with PnP JS
In this section, we will see how to create a webpart that does Create/Read/Updated/Delete operations against SharePoint List items using SPFx and PnP JS. The major project files used in this solution has been zipped and uploaded at Microsoft TechNet Gallery. Feel free to download it.
Create the Web part Project
Spin up Node.js command prompt, using which we will be creating the Web part project structure. We can create the directory, where we will be adding the solution, using the command given below.
md PnPSPCRUD
Let’s move to the newly created working directory, using the command.
cd PnPSPCRUD
We will then create the client Web part by running the Yeoman SharePoint Generator.
yo @microsoft/sharepoint
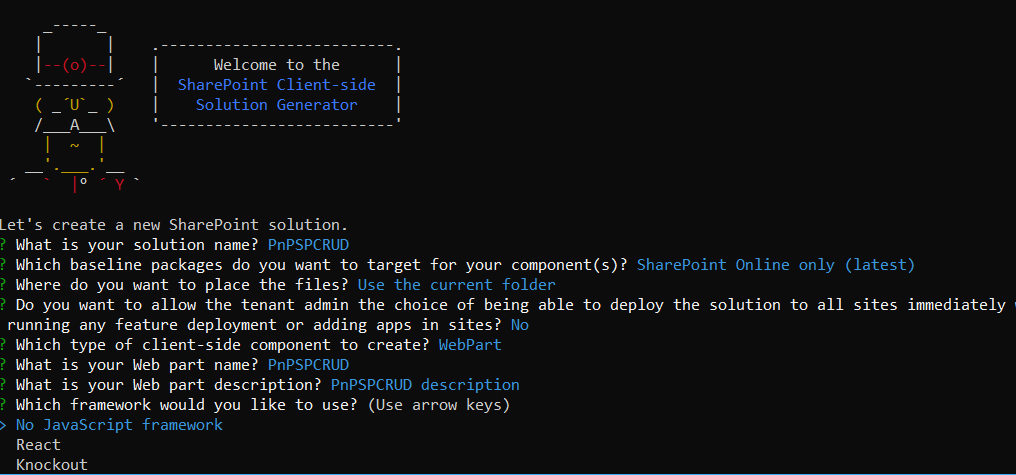
This will display the prompt, which we will have to fill up, so as to proceed with the project creation.
What is your solution name? : Set it to ‘PnPSPCRUD’.
On pressing enter, we will be asked to chose the working folder for the project.
Where do you want to place your files- Use current folder.
What framework would you like to start with- Select “No javaScript web framework” for the time being, as this is a sample Web part.
What is your Webpart name- We will specify it as ‘PnPSPCRUD’ and press Enter
What is your Webpart description- We will specify it as this Webpart will perform CRUD operations using PnP and SPFx

Edit the web part
Run
Code .
to create the scaffolding and open the project in Visual Studio Code

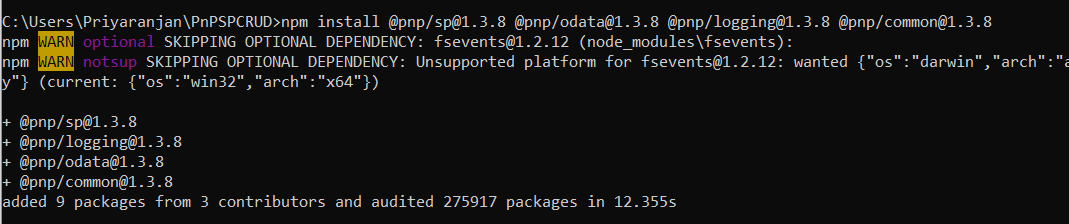
Now we have to load PnP JS file which we will use within the project to create list.We will be using npm to add PnP JS file.
npm install @pnp/sp@1.3.8 @pnp/odata@1.3.8 @pnp/logging@1.3.8 @pnp/common@1.3.8
Implement CRUD using PnP JS
In order to use PnP methods,we can refer the PnP file in the project as below :
import * as pnp from 'sp-pnp-js';
We will then add CRUD buttons in the render method so that the UI looks as below.
Each button will have an event listener which will be invoked on button click.
<button id="AddItem" type="submit" >Add</button>
<button id="UpdateItem" type="submit" >Update</button>
<button id="DeleteItem" type="submit" >Delete</button>
The event listeners will be added as :
private AddEventListeners() : void{
document.getElementById('AddItem').addEventListener('click',()=>this.AddItem());
document.getElementById('UpdateItem').addEventListener('click',()=>this.UpdateItem());
document.getElementById('DeleteItem').addEventListener('click',()=>this.DeleteItem()); 5. }
Each of these methods will use PnP to implement the CRUD operations as:
AddItem()
{
pnp.sp.web.lists.getByTitle('EmployeeList').items.add({
EmployeeName : document.getElementById('EmployeeName')["value"],
Experience : document.getElementById('Experience')["value"],
Location:document.getElementById('Location')["value"] 8. });
alert("Record with Employee Name : "+ document.getElementById('EmployeeName')["value"] + " Added !");
}
UpdateItem()
{
var id = document.getElementById('EmployeeId')["value"];
pnp.sp.web.lists.getByTitle("EmployeeList").items.getById(id).update({
EmployeeName : document.getElementById('EmployeeName')["value"],
Experience : document.getElementById('Experience')["value"],
Location:document.getElementById('Location')["value"]
});
alert("Record with Employee Name : "+ document.getElementById('EmployeeName')["value"]
+ " Updated !");
}
DeleteItem()
{
pnp.sp.web.lists.getByTitle("EmployeeList").items.getById(document.getElementById('Empl oyeeId')["value"]).delete();
alert("Record with Employee ID : "+ document.getElementById('EmployeeId')["value"]
+ " Deleted !");
}
TS File contents for implementing CRUD using PnP
The entire TS file contents is as shown below, this.getListData(); this.AddEventListeners();
in the render method will first call the function that will retrieve the list items and display within the div element declared in the render method. AddEventListeners will bind the button events to respective functions which gets called upon the button clicks.
1. import * as pnp from ‘@pnp/sp’
2.
import { Version } from '@microsoft/sp-core-library';
import {
BaseClientSideWebPart,
IPropertyPaneConfiguration,
PropertyPaneTextField
} from '@microsoft/sp-webpart-base';
import { escape } from '@microsoft/sp-lodash-subset'; 10.
11. import styles from './PnPspCrud.module.scss';
12. import * as strings from 'pnPspCrudStrings';
13. import { IPnPspCrudWebPartProps } from './IPnPspCrudWebPartProps'; 14.
export interface ISPList {
ID: string;
EmployeeName: string;
Experience: string;
Location: string;
20. }
21.
22. export default class PnPspCrudWebPart extends BaseClientSideWebPart<IPnPspCrudWebPartProps> {
23.
24.
25. private AddEventListeners() : void{
26. document.getElementById('AddItem').addEventListener('click',()=>this.AddItem());
27. document.getElementById('UpdateItem').addEventListener('click',()=>this.UpdateItem());
28. document.getElementById('DeleteItem').addEventListener('click',()=>this.DeleteItem());
29. } 30.
31. |
private _getListData(): Promise<ISPList[]> { |
|
32. |
return pnp.sp.web.lists.getByTitle("EmployeeList").items.get().then((response) => |
{ |
33. |
||
34. |
return response; |
|
35. |
}); |
|
36. |
||
37. } |
||
38. |
||
39. |
private getListData(): void { |
|
40. |
||
41. |
this._getListData() |
|
42. |
.then((response) => { |
|
43. |
this._renderList(response); |
|
44. |
}); |
|
45. } 46. 47. private _renderList(items: ISPList[]): void { 48. let html: string = '<table class="TFtable" border=1 width=100% style="border- collapse: collapse;">'; html += `<th>EmployeeId</th><th>EmployeeName</th><th>Experience</th><th>Location</th>`; items.forEach((item: ISPList) => { html += ` <tr> <td>${item.ID}</td> <td>${item.EmployeeName}</td> <td>${item.Experience}</td> <td>${item.Location}</td> 57. </tr> 58. `; 59. }); html += `</table>`; const listContainer: Element = this.domElement.querySelector('#spGetListItems'); listContainer.innerHTML = html; 63. } 64. 65. 66. public render(): void { this.domElement.innerHTML = ` 69. <div class="parentContainer" style="background-color: lightgrey"> 71. <div class="ms-Grid-row ms-bgColor-themeDark ms-fontColor-white ${styles.row}"> <div class="ms-Grid-col ms-u-lg10 ms-u-xl8 ms-u-xlPush2 ms-u-lgPush1"> |
||
73.
<span class="ms-font-xl ms-fontColor-white" style="font-size:28px">Welcome to SharePoint Framework Development using PnP JS Library</span>
74. <p class="ms-font-l ms-fontColor-white" style="text-align: left">Demo : SharePoint List CRUD using PnP JS and SPFx</p>
</div>
76. </div>
77. <div class="ms-Grid-row ms-bgColor-themeDark ms-fontColor-white ${styles.row}">
78. <div style="background-color:Black;color:white;text-align: center;font-weight: bold;font-size:18px;">Employee Details</div>
79.
80. </div>
81. <div style="background-color: lightgrey" >
<form >
<br>
<div data-role="header">
<h1>Add SharePoint List Items</h1>
</div>
<div data-role="main" class="ui-content">
<div >
<input id="EmployeeName" placeholder="EmployeeName" />
<input id="Experience" placeholder="Experience" />
<input id="Location" placeholder="Location" />
</div>
<div></br></div>
<div >
<button id="AddItem" type="submit" >Add</button>
</div>
</div>
<div data-role="header">
<h1>Update/Delete SharePoint List Items</h1>
</div>
<div data-role="main" class="ui-content">
<div >
<input id="EmployeeId" placeholder="EmployeeId" />
</div>
<div></br></div>
<div >
<button id="UpdateItem" type="submit" >Update</button>
<button id="DeleteItem" type="submit" >Delete</button>
</div>
</div>
</form>
</div>
<br>
<div style="background-color: lightgrey" id="spGetListItems" />
</div> 116.
117. `;
this.getListData();
this.AddEventListeners();
120. }
121.
122. AddItem()
123. {
124.
pnp.sp.web.lists.getByTitle('EmployeeList').items.add({
EmployeeName : document.getElementById('EmployeeName')["value"],
Experience : document.getElementById('Experience')["value"],
Location:document.getElementById('Location')["value"] 129. });
130. alert("Record with Employee Name : "+ document.getElementById('EmployeeName')["value"] + " Added !");
131.
132. }
133.
134. UpdateItem()
135. {
136.
var id = document.getElementById('EmployeeId')["value"];
pnp.sp.web.lists.getByTitle("EmployeeList").items.getById(id).update({
EmployeeName : document.getElementById('EmployeeName')["value"],
Experience : document.getElementById('Experience')["value"],
Location:document.getElementById('Location')["value"] 142. });
143. alert("Record with Employee Name : "+ document.getElementById('EmployeeName')["value"] + " Updated !");
144. }
145.
146. DeleteItem()
147. {
148.
pnp.sp.web.lists.getByTitle("EmployeeList").items.getById(document.getElementById('Empl oyeeId')["value"]).delete();
149. alert("Record with Employee ID : "+ document.getElementById('EmployeeId')["value"] + " Deleted !");
150. }
151.
protected get dataVersion(): Version {
return Version.parse('1.0');
154. }
155.
protected getPropertyPaneConfiguration(): IPropertyPaneConfiguration {
return {
pages: [
159. {
header: {
description: strings.PropertyPaneDescription
162. },
163. groups: [
164. {
groupName: strings.BasicGroupName,
groupFields: [
PropertyPaneTextField('description', {
label: strings.DescriptionFieldLabel
169. })
170. ]
171. }
172. ]
173. }
174. ]
175. };
176. }
177. }
Test the Web part in SharePoint Online
Now, let’s test the Web part in SharePoint Workbench available in SharePoint Online. Run
Gulp Serve
in the Node Command line and head over to SharePoint Online Site. Once we login to SharePoint
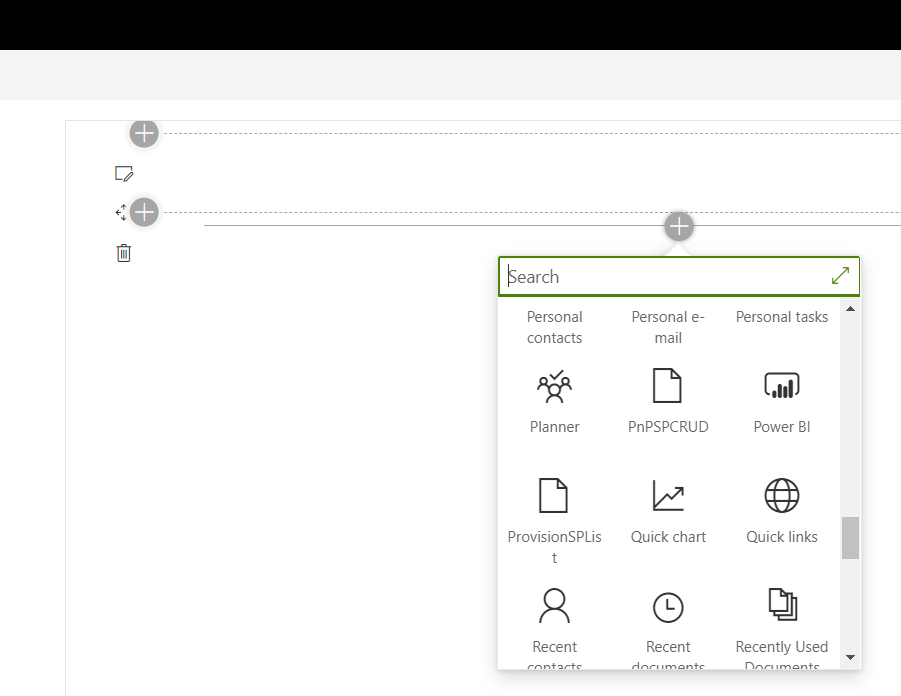
Online, we can invoke the workbench by appending the text ‘_layouts/15/workbench.aspx’ to SharePoint Online URL. Add the webpart to the page by selecting ‘PnPspCRUD’ icon.
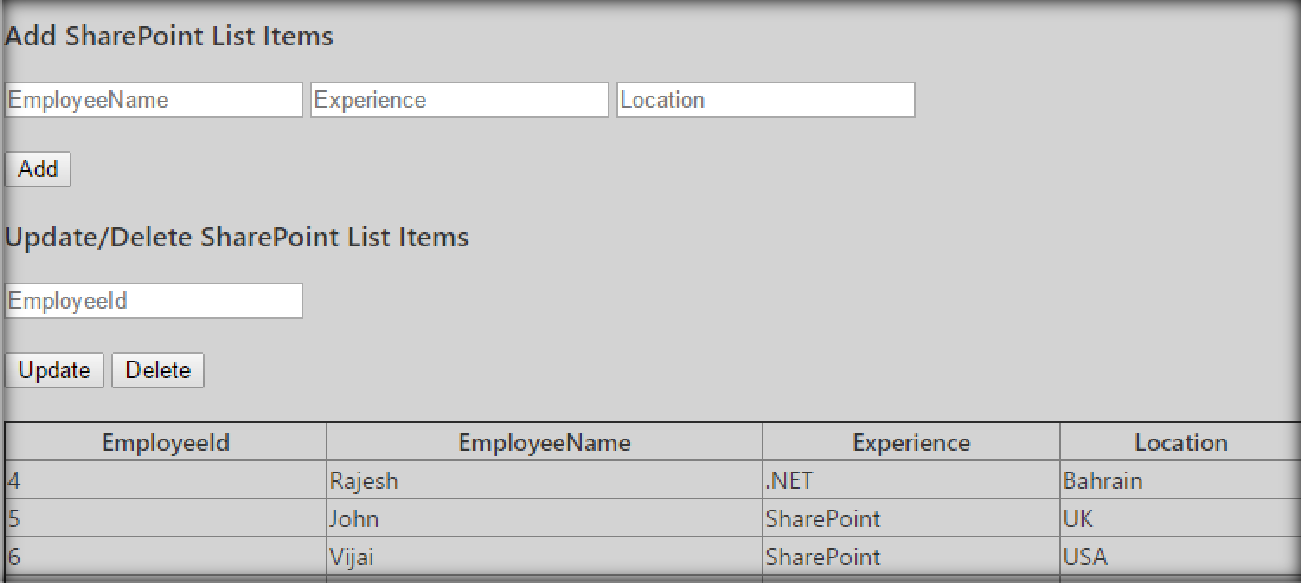
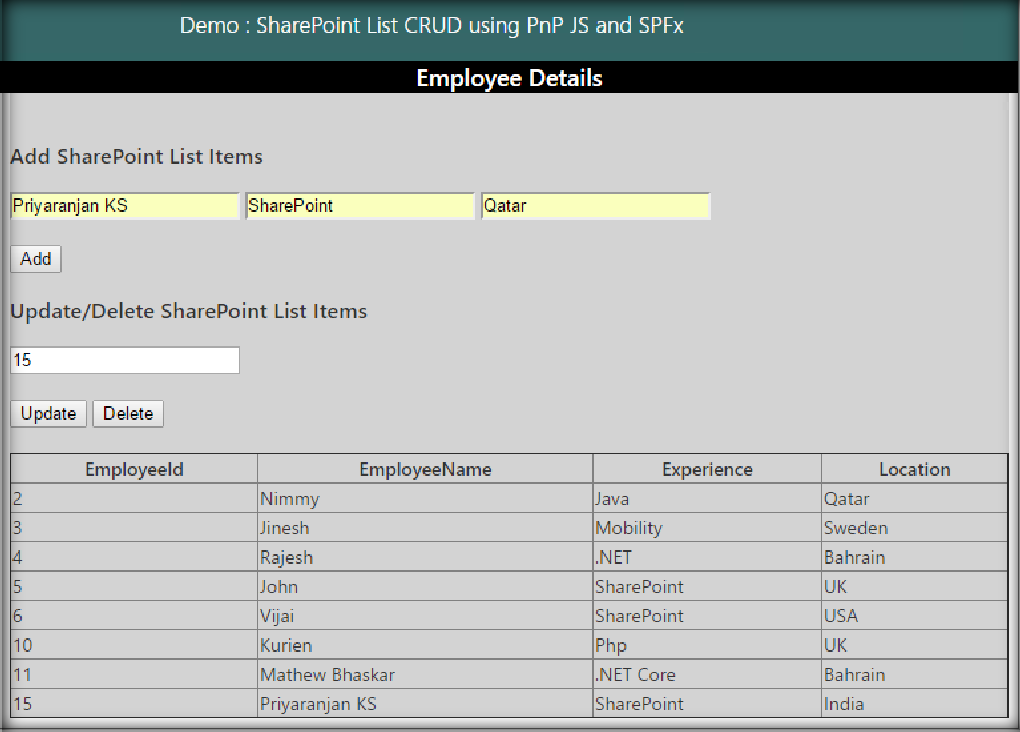
The UI will look like below:
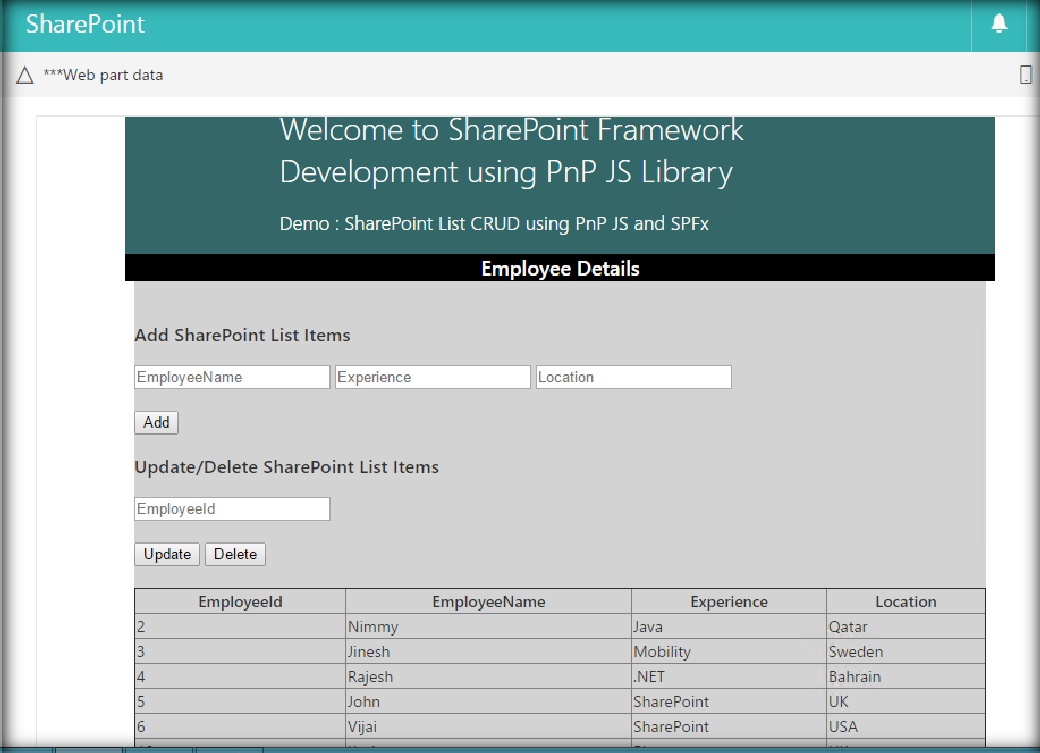
Add Item
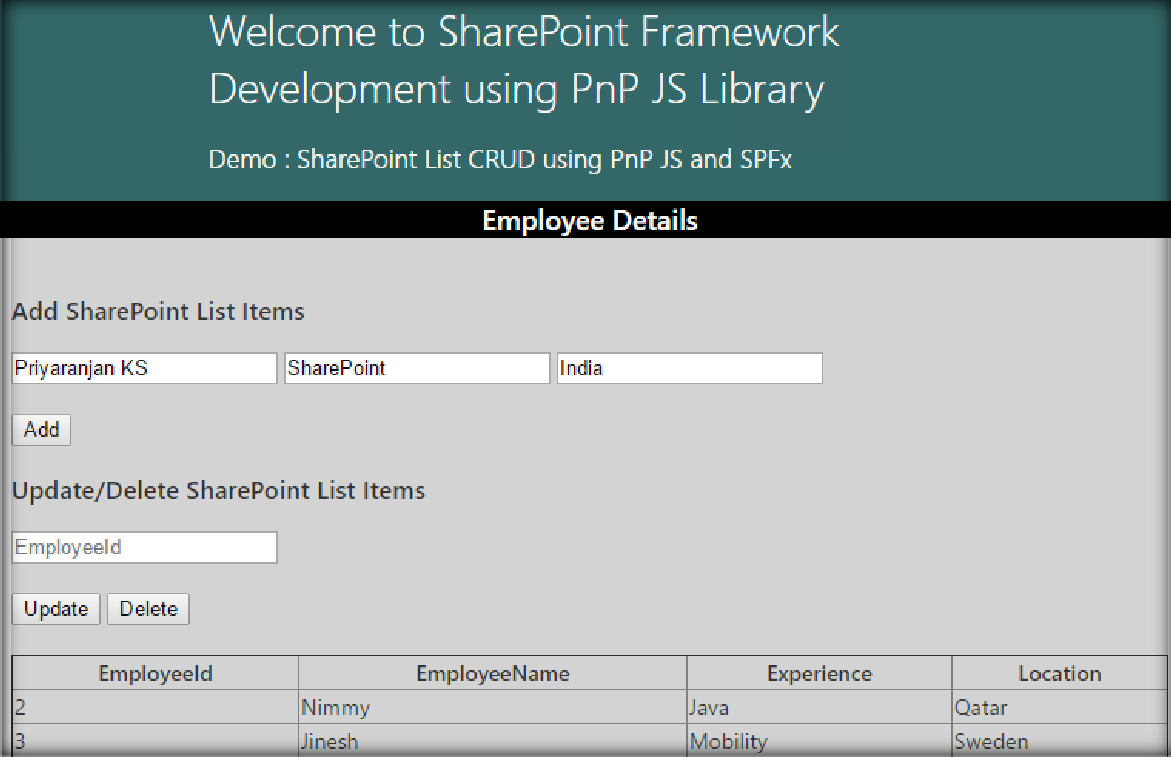
We can input the details and save it to the list by clicking on Add which will create a new list item using the PnP Add method
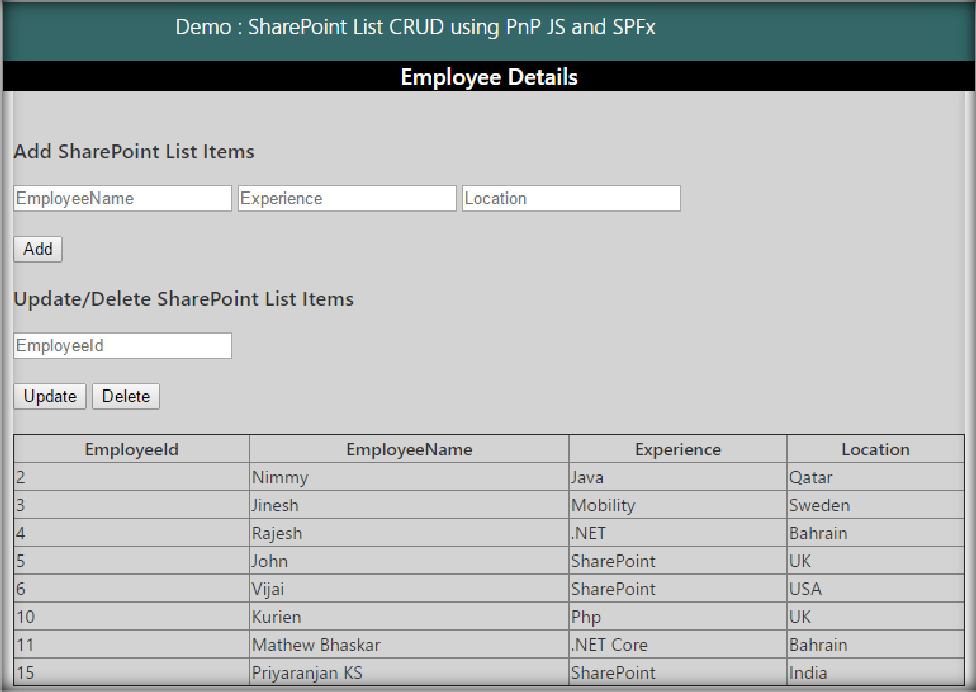
On Clicking on Add, the new item has been added to the SharePoint List. 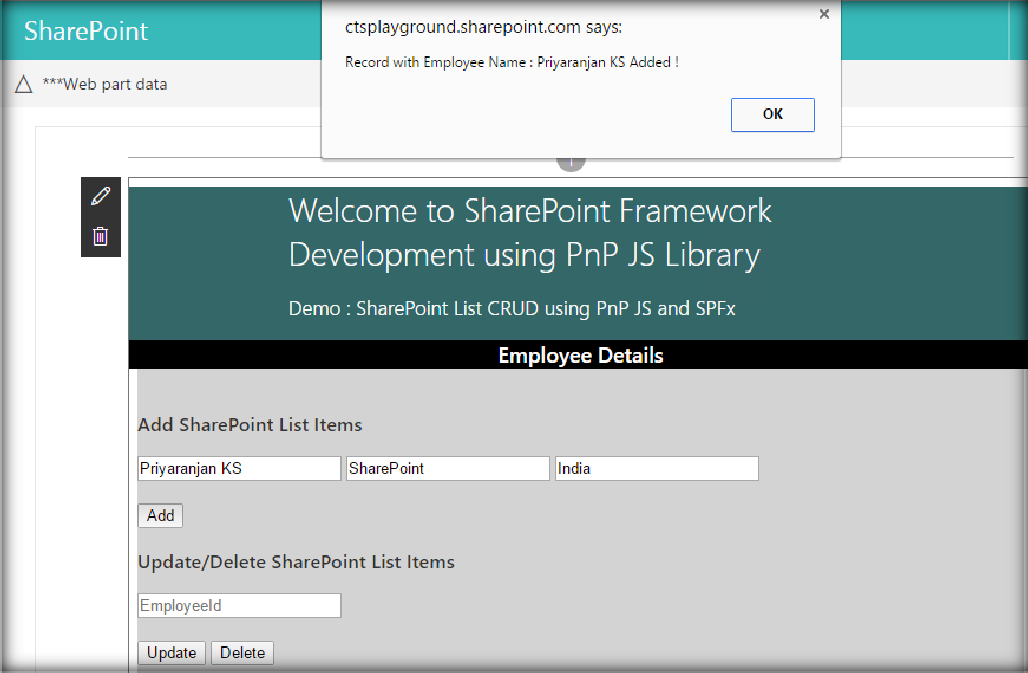
The table has listed the new item at the bottom of the list.
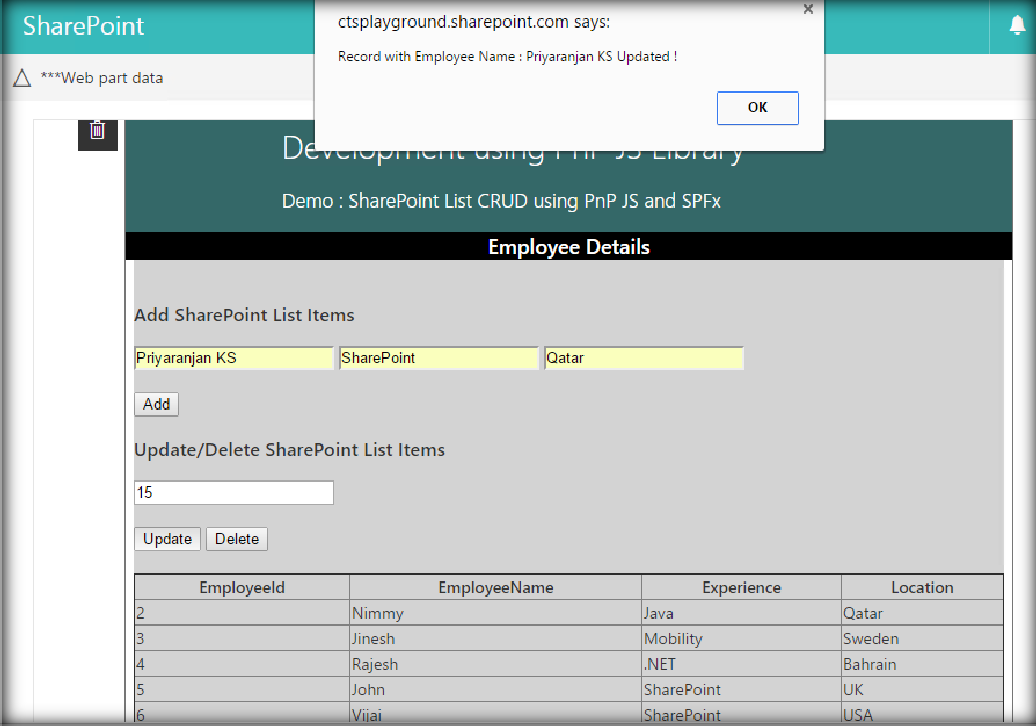
Update Item
Similarly, we can update the existing list item by adding the data and providing the list item id which will be used to pick the item from the list and update it.
On Clicking on Update, the list item has been updated.
The location column value of the list item has been changed and reflected in the table as shown below.
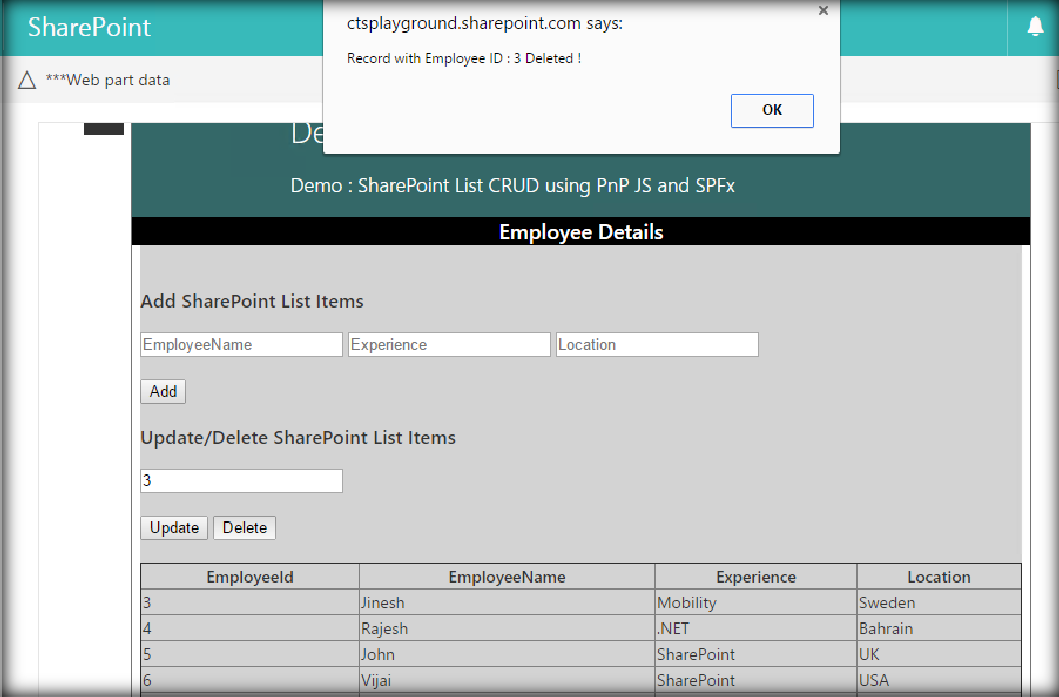
Delete item
We can make use of the PnP delete method to delete the item from the list by providing the item id as shown below.
The major project files used in this solution has been zipped and uploaded at Microsoft TechNet Gallery.
Feel free to download it.