Exchange Server: How to Decommission Exchange 2013 after Migration to Exchange Server 2019
Introduction
There are several reasons why you would need to upgrade from Exchange Server 2013 to Exchange Server 2019. Some of them are:
- Merging two systems into one from a separate Exchange Server still running an older version.
- Software end-of-support or end-of-life. Although the end-of-support for Exchange Server 2013 is till April 2023, it would be best to start planning to migrate to either Exchange Server 2016 or 2019.
- Requiring better features and functionality which are available in newer version.
Before decommissioning Exchange Server 2013
there are a few things to consider:
UM
Unified Messaging (UM) service is deprecated in Exchange Server 2019. It means that if you would kill the Exchange Server 2013, your users will not be able to receive their missed calls and voicemail messages in their mailbox. If you are running Lync Server or Skype for Business Server, you would need to look for alternatives. Alternative to the Unified Messaging (UM) service is either CX-E or use Skype for Business Online Plan 2 on Office 365 subscriptions.
Client Support
- Client support is important. If you’re running Outlook 2010 with SP1, it is compatible with Exchange Server 2013. However, it will not be able to connect to a mailbox in the Exchange Server 2019 environment. So, you might consider upgrading to Office 365 Business Apps or Office 2013, 2016 or 2019. If you are running Office 2013, you need to make sure that it is updated to the latest patches.
Now, you can proceed with the next steps that include changing the URLs, installation of certificates, email redirection, moving all the mailboxes, and uninstalling Exchange Server 2013.
Changing the URLs
Changing the addresses of all the services of the Exchange Server to point to the new server would take a little time, if you take the path of using the Exchange Admin Center (EAC). But with PowerShell, you can speed up this process. So, after opening the Exchange Management Shell, use the below commands to switchover the web addresses of virtual directories, such as Outlook Anywhere, OWA, ECP, and other services. The below given commands will get all the current URLs.
Get-ClientAccessServer | Select AutoDiscoverServiceInternalUri
Get-ECPVirtualDirectory | Select InternalURL,ExternalURL
Get-WebServicesVirtualDirectory | Select InternalURL,ExternalURL
Get-MAPIVirtualDirectory | Select InternalURL,ExternalURL
Get-ActiveSyncVirtualDirectory | Select InternalURL,ExternalURL
Get-OABVirtualDirectory | Select InternalURL,ExternalURL
Get-OWAVirtualDirectory | Select InternalURL,ExternalURL
Get-PowerShellVirtualDirectory | Select InternalURL,ExternalURL
Get-OutlookAnywhere | Select InternalHostName,ExternalHostName

If any service still points to the Exchange Server 2013, maybe it was skipped or failed to change. You need to use the below commands to do so.
Set-ClientAccessService -Identity EX2019 -AutodiscoverServiceInternalUri https://domain/autodiscover/autodiscover.xml
Get-WebServicesVirtualDirectory -Server EX2019 | Set-WebServicesVirtualDirectory -InternalUrl https://domain/ews/exchange.asmx -ExternalURL https://address/ews/exchange.asmx
Set-OWAVirtualDirectory -identity "EX2019\owa (Default Web Site) " -InternalURL https://domain/owa -ExternalURL https://domain/owa
Get-OABVirtualDirectory -Server EX2019 | Set-OABVirtualDirectory -InternalURL https://domain/OAB -ExternalURL https://domain/OAB
Get-ECPVirtualDirectory -Server EX2019 | Set-ECPVirtualDirectory -InternalURL https://domain/ECP -ExternalURL https://mail.thexchangelab.com/ECP
Get-MAPIVirtualDirectory -Server EX2019 | Set-MAPIVirtualDirectory -InternalURL https://domain/MAPI -ExternalURL https://domain/MAPI -IISAuthenticationMethods NTLM,Negotiate
Get-ActiveSyncVirtualDirectory -Server EX2019 | Set-ActiveSyncVirtualDirectory -InternalURL https://domain/Microsoft-Server-ActiveSync -ExternalURL https://domain/Microsoft-Server-ActiveSync
Set-OutlookAnywhere -identity "EX2019\RPC (Default Web Site)" -ExternalHostname mail.domain -InternalHostname mail.domain -InternalClientsRequireSSL $true -ExternalClientsRequireSsl $true -ExternalClientAuthenticationMethod:NTLM
Apart from the internal URLs, you need to have access to the internet domain’s DNS zone. You would need to point the URLs, like Outlook.mydomain.com or mail.mydomain.com, so that these point to the new server.
Installation of Certificates
The next step is to install the certificates or the wildcard certificate that you have in your Exchange Server 2013. Now, you cannot just install it as it is bound to the computer name. So, you need to generate a new certificate with your certificate authority and install it on the server. Once done, you need to browse the server by using the URL from outside and confirming that the certificate is installed, and the site is marked as safe. After you browse, click on the lock to see that the certificate is recognized.

Move all the Mailboxes
The next step is to confirm that all the mailboxes have been migrated and moved to the Exchange Server 2019. This can be checked by using the Exchange Admin Center (EAC) or the Get-MailboxDatabase PowerShell cmdlet.
Change the Email and Connectivity
The last step is to change the email and connectivity from the internal router or firewall to point the ports to the new server. For this operation, you would need the assistance of your network and security team, and open the following ports:
a. Client Connectivity
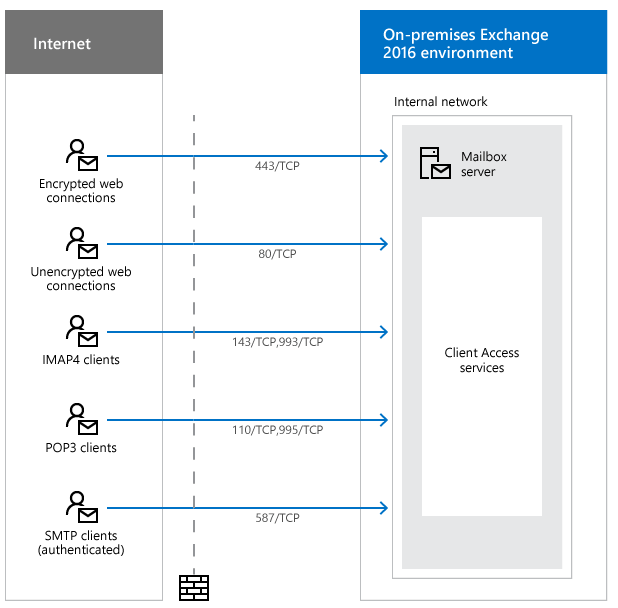
b. Server Connectivity for Email Transport

Note: This information is taken from the official Microsoft site. Depending on the setup and customization, this may change in your setup.
Uninstall the Exchange Server 2013
Now that you have everything pointing to the right direction, certificates installed, and all the mailboxes migrated, the final step is to gracefully uninstall the Exchange Server 2013. Here are the steps:
Open the Add Remove Programs
Find Microsoft Exchange Server 2013
Click on Uninstall

After this operation, shutdown the server and decommission the machine.
Conclusion
As you can see from the above, it is a smooth process where everything works ship shape and there were no hiccups. Although you try to prevent any issues that may occur during migration or transfer of data, you might end up with issues, such as mailboxes being unable to move or a hardware issue occurred during the process. You might also skip a step during the decommission process that could lead to the wrong method of killing off the old server and mailboxes were missed in the migration.
In such situations, third party applications are a real-life saver. With third party applications, You can open any Exchange version database and export data from it to PST and other formats. You can also export directly to a live Exchange database or an Office 365 tenant. Also check Exchange Migration Checklist and Guide.