Azure AD Connect : Customize Sync Options
Introduction
Azure AD Connect is the Microsoft tool that synchronizes objects between Windows Active Directory and Azure Active Directory.
By default, Azure AD Connect syncs all objects if we do not customize sync options. However, due to business requirement we need to filter out some users, groups and other objects based on multiple criteria's. The good thing is, Azure AD Connect offers such flexibility to fine tune sync settings as per business requirement.
In this article, we will cover some of the common use cases and will customize Azure AD Connect sync rules as per those use cases.
Before we start
Following points should be considered before we start working on sync rules or any other customization :
- In a running environment, these changes can create unexpected result, including removal of bulk accounts. Please take adequate precaution.
- Please test these rules it in a test environment and assess the impact. The test environment should use a separate Azure AD Tenant.
- Consider rule precedence carefully. In case of multiple sync rules which might conflict / overlap with each other; the effective rule will depend on the rule precedence.
- Read this Microsoft document and understand how sync rule works, before you start implementation.
- In this article, we have tested sync rules in a single forest single domain environment. However, your environment might have more than one domain / forest syncing with Azure AD. In that case, carefully evaluate and test the scenario before actual deployment.
Use Case 1 : Exclude a Domain or OU from Azure AD sync
Due to security reason, you might want to exclude an Organizational Unit from Azure AD Sync. This can be achieved from the Azure AD Connect Wizard, during of after initial installation of Azure AD Connect.
For existing Azure AD connect, you have to go to "Customize Synchronization Option".
In the below diagram, SubOU3 is excluded from Azure AD Sync.

Use Case 2 : Exclude newly created OUs from Azure AD sync
When a new OU is created in Windows AD, objects created under that OU are by default synced with Azure AD. However, you might want to change this behavior due to security reason. You might want that any new OU should be explicitly included in Azure AD Connect sync scope.
1. Open Synchronization Service Manager
2. Select Windows AD Connector and click Properties

- Click "Configure Directory Partitions" and select "Containers".

4. When prompted for credential, you can use any credential that has read access to your Windows AD domain.
5. Now you will see something like below screen.
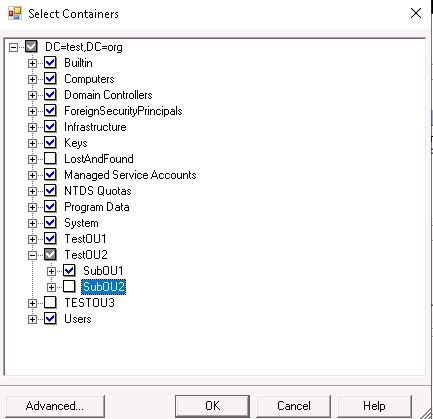
6. Notice the box color against TestOU2. It is grey with a white tick mark, because one Sub OU is part of AD Sync while another SUb OU is excluded.
With this check box color, any new OU created under TestOU2 will be automatically synced with Azure AD.
Now see the Checkbox color against TestOU2 and TestOU3. With both these configuration, any new OU created under testOU2 or TestOU3 will not be selected.

So to summarize, if there is any tick mark in the parent container, any new OU created under that container will be synced by default. New OU will not be synced only when there is no tick mark (Full Grey or Full White) in the upper level container.
We have configured this only for TestOU2 and TestOU3. If you want that no new OU will be synced by default in entire tets.Org domain, you have to make the same change at the Domain level.

Use Case 3 : Configure sync based on certain attribute value
Many organizations do not want to sync all user objects. They want to sync only certain user objects with Azure AD as per business requirement, Often, these users are scattered across multiple OUs, so you cannot apply OU based filtering.
In this use case, we will impose following conditions on all user objects within test.org domain :
- No user account will be synced to Azure AD
- User object will be synced if it contains the value "sync" for the attribute "msDS-cloudExtensionAttribute1".
Attribute based filtering
In this case, the best solution is to configure attribute based filtering, where users will be synced based on the value of a certain attribute. Attribute based filtering offer most flexibility and control for administrators.
There are two kinds of attribute based filtering :
**Negative Filtering (Do not sync these ) : ** If certain object attribute contains certain value, then do not sync that object.
Positive Filtering (Only Sync these) : Sync this object only if it contains certain value in a specific attribute.
In our case, we will configure Positive Filtering, where user object will be synced only if "msDS-cloudExtensionAttribute1"= "sync"
Advantage of this approach
This approach will ensure that unless manual intervention, no user account will be synced to Azure AD,
Also, if in future we need to disable sync for any user, we just need to remove the ***msDS-cloudExtensionAttribute1 ***attribute value from the user property, and the object will be removed from Azure AD in the next sync cycle.
**Azure AD Sync Rules
**
To configure attribute based filtering, we have to create few new sync rules. We can do this in the Azure AD Synchronization Rule Editor, which is present in the Azure AD Connect Server.
There are two kinds of rules, Inbound and Outbound. In this case, we will user Inbound rules.
cloudFiltered Attribute
In Azure AD Sync rule, the cloudFiltered attribute determines whether an object will be synced to Azure AD tenant or not.
***cloudFiltered = True : Object will NOT be synced with Azure AD
***cloudFiltered = False : ***Object will be synced with Azure AD
**Inbound Rule 1 : To block all users **
******This is a "catch-all" rule, which will block all users in Test.Org to be synced to Azure AD.
In Synchronization Rule Editor , we will create a new Inbound Sync rule called* In from*** AD - User Catchall Filter**. It can be any meaningful name, but start with In from AD.
- Description : Provide a meaningful description.
- ***Connected System : *test.org (Windows AD Domain Name)
- Connected System Object Type : user
- Metaverse Object Type : person
- ***Link type : *join
- Precedence : Give any precedence which is currently not use by other rules.
Click* Next*

Do not configure any option on the* ***Scoping Filter **screen, as this rule will apply to all users in test.Org.

Click* Next
*
Do not configure anything on* Join Rules *screen.

Click* Next
*
In the Transformation Screen, perform below steps :
- ***FlowType : *** Constant
- **Target Attribute : ** cloudFiltered
- ***Source : *** True
- ***Merge Type : ***update

Once done, click Add to save the rule.
As we have mentioned*** cloudFiltered = True***, so user objects under this rule will be filtered , and will NOT be synced with Azure AD.
So in this way, this rule will block all users to sync with Azure AD.
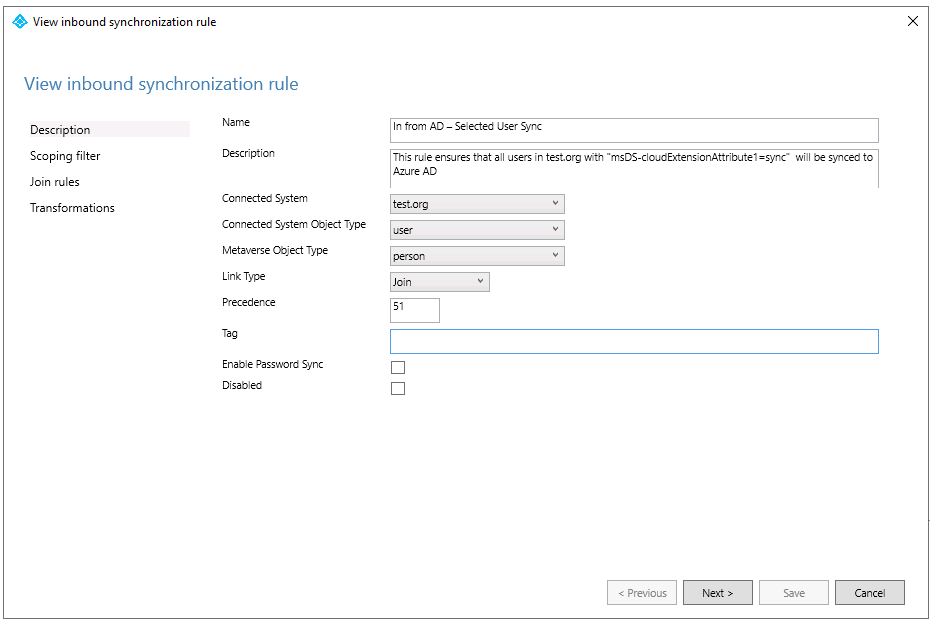
Inbound Rule 2 : To allow users where msDS-cloudExtensionAttribute1 = sync
In Synchronization Rule Editor , we will create a new Inbound Sync rule called* In from*** AD - Selected User Sync**. It can be any meaningful name, but start with In from AD.
- Description : Provide a meaningful description.
- ***Connected System : *test.org (Windows AD Domain Name)
- Connected System Object Type : user
- Metaverse Object Type : person
- ***Link type : *join
- Precedence : Give any precedence which is currently not use by other rules, and which is lower than 99 (previous rule precedence). Please note that this rule must be executed after the catch-all users rule.
Click* Next*
*In the ***Scoping Filter **screen :
- Click Add group and then click Add clause
- *Attribute : *msDS-cloudExtensionAttribute1
- Operator : EQUAL
- Value : sync
Click* Next*

Do not configure anything on Join Rules screen.

Click *Next
*
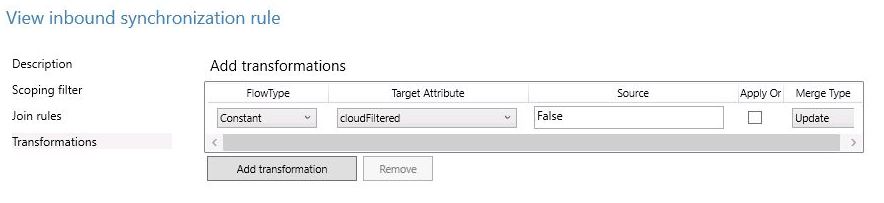
In the Transformation Screen, perform below steps :
- ***FlowType : *** Constant
- **Target Attribute : ** cloudFiltered
- ***Source : *** False
- Merge Type : update
Once done, click Add to save the rule.
As we have mentioned cloudFiltered = False, so user objects under this rule will not be filtered , and will be synced with Azure AD.
**Effective Rule
**
So we have defined below two rules :
- Block all users in test.org domain : Precedence 99
- Allow users with attribute "msDS-cloudExtensionAttribute1=Sync" : Precedence 51
So in this case, the first rule (with precedence 99) will block users, but second rule (with precedence 51) will allow users with selected attributes. We will discuss rule precedence in upcoming section.
Use Case 4 : Block disabled user accounts to sync with Azure AD
This is another use case, where disabled user account will not be synced with Azure AD. If any user account will be disabled after syncing to Azure AD, it will be removed from Azure AD once this rule is applied.
In Synchronization Rule Editor , we will create a new Inbound Sync rule called* In from*** AD - Do not sync disabled user accounts**.
- Description : Provide a meaningful description.
- ***Connected System : *test.org (Windows AD Domain Name)
- Connected System Object Type : user
- Metaverse Object Type : person
- ***Link type : *join
- Precedence : Give any precedence which is currently not use by other rules, and which is lower that 51 (previous rule precedence). This rule must be executed after previous two rules , which we have discussed in the last section. We have given the precedence 50.
Click* Next*

*In the ***Scoping Filter **screen :
- Click Add group and then click Add clause
- *Attribute : *userAccountControl
- Operator : EQUAL
- Value : 66050
When a user account is disabled, the userAccountControl value is automatically updated to 66050. This is the reason we are specifying this value in the clause.
Click* Next*

Do not configure anything on Join Rules screen. Click* Next.*
In the Transformation Screen, perform below steps :
- ***FlowType : *** Constant
- **Target Attribute : ** cloudFiltered
- ***Source : *** True
- ***Merge Type : ***update

Once done, click Add to save the rule.
As we have mentioned*** cloudFiltered = False***, so user objects under this rule will not be filtered , and will be synced with Azure AD.
Rule Precedence
When working with multiple sync rules, you have to be extra cautious about the rule precedence. This is because the effective sync rule will mostly depends on rule precedence.
Please note that higher the precedence number, lower the priority of that rule. Because during Azure AD connect evaluates sync rules from higher to lower precedence, so a rule with precedence 50 will be applied after a rule with precedence 51.
So the three custom rules which we have created in previous sections will be applied in following order :
1. Do not allow any user to sync with Azure AD (Catch All Rule) : Precedence 99
2. Allow users with attribute "msDS-cloudExtensionAttribute1=Sync" : Precedence 51
3. Do not allow users with attribute "userAccountControl=66050" (disabled users) : Precedence 50
As you can understand, these three rules must follow this exact sequence. If you change the sequence of these 3 rules, you will not get the desired result.
For example, if Rule number 2 will be executed after Rule number 3, it will override disabled user settings and will sync disabled user if that has "msDS-cloudExtensionAttribute1=Sync".
Also, please note that the OUs which we have excluded using Azure AD Connect Wizard (Use case 1), will not be synced. As that was done using Azure AD Connect Configuration and not by sync rules, that is not effected by any of these sync rules.
Test Cases
After implementing the catch-all rule and a full sync, all the users were removed from Azure AD. This was expected, as this rule prevents all users from sync.
We have then set the "msDS-cloudExtensionAttribute1=Sync" on user xyz2, user6, and user8 .
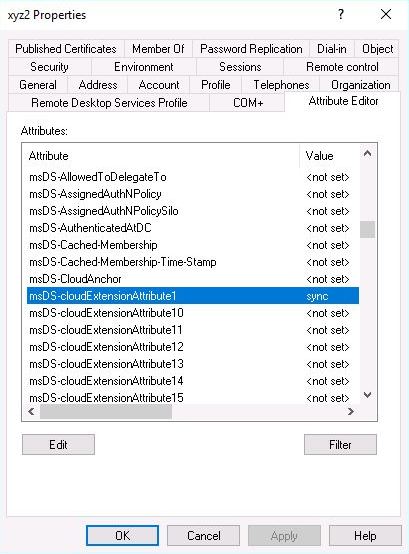
After the next sync, all these three user accounts all got synced to Azure AD.

This confirms that our second rule is working.
Now, we have disabled the user xyz2.

After the next sync, the user is removed from Azure AD tenant.

This confirms that the third rule is working, and disabled user are not synced with Azure AD.