Power Automate: Imitate SharePoint On-Premise Library’s Incoming Email Feature

- Introduction
- Business Use case
- Implementation
- Test the Flow
- Summary
Introduction
In this article we will see how to imitate the incoming email list functionality which existed in On Premise in the Office 365 world. The incoming email list was a great boon in implementing many business use cases as the On-Premises list had an email id attached to it and users could directly sent mails or documents to the list directly so that invoking a business process via workflow or as a matter of fact using the list as a content repository was really easy and straight forward.
Business Use case
In On Premise, we had a library where incoming email settings were enabled, and external vendors used to send invoices directly to this library as a mail. On the reception of the mail, the workflow would extract the document and start an approval process.
To imitate this functionality, we will take the help of Shared Mailboxes in Office 365 and attach a Power Automate cloud flow which will be invoked on email reception. The flow will then extract the attachment and start and approval process.
Implementation
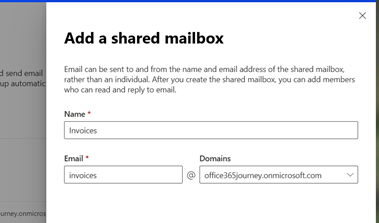
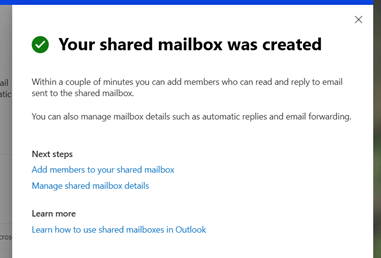
We will first create a Shared mailbox which will act as the receiver of the mails that contain the customer information. We can create this by heading over to SharePoint Admin Center -> Teams & Groups -> Shared mailboxes. Specify the name of the mailbox and create a new shared mail box.
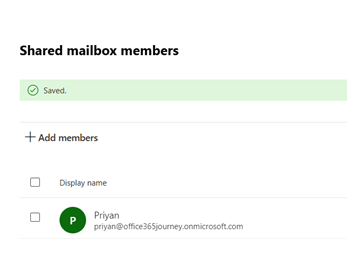
We can as also add members to the newly created Shared Mailbox. Members are the people who will be able to view the incoming mail to this shared mailbox, and the outgoing replies.
I have added myself as a member to the shared mailbox and as per requirement we can add more members as well.
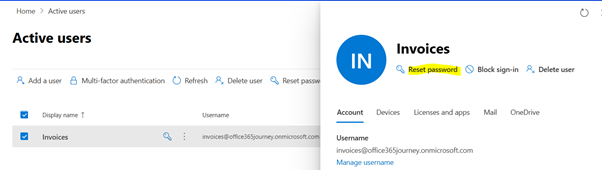
In case you want to visit the mailbox to check on the incoming mails, it’s a good thing to reset the password first by going to the users list where the newly created shared mailbox will be listed
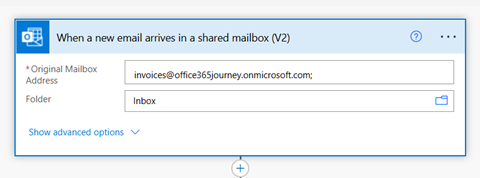
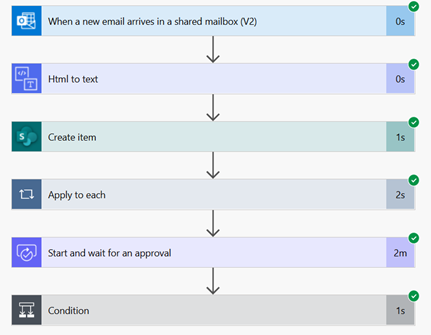
Since we have the shared mailbox in place, we can replicate the incoming email functionality of the SharePoint On Premise List using this shared Mail Box. Now, let’s create a Power Automate cloud flow that will get triggered when a mail is received by the shared mailbox.
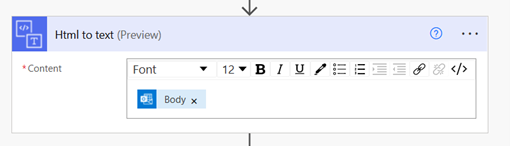
So as to ensure that the body of the message is converted into plain text so that it can be saved in a more readable format in the list, lets add an action Html to text to convert the email html body into text.
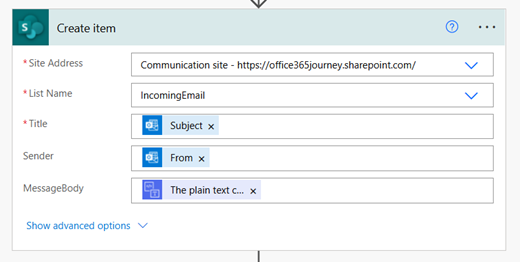
Based on the data from the mail, we will create an item in SharePoint list and copy over the subject, sender, and body to the list item. The Title(Subject) and Sender(From) values are taken from the trigger outputs while the Message Body is taken from the output of the HTML to text action
In the next step, we will have to extract the attachments from the mail and add them as attachment to the recently created SharePoint list item. As there may be multiple attachments, we add an apply to each loop and take in the mail attachments as the input for looping. We will add the first action which is the Get Attachment, for each iteration we will get individual attachment from the mail’s attachment collection by using the below values:
Message Id : Message Id shown in the dynamic content of the trigger ”when a new email arrives in shared mailbox”
Attachment Id : Attachment Id shown in the dynamic content of the trigger ”when a new email arrives in shared mailbox”
Followed by this, within the same loop, we will add another action – Add attachment which will append the attachment to the recently created item by using the below values :
Id : ID from the Dynamic Content “Create Item”
File Name : Name from the Dynamic Content “Get Attachment from mail”
File Content :Content Bytes from the Dynamic Content “Get Attachment from mail”

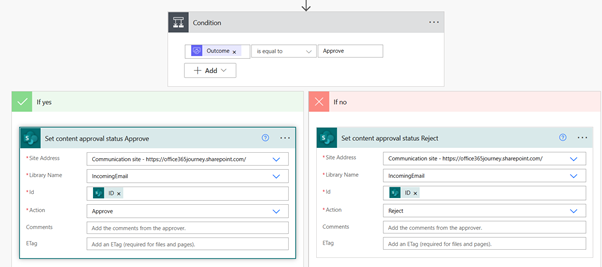
This will complete the creation of the item and attachment of the mail attachments to the recently created list item. Since content approval is enabled, we will add one final step for approval.
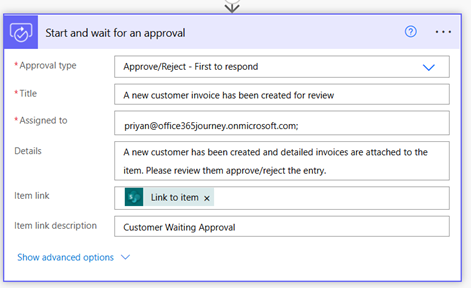
This will generate an approval process which comes up as an adaptive card in the mail to the approver

Based on the outcome of the approval action, we will set the content approval status for the item in the list.
Test the Flow
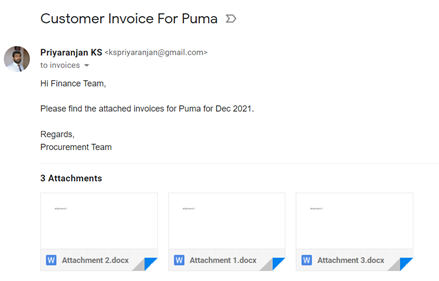
We will now test the flow by sending a customer invoice mail to the shared mailbox where we have attached 3 invoices as well.
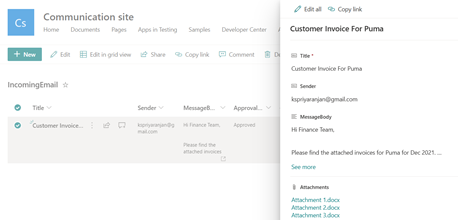
It had invoked the cloud flow which has extracted the content and attachment and created a list item in SharePoint and routed it for approval.
Upon approval, the item successfully moved to content approved status and is visible for all stake holders.
Summary
Thus we saw how to use Shared Mail Boxes and Power Automate to imitate the incoming email functionality of On-premise lists and to kickstart a business approval process based on the data captured from the incoming email in the shared mail box.