Power Virtual Agents: Implement Manual Authentication with Azure Active Directory
- Introduction
- Business Use Case
- Implementation
- Call the Flow
- Test the bot
- Publish the bot
- Test the bot
- Summary
Introduction
Power Virtual Agents helps us create intelligent conversational chat bots without any code implementation. With these bots we can engage with customers and employees in multiple languages across websites, mobile apps, Facebook, Microsoft Teams, or any channel supported by the Azure Bot Framework
In this article we will see how to create a basic bot and use the Manual Authentication. With manual authentication we can configure any Azure AD, Azure AD V2, or OAuth compatible identity provider and use it with any channel listed in the PVA channels list.
Once Manual Authentication is configured, the following variables will be available in the authoring canvas:
- UserID
- UserDisplayName
- AuthToken
- IsLoggedIn
Business Use Case
We will try to implement a Teams creation bot that will take in the needed teams creation parameters from the user using PVA bot and invoke a power automate to call Graph API and use the authentication token created during the login sequence of the PVA to authorize the team creation action.
Implementation
To implement the Automated Enquiry system, we will use Power Virtual Agents where we can create a bot to attend to the queries and give automated responses based on the information we have in the system. To start with we will head over to https://web.powerva.microsoft.com/ and click on the Bot symbol on the top right corner which lets you create a new bot

Specify the name and language for use in the bot as well as the environment where it should be provisioned.
It will create a basic bot where we can add the customizations needed for our requirement. We can see the section Topics which by default lists multiple conversation topic listed out. A topic defines how a bot conversation will be initiated and how the bot would respond to user interactions.
As the first step, lets create a topic that will define a general conversation starter which will pick information about the user. We can have multiple topics created in a bot and based on the way conversation is proceeding, we can navigate between multiple topics. Click on New Topic and Select From blank to create a Topic and we will name it Team Creation Bot.

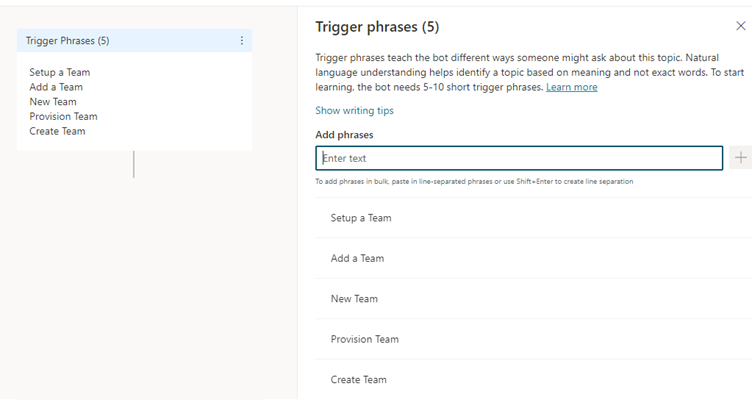
To trigger the topic, so that the control flows to that specific topic, we will define few words called Trigger Phrases that will transfer the control to these topics. The trigger phrases can be single keywords or a group of words and to cover a broad spectrum of possible trigger conditions, it is good to mention 5-10 different and still related phrases. Click on Trigger phrases that will open a right pane where we can add the trigger words.
As the next step, lets add a message box with welcome message followed by 2 questions that will take input from the user regarding the Team name and description.

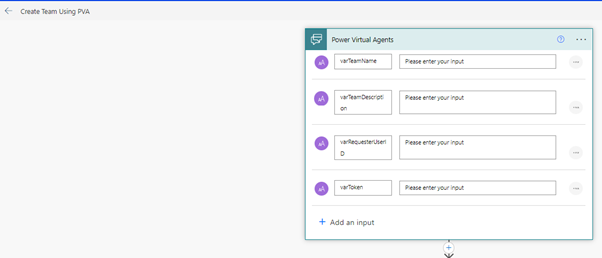
Click on Call an action node and select create a flow to design the power automate that will provision the team

This will open Power Automate Designer in new tab where we will define 4 text inputs to get the values from PVA for Team Name, Team Description, Requester UserId and Authentication Token
Let declare a variable to hold the output that will be passed back to PVA at the end of the flow. Followed by that we will add a Get User Profile action and pass the UserId which we get as a system variable in PVA. Using this action, we will get the Email ID to be used in Teams Creation action

As part of the Team creation process, we will need to get an approval from a channel in a Team which contains a set of approvers. This way we can identify genuine requests and reject the requests which do not have a business justification

For more details on building adaptive card and its syntax you can refer to the articles
-Send an Adaptive Card to Teams using Power Automate
- Working with Adaptive Cards to send Scheduled Power Automate Notifications to Microsoft Teams
- Adaptive Card: Fetch and Display User Profile Image
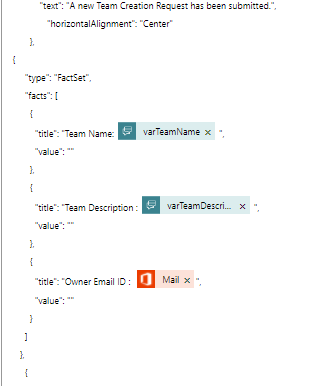
The JSON used in the adaptive card has been designed using the adaptive card designer.The body of the adaptive card uses the below JSON:

{
"type": "AdaptiveCard",
"body": [
{
"type": "TextBlock",
"size": "Medium",
"weight": "Bolder",
"text": "A new Team Creation Request has been submitted.",
"horizontalAlignment": "Center"
},
{
"type": "FactSet",
"facts": [
{
"title": "Team Name: @{triggerBody()['text']} ",
"value": ""
},
{
"title": "Team Description : @{triggerBody()['text_1']} ",
"value": ""
},
{
"title": "Owner Email ID : @{outputs('Get_user_profile_(V2)')?['body/mail']}",
"value": ""
}
]
},
{
"type": "TextBlock",
"text": "Approval/Rejection Comments",
"weight": "Bolder",
"wrap": true
},
{
"type": "Input.Text",
"id": "commentsID",
"placeholder": "Enter the Approval/Rejection Comments"
}
],
"actions": [
{
"type": "Action.Submit",
"title": "Approve",
"id": "approveID"
},
{
"type": "Action.Submit",
"title": "Reject",
"id": "rejectID"
}
],
"$schema": "http://adaptivecards.io/schemas/adaptive-card.json",
"version": "1.2"
}
It would be posted in the Team Creation Approvers Channel in the Operations Team.

As the Adaptive card contains 2 action buttons with ID ApproveID and RejectID, clicking on either one of them will notify Power Automate of the corresponding action and we can get to know which button was clicked by checking the submitActionId. So, we will check if the submitActionId contains the text approve to understand if approve or reject button was clicked.
Note: The Output of Adaptive card will not be visible after the action if the message body contains some dynamic content like below. So to see submitActionId in the output, temporarily remove dynamic content from adaptive card message and after making use of submitActionId from the dynamic output, put the below variables back in position.

If the approve button was clicked, we will enter the left branch and add an HTTP action to call the graph end point to URL https://graph.microsoft.com/v1.0/teams a
and pass the body to create the team with the use inputted team name and description. We will also use the email id we have extracted previously as the owner email id in the team creation body. We have added few team settings so that by default they will be applied on creation. To process the authentication, we will use the already authenticated token which we have passed from the PVA system variable and use that in the Value section. Post the http action, we will add the action to assign the output variable with a successful team creation message.
{
"template@odata.bind": "https://graph.microsoft.com/v1.0/teamsTemplates('standard')",
"displayName": "@{triggerBody()['text']}",
"description": "@{triggerBody()['text_1']}",
"members": [
{
"@odata.type": "#microsoft.graph.aadUserConversationMember",
"roles": [
"owner"
],
"user@odata.bind": "https://graph.microsoft.com/v1.0/users('@{outputs('Get_user_profile_(V2)')?['body/mail']}')"
}
],
"memberSettings": {
"allowCreateUpdateChannels": true,
"allowDeleteChannels": true,
"allowAddRemoveApps": true,
"allowCreateUpdateRemoveTabs": true,
"allowCreateUpdateRemoveConnectors": true
}
}
If the approver had rejected from adaptive card, we would fetch the corresponding comments from the adaptive card and add it to the output variable so that we can show it to the end user.
Finally, we will return back the output variable to PVA

Call the Flow
Heading back to power automate, we can call the above created flow from PVA and pass the 4 inputs which will be used in the flow and finally add the message box which will show the success/failure of the team creation process.

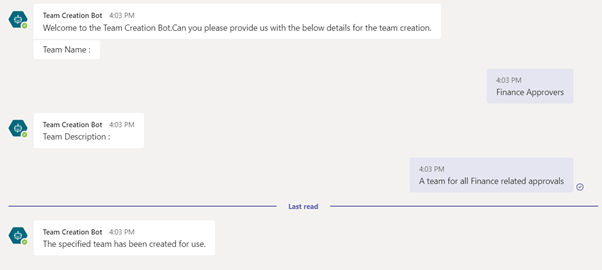
Test the bot
As part of testing the bot,let type in the trigger word like Create Team
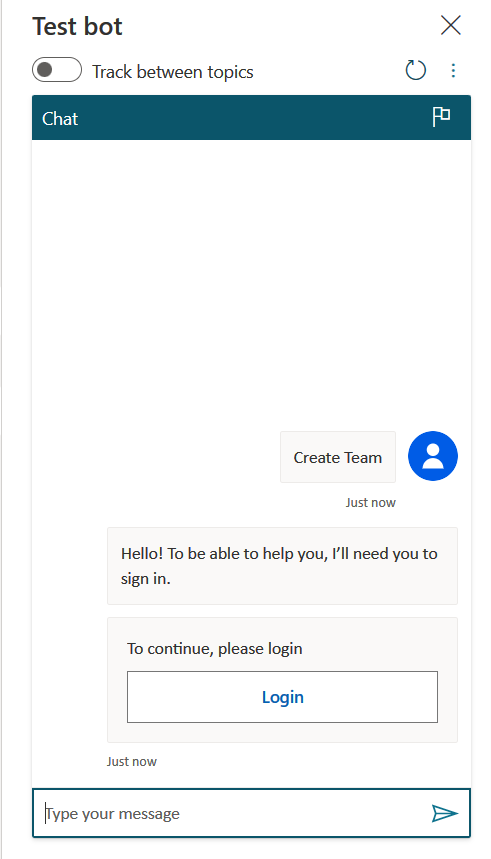
It will open a table where we can get the verification code to complete the sign in.

Copying and pasting the code back to the PVA chat window, will complete the authentication handshake. We can specify the Team Name and Description so that it will be used for the provisioning of teams upon the approval.

The approval request has been generated as an adaptive card in Teams. We will go ahead and approve it which will provision the team and share back the output to the test chat window.

The Team is now available for collaboration in Microsoft Teams.

Publish the bot
After successful testing, Let’s publish the bot to teams’ channel by heading over to Publish tab in the left pane. We will select Team as the preferred channel.

Clicking on Availability options will open the pane to publish the Bot for admin approval so that everyone in the org can use it. Or you download the zip and upload as custom app for personal use as well.

If we have selected Show to everyone in org, tha bot will appear in the Manage apps section where the admin can publish it for organizational use.

Test the bot
Once it is approved by the admin from the Teams admin centre, it will be available for use in teams. We can use the bot just the way we tested and used in the Test Windowpane in Power Virtual Agents where we would get the Authentication prompt.

Upon Authentication, we will enter the details and the Team will be provisioned and the status will be updated back in the bot.
Summary
Thus, we saw how to set up an Authentication Provider for use with Power Virtual Agent bots which will perform an authentication against the provider to continue with the Bot Conversations.