Power Virtual Agents: Implement Only for Teams Authentication and fetch User Details
- Introduction
- Business Use Case
- Create the Power Automate
- Publish the bot
- Test the bot
- Summary
Introduction
Power Virtual Agents helps us create intelligent conversational chat bots without any code implementation. With these bots we can engage with customers and employees in multiple languages across websites, mobile apps, Facebook, Microsoft Teams, or any channel supported by the Azure Bot Framework
In this article we will see how to create a basic bot and use the Only for Teams Authentication. When choosing this option, only the Teams channel will be available for publishing and sharing the bot. All other channels will be disabled, and a warning will be displayed. This configuration option is optimized for Teams channel usage. It automatically sets up Azure Active Directory (Azure AD) authentication for Teams without the need for any manual configuration.
It uses the Teams authentication itself to identify the user, meaning the user will not be prompted to sign-in while in Teams
The following variables will be available in the authoring canvas after the Only for Teams option is selected:
- UserID
- UserDisplayName
Business Use Case
We will try to create a bot that get user details from the User Profile. We will give the user an option to select whether he needs to fetch personal details or the user details of another user. For personal details fetching, we will use the UserID variable that comes along with the Teams Authentication enablement and for getting the user profile details of another user, we will get the display name of the concerned user and use Power Automate action to get the respective details.
Implementation
To implement the Automated Enquiry system, we will use Power Virtual Agents where we can create a bot to attend to the queries and give automated responses based on the information we have in the system. To start with we will head over to https://web.powerva.microsoft.com/ and click on the Bot symbol on the top right corner which lets you create a new bot
Specify the name and language for use in the bot as well as the environment where it should be provisioned.
It will create a basic bot where we can add the customizations needed for our requirement. We can see the section Topics which by default lists multiple conversation topic listed out. A topic defines how a bot conversation will be initiated and how the bot would respond to user interactions.
As the first step, lets create a topic that will define a general conversation starter which will pick information about the user. We can have multiple topics created in a bot and based on the way conversation is proceeding, we can navigate between multiple topics. Click on New Topic and Select From blank to create a Topic and we will name it UserDetailsBot.
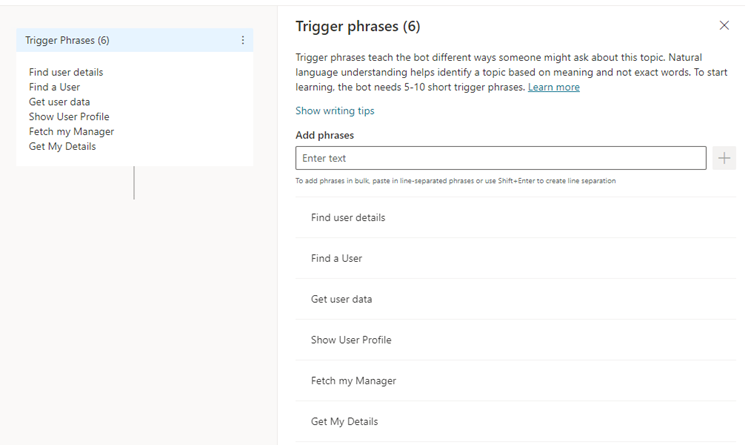
To trigger the topic, so that the control flows to that specific topic, we will define few words called Trigger Phrases that will transfer the control to these topics. The trigger phrases can be single keywords or a group of words and to cover a broad spectrum of possible trigger conditions, It is good to mention 5-10 different and still related phrases. Click on Trigger phrases that will open a right pane where we can add the trigger words.
Let’s add a message box with the welcome message and add the node add a question to ask for more details from the user related to whose profile information he would like to view – Own/Another User.The input from the user will be saved in the variable userProfileChoice.
Based on the choice selection,PVA will automatically create 2 branches for getting the personal details Or for another user. In case of userProfileChoice = Mine , we will add the call an action to create a power automate and pass the choice value and the user id which we will get from the system variable bot.UserId.
While in case of another user, we will ask for more information about the user name of the person whose details has to be fetched and will call the power automate by passing in the choice value and the user name obtained from the user.
In both the branches we will show the details using a message box
Create the Power Automate
To create the power automate we used in the above PVA, click on call an action and select Create a flow.
This will open Power Automate in new tab where we can add 2 variables to get the choice value and the user identifier from PVA. We will also initialize a variable to hold the data that needs to be passed back to PVA.
We will then add a condition to check the choice value selected by the user. If it evaluates to Mine, will add the logic in the left branch else the logic will be added to the right branch for getting another user’s details.
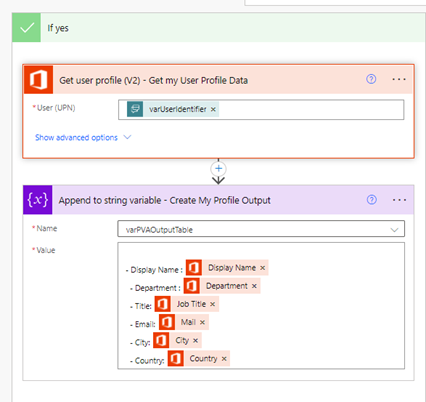
In case the selected option is mine, the system variable User ID will be available in the flow which we will use directly in the Get User Profile action to get the details of the current user. We will then append it to the output variable using markdown language.As PVA do not support html tables, we will use markdown language to create a bulleted list of items to show in the chat window. To create an unordered list, add dashes (-), asterisks (*), or plus signs (+) in front of line items. Indent one or more items to create a nested list.In this sample we will be using the below mark down syntax :
- First item
- Second item
- Third item
- Indented item
- Indented item - Fourth item
Which will generate the output as :
- First item
- Second item
- Third item
- Indented item
- Indented item
- Fourth item
So in the value box, we will add the hyphen markdown followed by the User Profile Column name and the corresponding value.
In case the user has selected the choice to get another user’s details, the right branch will be called and as we have only the user’s name and not the id, we cannot use the get user profile action which expects the ID, instead we will call the Search for users and pass the name to it. It will return a collection of users with matching names. We will use an apply to each action to loop through the output and get the ID of each user in the collection and call the Get User Profile action to get the details of each user. The detail of each user is then appended to the output variable using markdown language.
Let’s pass the output variable back to the PVA
Publish the bot
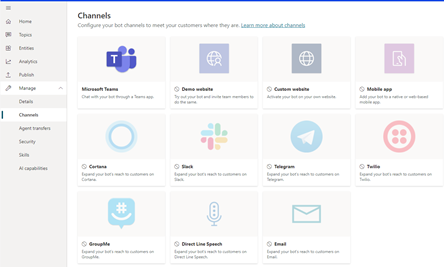
If we try to publish and deploy the bot, we will be able to see only the Teams channel and all other channels with be greyed out as we have used Teams Only Authentication
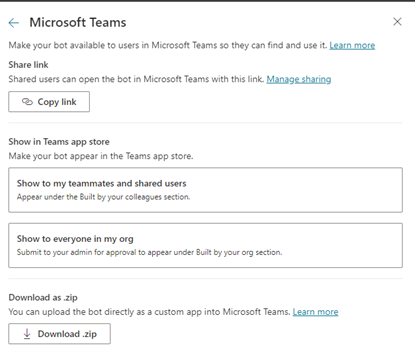
Selecting Teams will provide us the option to either download the zip and upload as a custom app or send the app to the teams admin for approval so that he can publish it and make it available to the whole organization.
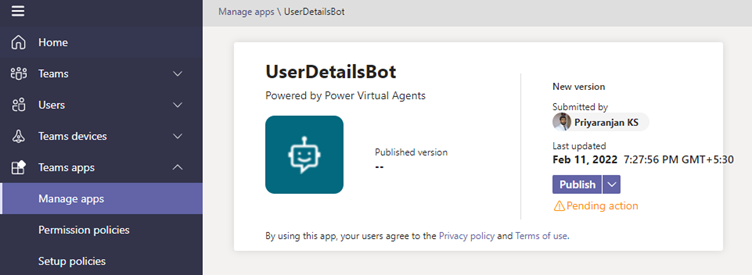
The admin can publish the bot from the Teams admin center
After some time, we will be able to see it in Teams and can add the bot as an app.
Test the bot
Let’s test the bot using the trigger keyword – User Details which asks for choosing a selection Mine/Another User.
Selecting Mine picks personal user profile details. Let’s also try fetching details of another user.
Selecting another user choice will ask for details of the other user’s name and pick the details of the user
Summary
Thus we saw how to use the Only Teams Authentication to use the system variable bot.userId to work with one of the business requirements where we can pass it to Power Automate for further processing and we also saw how to deploy the bot to teams for a seamless authentication experience.
