Setting up ADFS (Active Directory Federation Services) for Microsoft 365 for SSO (Single Sign On)
Overview
Many organizations are using Identity Access solutions like ADFS (Active Directory Federation Services) to provide users (internal & external) with seamless SSO access to internet-facing applications or services.
A single sign-on solution can simplify username and password management for both users and administrators. Users no longer have to keep track of different sets of credentials and can simply remember a single more complex password. SSO often enables users to just get access to their applications much faster.

ADFS (Active Directory Federation Services)
Active Directory Federation Services (AD FS) provides simplified, secured identity federation and Web single sign-on (SSO) capabilities for end users who want to access applications within an AD FS-secured enterprise, in federation partner organizations, or in the cloud.
Setting Up ADFS for Microsoft 365
Step 1: Install Active Directory Federation Services (Skip this step if already deployed)
Step 2: Request a certificate from a third-party CA for the Federation server name
Step 3: Configure AD FS
Step 4: Download Microsoft 365 tools
Step 5: Add your domain to Microsoft 365 (If not already added)
Step 6: Connect AD FS to Microsoft 365
Step 7: Sync local Active Directory user accounts to Microsoft 365
Step 8: Configure the client computer for Single Sign-On
Request a certificate from a third-party CA for the Federation server name
Microsoft 365 requires a trusted certificate on your AD FS server. Therefore, you must obtain a certificate from a third-party certification authority (CA).
You can obtain certificate from Let's Encrypt, see the following link.

Configure AD FS
Open up Server Manager -> "Add Roles & Features"
Select "Active Directory Federation Services" , click next and follow the wizard.
Once your setup is complete, open up ADFS Management console to verify.
Sync local Active Directory user accounts to Microsoft 365
1. Azure AD Connect
You need to install Azure AD Connect to Sync on premise users to Azure AD.
If you have on-premises AD Domain like contoso.local then you must add UPN Suffix (contoso.com).
Connect AD FS to Microsoft 365
Once you have installed Azure AD Connect, configure ADFS.
Run PowerShell as Administrator and execute the command:
Set-AdfsProperties -EnableIdpInitiatedSignonPage $true
Convert Azure AD Domain "Managed" to "Federated"
Enable-PSRemoting
Connect-MsolService
Set-MsolADFSContext –computer <the FQDN of the AD FS server>
Convert-MsolDomainToFederated –domain <the custom domain name you added into Microsoft 365>
Configure the client computer for Single Sign-On
After you add the Federation server name to the local Intranet zone in Internet Explorer, the NTLM authentication is used when users try to authenticate on the AD FS server. Therefore, they are not prompted to enter their credentials.
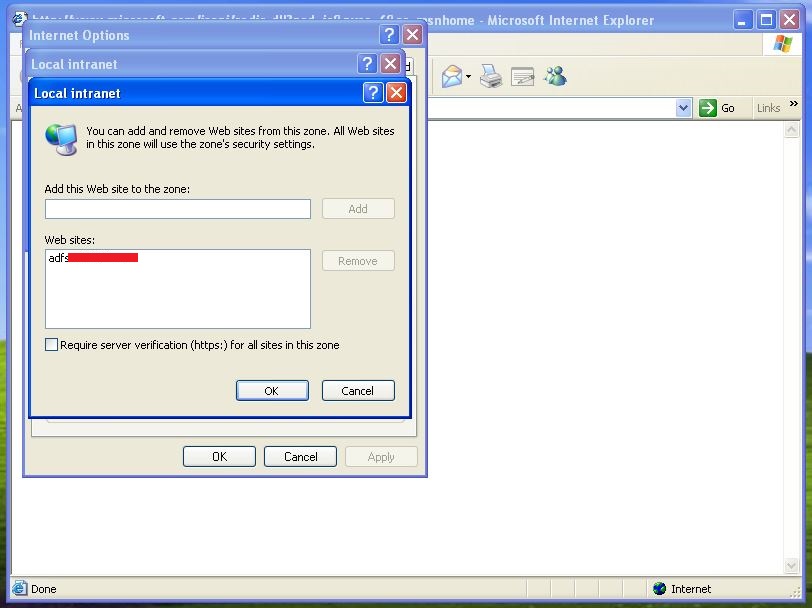
Administrators can implement Group Policy settings to configure a Single Sign-On solution on client computers that are joined to the domain.
When user will navigate to Office 365 it will be redirected to Organization's SSO Page.
Verify using this URL: [Replace adfs.contoso.com with your FQDN]
https://adfs.contoso.com/adfs/ls/IdpInitiatedSignon.aspx
