Screens in Visual Studio LightSwitch
Screens are one of the basic visual representation in LightSwitch. With screens, users can view and manipulate data in LightSwitch.
There are five standard screen templates in LightSwitch 2011:
- Detail Screen
- Editable Grid Screen
- List and Detail Screen
- New Data Screen
- Search Data Screen
You can also create a screen without reference to any entity by using one of the screen templates and not choosing any Screen Data.
- Empty Screen Template
But firstly, we need some data entities. Entities can be discovered and imported from external data sources or you can create some intrinsic entities (create database model) in entity designer.
Create Model
To create entities for the intrinsic database we need to go to entity designer and create these sample entities:
- Contact (FisrtName, LastName, Company, MiddleName, NickName, Title)
- ContactDetail (Name, Value)
- City (Name, PostalCode, Region)
Go to Solution Explorer, then select project Contact -> Data Sources -> Add Table:

Add entities Contact, City, ContactDetail with corresponding properties. Use Relationship button to create relationships between entities as:

Relationships have multiplicity:
Contact To City: Many To One
Contact To ContactDetail: Zero or one To Many
Now, we are ready to create screens.
Go to Solution Explorer, then select project Contact -> Screens -> Add Screen:

Add New Screen dialog shows us the available screen templates to choose from. Screen Name and Screen Data are needed as well:

New Data Screen
New Data Screen is used for creating data.
To create screen select New Data Screen from screen template and choose Contact from Screen Data.
After creating a screen from the template, the screen designer will display the hierarchical tree of the screen elements:

In the left part of the screen properties are listed and in the right part of the screen designer are controls bound to properties in tree presentation.
We need to create another New Data Screen for City entity.
After launching application CreateNewContact look like:

In order to be able to use functionality from next screen you need to enter data in screens: CreateNewCity and CreateNewContact.
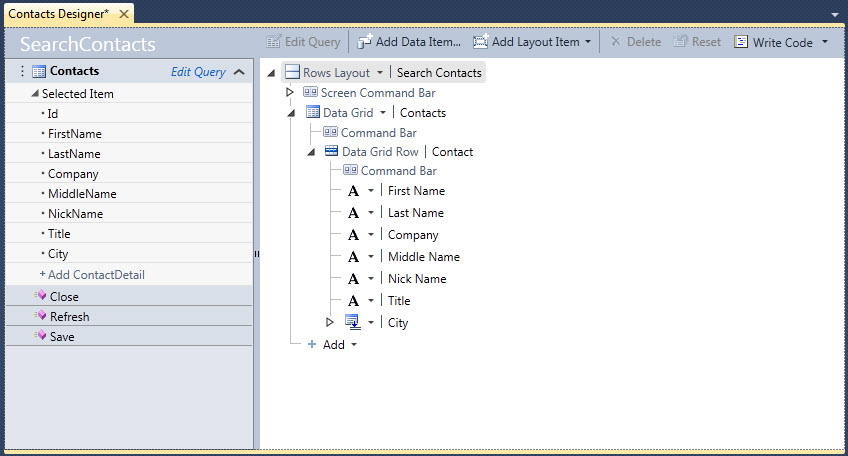
Search Data Screen
In order to search data we use search screen.
From Add New Screen dialog choose Search Data Screen template and for Screen Data select Contact:

Screen designer for SearchContacts:
When we run this screen:

We get built-in functionallity such as:
- Search using Search Text Box
- Export to Excel (only in Desktop application)
- Paging
If we click on value in column FirstName default Detail Screen will show up for Contacts:
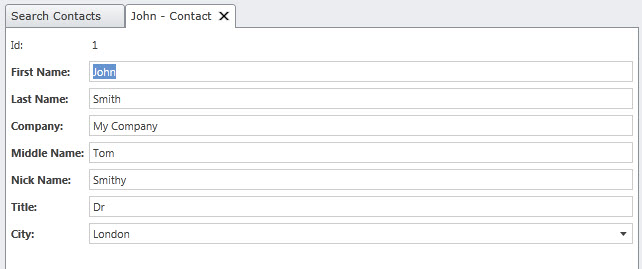
We can also create our own default Detail Screen for Contact entity usign Detail Screen template.
Details Screen
In order to edit data we use detail screen.
From Add New Screen dialog choose Detail Screen template and for Screen Data select Contact:
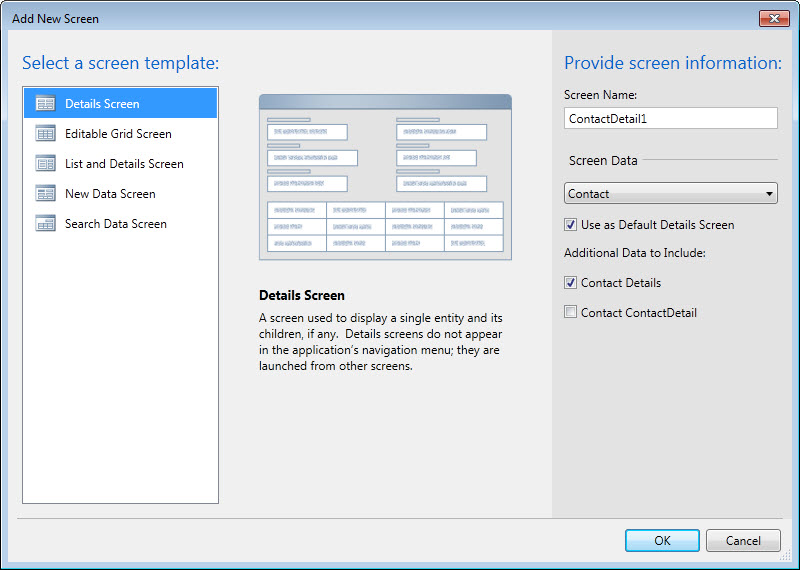
As we create new detail screen for contact we need to give another name for this screen: ContactDetail1. We have possibility to set this screen as default detail screen with options: Use as Default Details Screen. If you do not have a custom details screen set as the default then LightSwitch will generate a default modal dialog screen at runtime for data entry.
This screen, ContactDetail1 is the same as built-in detail screen for entity Contact but now this new screen is default detail screen.
We can also change data in grid using Editable Grid Screen.
Editable Grid Screen
This screen is used to change data.
From Add New Screen dialog choose Editable Grid Screen template and for Screen Data select Contact:

When we launch application Editable Grid Screen look like:
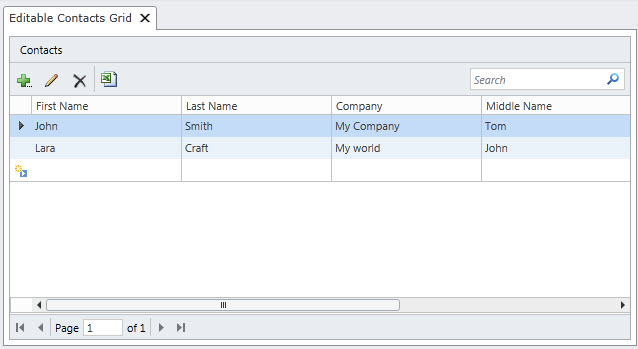
This screen have the same functionallity as search screen but with ability to change data in grid.
Finally, we have List and Detail screen.
List and Detail Screen
This screen is useful when we have collection such as ContactDetail in entity Contact.
From Add New Screen dialog choose List and Detail Screen template and for Screen Data select Contact Details and Contact ContactDetail:

Screen designer for this screen look like:

When we launch application List and Detail Screen look like:

In this type of screen we can change data for Contact entity and also add data in collection Contact Detal (Name and Value column).
Empty Screen Template
Finally we can use any of the screen templates except Details Screen (i.e. Search Screen template) to create Home Screen for our application:
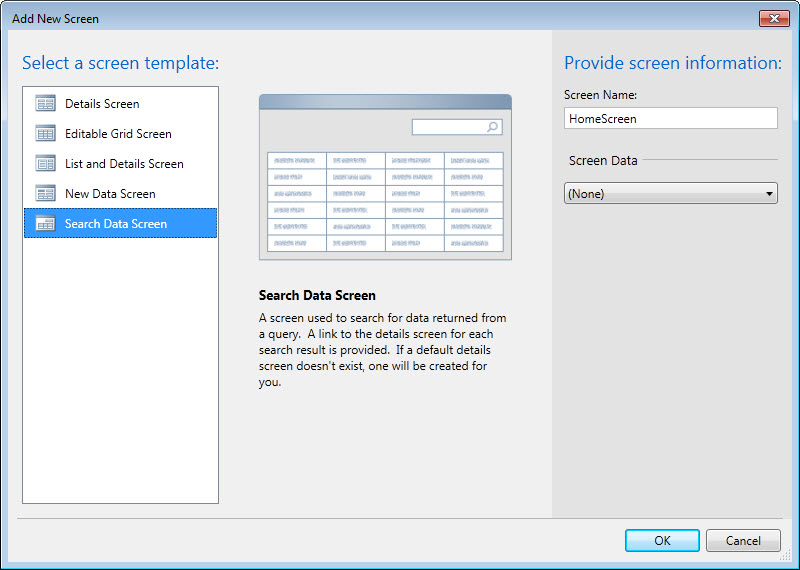
For this screen we don't need do select any Screen Data (None). On this screen we could put logo for company or images which would be link to our own functionallity in application.
We can set startup screen when we launch application. In Solution Explorer select project Contact -> Properties -> Screen Navigation:

Select one of the screen and press button Set. We can change order in menu using arrow for the screen in Screen Navigation dialog.
When we launch application startup screen will show up (empty Home Screen):
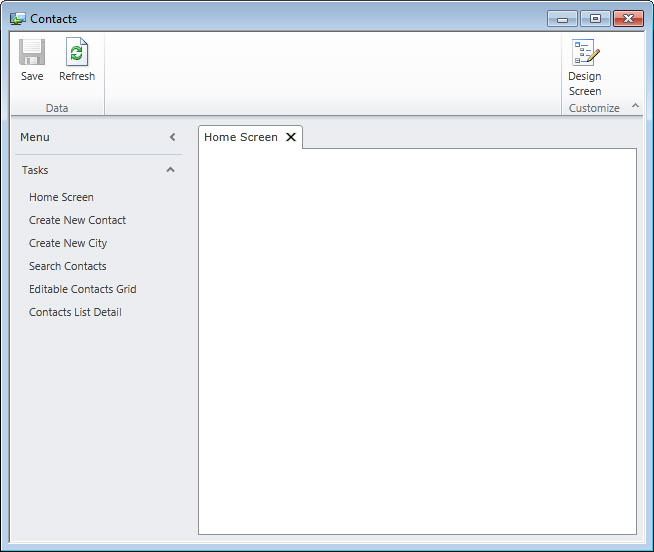
The navigation menu entries are automatically created for the screens.
This article demonstrates how to create an application using LightSwitch without having to write one single line of code, just using default screen templates.