How to Install BizTalk Server 2010 in a Basic Multi-Computer Environment
There are many things to consider when planning this type of installation, often the network infrastructure already exists and BizTalk Server must coexist with other network applications. This guide describes some of the considerations that apply to the various parts of a BizTalk Server installation in a basic multi-computer environment. This information will help you plan the installation and configuration of BizTalk Server 2010, applications and components on which it depends.
BizTalk Server Installation scenario
This article explains how to install Microsoft BizTalk Server 2010 on a basic multi-computer (or basic multi-server), i.e. installation of BizTalk Server with a remote SQL Server (1 SQL Server and 1 BizTalk Server) and will be based on an infrastructure and needs of one of my customers.

Some considerations on the scenario:
- The servers are in same domain.
- There are in different networks with limited access to machines (network restriction)
- So we have to request access to different ports for the communication between the two machines.
Because this scenario is hard to emulate I will use firewalls in both machines to emulate network access

There will be 3 virtual servers:
- 1 Domain controller
- 1 Virtual Machine to host SQL Server
- Windows Server 2008 R2
- SQL Server 2008 R2 Standard Edition
- 1 Virtual Machine to host BizTalk Server.
- Windows Server 2008 R2
- BizTalk Server 2010 Development Edition
In this scenario I will perform a full installation, with the exception of the SharePoint Adapter, of Microsoft BizTalk Server 2010 emulating a production environment. The following components will be installed:
- Enterprise Single Sign-On (SSO).
- BizTalk Group.
- BizTalk Runtime.
- Business Rule Engine.
- BAM Tools and Alerts.
- BAM Portal.
- BizTalk EDI/AS2 Runtime
- Microsoft BizTalk Adapters
And we assume that all machines are already installed with the operating system and latest critical Windows updates from Microsoft. Another presumption is that the domain controller is already installed and configured (this article will not explain this step)
The need for a Domain Controller - Windows Groups and Service Accounts
A very important difference between a single server and a multi-server installation is that the multi-server configuration requires you to use domain users and groups to run the various BizTalk services making having a domain controller a necessity. These domain accounts and groups are used for the security configuration of the BizTalk Server databases.
Because BizTalk and SQL are installed on a separate machine, the use of a domain user account is therefore a necessity so that the account can have access rights on both the BizTalk machine and the SQL Server machine.
Create Domain Groups and Users
The BizTalk setup procedure is not able to create the Windows Groups and Users on a Domain Controller, so on a multi-computer installation, BizTalk Windows Groups and Users must be created manually on the Domain Controller.
The following information will be useful in creating these groups and accounts.
- In a multicomputer environment, BizTalk Server supports only domain groups and domain service accounts.
- BizTalk Server 2010 supports only <NetBIOSDomainName>\User> name formats for Windows groups and service accounts.
- BizTalk Server supports only Active Directory domain groups and user accounts in multi-computer configurations. Domain groups include Domain Local groups, Global groups, and Universal groups, which are supported in both single computer and multi-computer environments.
- Built-in accounts such as NT AUTHORITY\LOCAL SERVICE, NT AUTHORITY\NETWORK SERVICE, NT AUTHORITY\SERVICE, NT AUTHORITY\SYSTEM, and Everyone are not supported when you install and configure BizTalk Server 2010 in a multi-computer environment.
- For more information see Installing BizTalk Server 2010 and BAM in a Multi-Computer Environment manual.
Planning the use of a new Organizational Unit
To keep things tidy, we can place the BizTalk Users and Groups in an Organizational Unit (OU), it is a good practice to utilize a new Organizational Unit (OU) to create all groups, user accounts and service accounts that we will use in the configuration of BizTalk Server 2010.
OU are Active Directory containers into which you can place users, groups, computers, and other organizational units. By using them you can create containers within a domain that represent the hierarchical or logical structures within your organization.
To create a new OU follow these steps:
- Click Start, point to Programs, point to Administrative Tools, and then click Active Directory Users and Computers.
- Right-click on the domain name and select New->Organizational Unit.

- Enter “BizTalk” as the name of the new ‘Organizational Unit Object”, Ensure to check “Protect container from accidental deletion” and press “OK”
Windows Groups Used In BizTalk Server
The following table lists the Windows groups and their membership used by BizTalk Server.
Note: must be created within the OU created earlier
| Group | Group Description | Membership |
| SSO Administrators | Administrator of the Enterprise Single Sign-On (SSO) service. For more information about SSO accounts, see "How to Specify SSO Administrator and Affiliate Administrators Accounts" at http://go.microsoft.com/fwlink/?LinkID=89383. | Contains service accounts for Enterprise Single Sign-On service. Contains users/groups that need to be able to configure and administer BizTalk Server and SSO service. Contains accounts used to run BizTalk Configuration Manager when configuring SSO master secret server. |
| SSO Affiliate Administrators | Administrators of certain SSO affiliate applications. Can create/delete SSO affiliate applications, administer user mappings, and set credentials for affiliate application users. | Contains no service accounts. Contains account used for BizTalk Server Administrators. |
| BizTalk Server Administrators | Has the fewest privileges necessary to perform administrative tasks. Can deploy solutions, manage applications, and resolve message processing issues. To perform administrative tasks for adapters, receive and send handlers, and receive locations, the BizTalk Server Administrators must be added to the Single Sign-On Affiliate Administrators. For more information, see "Managing BizTalk Server Security" in at http://go.microsoft.com/fwlink/?linkid=110476. | Contains users/groups that need to be able to configure and administer BizTalk Server. |
| BizTalk Server Operators | Has a low privilege role with access only to monitoring and troubleshooting actions. | Contains user/groups that will monitor solutions. |
| BizTalk Server B2B Operators | Has a low privilege role with access only to monitoring and troubleshooting actions. |
Contains user/groups that will perform all party management operations |
| BizTalk Application Users | The default name of the first In-Process BizTalk Host Group created by Configuration Manager. Use one BizTalk Host Group for each In-Process host in your environment. Includes accounts with access to In-Process BizTalk Hosts (hosts processes in BizTalk Server, BTSNTSvc.exe). |
Contains service accounts for the BizTalk In-Process host instance in the host that the BizTalk Host Group is designated for. |
| BizTalk Isolated Host Users | The default name of the first Isolated BizTalk Host Group created by Configuration Manager. Isolated BizTalk hosts not running on BizTalk Server, such as HTTP and SOAP. Use one BizTalk Isolated Host Group for each Isolated Host in your environment. |
Contains service accounts for the BizTalk Isolated host instance in the host that the Isolated BizTalk Host Group is designated for. |
| EDI Subsystem Users | Has access to the EDI database |
Contains service accounts for BizTalk Base EDI service. |
| BAM Portal Users | Has access to BAM Portal Web site. |
Everyone group is used for this role by default. |
| BizTalk SharePoint Adapter Enabled Hosts | Has access to Windows SharePoint Services Adapter Web Service. |
Contains service accounts for the BizTalk host instance to be able to call SharePoint Adapter. |
To create a new Group follow these steps:
- Click Start, point to Programs, point to Administrative Tools, and then click Active Directory Users and Computers.
- Select the OU create earlier: “BizTalk”. Right-click on the OU name and select New->Group.

- Enter the Group name of the new Group and ensure to select “Group scope” as “Domain local” or “Global” and “Group Type” as “Security”, press “OK”.
- Repeat all the steps for the remaining groups.
IIS_IUSRS Group
IIS_IUSRS is another group used by BizTalk Server 2010, however, unlike the previous groups we do not need to create this because it is a built-in group with access to all the necessary file and system resources so that an account, when added to this group, can seamlessly act as an application pool identity.
User and Service Accounts Used In BizTalk Server
The following table lists the Windows user or service accounts and group affiliations used by BizTalk Server.
Note: must be created within the OU created earlier
| User | User Description | Group Affiliation |
| Enterprise Single Sign-On Service Suggestions: - SsoService - srvc-bts-sso |
Service account used to run Enterprise Single Sign-On Service, which accesses the SSO database. |
SSO Administrators |
| Enterprise Single Sign-On Administrator Suggestions: - SsoAdmin - usr-bts-sso-admin |
User account for the SSO Administrator. |
SSO Administrators |
| Single Sign-On affiliate User Suggestions: - SsoAffiliate - usr-bts-sso-affiliate |
User accounts for SSO Affiliate Administrators |
SSO Affiliate Administrators |
| BizTalk Host Instance Account Suggestions: - BTSHostService - srvc-bts-untrusted |
Service account used to run BizTalk In-Process host instance (BTNTSVC). |
BizTalk Application Users |
| BizTalk Isolated Host Instance Account Suggestions: - BTSIsolatedHostService - srvc-bts-trusted |
Service account used to run BizTalk Isolated host instance (HTTP/SOAP). |
BizTalk Isolated Host Users IIS_WPG |
| Rule Engine Update Service Suggestions: - ReuService - srvc-bts-rule-engine |
Service account used to run Rule Engine Update Service, which receives notifications to deployment/undeployment policies from the Rule engine database. |
|
| BAM Notification Services User Suggestions: - BamService - srvc-bts-bam-ns |
Service account used to run BAM Notification Services, which accesses the BAM databases. |
SQLServer2005NotificationServicesUser$ <ComputerName> |
| BAM Management Web Service User Suggestions: - BamWebService - srvc-bts-bam-ws - srvc-bts-bam |
User account for BAM Management Web service (BAMManagementService) to access various BAM resources. BAM Portal calls BAMManagementService with the user credentials logged on the BAM Portal to manage alerts, get BAM definition XML and BAM views |
IIS_WPG |
| BizTalk Base EDI service Suggestions: - EDIService - srvc-bts-edi |
Service account used to run BizTalk Base EDI service, which processes EDI documentations. Important: The Base EDI adapter was deprecated in BizTalk Server 2006 R2. The Base EDI adapter can be used in upgrade scenarios, but for new installations of BizTalk Server, use the native EDI and AS2 functionality. |
EDI Subsystem Users In-Process BizTalk Host Groups hosting the Base EDI adapter. |
| BizTalk Administrator Suggestions: - BTSAdm - usr-bts-admin |
User need to be able to configure and administer BizTalk Server. |
BizTalk Server Administrators |
| BizTalk Server Operator User Suggestions: - BTSOperator - usr-bts-operator |
User account that will monitor solutions |
BizTalk Server Operators |
| BizTalk Server B2B Operator User Suggestions: - BTSB2BOperator - usr-bts-b2b-operator |
User account that will perform all party management operations |
BizTalk Server B2B Operators |
To create a new user follow these steps:
- Click Start, point to Programs, point to Administrative Tools, and then click Active Directory Users and Computers.
- Select the OU create earlier: “BizTalk”. Right-click on the OU name and select New->User.

- Enter the First and Last name and the User logon name of the new User. Press Next.
- Enter the password and password confirmation and ensure to select “Password never expires”, press “Next”.
- Repeat all the steps for the remaining groups.
Summary of users and Groups Affiliation
| Group | Accounts |
| SSO Administrators | - Enterprise Single Sign-On Service - Enterprise Single Sign-On Administrator - BizTalk Server Administrators group |
| SSO Affiliate Administrators | - Single Sign-On affiliate User |
| BizTalk Server Administrators |
- BizTalk Administrator - Your user (suggestion) or sometimes Domain Admin |
| BizTalk Server Operators |
- BizTalk Server Operator User |
| BizTalk Server B2B Operators |
- BizTalk Server B2B Operator User |
| BizTalk Application Users |
- BizTalk Host Instance Account |
| BizTalk Isolated Host Users |
- BizTalk Isolated Host Instance Account |
| EDI Subsystem Users |
- BizTalk Base EDI service |
| BAM Portal Users |
- Everyone group is used for this role by default. - Domain Users (suggestion) |
| IIS_IUSRS Group |
- BizTalk Isolated Host Instance Account - BAM Management Web Service User - BAM Application Pool Account |
SQL Server Service Accounts
The following table lists the Windows service accounts used by SQL Server.
Note: must be created within the OU created earlier
| User | User Description |
| SQL Server Agent Service Suggestions: - srvc-sql-agent |
Service account used to run SQL Server Agent. |
| SQL Server Database Service - srvc-sql- engine |
Service account used to run SQL Server Database. |
| SQL Server Analysis Service Suggestions: - srvc-sql- analysis |
Service account used to run SQL Server Analysis. |
| SQL Server Reporting Service Suggestions: - srvc-sql- reporting |
Service account used to run SQL Server Reporting. |
| SQL Server Integration Service Suggestions: - srvc-sql-integration |
Service account used to run SQL Server Integration. |
Alternatively, you can create a single Domain Account to run this services (like sql-bts-service or srvc-sql-bts)
Depending on the selection that you made while installing SQL Server, you will have the services installed in your server.
SQL Server Database Services:
- SQL Server Agent
- Analysis Services
- Reporting Services
- Integration Services
- SQL Server Browser
- Full-text search
- SQL Server Active Directory Helper
- SQL Writer
You can configure you SQL Server related services either during the setup or after the installation using the SQL Server configuration Manager.
Types of startup accounts:
- Local User Account: This user account is created in your server where SQL Server is installed, this account does not have access to network resources.
- Local Service Account: This is a built-in windows account that is available for configuring services in windows. This account has permissions as same as accounts that are in the users group, thus it has limited access to the resources in the server. This account is not supported for SQL SERVER and AGENT services.
- Local System Account: This is a built-in windows account that is available for configuring services in windows. This is a highly privileged account that has access to all resources in the server with administrator rights.
- Network Service Account: This is a built-in windows account that is available for configuring services in windows. This has permissions to access resources in the network under the computer account.
- Domain Account: This account is a part of your domain that has access to network resources for which it is intended to have permission for. It is always advised to run SQL Server and related services under a domain account with minimum privilege need to run SQL Server and its related services.
Changing Service Accounts:
SQL Server service accounts can be configured either during installation or using SQL Server configuration Manager. The first one is part of the installation and can be configured during the step Instance Configuration. I would walk you through changing a service account using SQL Server Configuration Manager.
- Start -> Programs Microsoft SQL Server 2008 -> Configuration Tools -> SQL Configuration Manager
- Highlight a service in the right pane, right click for properties.
You can change the built-in account here, else if you would like to change it to a Local User account or a domain user account, choose option This Account to Ungray it and enter the credentials of a local or a domain user account.
Remember that you will need to restart the SQL Server and related services for the new Service account to take effect.
References
- Windows Groups and User Accounts in BizTalk Server
- Part 3: BizTalk High Availability Server Environment – SQL & BizTalk Active Directory Accounts
- Installing BizTalk Server 2010 and BAM in a Multi-Computer Environment manual
- SQL Server Service accounts
Preparing Computers for Installation - Important considerations before set up the servers
There are some important considerations or suggestions, since these operations are not mandatory, that we can set before starting the installation and configuration of both servers.
Machine name
If your computer name is longer than 15 characters, BizTalk Server Configuration will not work.
Join the Local Administrators Group
To be able to install and configure BizTalk Server 2010, you have to log on the server using a Domain User who has Administrator rights on both the SQL Server and the BizTalk Server. So the next step is to add BizTalk Server Administrators group to the Local Administrators Group in both machines.
To join to Local Administrators Group:
- Click ‘Start’, ‘Control Panel’, ‘Administrator Tools’, ‘Computer Management’, ‘Local Users and Groups, ‘Groups’
- Add you user account and BizTalk Server Administrators group to the ‘Administrators’ group
By default the Windows Built-in\Administrators group has the sysadmin SQL role on the SQL Server.
The user running the BizTalk Server configuration must belong
The user running the BizTalk Server configuration must belong to the following user groups:• To the Administrators group on the local computer
- To the System Administrators group on the SQL Server computer
- To the domain group used for the BizTalk Server Administrators group
- And to the domain group used for the SSO Administrators group
To simplify things put this user on the BizTalk Server Administrators group. After BizTalk Server is configured and installed, the user does not have to be part of the BizTalk Server Administrators group anymore.
By default the Windows Built-in\Administrators group has the sysadmin SQL role on the SQL Server.
Once SQL Server is installed, you will be able to check that by opening the SQL Server Management Console, go to “Security\Server Roles” and double click on the “sysadmin” role. The pop up window will show all the windows and SQL logins having the sysadmin role.
Install Critical Windows Updates
Before installing BizTalk Server or its prerequisites, make sure you have installed the latest critical Windows updates from Microsoft.
To install Windows updates:
- Click Start, point to All Programs, and then click Windows Update.
- Follow the directions on the Windows Update site.
- If prompted, restart your computer
Disable IPv6
IPv6 is the latest address protocol that will eventually replace IPv4. Windows Server 2008 R2 kept this protocol enabled by default, but it is also a fact that IPv6 is not yet common and many software, routers, modems, and other network equipment do not support it yet. So it may be a wise approach to disable it for now. Also by turning off it will facilitate the process of detecting which port certain application are listening.
IPv6 can be disabled either through the DisabledComponents registry value or through the check box for the Internet Protocol Version 6 (TCP/IPv6) component in the list of items on the Networking tab for the properties of connections in the Network Connections folder. The following figure shows an example:

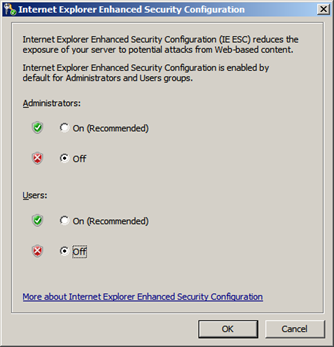
Turn off Internet Explorer Enhanced Security Configuration
Internet Explorer Enhanced Security Configuration established a configuration for your server and for Microsoft Internet Explorer that decreases the exposure of your server to potential attacks that can occur through Web content and application scripts. As a result, some Web sites may not display or perform as expected. By default, Internet Explorer Enhanced Security Configuration is enabled on Windows Server 2008 R2 and can be configured through Server Manager.
To Turn off Internet Explorer Enhanced Security Configuration in Windows Server 2008 R2:
- Open the Server Manager by going to Start > Server Manager
- In the Server Manager browse to the Security Information section and click Configure IE ESC. In the figure below, IE ESC is located in the very lower right-hand corner of the window.

- A dialog box appears, letting Internet Explorer Enhanced Security Configuration be enabled/disable separately for normal users and administrators, turn off both.
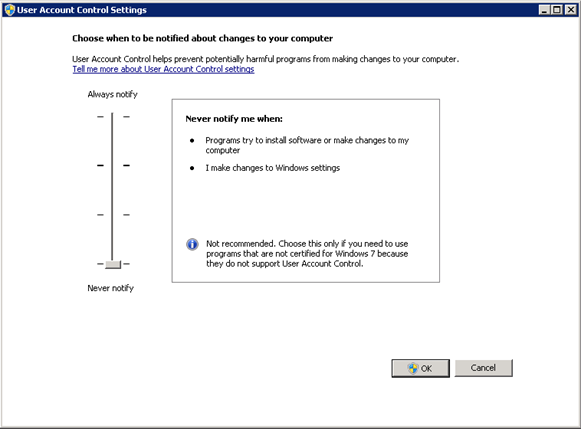
Disable User Account Control
User Account Control (UAC) is a security component that allows an administrator to enter credentials during a non-administrator's user session to perform occasional administrative tasks.
Whenever you need to configure a Windows Server 2008 R2 setting, even if you are logged on as the administrator - you need elevated privileges. This is by design, and part of the fierce security initiative in Windows Server 2008. Before you can complete any administrative task, the User Account Control manager pops up with a 'Continue' message.
To Disable User Account Control (UAC):
- Click Start, and type “Change User Account Control Settings”
.NET Framework 3.5 SP1 requirement
The .NET Framework 3.5 SP1 (also referred to as .NET Framework 3.5.1) is a prerequisite for SQL Server 2008 R2, however you should install .NET Framework 3.5 SP1 on both machines (BizTalk Server and SQL Server).
In Windows Server 2008 R2, the .NET Framework is a feature and installing it is different when compared to older versions of Windows Operating System. In previous versions, one could either download the .NET Framework 3.5.1 install binaries from Microsoft download site or use the install binaries from of the SQL Server 2008 installation media. Starting with Windows Server 2008, the method of installing .NET Framework 3.5.1 has changed.
To install/enable .Net 3.5 SP1 on Windows Server 2008:
- Using PowerShell
- Click the Start button in the lower left hand corner of the display.
- Highlight All Programs and select Accessories
- Expand Windows PowerShell and right click Windows PowerShell and select Run as administrator. Click Yes on the User Account Control box.
- At the PowerShell command prompt, type the following commands, and then press ENTER after each command:
- Import-Module ServerManager
- Add-WindowsFeature as-net-framework

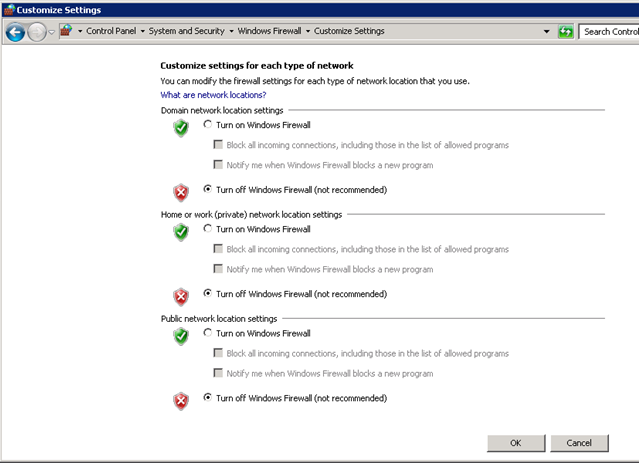
Turn Windows Firewall off
In you scenarios I advise you to turn Windows Firewall off on both machines However as I explained earlier, I will use firewalls in both machines to emulate network access To turn Windows Firewall off:
- Click Start, and type “Windows Firewall”
- Select “Turn Windows Firewall on or off” option
- And select the option “Turn off Windows Firewall (not recommended)” in all the three settings
Configure Microsoft Distributed Transaction Coordinator (MS DTC)
In Windows server 2008 R2 MSDTC is installed by default.
In order for BizTalk to run against its databases located on a remote SQL server, you will need to turn on MS DTC options (both on the SQL Server and BizTalk Server).
Configure MSDTC on BizTalk and SQL Servers:
- Click ‘Start’, ‘Run’, type ‘dcomcnfg’, and hit the ‘Enter’ key
- Under ‘Component Services’, ‘My Computer’, ‘Distributed Transaction Coordinator’, right-click ‘Local DTC’ and select ‘Properties’, click the ‘Security’ tab.
- Ensure that the ‘Network DTC Access’, ‘Allow Inbound’, ‘Allow Outbound’, and ‘No Authentication Required’ options are selected and all others are cleared.
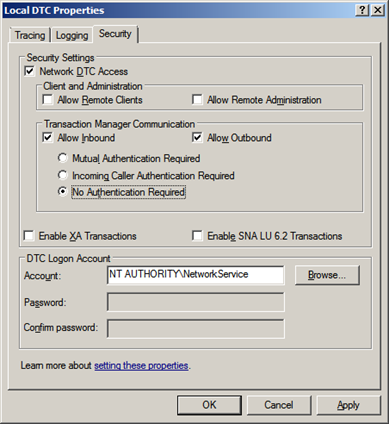
- Click ‘OK’
- Click ‘Yes’
NOTE1: It is suggested that a minimum of 100 ports are set, between ports 1024 to 10000.
NOTE2: If you receive COM+ related events or errors because of this setting you can revert it later or increase the ports range accordingly.
References:
- Troubleshooting MSDTC issues with the DTCPing tool
- How to configure DCOM to listen to a specific ports range
Network COM+ access considerations
Network COM+ access must also be enabled for all BizTalk and SQL servers. It is turned off by default on Windows Server 2008 R2. The Application Server role installation process provides an option for enabling COM+ Network Access. When COM+ Network Access is enabled, a firewall exception rule is created that opens port 135.
In order to make DCOM applications work in Windows Server 2008 R2 you need to do install the Application role Application and then select the COM+ network access role service.

A quick test of DCOM access is the DCOM test client/server app, however to do this test is still necessary to give permissions at firewall level.
Preparing and Installing SQL Server 2008 R2 machine
This part of the article will focus on installing the SQL Server machine and all necessary requirements and components
Important considerations before set up the servers
Check if all the considerations described above are implemented:
- Join the BizTalk Administrator Group to Local Administrators Group
- Install Critical Windows Updates
- Disable IPv6
- Turn off Internet Explorer Enhanced Security Configuration
- Disable User Account Control
- Install .NET Framework 3.5 SP1
- Configure Microsoft Distributed Transaction Coordinator (MS DTC)
- Enable Network COM+ access
Install SQL Server 2008 R2
In this step, we will install SQL Server 2008 R2 on the machine that will host the BizTalk databases The basic steps are described here:
The only recommendation that I made is to change the user running the SQL services to a domain account in the step 11, Microsoft recommends that you use a separate account for each SQL Server service (see SQL Server Service Accounts topic described earlier).
Note: Using SQL Server Express Edition in a production environment is not recommended. The Express edition does not include certain features needed by BizTalk Server.
Install Service Pack 1 for Microsoft SQL Server 2008 R2
Service Pack 1 for Microsoft SQL Server 2008 R2 can be found here.
SQL Server 2008 R2 service packs are cumulative updates and upgrade all service levels of SQL Server 2008 R2 to SP1. This service pack contains the cumulative updates of SQL Server 2008 R2 cumulative update packages 1 thru 6. You can use these packages to upgrade any of the following SQL Server 2008 R2 editions:
- SQL Server 2008 R2 Datacenter Edition
- SQL Server 2008 R2 Enterprise Edition and Developer Edition
- SQL Server 2008 R2 Standard Edition
- SQL Server 2008 R2 Web Edition
- SQL Server 2008 R2 Workgroup Edition
- SQL Server 2008 R2 Express Edition
You should install this Service Pack.
SQL Reporting Services Note
One of the changes in the SQL Server Reporting 2008 Reporting Services is the removal of the Internet Information Services (IIS) dependency. The first reason Microsoft moved away from IIS is for better configuration. IIS was built several years ago to do lots of things, including serving up web pages from the file system, host ISAPIs, Internet printing, etc. SSRS 2005 uses very little of IIS, mainly as a port 80 listener, client authentication, and process hosting. But when you install IIS, you got a bunch of stuff that RS really doesn’t need at all. It turns out that all of the parts of IIS that we didn’t use got configured in very strange ways and made RS not work.
This is especially true in the case where there were other IIS applications on the same server as RS. Not only did other application settings conflict with RS, any application running under the same Application Pool identity is granted full access to the RS catalog. By moving out of IIS, so Microsoft have actually significantly reduced the surface area that you to configure and secure.
The second reason for the change is a need for better resource management. IIS has a pretty simple model for thread, memory, and state management. This works well for most applications that are serving up static or dynamic HTML pages. However, it wasn’t really built to host an enterprise server responsible for serving up reports with gigabytes of data in multiple formats to thousands of users simultaneously. By hosting the service engine ourselves, Microsoft gain much more control over resource management. For example, RS 2008 has a new on-demand processing model to ensure that no report executions will run out of memory. It does this by paging and releasing allocated memory to the disk when it gets memory pressure notifications. This would have been very difficult to implement using the IIS hosting model.
Reference:
Configure SQL Server for Remote Connections.
In order for the BizTalk servers to connect to SQL Server, remote connections need to be enabled. To do so you need to:
- Run Microsoft SQL Server Management Studio and connect to the right instance.
- Once the tool opens, right click over instance name and select Properties
- Go to Connections page and select the option “Allow remote connections to this server”

Configured SQL Server protocols - Disable the Shared Memory Protocol, Enable TCP/IP and Named Pipes
The basic steps are described here: BizTalk 2010 Installation and Configuration – Disable the Shared Memory Protocol (Part 7) Click ‘Start’, ‘All Programs’, click ‘Microsoft SQL Server 2008 R2’, click ‘Configuration Tools’, then click ‘SQL Server Configuration Manager’
In the SQL Server Configuration Manager, click on the ‘SQL Server Network Configuration’ node and expand it, under ‘Protocols for MSSQLSERVER’ right-click the ‘Shared Memory’ protocol and disable it. Right-click the TCP/IP protocol and enable it and repeat the process for Named Pipes.

Configure a Server to Listen on a Specific TCP Port (SQL Server Configuration Manager)
If enabled, the default instance of the SQL Server Database Engine listens on TCP port 1433. Named instances of the Database Engine and SQL Server Compact 3.5 SP2 are configured for dynamic ports. This means they select an available port when the SQL Server service is started. When you are connecting to a named instance through a firewall, configure the Database Engine to listen on a specific port, so that the appropriate port can be opened in the firewall.
To assign a TCP/IP port number to the SQL Server Database Engine
- In SQL Server Configuration Manager, in the console pane, expand SQL Server Network Configuration, expand Protocols for <instance name>, and then double-click TCP/IP.
- In the TCP/IP Properties dialog box, on the Protocol tab, change the property “Listen All” to “No”(This is optional - just want to listen in one IP set in the machine)
- In the TCP/IP Properties dialog box, on the IP Addresses tab, several IP addresses appear in the format IP1, IP2, up to IPAll. One of these is for the IP address of the loopback adapter, 127.0.0.1. Additional IP addresses appear for each IP Address on the computer. Right-click each address, and then click Properties to identify the IP address that you want to configure.
- If the TCP Dynamic Ports dialog box contains 0, indicating the Database Engine is listening on dynamic ports, delete the 0.
- In the IPn Properties area box, in the TCP Port box, type the port number you want this IP address to listen on, and then click OK.

- In the console pane, click SQL Server Services.
- In the details pane, right-click SQL Server (<instance name>) and then click Restart, to stop and restart SQL Server.
After you have configured SQL Server to listen on a specific port, there are three ways to connect to a specific port with a client application:
- Run the SQL Server Browser service on the server to connect to the Database Engine instance by name.
- Create an alias on the client, specifying the port number.
- Program the client to connect using a custom connection string.
Reference: How to: Configure a Server to Listen on a Specific TCP Port (SQL Server Configuration Manager)
Configure SQL Analysis Server to Listen on a Specific TCP Port
This is one request of my client. You will be able to configure the port that SQL Analysis Server is listening by:
- Opening the SQL Server Management Console
- Connect to Analysis Server
- Right Click on SQL instance and select “Properties” option
- On “General” tab, go to “Port” and set the port that you want to configure, in my case “2382”.

- Click “Ok” and restart the service.
Configuring Microsoft Distributed Transaction Coordinator (DTC) to work through a firewall or network address translation firewalls
DTC uses Remote Procedure Call (RPC) dynamic port allocation. By default, RPC dynamic port allocation randomly selects port numbers above 1024. You can configure DTC to communicate through firewalls, including network address translation firewalls, just follow these steps:
- Go to Component Services
- On Component Services console, expand “Component Services
- Right click over “My Computer” and select Properties option
- Go to “Default Protocols” tab select “Connection-oriented TCP/IP” option in DCOM protocols
- Click “Properties” button
- On “Properties for COM Internet Services” windows, click “Add” button to set a port range
- Specify the range of ports you want to use, I set the following range: “5000-8976”
- Click “Ok”

- Ensure that “Internet range” is check in both options: “Port range assignment” and “Default dynamic port allocation”
List of ports between BizTalk Server and SQL Server
The following table lists the ports that we need to configured in firewall or request ACLs to network IT.Direction:
- Source Host: BizTalk Server
- Destination Host: SQL Server
| Port No. | Protocol /Service | Description of Service |
| 135 | TCP | RPC: Transacted connection to SQL Server Transacted connection to SQL Server for SQL adapter |
| 5000-8976 (you may extend more ports for performance) |
TCP |
Secondary RPC ports Secondary RPC ports for SQL adapter |
| 1433 |
TCP |
Microsoft SQL Server port used typically for remote connections to the database. For the Enterprise Single Sign-On service to connect to the SSO database To create and configure the MessageBox database To create and configure the Tracking database |
| 1434 |
UDP |
Microsoft SQL Monitor use in monitoring Microsoft SQL Databases. |
| 2382 |
TCP |
To update and retrieve information from the BAM Analysis database |
| 445 |
TCP |
To create the OLAP data file (.mdb) on the remote computer |
| 2725 |
TCP |
For data retrieval for analysis (PivotTable® reports) |
| 80 |
TCP |
Reporting Services |
Reference: Required Ports for BizTalk Server
Configure Firewall on SQL Server machine
Inbound Rules
In order to make DCOM applications work in Windows Server 2008 R2 you need to add the COM+ network access as show below:
- Open “Server manager” console and expand “Configuration” option in the left tree.
- Expand “Windows Firewall with Advanced Security” and select “Inbound Rules” option.
- Enable the following inbound rules by select them and right click and select the option “Enable Rule” option
- COM+ Network Access (DCOM-in)
- COM+ Remote Administrator (DCOM-In)
Also we enable Microsoft Distributed Transaction Coordinator (MS DTC) to communicate through a firewall with another MS DTC. Repeat the previous steps and Enable the following rules:
- Distributed Transaction Coordinator (RPC)
- Distributed Transaction Coordinator (RPC-EPMAP)
- Distributed Transaction Coordinator (TCP-In)
Now we need to create new rules for each of port described in topic “List of ports between BizTalk Server and SQL Server” to allow BizTalk Server to communicate with SQL Server machine. To create a new Inbound Rule, follow these steps:
- Right click on “Inbound Rules” on the left tree and select the option “New Rule”
- On “New Inbounded Rule Wizard” windows in step “Rule Type” select "Port" option
- In step "Protocol and Ports" select the protocol requested and specify the port or list of ports
- In step "Action" select "Allow the connection" option
- In step "Profile" leave the default options
- In step "name" set the name and description of the rule
Outbound Rules
First thing is to enable the following outbound rules:• Distributed Transaction Coordinator (TCP-Out) – this will allow Outbound traffic for the Distributed Transaction Coordinator. To do this follow the steps described in Inbound Rules, the steps are the same the only difference is that we are dealing with Outbound Rules.
The second is to create a new outbound rule for RPC ports:
- Right click on “Outbound Rules” on the left tree and select the option “New Rule”
- On “New Outbounded Rule Wizard” windows in step “Rule Type” select "Port" option
- In step "Protocol and Ports"
- Select the protocol: TCP
- Specify the range of ports: 5000-8976
- In step "Action" select "Allow the connection" option
- In step "Profile" leave the default options
- In step "name" set the name and description of the rule
Preparing and install prerequisites on BizTalk Server 2010 machine
This part of the article will focus on installing the BizTalk prerequisites and operate the necessary configuration on BizTalk Server machine. Before installing BizTalk Server or its prerequisites, make sure you have installed the latest critical Windows updates from Microsoft.
Important considerations before set up BizTalk Server
Check if all the considerations described above are implemented:
- Join the BizTalk Administrator Group to Local Administrators Group
- Install Critical Windows Updates
- Disable IPv6
- Turn off Internet Explorer Enhanced Security Configuration
- Disable User Account Control
- Install .NET Framework 3.5 SP1
- Configure Microsoft Distributed Transaction Coordinator (MS DTC)
- Enable Network COM+ access
Enable Internet Information Services
Microsoft Internet Information Services (IIS) provides a Web application infrastructure for many BizTalk Server features. BizTalk Server requires IIS for the following features:
- HTTP adapter
- SOAP adapter
- Windows SharePoint Services adapter
- Secure Sockets Layer (SSL) encryption
- BAM Portal
The basic steps are described in here: BizTalk 2010 Installation and Configuration – Enable Internet Information Services (Part 1) In alternative you can install these features by using PowerShell:
- Open PowerShell as administrator and run this script
- Set-ExecutionPolicy unrestricted press ‘y’
- Import-Module ServerManager
@("Web-Server",
"Web-Http-Errors",
"Web-App-Dev",
"Web-Asp-Net",
"Web-Net-Ext",
"Web-ASP",
"Web-CGI",
"Web-ISAPI-Ext",
"Web-ISAPI-Filter",
"Web-Includes",
"Web-Basic-Auth",
"Web-Windows-Auth",
"Web-Mgmt-Compat",
"Web-Metabase",
"Web-WMI",
"Web-Lgcy-Scripting",
"Web-Lgcy-Mgmt-Console"
)| Add-WindowsFeature
Install Microsoft Office Excel 2010 or Excel 2007
Microsoft Office Excel is required for using the Business Activity Monitoring (BAM) feature in BizTalk Server. You use the BAM Office Excel Workbook to define the business processes you want to monitor. You also use the BAM Excel Workbook to define the way in which business users see the data collected by BAM.
The basic steps are described in here: BizTalk 2010 Installation and Configuration – Install Microsoft Office Excel 2007 (Part 2)
Install Visual Studio 2010
The BizTalk Server development tools are based on Visual Studio 2010. Because this is an emulation of production environment I will skip this part.
However, the basic steps are described in here: BizTalk 2010 Installation and Configuration – Install Visual Studio 2010 (Part 3)
SQL Server Considerations
The following software requirements are need when SQL Server is installed on a computer other than the one where BizTalk Server is installed:
| BAM feature | Feature configuration | BizTalk Server | SQL Server |
| BAM Tools |
BAM Primary Import Tables and BAM Archive database |
ADOMD .NET 10 SQL Server 2008 R2/2008 SP1 Integration Services |
SQL Server 2008 R2/2008 SP1 |
| BAM Tools |
Enable Analysis Services for BAM aggregations |
SQL Server 2008 R2/2008 SP1 Integration Services |
SQL Server 2008 R2/2008 SP1 Analysis Services |
| BAM Notification Services Application Database |
Enable Notification Services for BAM alerts |
SQL Server 2005 Notification Services Engine Components |
N/A |
The following conditions apply regarding remote computers.
- SQL Server Client Tools must be installed on the local computer when SQL Server is remote. The SQL Server Client Tools install the client libraries required to communicate with the remote instance of SQL Server.
- The version of the SQL Server Client tools on the local computer must be the same version that is installed on the remote SQL Server.
- SQL Server OLAP client must be installed on the local computer if you plan to use Analysis Services remotely.
- The remote SQL Server must be running during BizTalk Server configuration.
- The TCP and UDP ports you specified during the SQL Server setup process must be open during BizTalk Server configuration.
- Named instances of SQL Server 2008 Analysis Services are not supported.
Install SQL Server 2008 R2 Client Tools
SQL Server Client Tools must be installed on the local computer when SQL Server is remote.
The SQL Server Client Tools (must be the same version that is installed on the remote SQL Server) install the client libraries required to communicate with the remote instance of SQL Server.
To Install SQL Server 2008 R2 Client Tools:
- Insert the SQL Server 2008 R2 installation disk into the DVD-ROM drive. The setup program will begin automatically. If prompted for automatic installation of prerequisite software, click OK.
- On the SQL Server Installation Center, click Installation.
- Click New Installation or Add Features to an Existing Installation.
- Review the information on the Setup Support Rules screen, and then click OK.
- On the Product Key screen, enter your product key and click Next.
- On the License Terms screen, select I accept the license terms, and then click Next.
- On the Setup Support Files screen, click Install.
- On the Feature Selection screen, select the following features, and then click Next.
- Shared Features
- Management Tools – Basic
- Management Tools – Complete
- Shared Features
The similar basic steps are described in here: BizTalk 2010 Installation and Configuration – Install SQL Server 2008 R2 (Part 4)
Install SQL Server 2005 Notification Services
If you plan to use BAM Alerts in your BizTalk Server project, you must install SQL Notification Services and its prerequisites.
The steps are described in my blog: BizTalk 2010 Installation and Configuration – Install SQL Server 2005 Notification Services on top of SQL Server 2008 R2 (Part 5)
Microsoft SQL Server Native Client
Microsoft SQL Server Native Client (SQL Native Client) is a single dynamic-link library (DLL) containing both the SQL OLE DB provider and SQL ODBC driver. It contains run-time support for applications using native-code APIs (ODBC, OLE DB and ADO) to connect to Microsoft SQL Server 7.0, 2000 or 2005. SQL Native Client should be used to create new applications or enhance existing applications that need to take advantage of new SQL Server 2005 features. This redistributable installer for SQL Native Client installs the client components needed during run time to take advantage of new SQL Server 2005 features, and optionally installs the header files needed to develop an application that uses the SQL Native Client API.
Microsoft SQL Server 2005 Management Objects Collection
The Management Objects Collection package includes several key elements of the SQL Server 2005 management API, including Analysis Management Objects (AMO), Replication Management Objects (RMO), and SQL Server Management Objects (SMO). Developers and DBAs can use these components to programmatically manage SQL Server 2005.
Note: Microsoft SQL Server 2005 Management Objects Collection requires Microsoft Core XML Services (MSXML) 6.0 and Microsoft SQL Server Native Client, also available on this page.
Microsoft SQL Server 2005 Notification Services Client Components
The SQL Server 2005 Notification Services Client Components package provides client APIs that enable subscription management and event submission within custom applications that include SQL Server 2005 Notification Services functionality. The subscription management APIs allows developers to create subscriptions and subscribers, and manage subscriber devices. The event submission APIs allow users to specify events using the event APIs or stored procedures.
Create SQL Alias to communicate with remote SQL Server using Non-Standard Port
When we want to install BizTalk Server with a remote SQL Server using non default port we cannot use “servername\instance, port number” for BizTalk installation, it will give you the following error:
Error Configuration Framework]Feature: [Group] Failed to configure with error message [Exception of type 'System.EnterpriseServices.TransactionProxyException' was thrown.]
Instead you should create a SQL Server Alias on the client machine to connect to SQL Server machine.
An alias can be created on the client machine by running the SQL Server Configuration Manager tool.
- Under the SQL Server Native Client folder, right click on the “Aliases” item and select the “New Aliases” item.
- When doing this the “Alias – New” dialog box will be displayed. In the new alias dialog box, you can create an alias where you can specify the instance name and the port number it is using.
- In the “Alias Name “set the name of alias: “BizTalkSQL”
- In “Port No” specify the port where Database Engine running is listening: 1433
- In “Protocol” leave the default value “TCP/IP”
- In “Server” specify “servername\instance”

List of ports between SQL Server and BizTalk Server
The following table lists the ports that we need to configured in firewall or request ACLs to network IT.
Direction:
- Source Host: SQL Server
- Destination Host: BizTalk Server
| Port No. | Protocol /Service | Description of Service |
| 135 |
TCP |
RPC: Transacted connection to SQL Server Transacted connection to SQL Server for SQL adapter |
| 5000-8976 (you may extend more ports for performance) |
TCP |
Secondary RPC ports Secondary RPC ports for SQL adapter |
Reference: Required Ports for BizTalk Server
Configuring Microsoft Distributed Transaction Coordinator (DTC) to work through a firewall or network address translation firewalls
DTC uses Remote Procedure Call (RPC) dynamic port allocation. By default, RPC dynamic port allocation randomly selects port numbers above 1024.
You can configure DTC to communicate through firewalls, including network address translation firewalls, just follow these steps:
- Go to Component Services
- On Component Services console, expand “Component Services
- Right click over “My Computer” and select Properties option
- Go to “Default Protocols” tab select “Connection-oriented TCP/IP” option in DCOM protocols
- Click “Properties” button
- On “Properties for COM Internet Services” windows, click “Add” button to set a port range
- Specify the range of ports you want to use, I set the following range: “5000-8976”
- Click “Ok”
- Ensure that “Internet range” is check in both options: “Port range assignment” and “Default dynamic port allocation”
Configure Firewall on BizTalk Server machine
Inbound Rules
In order to make DCOM applications work in Windows Server 2008 R2 you need to add the COM+ network access as show below:
- As described previously on “Configure Firewall on SQL Server machine”. Enable the following inbound rules by select them and right click and select the option “Enable Rule” option
- COM+ Network Access (DCOM-In)
- COM+ Remote Administrator (DCOM-In)
- Also enable Microsoft Distributed Transaction Coordinator (MS DTC) to communicate through a firewall with another MS DTC.
- Distributed Transaction Coordinator (RPC)
- Distributed Transaction Coordinator (RPC-EPMAP)
- Distributed Transaction Coordinator (TCP-In)
Now we need to create new rules for each of port described in topic “List of ports between SQL Server and BizTalk Server” to allow SQL Server to communicate with BizTalk Server machine. As described previously on “Configure Firewall on SQL Server machine”
Outbound Rules
First thing is to enable the following outbound rules:
- Distributed Transaction Coordinator (TCP-Out) – this will allow Outbound traffic for the Distributed Transaction Coordinator.
The second is to create a new outbound rule for RPC ports:
- Right click on “Outbound Rules” on the left tree and select the option “New Rule”
- On “New Outbounded Rule Wizard” windows in step “Rule Type” select "Port" option
- In step "Protocol and Ports"
- Select the protocol: TCP
- Specify the range of ports: 5000-8976
- In step "Action" select "Allow the connection" option
- In step "Profile" leave the default options
- In step "name" set the name and description of the rule
Testing environment connectivity’s
Before you install and configure BizTalk Server is always a good practice to test or validate the connectivity’s between BizTalk Server and SQL Server machines.
To accomplish that we can use 4 Tools:
- TCPView – This is a Windows program that will show you detailed listings of all TCP and UDP endpoints on your system and can be obtained from Microsoft: TCPView
- DTCPing - This tool is designed to assist with troubleshooting Microsoft DTC Firewall Issues and can be obtained from Microsoft: DTCPing
- DTCTester – This tool tests a distributed transaction against a specified Microsoft SQL Server. This tool helps to test distributed transactions across firewalls or against networks. The tool performs distributed transactions by using ODBC API against a SQL Server database and can be obtained from Microsoft: How To Use DTCTester Tool
- SQL Server 2008 R2 Client Tools – Tools to communicate with the remote instance of SQL Server
TCPView
TCPView is a Windows program that will show you detailed listings of all TCP and UDP endpoints on your system, including the local and remote addresses and state of TCP connections.
To execute this tool, just download it, extract all files and execute Tcpview.exe file.

DTCPing
Before running this tool and since this tool runs on dynamic port, we have to check which port this tool is listening on both machines and add an inbound rule in each firewall. To accomplish that, we can use the tool TCPView (see picture above).
To test DTCPing tool you must run this tool on both the machines, then you can test whether the normal RPC communication is working or not.
On SQL Server machine put the following configuration:
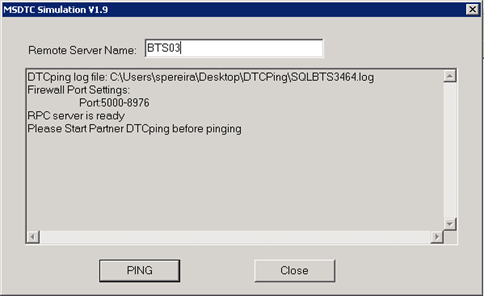
On BizTalk Server machine put the following configuration:

Test ping on both machines, you receive a similar message:
*Please refer to following log file for details:
C:\Users\..\Desktop\dtcping\BTSSQL1704.log
Invoking RPC method on BTSSQL
WARNING:the CID values for both test machines are the same
Please send following LOG to Microsoft for analysis:
Partner LOG: BTSSQL 1704.log
My LOG: BTSSQL 1704.log
RPC test is successful
++++++++++++RPC test completed+++++++++++++++
*
DTCTester
To test DTCTester you must:
- Create an ODBC Data Source in BizTalk machine
- Go to Start -> Data sources (ODBC)
- Select “Add” button and select “SQL Server” option
- Configure the New Data Source

- Leave Default options
- Leave Default options
- Leave Default options
- Press Finish
- Test Data Source
- Press Ok and Ok
- Access to command line (run->cmd) from BizTalk Server machine a run the following command:
- Go to DTCTester directory
- Type dtctester <odbc name> <user name> <password>
- Example: dtctester SQLTest myuser mypass

SQL Server 2008 R2 Client Tools
This is the easy part, just open SQL Server Management Studio from BizTalk Server machine and try to connect to Database Engine and Analysis Services by using servername\instance or the Alias that we create earlier.
Installing and configuring BizTalk Server 2010 machine
This part of the article will focus on installing and configuring BizTalk Server 2010, installing additional components and confirm that the installation succeeded.
Install BizTalk Server 2010
The basic steps are described in here: BizTalk 2010 Installation and Configuration – Installing and Configuring BizTalk Server (Part 8)
Configure BizTalk Server
To configure BizTalk Server 2010, click Start, click All Programs, click Microsoft BizTalk Server 2010, right-click BizTalk Server Configuration, and then click Run as Administrator.
- Because this is a multi-Computer BizTalk Server installation we cannot use a “Basic Configuration” option. You must select “Custom configuration” option
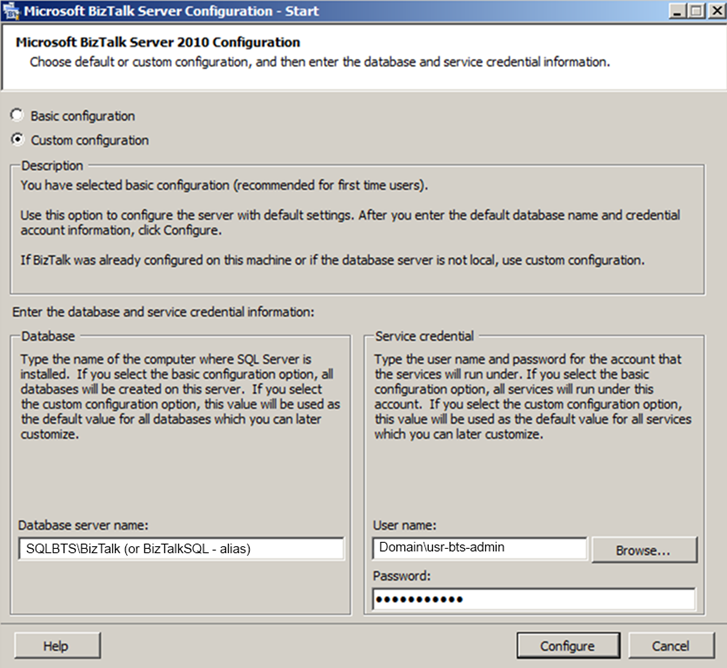
- Click Configure
- On Enterprise SSO tab, Create a new SSO System and place the following configurations

- On Enterprise SSO Secret Backup tab, set a secret backup password, password reminder and the location of the SSO backup file

- On Group tab, Create a new BizTalk Group and place the following configurations

- On BizTalk Runtime tab, Create a new In-Process and Isolate Host and Instance with the following configurations

- On Business Rule Engine tab place the following configurations

- On BAM Tools tab, Enable Analysis Services for BAM aggregations and place the following configurations

- On BAM Alerts tab, enable SQL Notification Services for BAM Alerts and place the following configurations

- On BAM Portal tab, place the following configurations

- On BizTalk EDI/AS2 Runtime tab, enable all features

- Click “Apply Configurations”
- On the Summary screen, review the configuration about to be performed, and then click Next.
- On the Completion screen, click Finish.
Install BizTalk Adapter Pack 2010
The BizTalk Adapter Pack 2010 provides connectivity to SAP, Oracle E-Business Suite, Siebel and SQL and Oracle Databases. The BizTalk Adapter Pack can be installed in conjunction with, or separately from, BizTalk Server. BizTalk Adapter Pack 2010 it is included in both the Enterprise and Standard Editions of BizTalk and can be install from BizTalk Server 2010 installation disk into the DVD-ROM drive
The steps are described in Steef-Jan Wiggers blog: Installing BizTalk Adapter Pack 2010 on x64
Install Microsoft AppFabric Connect
BizTalk Server 2010 introduces a new feature “AppFabric Connect”, which combines rich proven features of BizTalk Server with the flexible development experience of .NET to allow users to easily develop simple integration applications. This enables users to:
- Develop custom .NET applications that require connectivity to backend Line of Business (LOB) systems like SAP, Oracle database, Oracle E-Business Suite, Siebel, and SQL Server without writing custom code for LOB connectivity
- Utilize the XML-based data transformation capabilities of the easy to use and rich interface of the BizTalk Server Mapper directly from within a .NET project.
References: Introducing BizTalk Server 2010 AppFabric Connect
Installation process is similar to the previous point.
Install BizTalk Server 2010 Cumulative Updates
You should install the last cumulative updates available for BizTalk Server 2010.
List of CU available are referenced here: BizTalk Server: List of Service Packs and Cumulative Updates available
Configure BizTalk Services to start Automatic (Delayed Start)
The basic steps to prevents that the services don’t start up automatically after a server restart are described here: BizTalk 2010: BizTalk Server Application Service (BTSNTSvc.exe) fails to start automatically after a system restart
Verify BizTalk Configuration
You can check if the configuration went well by having a look at the Windows Event Log, there should be a lot of Information entries and no errors or warning related to BizTalk.
You should also start the BizTalk Server administration console and verify the BizTalk Server host instance is started (found under BizTalk Group\Platform Settings\ Host Instances). Try stopping and starting the host instance.
Configure BizTalk Server SQL Jobs
By default, the following BizTalk jobs aren’t configured and enabled upon installation.
- Backup BizTalk Server (BizTalkMgmtDb)
- DTA Purge and Archive (BizTalkDTADb)
- MessageBox_Message_Cleanup_BizTalkMsgBoxDb
If you want these functionalities you must configure and enabled them.
The basic steps are described here: BizTalk 2010 Installation and Configuration – Configure BizTalk Server SQL Jobs (Part 11)
General network TCP settings that can impact BizTalk Server
This part of the article will focus on configuring TCP setting on BizTalk server and the SQL server machines that can impact BizTalk Server and that can prevent from occurring general network errors.
In the scenario described in this series of articles we should apply the following TCP/IP settings:
- Disable the Scalable Networking Pack (SNP) features
- This needs to be done on the BizTalk Server and the SQL Server
- Disable Privilege Attribute Certificate (PAC)
- This needs to be done on the BizTalk Server and the SQL Server
- Check and if necessary increase the ephemeral ports and reduce the TCP re-use timeout setting
- This needs to be done only on the BizTalk Server
How to Disable the Scalable Networking Pack (SNP) features
Scalable Networking Pack (SNP) be used, under specific circumstances, to improve network performance, however, most environments do not have SNP capable network adapters/drivers. This can result in unexpected network problem which is why it is recommended to disable SNP unless a server can benefit from it.
To disable SNP features we need to:
- Disable TCP Chimney Offload in the operating system
- Use administrative credentials to open a command prompt.
- At the command prompt, type the following command, and then press ENTER:
- netsh int tcp set global chimney=disabled
- Disable RSS in the operating system
- Use administrative credentials to open a command prompt.
- At the command prompt, type the following command, and then press ENTER:
- netsh int tcp set global rss=disabled
- Disable NetDMA in the operating system
- Click Start, click Run, type regedit, and then click OK.
- Locate the following registry subkey, and then click it:
- HKEY_LOCAL_MACHINE\SYSTEM\CurrentControlSet\Services\Tcpip\Parameters
- Double-click the EnableTCPA registry entry.
- Note: If this registry entry does not exist, right-click Parameters, point to New, click DWORD Value, type EnableTCPA, and then press ENTER.
- To disable NetDMA, type 0 in the Value data box, and then click OK.
To determine the current status of SNP features, follow these steps:
- Use administrative credentials to open a command prompt.
- At the command prompt, type the following command, and then press ENTER:
- netsh int tcp show global
Note: you need to restart the computer first.
How to Disable Privilege Attribute Certificate (PAC)
The Privilege Attribute Certificate (PAC) is a function invoked within the Windows security system when you log on to a system utilizing Kerberos. It is a network authentication protocol.
The Kerberos Privilege Attribute Certificate (PAC) contains all of the group memberships for the security principal requesting access to a resource. PAC validation means a more secure environment so why should be disabled?
When you run a high-volume server program on a domain member that uses Kerberos to authenticate users, you experience a delay in the user-authentication process. Additionally, you notice an increase in the remote procedure call (RPC) traffic between the domain controller that uses the Net Logon RPC interface and the server. This problem occurs because the Kerberos client verifies the Privilege Attribute Certificate (PAC) signature in the Kerberos ticket by using the domain controller. The Kerberos client performs this verification to prevent PAC spoofing. The increased network traffic is generated by the RPC requests that are part of this verification process.
To disable PAC we need to:
- Click Start, click Run, type regedit, and then click OK.
- Locate the following registry subkey, and then click it:
- HKEY_LOCAL_MACHINE\SYSTEM\CurrentControlSet\Control\Lsa\Kerberos\Parameters
- Add the following registry entry
- Right-click Parameters, point to New, click DWORD Value, type ValidateKdcPacSignature, and then press ENTER.
- To disable PAC, double-click the ValidateKdcPacSignature registry entry and type 0 in the Value data box, and then click OK
How to Check and if necessary increase the ephemeral ports and reduce the TCP re-use timeout setting
When a client initiates a TCP/IP socket connection to a server, the client typically connects to a specific port on the server and requests that the server responds to the client over an ephemeral, or short lived, TCP or UDP port.
Under certain conditions it is possible that the available ports in the default range will be exhausted. If this occurs the following symptoms may be observed:
- Client applications may fail to connect to the BizTalk Server.
- The BizTalk Application service may fail to connect to a remote SQL Server.
- BizTalk Server adapters may fail to connect to a remote server.
To verify that one or more client applications are not generating excessive TCP/IP socket connections perform the following on the BizTalk servers in the group:
- From a command prompt window execute “netstat -ano -p tcp”.
- Count the number of unique Local Address TCP ports open above 1024 for each IP address.
If less than 3000 ephemeral ports are currently in use then it’s fine. (Original source: Recommended Platform Configuration for BizTalk Server by Abdul Rafay)
You can check or modify these settings at the HKLM\SYSTEM\CurrentControlSet\Services\Tcpip\Parameters registry key. The recommended values are:
- Registry name: MaxUserPort
- Value: 0xFFFE (65534)
- Comment: Prevents port exhaustion
- Registry name: TcpTimedWaitDelay
- Value: 0x1E (30)
- Comment: Release unused ports as quickly as possible
Or you can view the dynamic port range by using the following netsh commands:
- netsh int ipv4 show dynamicport tcp
- netsh int ipv4 show dynamicport udp
On all BizTalk servers running on Windows Server 2008, Microsoft recommend not modifying the dynamic port range. However, if you determine that additional dynamic ports are needed you can also use netsh command to modify these settings, as follows:
- netsh int <ipv4|ipv6> set dynamic <tcp|udp> start=number num=range
This command sets the dynamic port range for TCP. The start port is number, and the total number of ports is range. The following are sample commands:
- netsh int ipv4 set dynamicport tcp start=10000 num=1000
These sample commands set the dynamic port range to start at port 10000 and to end at port 11000 (1000 ports).
Important notes:
- The minimum range of ports that can be set is 255.
- The minimum starting port that can be set is 1025.
- The maximum end port (based on the range being configured) cannot exceed 65535.
See Microsoft Help and Support
At the end you should restart BizTalk and SQL Servers.
TCP settings that can impact BizTalk Server
Author
Sandro Pereira
DevScope | MVP & MCTS BizTalk Server 2010
http://sandroaspbiztalkblog.wordpress.com/ | @sandro_asp
See Also
Read suggested related topics:
- How to Install and Configure BizTalk Server 2010 in a Standalone Machine
- Recommendations for Installing, Sizing, Deploying, and Maintaining a BizTalk Server Solution
- Install and Configure BAM (Business Activity Monitoring) in a Multi-Computer Environment
Another important place to find a huge amount of BizTalk related articles is the TechNet Wiki itself. The best entry point is BizTalk Server Resources on the TechNet Wiki.