License Link for Azure and Windows HPC
This topic describes the steps to enable applications that are running on Azure nodes to use a license server on an enterprise network. The Azure nodes in this scenario are deployed as part of a Windows HPC Server 2008 R2 cluster, Service Pack 2 or later.
Note: These procedures are intended for proof of concept or evaluation purposes only. The connectivity enabled with these steps is not very stable. Additionally, connectivity is established by using a Beta version of Azure Connect.
Overview
A large percentage of HPC applications, MPI and otherwise, in use today are licensed, commercial applications which use a licensing server to enable users to share licenses within an Enterprise. This document describes a method of safely extending a license server's reach into a set of Azure compute nodes (Windows Azure compute instances that are joined to a Windows HPC cluster).
Most license servers work over IPv4. Azure Connect can be used to establish an encrypted IPv6 connection from an on-premises machine to the Azure Nodes. In the approach described in this topic, we create an unencrypted IPv4 tunnel inside the IPv6 tunnel for communication between the Azure Nodes and the license server (by way of a “junction box”). We set up a junction box on a standalone physical machine or on a virtual machine. Ideally, the junction box is not domain joined (to increase security by restricting Enterprise network access to boundary servers). We install the Azure Connector endpoint software on the junction box to establish the IPv6 connection to the Windows Azure nodes. We then create an IPv4 VPN server on the junction box. Each Azure Node will have the Azure Connect client (automatically with deployment from HPC) and the IPv4 client connection to the VPN server on the junction box (manual configuration step). Communications between the junction box and the license server occur over an IPv4 connection.
The following diagram illustrates the basic architecture of this solution:

Additional considerations:
- The IPv4 tunnel is unencrypted. This is still secure because it exists “inside” the encrypted IPv6 tunnel created by Azure Connect. We do this to reduce compute overhead (encryption/decryption) on each end of the tunnel.
- To reduce security attack surface, we strongly recommend the junction box is NOT domain joined, and the IPv4 VPN connects using non-domain credentials that are local to the junction box.
- The setup steps done on the Azure compute nodes (initiating the IPv4 VPN connection) are not necessarily persistent across a node servicing by the Azure fabric controller. Thus, over the course of several days of a large deployment you’ll see nodes gradually losing connectivity with the license server because they’ve been serviced and the IPv4 connection was not re-started. To avoid this, you can define the IPv4 setup steps as a script and specify the script in the Node Template as part of the provisioning process (see Configure a Startup Script for Windows Azure Nodes).
Requirements
The procedures in this topic assume that you have the following prerequisites:
An on-premises head node running Windows HPC Server 2008 R2 SP2 or later
Windows Azure nodes already deployed and operational (see Deploying Windows Azure Nodes in Windows HPC)
Note: When you create the Azure Node template in the HPC Cluster Manager console, ensure that you enable Azure Connect. By enabling this option, the necessary Azure Connect setup is performed automatically at deployment.
Licensing server is operational
Junction box server is configured as follows:
- Junction box server can be on a physical machine or on a VM on the head node, license server, or another server
- Junction box is not joined to the domain
- Junction box has reliable internet connectivity
- Junction box has Internet Security and Acceleration (ISA) or other firewall client installed if required by your Enterprise network environment
- IPv6 is enabled on the junction box NIC
Steps
This section includes the following procedures:
- Install Azure Connector software on the junction box
- Create a new Azure Endpoint group
- Enable VPN on the junction box
- Configure IPv4 and IPv6 routing on the junction box
- Create a non-administrator user account on the junction box
- Configure IPv4 VPN client on each Windows Azure compute node
Install Azure Connector software on the junction box
Log on to the junction box as a local administrator.
Browse to http://windows.azure.com and log in with your Azure credentials.
In the Virtual Network view, select Groups and Roles, and then click Install Local Endpoint.

In the Install Windows Azure Connect Endpoint Software dialog box, click Copy Link to Clipboard.
Enable the Azure website to access your clipboard.
Paste the link into a new window in your internet browser and the click Run to install the Azure Endpoint software.
Follow the installation prompts to install Azure endpoint software. When installation is complete you’ll see a new icon in the notification try for the Endpoint with a right-click menu.
Note: Do NOT modify the connection or start the Azure Connect application! Continue with this procedure.In the Windows Azure management portal, verify that the newly installed endpoint appears in the Groups and Roles view.
Create a new Azure Endpoint group
In the Azure Management portal, in the Virtual Network view, click Create Group.

In the create group dialog box:
Provide a name for the group and optional description.
In the Enpoints list, add the junction box and the Azure compute instances on which you enabled Azure Connect
Select the Interconnected check box to allow connections between endpoints in the group.
Do not enter anything in the Connect to section of the dialog box.
Click Create.

Wait 5-20 minutes and then run the ipconfig command to verify that a new PPP network adapter is configured. The ipconfig output should include information similar to the following:
PPP adapter Windows Azure Connect Relay1 1:
Connection-specific DNS Suffix . :
IPv6 Address. . . . . . . . . . . : 2a01:111:3f00:xxxx:xxxx:xxxx:xxxx:xxxx
Default Gateway . . . . . . . . . :
Note: This adapter will NOT be visible in Windows Network Connection dialog.
You can test the connection using combinations of the following commands. Run these commands from the cluster head node, or from the junction box if it has the Microsoft HPC Pack client utilities installed.
- To enable IPv6 ping on all the Azure compute nodes:
clusrun /nodegroup:azurenodes netsh advfirewall firewall add rule name=^"Enable ICMPv6^" dir=in action=allow protocol=icmpv6 - To list the Azure names for each node along with the HPC Server “friendly name”:
clusrun /nodegroup:azurenodes /interleaved hostname - To force ping to use only IPv6 routes to the destination machine:
ping -6
- To enable IPv6 ping on all the Azure compute nodes:
Enable VPN on the junction box
- Add the Network Policy and Access Services role to the junction box:
Open the Server Manager console (ServerManager.msc).
In the navigation pane, select Roles.
Click Add Roles.
In the Add Roles Wizard, in the Server Roles tab, select Network Policy and Access Services.
In the Role Services tab, select both Remote Access Service and Routing.

Note: Select only Routing if the junction box is not installed with the same OS instance as the license server.
Complete the wizard and click Install.
- Configure for VPN and Start the RRAS service:
In Server Manager, in the navigation tree, expand Network Policy and Access.
Right-click Routing and Remote Access and then click Configure and Enable Routing and Remote Access.

In the Routing and Remote Access Server Setup Wizard, on the Configuration page, select Custom Configuration.
On the Custom Configuration page, select the VPN access check box.
Complete the Wizard and then click Start Service.
Configure IPv4 and IPv6 routing on the junction box
This procedure enables the local DHCP server on the junction box to provision IPv6 addresses to the Azure end of the VPN tunnel (to avoid setting static IP addresses). The procedure also enables the junction box to route IPv4 message to and from the licensing server on the Enterprise network.
In Server Manager, in the navigation tree, expand Routing and Remote Acess, and then expand the IPv6 node.
In IPv6, right-click General, and then click New Routing Protocol.
In the dialog box, select DHCPv6 Relay Agent. A new DHCPv6 Relay Agent node appears under IPv6 in the navigation tree.
Configure the IPv6 DHCP Relay Agent with the correct NIC and settings:
In the navigation tree, right-click DHPCPv6 Relay Agent and click New Interface.

In the dialog box, select the network interface that the junction box will use to access the license server.
Click OK to accept the defaults for the DHCP configuration.
Disable Router Manager for IPv6 and IPv4
In the navigation tree, in IPv6, select General. The views pane displays the IPv6 interfaces.
In the views pane, select the network interface that the junction box will use to access the license server.
Right-click the interface, and then click Properties.

In the properties dialog box, clear the Enable IPv6 router manager check box.
Use similar steps to disable router manager for IPv4.

Enable IPv6 Remote Access Server
In the navigation tree, right-click Routing and Remote Access, and then click Properties.
The properties dialog box appears.
In the General tab, select the IPv6 Remote access server check box. Do not select the IPv6 Router check box.

In the Security tab, select the Allow custom IPsec policy for L2TP connection check box and then specify a character string in the Preshared Key text box.
Note: This setting enables the encryption for the LT2P connection to be based on a pre-shared key - the character string. Make a note of the key because you will use it to configure the VPN client on the Azure compute nodes.
In the IPv4 tab, if you have more than one network adapter on the junction box, select the network adapter that you will use to access the license server.
Note: If you only have one network adapater on your junction box, skip this step (the option will not even be visible on the IPv4 tab, see screen shots below).
In the IPv6 tab, in IPv6 prefix assignment, type a random IPv6 prefix with 3 octets and ending in 2 colons (::). The prefix will be prepended to the IPv4 packets to and from the license server for their traversal within the IPv6 tunnel that is Azure Connect. For example: 2011:1234:5678::
In the IPv6 tab, if you have more than one network adapter on the junction box, select the network adapter that you will use to access the license server.

Click OK to save your changes.
When prompted, click Yes to restart the router and apply the new settings.
Use Network Policy Server MMC snap-in (even though NPS itself is not enabled) to disable encryption within the IPv4 VPN tunnel since the IPv6 Connector tunnel within which it exists is already encrypted (this reduces load on the junction box NIC and CPU):
In the navigation tree, in Routing and Remote Access, right-click Remote Access Logging & Policies and then click Launch NPS.
The MMC tool for Network Policy Server appears.
In the Network Policy Server MMC, in the navigation tree, right-click Network Policies and then click Properties.

In the properties dialog box, select the Settings tab.
Select Encryption, and then ensure that only the No encryption check box is selected.

Create a non-administrator user account on the junction box
The following procedure describes how to create a user account that will be used by the Windows Azure compute nodes to authenticate into the VPN connection. This user account requires dial-in permissions.
- Use one of the following methods to add a new user:
Run the following command at a command prompt window, where "relayUSER" is the account name, and "myPassword" is the password you want to use:
net user /add relayUSER myPasswordOr use the User Accounts settings in Control Panel:

- Grant dial-in permissions for the user account:
In Server Manager, in the navigation tree, expand the Configuration node, expand Local Users and Groups, and then select Users.
In the views pane, right-click the new user account you created and then click Properties.
In the properties dialog box, select the Dial-in tab.
In Network Access Permission, select the Allow access radio button.

Click OK.
Configure IPv4 VPN client on each Windows Azure compute node
The following steps must be taken on EACH Azure compute node to install and initiate an IPv4 VPN connection to the junction box. These steps must be repeated in the following cases:
- Each time a node is serviced (moved) by the Azure fabric controller
- Each time a node is stopped and started using the HPC Server Cluster Manager console.
- Each time an Azure node is rebooted (VPN initiation step only).
In the Windows Azure management portal, select the Hosted Services, Storage Accounts & CDN view.
In the views pane, select a compute node instance and then click Connect to start a Remote Desktop connection with the node.

On the compute node, start the VPN connection wizard: Type "vpn connect" in the Start menu and then in the search results, click Set up a virtual private network (VPN) connection.

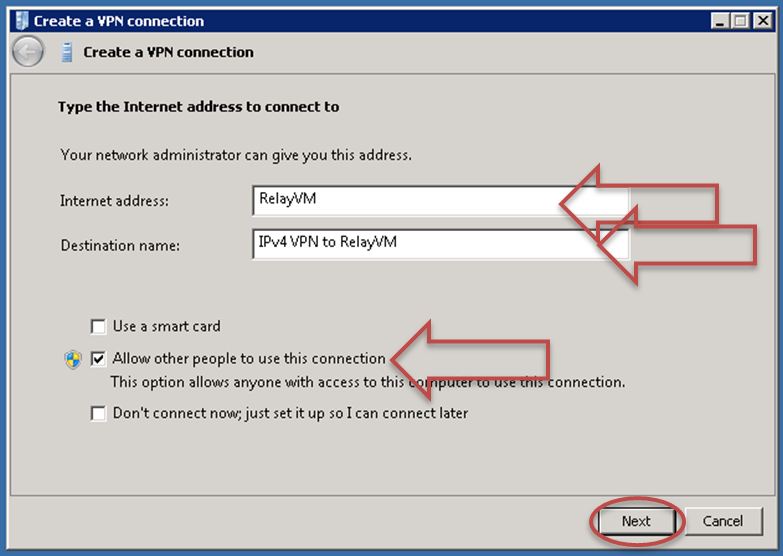
In the Create a VPN connection dialog box, specify the settings as follows:
- Internet address - specify the name of the junction box.
- Destination name - specify a lable for the VPN.
- Select the Allow other people to use this connection check box to enable all Azure cluster users from your Enterprise to use this VPN to access your Enterprise license server.
- Click Next.
For the user name and password, specify the non-administrator credentials that you created earlier and then click Connect.

Verify the VPN connection status.

Repeat these steps on each Windows Azure compute node.
CONGRATULATIONS, your Azure nodes can now access your Enterprise license server.