SharePoint 2010: Customize Fast Search to Crawl Related Data (Lookup Columns)
How to Use This Guide
This guide has the three sections regarding problem, solution and results. For better understanding, review them in order, as each section builds on concepts presented in previous sections.
Intended Audience
Audience should have a fair understanding of following :
- Microsoft SharePoint Server 2010
- FAST Search for SharePoint Server 2010
- Visual Studio 2010 for writing WCF Services
Introduction / Background
This guide is designed to highlight the solution for crawling the related data in SharePoint Server 2010 Fast Search. It provides an overview of the problem statement, a solution for the issue, and concludes with implementation of the solution suggested. 
Problem Statement
This section describes why exactly we need relational crawled properties. It refers to a practical scenario where we need to address the crawled property for related data.
Use Case
Suppose we have 4 SharePoint lists names Cities, Universities, Courses & Colleges

The data for the above mentioned lists are as follows:


What are we getting
As seen from above schema, there is no information related to city in the Colleges list. So now when user searches any record related to any city, FAST Search will retrieve the record from Cities list only.
What we want
We want to achieve that, when a user searches for any city, then related records must also be retrieved (i.e. from Universities list and Colleges list also, as City is a lookup column in Universities list and University column is a lookup column in Colleges list.)

Proposed Solution
The pipeline extensibility of FAST Search has been customized and is called Processing Component. The item processing pipeline prepares an item from a content source for indexing and searching. Additional searchable metadata has been generated from the content. This preparation includes text extraction, language detection, and tokenization.
The following diagram depicts the architecture of how pipeline extensibility in FAST Search works. It shows the standard sequence of ‘stages’ from crawl to Index.
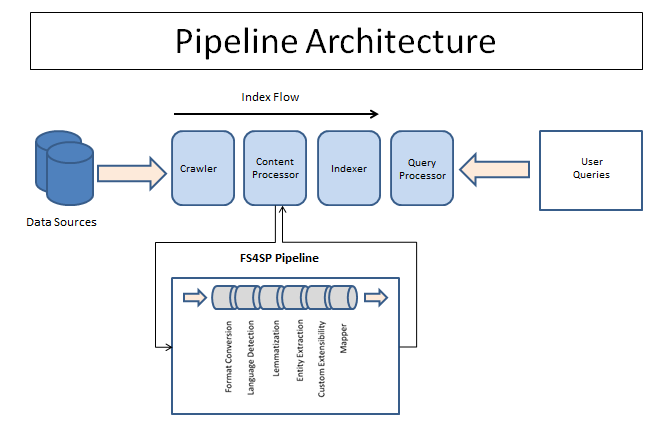
- The pipeline extensibility interface enables us to run custom processing commands for each item that is fed through the pipeline.
- A command takes a set of crawled properties as input, processes them, and outputs another set of crawled properties.
- The communication between the item processing pipeline and custom command occurs by using temporary XML files.
- The pipeline extensibility processing takes place before crawled properties are mapped to managed properties.
- The input crawled properties may be metadata retrieved from the content source, or custom XML item processing can be used; on retrieved XML items to create crawled properties from the XML data.
- Pipeline Extensibility Configuration Schema: specifies the XML configuration file format that is used to integrate an external item processing component.

We can solve this by customizing the pipeline extensibility of FAST Search (creating Pipeline Extensibility Stage), which enables us to run custom processing commands for each item that is fed through the pipeline. This helps to work on the indexed data before it is made searchable
Solution Implementation
According to the problem statement, when a user searches for a city, the related records should also be retrieved.
The following steps needs to be performed in order to get this solution in place:
Step 1: Create WCF Service
- Fetch the list &column details from a web config file
private static  readonly string  SiteURL =    ConfigurationManager.AppSettings["SiteURL"];
private static  readonly string  List1 = ConfigurationManager.AppSettings["List1"]; //Colleges List
private static  readonly string  List2 = ConfigurationManager.AppSettings["List2"]; //Universities List
private static  readonly string  List1ColumnName = ConfigurationManager.AppSettings["List1ColumnName"]; //University column
private static  readonly string  List2ColumnName = ConfigurationManager.AppSettings["List2ColumnName"]; //City Column
private const  stringSeprator = ";#";
- The below mentioned entries are placed in the web config file
<appSettings>
<addkey="SiteURL"value="http://servername/:PortNumber"/>
<addkey="List1"value="Colleges"/>
<addkey="List2"value="Universities"/>
<addkey="List1ColumnName"value="University"/>
<addkey="List2ColumnName"value="City"/>
</appSettings>
- The GetMessage method of the web service finds and returns the related data (city value) from the lists mentioned above.
objItem = web.Lists[List1].GetItemById(itemID);
strvalue = Convert.ToString(objItem[List1ColumnName]);
string[] arrUnivValues = strvalue.Split(newstring[] { Seprator }, StringSplitOptions.None);
if (arrUnivValues.Length> 1)
{
intunivItemId = Convert.ToInt32(arrUnivValues[0]);
objItem = web.Lists[List2].GetItemById(univItemId);
strvalue = Convert.ToString(objItem[List2ColumnName]);
string[] arrCityValues = strvalue.Split(newstring[] { Seprator },   StringSplitOptions.None);
if (arrCityValues.Length> 1)
    {
strCityValue = arrCityValues[1];
    }
}
Step 2: Create EXE (Custom Stage)
- Create a console application, and add a reference to the WCF service created above
- DoProcessing method takes two arguments, the input file to read, and the output file to write. These argumentsare passed from the document processor pipeline in FAST, and this is how custom stages work. They read in an xml file with the data to process, and write out a new one with the new/modified data. You don't need to clean up these files yourself as that is part is handled by FAST
private static  int Main(string[] args)
{
    try
    {
CustomCode objCustomCode = new  CustomCode();
objCustomCode.DoProcessing(args[0], args[1]);
    }
catch (Exception e)
    {
// This will end up in the crawl log, since exit code != 0
Console.WriteLine("Failed: " + e.Message + "/" + e.StackTrace);
return 1;
    }
return 0;
 }
- The code which updates the relational data in the crawled property uses the XDocument class and linq to xml for reading and writing the input and output data
public void  DoProcessing(string  inputFile, string  outputFile)
{
bool status = false;
XDocument inputDoc = XDocument.Load(inputFile);
string strCityValue = string.Empty;

var listID = from cp in  inputDoc.Descendants(CRAWLED_PROPERTY)
where cp.Attribute(PROPERTY_SET).Value.Equals (CrawledCategorySharePoint_PropertySetID) && cp.Attribute(PROPERTY_NAME).Value == CrawledProperty_SPList &&
cp.Attribute(VAR_TYPE).Value == VAR_TYPE_TEXT selectcp.Value;

var itemID = from cp in  inputDoc.Descendants(CRAWLED_PROPERTY)
where cp.Attribute(PROPERTY_SET).Value.Equals(CrawledCategorySharePoint) &&
cp.Attribute(PROPERTY_NAME).Value == CrawledProperty_ItemID &&
cp.Attribute(VAR_TYPE).Value == VAR_TYPE_INTEGER selectcp.Value;
- Finding city value using web service and adding it to crawled property
Element outputElement = new  XElement(DOCUMENT);
if ((listID != null && listID.First().Length > 0) && (itemID != null&&itemID.First().Length > 0))
{
Logger.WriteLogFile(inputFile, FILE_SUFIX_INPUT);
Service1Client client = newService1Client();
client.ClientCredentials.Windows.AllowNtlm = true;
client.ClientCredentials.Windows.AllowedImpersonationLevel = System.Security.Principal.TokenImpersonationLevel.Impersonation;
try
    {
        status = true;
strCityValue = client.GetMessage(listID.First(), Convert.ToInt32(itemID.First()));
client.Close();
}
catch (Exception ex)
    {
        strCityValue = ex.Message;
if (client.State == System.ServiceModel.CommunicationState.Opened)
client.Close();
}
outputElement.Add(newXElement(CRAWLED_PROPERTY,
newXAttribute(PROPERTY_SET, CrawledCategorySharePoint),
newXAttribute(PROPERTY_NAME, CrawledProperty_City),
newXAttribute(VAR_TYPE, 31), strCityValue)
- Build the custom stage code and place the EXE and config file at some location (Say C:\PipelineModules)
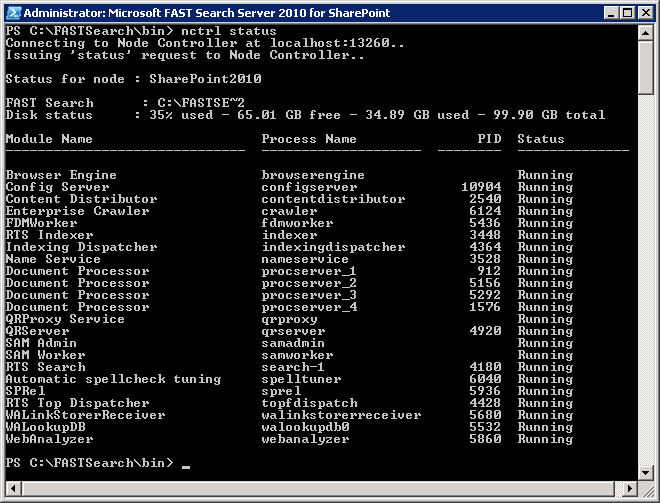
- Check the document processors status using the command nctrl status. Verify that all processors are in running state
Step 3: Configure PipelineExtensibility.xml
Edit the PipelineExtensibility.xml file and update it as shown below to include the custom code details and crawled properties details
<PipelineExtensibility>
<Runcommand="C:\pipelinemodules\CustomCode.exe %(input)s %(output)s">
<Input>
<CrawledPropertypropertySet="158d7563-aeff-4dbf-bf16-4a1445f0366c"varType="31"propertyName="ows_taxId_SPLocationList" />
<CrawledPropertypropertySet="00130329-0000-0130-c000-000000131346"varType="20"propertyName="ows_ID" />
</Input>
<Output>
<CrawledPropertypropertySet="00130329-0000-0130-c000-000000131346"varType="31"propertyName="ows_city"/>
</Output>
</Run>
</PipelineExtensibility>
Step 4: Reset the document processors
After saving the file reset the document processors in order to read the updated configuration with the command:psctrl reset
Step 5: Start FULL Crawl
- Custom stage has been deployed now. You can check the effect by starting new FULL Crawl, which will update the crawled property
- After crawling is done, we can check our crawled property by running the following command: Get-FASTSearchMetadataCrawledProperty -Name "ows_City"

Step 6: Create Managed property and map to crawled property
- Create new Managed Property named City, and map the crawled property ows_city to it. This managed property will be used while searching

- We can also check our log folder for verification of crawled data, at the location: C:\Users\spadmin\AppData\LocalLow\pipelinelog

Output File’s content
<?xmlversion="1.0"encoding="utf-8"?>
<Document>
<CrawledPropertypropertySet="00130329-0000-0130-c000-000000131346"propertyName="ows_city"varType="31"></CrawledProperty>
</Document>
Input File’s content:
<?xmlversion="1.0"encoding="UTF-8"?>
<Document>
<CrawledPropertypropertySet="158d7563-aeff-4dbf-bf16-4a1445f0366c"varType="31"propertyName="ows_taxId_SPLocationList">{fc03eeb1-56c7-4dfd-af1e-0a22dc06b4d2}</CrawledProperty>
<CrawledPropertypropertySet="00130329-0000-0130-c000-000000131346"varType="20"propertyName="ows_ID">2</CrawledProperty>
</Document>
Results / Conclusion
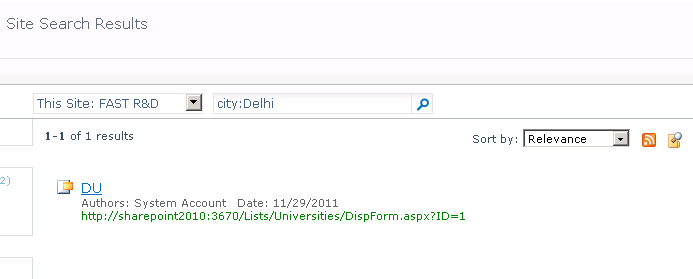
After successfull configuration of FAST Search and customizing Pipeline extensiblity, browse the site and check search results.
Searching Delhi as the city shows DU as the university in Delhi, as well as Kirori Mal College as the college in Delhi.

About Authors
- Nitin K. Gupta - SharePoint Consultant since 2004, developed and designed serveral solutions in Sharepoint 2003, MOSS 2007, Sharepoint 2010, WSS 3.0 and Microsoft CRM 3.0. Currently working as Consultant, Techperspect Softwares. Noida, India.
http://in.linkedin.com/in/nitingupta4u - Parveen Siwach - SharePoint Developer, developed solutions in Sharepoint MOSS 2007, Sharepoint 2010.
- Ankit Kumar Saxena - MCTS Certified SharePoint consultant with around 6 years of extensive hands on experience on custom application development around customizing SharePoint (MOSS and SharePoint 2010). Involved in extensive usage of SharePoint object model to build custom site definitions, features, web parts, customising search, infopath forms and workflows. Consulting experience with Big 5 firms (Three Pillar Global, KPMG Consulting, EMI Music, Dixons Group, HCL Technologies).