Troubleshooting the FIM Group Management Outlook 2007 Add-In
After having much difficulty with this myself, I thought I'd post some of the gotchas around making the Outlook add-in work for FIM 2010 Group Management scenarios.
Before you start, make sure the following has been verified:
- Both the FIM Service account and your requestors are on Exchange 2007 end to end (refer to this thread)
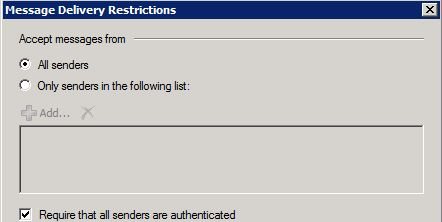
- Follow the procedure entitled "Configuring FIM Service service Exchange mailbox" in the FIM 2010 Best Practices guide - not having "Require that all senders are authenticated" will cause issues
- If you are operating in a cross-forest environment, the forests must have trusts in place and operational
- Ensure that the email address for the FIM Web Service account was entered properly during the FIM 2010 Add-ins and extensions installation, or configure this via group policy
Configuring the FIM Client via AD Group Policy
While you can rely on configuring the clients at install time, it is recommended that you
- From your FIM 2010 distribution, locate the Group Policy Templates – there should be two files:
- ForefrontIdentityManager.admx
- en-US\ForefrontIdentityManager.adml
- For information on how to create the Central Store for Group Policy templates, see KB929841, otherwise copy these two files to your local Policies folder and edit the GPO from there
NOTE: ADMX templates must be edited from a 2008/Vista/7 system
- Open Group Policy Management snap-in and create a new Policy (Create a GPO in this domain, and Link it here), and then edit the new policy
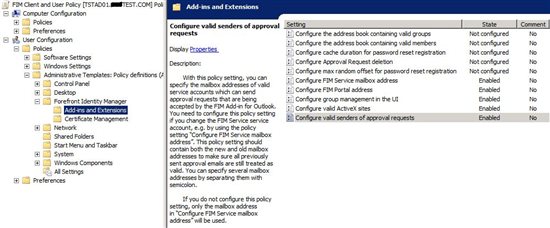
- Expand Computer Configuration/Policies/Administrative Templates/Forefront Identity Manager/Add-ins and Extensions
- Under Configure FIM Service address, click Enabled, and then enter the address of your FIM portal. If you are running in a load balanced/farm configuration then this is the load balanced host header with the 5725 port designated (http://fim:5725)
- Expand User Configuration/Administrative Templates/Forefront Identity Manager/Add-ins and Extensions
- You should configure the following settings:
- Configure FIM Service mailbox address – this is the SMTP address(es) of your FIM WS (svc.fimws@domain.com)
- Configure FIM Portal address – this is the URL users will be directed to if they click the "Group Management Website" link in the Outlook ribbon; it should reflect your portal address (http://fim/identitymanagement/aspx/groups/MyDLs.aspx)
- Configure group management in the UI – enables or disables the "Group Management Website" link in the Outlook ribbon
- Configure valid ActiveX sites – a semi-colon delimited list of hosts that the user may run the FIM ActiveX control (for password reset and registration) from (fim;fim.domain.com)
- Configure valid senders of approval requests – this is the SMTP address(es), semi-colon delimited, of mailboxes that are or have (in the event you've altered the email address) hosted the FIM Web Service.
NOTE: Both Configure FIM Service mailbox address and Configure valid senders of approval requests should have the same entries – do not configure one and not the other.
You should also highly consider adding your FIM portal address to the list of Intranet sites and pushing this out via group policy as well.
Common Issues
Approve or Reject buttons do not appear in the Outlook form
Possible issues include:
- FIM Service account or recipient is not on an Exchange 2007 server
- Valid sender (FIM WS) not configured during installation or via Group Policy
Ensure that all mailboxes are on Exchange 2007 and that the senders are configured properly via policy.
Approve and Reject button only appears on the Preview pane
The buttons appear in the preview pane, but not in the expanded email, nor do the context sensitive options appear when right clicking the email in the list view. Try this:
- From Outlook, select Tools, Trust Center
- From Trust Center, select Add-ins and highlight the Microsoft Forefront Identity Manager Add-in
- With the Add-in selected, ensure that "COM Add-ins" is selected in the Manage dropdown and click Go
- Uncheck the box next to the FIM add-in, click OK and then close Outlook
- Launch Outlook again – the add-in will be reinstalled and the feature should work
Forefront Identity Manager service error: Cannot accept approval
During a request approval process you may receive an email back from FIM with the following text:
Your response to the request for approval was received, but some errors occurred in processing it.
We were unable to approve or reject the request(s) to which you were responding.
Please contact your Forefront Identity Manager support personnel for assistance.
The request may have even succeeded, but per the Best Practice recommendation, ensure that Require that all senders are authenticated has been checked on the FIM Web Service mailbox.
We were unable to add these members to groups
You get the Forefront Identity Manager service response: Add member(s) to group(s) email and none of the members could be added. Validate the following:
- Ensure that all requested approvers (owners of the group) have valid email addresses on their portal profile
- The group you are requesting access to is not a calculated or "manager" group
If the requested Approver (the owner of the group that requires approval) does not have an email attribute specified in the portal then you will get this error.
Validating Group Policy
You can validate that the FIM policy is applying by opening up regedit and validating the following entries:
HKEY_CURRENT_USER\Software\Policies\Microsoft\Forefront Identity Manager\2010\Add-ins
- MonitoredAccountName
- PortalUrl
- ShowGroupManagementUi
- ValidApprovalRequestSenders
HKEY_LOCAL_MACHINE\SOFTWARE\Policies\Microsoft\Forefront Identity Manager\2010\Extensions\Intranet
- Address
See Also
Note
To provide feedback about this article, create a post on the FIM TechNet Forum.