Using Hotfix Uninstall DaRT 7.0 to Uninstall a Hotfix
Tip : Get the RSS feed or e-mail to this Wiki page to get automatic notification when it is updated!
This article was originally written in: http://social.technet.microsoft.com/wiki/contents/articles/5926.utilizando-o-hotfix-uninstall-do-dart-7-0-para-desinstalar-um-hotfix-pt-br.aspx
Goal
This article aims to demonstrate how to uninstall a hotfix using the Hotfix Uninstall the DaRT 7.0 (Microsoft Diagnostics and Recovery Toolset) quickly and easily.
Applies to:
- Windows 7 32-Bit;
- Windows 7 64-Bit;
- Windows Server 2008 R2.
Overview Hotfix Uninstall
The Hotfix Uninstall Wizard allows you to remove hotfixes or service packs of Windows operating system on the computer you are repairing. Use this tool when a hotfix or service pack is preventing you from booting the operating system.
Note
It is recommended that you uninstall the hotfix one at a time, even if the tool allows you to uninstall more than one.
Using Hotfix Uninstall
1 - Insert the CD / DVD DaRT 7.0 drive in the computer that you will uninstall the hotfix. Will load the dialog box as shown in Figure 1.1.
Note
If you have not created the CD / DVD 7.0 DaRT see the articles below:
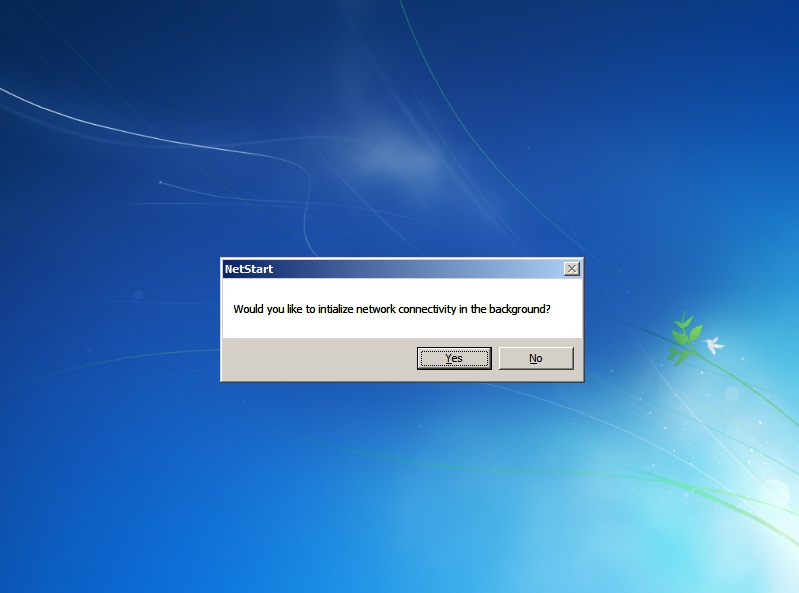
Figure 1.1
2 - In the dialog box netstart click Yes if you want to start the network connectivity in the background. In this article we will click Yes . Will load the dialog box as shown in Figure 1.2.

Figure 1.2
3 - In the dialog box netstart click Yes if you want to remap the drive letters to match the mappings of the target operating system. In this article we will click Yes . Will load the dialog box as shown in Figure 1.3.

Figure 1.3
4 - In the dialog box System Recovery Options select the keyboard layout and click Next . Will load the dialog box as shown in Figure 1.4.

Figure 1.4
5 - In the dialog box System Recovery Options select Use recovery tools That Can Help fix problems starting Windows. Select an operating system to repair and make sure that the system operating is listed below and then click Next . Will load the dialog box as shown in Figure 1.5.

Figure 1.5
6 - In the dialog box System Recovery Options select the Microsoft Diagnostics and Recovery Toolset . Will load the dialog box as shown in Figure 1.6.

Figure 1.6
7 - In the window Diagnostics and Recovery Toolset click the Hotfix Uninstall . Will load the dialog box as shown in Figure 1.7.
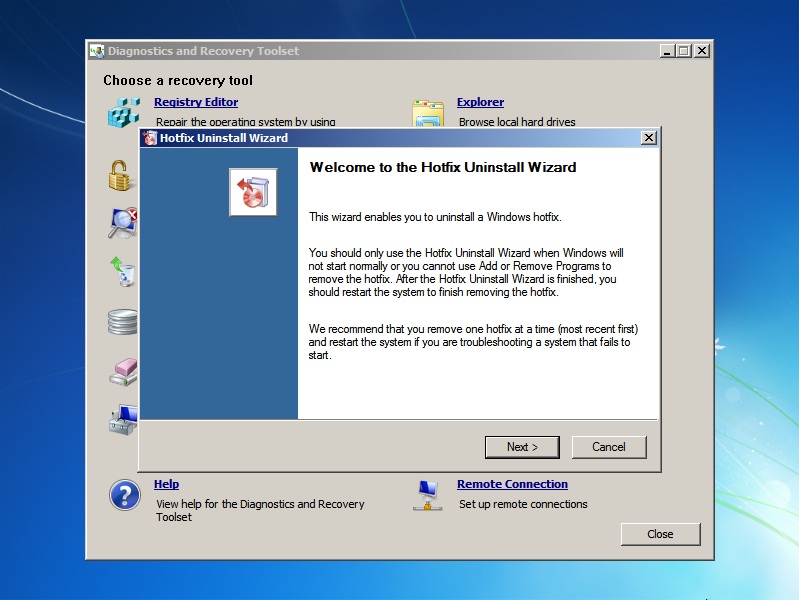
Figure 1.7
8 - In the dialog box Welcome to the Hotfix Uninstall Wizard click Next to continue. Will load the dialog box as shown in figure 1.8.

Figure 1.8
9 - In the dialog box Selection hotfix select the hotfix you want to uninstall and then click Next . Will load the dialog box as shown in figure 1.9.

Figure 1.9
10 - box Hotfix Uninstall Results check the status of hotfix selected to be uninstalled and then click Next .Will load the dialog box as shown in Figure 1.10.

Figure 1.10
11 - In the dialog box Completing the Hotfix Uninstall Wizard click Finish to close the wizard.
12 - In the window Diagnostics and Recovery Toolset click the Close box and Dialog System Recovery Options then click Restart .
13 - Remove the CD / DVD of DaRT 7.0 and then wait for Windows to load.
References
Related Articles
- Installing DaRT 7.0 (en-US)
- Creating a Recovery Image with DaRT 7.0 (en-US)
- Using the Locksmith DaRT 7.0 to Change the Local Administrator Password (en-US)
Other Languages
This article is also available the following languages:
This article was originally written by:
Luciano Lima
** [MVP Enterprise Security]-[MCSA Security]-[MCSE Security]
**http://lucianolimamvp.wordpress.com
http://twitter.com/LucianoLima_MVP