Windows Home Server Router Setup
Accessing computers and files on your home or business network from a remote location is a popular feature of Windows Home Server. To enable remote access, you need to configure your router to open certain ports so network traffic will flow properly.
If your router is not listed, use the General Directions.
Important: Verify Your Settings!
You should verify any settings in this document to ensure your router is properly directing and filtering Internet traffic as desired.
Overview
The following is a diagram of a typical home or small business network.

A typical home or small business network consists of the following:
- An Internet connection: provided by your Internet Service Provider (ISP).
- An Internet connection device: usually a cable or DSL modem provided by your ISP. Some ISPs provide a device that combines a modem with a broadband router.
- A broadband router: a device that routes network traffic from your local network to the Internet. Small business routers usually provide firewall services requiring port configuration. Some routers support UPnP to simplify configuration. The router may also function as a wireless access point.
- Client computers: connect to each other through a switch (sometimes part of the router) and to the Internet through the broadband router. Multiple switches may be used if you connect more than a few desktop and notebook computers.
- A home or small business server: provides file sharing and remote access.
Reality Check
Setting up a network means configuring settings on a variety of devices. Some familiarity with networking is recommended.
If the terms ping, static IP address, DHCP, firewall ports, and UPnP are a foreign language for you, consider having a friend or consultant help you set up your network.
The following links provide information on home networking:
http://www.wegotserved.com/2009/06/22/get-started-configure-windows-home-server-remote-access/
http://windows.microsoft.com/en-US/windows-vista/Setting-up-a-home-network
http://compnetworking.about.com/od/tcpip/TCPIP_Transmission_Control_Protocol_Internet_Protocol
General Directions
Network Configuration
Before setting up your router, you need to set up your network. There are three steps for you to complete.
First Step - Determine IP Address
The first step in configuring your network is to determine the IP addresses of your Windows Home Server and your router (gateway).
Log on to your Windows Home Server.
Open a command prompt - click Start, point to All Programs, point to Accessories, and then click Command Prompt...
Type: ipconfig/all, press Enter, and note the IP address and Default Gateway as in the screenshot below:

In this example, the following information is highlighted:
- Physical address: the MAC address of the network adapter. This number is useful when you need to reserve the dynamic IP address of the Windows Home Server. You may use the MAC address in the Third Step.
- DHCP enabled: Yes = this network adapter is receiving an IP address dynamically from the router (or other DHCP server). No = this network adapter has a static IP address entered manually.
- IP address: the IP address of the Windows Home Server.
- Subnet mask: typically 255.255.255.0
- Default gateway: the IP address of the router.
- DNS servers: the IP address of the DNS server. Typically provided by your ISP.
Second Step - Check Communication
Next, determine if your Windows Home Server and router can communicate.
- Log on to your Windows Home Server.
- Open a command prompt - click Start, point to All Programs, point to Accessories, and then click Command Prompt...
- Type: ping 192.168.1.1, and press Enter. Substitute the address of your router for 192.168.1.1.
If your router and home server can communicate, you should see results like the following:

If you are not able to determine your IP addresses, or if you are not able to determine or correct network communication issues, now’s the time to find a friend or consultant to assist you.
Third Step - Set Static IP Address
The final step in configuring your network is to verify that your Windows Home Server has a static IP address. Typical home routers have DHCP enabled. Your home server receives its IP address from the router and, because it is a dynamic IP address, the home server IP address can change. A changing IP address will break router firewall settings you set up as directed later in this article. A static IP address for your home server will ensure that firewall settings will continue to work and network traffic will continue to reach your home server.
There are two ways to set a static IP address for your home server.
- In some routers, using the MAC address determined in the First Step, you can reserve the IP address of Windows Home Server. See your router documentation to see if this method is supported and for instructions.
- In all cases, you can set the IP address of Windows Home Server to be a static IP address. See the following link for directions: http://wiki.wegotserved.com/index.php?title=Set_up_Static_IP_for_Windows_Home_Server
Once you have determined IP addresses, verified communication, and set Windows Home Server to a static IP address, you are ready to configure your router to allow remote access.
UPnP Router Configuration
Many broadband routers designed for home use support Universal Plug and Play (UPnP) – a standard that simplifies router setup. Check your product documentation for UPnP support. If UPnP is supported, Windows Home Server may be able to automatically configure your broadband router.
If your router supports UPnP, check to see if UPnP is enabled.
- Open your Web browser, and then connect to the configuration Web page for your router. Usually the Web page is the IP address of your router which you determined in the above steps.
- If necessary, type the user name and password to log on to the configuration Web page. Some routers include a default user name, password, and IP address on the underside of the router. For more information, see the documentation for your router.
- Go to the UPnP setting page on your router and verify that UPnP is enabled.
- Save the configuration on your router, and then close the browser. If your router needs to restart, wait until it restarts completely before you proceed.
- On the Windows Home Server Remote Access Settings page, click Repair. The configuration tests run again.
Manual Router Configuration
If your router does not support UPnP, you must manually configure your router to forward the following ports to the IP address of your Windows Home Server:
| Service or Protocol | Port |
| HTTP | TCP 80 |
| HTTPS | TCP 443 |
| Remote Desktop Protocol (RDP) | TCP 4125 |
- HTTP is the protocol that your Web browser uses to view Web pages. You use this protocol to view your default Web page for Windows Home Server.
- HTTPS is the protocol that secures communication from a Web browser to your server. You use this protocol to view your Remote Access Web page for Windows Home Server.
- Remote Desktop Protocol is the service that is used to connect to your home computers via the Remote Access Computers tab.
A typical router-configuration page includes a table that looks similar to the following one, assuming the IP address of your home server is 192.168.1.3:
Port forwarding rules
| IP Address | Protocol (TCP/UDP) | Schedule | Inbound Filter |
| 192.168.1.3 | TCP 80 | Always | Allow All |
| 192.168.1.3 | TCP 443 | Always | Allow All |
| 192.168.1.3 | TCP 4125 | Always | Allow All |
To Manually Configure Your Router
- Open your Web browser, and then connect to the configuration Web page for your router. Usually the Web page is at the IP address of your router.
- If necessary, type your user name and password to log on to the configuration Web page. Some routers include a default user name, password, and IP address on the underside of the router. For more information, see the documentation for your router.
- Disable UPnP on your router.
- Find the port forwarding configuration page on your router. For more information, see the documentation for your router.
- Type the necessary information to forward TCP port 80, TCP port 443, and TCP port 4125 to the IP address of your home server. The IP address of your home server appears on the Remote Access Settings page.
- Save the port-forwarding configuration on your router, and then close the browser. If your router needs to restart, wait until it restarts completely before you proceed.
- On the Remote Access Settings page, click Repair. The configuration tests run again.
Configure the Linksys BEFSR41 for Remote Access

Model: BEFSR41
Version: 4.1
Firmware: 1.04.09
http://homesupport.cisco.com/en-us/wireless/lbc/BEFSR41?referrer=www.linksysbycisco.com
Configure Your Network
Follow the first two steps in the General Directions to verify your network is properly configured. Then, configure your home server with a static IP address.
Reserve an IP Address
To set a static IP address for Windows Home Server
See the following links for directions:
- http://www.homeserverland.com/wiki/w/whs/assign-static-ip-address.aspx
- http://wiki.wegotserved.com/index.php?title=Set_up_Static_IP_for_Windows_Home_Server
UPnP Router Configuration
The Linksys BEFSR41 broadband router supports UPnP – a standard that simplifies router setup. If you enable UPnP in the Linksys BEFSR41, Windows Home Server may be able to automatically configure your remote access settings.
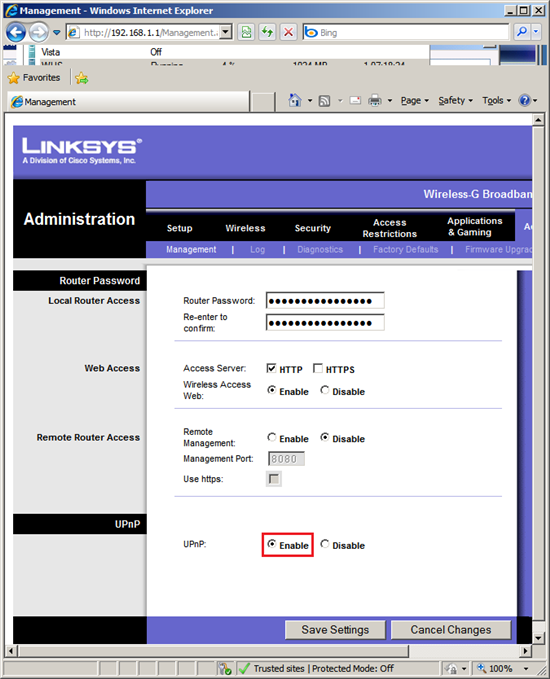
- Open the Web browser on your computer and enter the address for the Linksys router in the address field. The default IP address is 192.168.1.1.
- At the login screen, leave the User Name field blank and enter the router password. The default password is admin.
- Click the Administration tab, the Management page should be selected. If not, click the Management tab.
- For UPnP, click Enabled, and then click Save Settings.
- Close the Web browser.

With UPnP enabled, open the Windows Home Server Console, click Settings, click Remote Access, and then click Repair. Windows Home Server will attempt to automatically configure the Linksys router to forward Web site requests to your home server.
Manual Router Configuration
If you prefer to not use UPnP, you must manually configure your router to forward the following ports to the IP address of your Windows Home Server:
| Service or Protocol | Port |
| HTTP | TCP 80 |
| HTTPS | TCP 443 |
| Remote Desktop Protocol (RDP) | TCP 4125 |
- HTTP is the protocol that your Web browser uses to view Web pages. You use this protocol to view your default Web page for Windows Home Server.
- HTTPS is the protocol that your Web browser uses to view secure Web pages. You use this protocol to view your Remote Access Web page for Windows Home Server.
- Remote Desktop Protocol is the service that is used to connect to your home computers via the Remote Access Computers tab.
To manually configure your router
- Open the Web browser on your computer and enter the address for the Linksys router in the address field. The default IP address is 192.168.1.1.
- At the login screen, leave the User Name field blank and enter the router password. The default password is admin.
- Find the screen with UPnP settings and disable UPnP.
- Click the Applications and Gaming tab, the Port Range Forwarding page should be selected. If not, click the Port Range Forwarding tab.
- Enter the settings as in the screenshot below. The IP address should be the IP address of your home server.
- Click Save Settings, and then close the Web browser.

With port forwarding manually configured, open the Windows Home Server Console, click Settings, click Remote Access, and then click Repair. Windows Home Server will run the configuration test to verify network settings.
Configure the Netgear RP614 for Remote Access

Model: RP614
Version: 4
Firmware: 1.0.2_06.29
http://www.netgear.com/Products/RoutersandGateways/WiredRouters/RP614.aspx
Configure Your Network
Follow the first two steps in the General Directions to verify your network is properly configured. Then, configure your home server with a static IP address.
Reserve an IP Address
There are two ways to set a static IP address for your home server: reserve an IP address on the Netgear RP614 router, or set the IP address of the home server to be a static IP address.
To reserve an IP address
- Open the Web browser on your computer and enter the address for the Netgear router in the address field. The default IP address is 192.168.1.1.
- At the login screen, enter the user name and password. The default user name is admin. The default password is password.
- Under Advanced, click LAN IP Setup.
- Under Address Reservation, click Add.
- Follow the directions in the Help section. Use the MAC address from the First Step.
- Close the Web browser.
To set a static IP address for Windows Home Server
See the following links for directions:
- http://www.homeserverland.com/wiki/w/whs/assign-static-ip-address.aspx
- http://wiki.wegotserved.com/index.php?title=Set_up_Static_IP_for_Windows_Home_Server
UPnP Router Configuration
The Netgear RP614v4 broadband router supports UPnP – a standard that simplifies router setup. If you enable UPnP in the Netgear RP614v4, Windows Home Server may be able to automatically configure your remote access settings.
Open the Web browser on your computer and enter the address for the Netgear router in the address field. The default IP address is 192.168.1.1.
At the login screen, enter the user name and password. The default user name is admin. The default password is password.
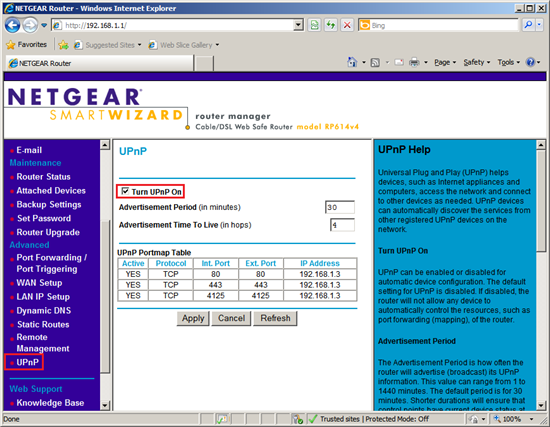
Under Advanced, click UPnP.
Click Turn UPnP On, and then click Apply.
Configure Windows Home Server settings. Open the Windows Home Server Console, click Settings, click Remote Access, and then click Repair. Windows Home Server will attempt to automatically configure the Netgear router to forward Web site requests to your home server.
Come back to the Netgear UPnP page, and then click Refresh. If UPnP was successfully configured you should see the three ports opened in the screenshot below.
Close the Web browser.
Manual Router Configuration
If you prefer to not use UPnP, you must manually configure your router to forward the following ports to the IP address of your Windows Home Server:
| Service or Protocol | Port |
| HTTP | TCP 80 |
| HTTPS | TCP 443 |
| Remote Desktop Protocol (RDP) | TCP 4125 |
- HTTP is the protocol that your Web browser uses to view Web pages. You use this protocol to view your default Web page for Windows Home Server.
- HTTPS is the protocol that your Web browser uses to view secure Web pages. You use this protocol to view your Remote Access Web page for Windows Home Server.
- Remote Desktop Protocol is the service that is used to connect to your home computers via the Remote Access Computers tab.
To manually configure your router
Open the Web browser on your computer and enter the address for the Linksys router in the address field. The default IP address is 192.168.1.1.
At the login screen, enter the user name and password. The default user name is admin. The default password is password.
Find the screen with UPnP settings and disable UPnP.
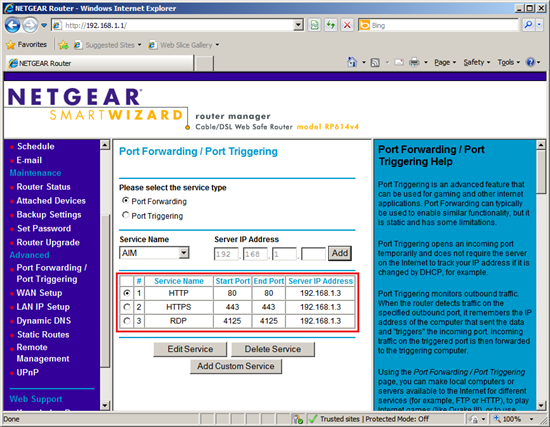
Under Advanced, click Port Forwarding / Port Triggering.
Under Service Name, click HTTP, enter the server IP address, and then click Add.
Click Add Custom Service, and then enter the following settings:
Service Name: HTTPS
Service Type: TCP
Starting Port: 443
Ending Port: 443
Server IP Address: your server IP address
Click Apply.
Click Add Custom Service, and then enter the following settings:
Service Name: RDP
Service Type: TCP
Starting Port: 4125
Ending Port: 4125
Server IP Address: your server IP address
Click Apply.
Close the Web browser.
With port forwarding manually configured, open the Windows Home Server Console, click Settings, click Remote Access, and then click Repair. Windows Home Server will run the configuration test to verify network settings.
Configure the Sonicwall TZ170 for Remote Access

Model: TZ170
Version: Standard
Firmware: SonicOS Standard 3.1.6.3-4s
http://www.sonicwall.com/us/support/3134.html
Configure Your Network
Follow the first two steps in the General Directions to verify your network is properly configured. Then, configure your home server with a static IP address.
Reserve an IP Address
There are two ways to set a static IP address for your home server: reserve an IP address on the Sonicwall TZ170 router, or set the IP address of the home server to be a static IP address.
To reserve an IP address
Open the Web browser on your computer and enter the address for the Sonicwall router in the address field. The default IP address is 192.168.1.1.
At the login screen, enter the user name and password. The default user name is admin. The default password is password.
Click Network, and then click DHCP Server.
Verify that Enable DHCP Server is checked.
Under Current DHCP Leases, you should see the home server in the list.
Under DHCP Server Lease Scopes, click Add Static.
Ensure DHCP Lease time set to 1440 minutes.
Enter the following settings:
Entry Name: type text to identify your home server.
Static IP Address: type an IP address not in the DHCP scope. This will be the IP address of your home server.
Ethernet Address: select the MAC address of the network adapter of your home server. See the First Step.

Click OK, and then click Apply.
To set a static IP address for Windows Home Server
See the following links for directions:
http://www.homeserverland.com/wiki/w/whs/assign-static-ip-address.aspx
http://wiki.wegotserved.com/index.php?title=Set_up_Static_IP_for_Windows_Home_Server
UPnP Router Configuration
The Sonicwall TZ170 broadband router does not support UPnP.
Manual Router Configuration
You must manually configure your router to forward the following ports to the IP address of your Windows Home Server:
| Service or Protocol | Port |
| HTTP | TCP 80 |
| HTTPS | TCP 443 |
| Remote Desktop Protocol (RDP) | TCP 4125 |
- HTTP is the protocol that your Web browser uses to view Web pages. You use this protocol to view your default Web page for Windows Home Server.
- HTTPS is the protocol that your Web browser uses to view secure Web pages. You use this protocol to view your Remote Access Web page for Windows Home Server.
- Remote Desktop Protocol is the service that is used to connect to your home computers via the Remote Access Computers tab.
To manually configure your router
Open the Web browser on your computer and enter the address for the Sonicwall router in the address field. The default IP address is 192.168.1.1.
At the login screen, enter the user name and password. The default user name is admin. The default password is password.
Find the screen with UPnP settings and disable UPnP.
Click Firewall, and then click Services.
Under Custom Services, click Add.
Enter the following settings:
Name: RDP
Port Range: 4125 - 4125
Protocol: TCP(6)
**
**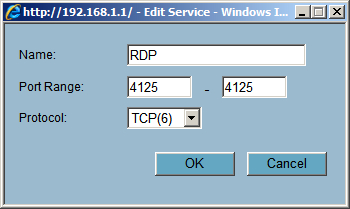
Click OK.
Under Firewall, click Access Rules.
Click Add.
Enter the following settings:
Action: Allow
Service: RDP
Source, Ethernet: WAN
Destination, Ethernet: LAN
Destination, Address Range Begin: your server’s IP address

Click OK.
Under Firewall, click Access Rules.
Click Add.
Enter the following settings:
Action: Allow
Service: Web (HTTP)
Source, Ethernet: WAN
Destination, Ethernet: LAN
Destination, Address Range Begin: your home server’s IP address
Click OK.
Under Firewall, click Access Rules.
Click Add.
Enter the following settings:
Action: Allow
Service: HTTPS
Source, Ethernet: WAN
Destination, Ethernet: LAN
Destination, Address Range Begin: your server’s IP address
Click OK.
Close the Web browser.

With port forwarding manually configured, open the Windows Home Server Console, click Settings, click Remote Access, and then click Repair. Windows Home Server will run the configuration test to verify network settings.
Configure the Sonicwall TZ100 for Remote Access

Model: TZ100 wireless-N
Firmware: SonicOS Enhanced 5.5.1.0-5o
http://www.sonicwall.com/us/support/13528.html
Configure Your Network
Follow the first two steps in the General Directions to verify your network is properly configured. Then, configure your home server with a static IP address.
Reserve an IP Address
There are two ways to set a static IP address for your home server: reserve an IP address on the Sonicwall TZ100 router, or set the IP address of the home server to be a static IP address.
To reserve an IP address
Open the Web browser on your computer and enter the address for the Sonicwall router in the address field. The default IP address is 192.168.168.168.
At the login screen, enter the user name and password. The default user name is admin. The default password is password.
Click Network, and then click DHCP Server.
Verify that Enable DHCP Server is checked.
Under Current DHCP Leases, you should see the home server in the list.
Under DHCP Server Lease Scopes, click Add Static.
Ensure DHCP Lease time set to 1440 minutes.
Enter the following settings:
Entry Name: type text to identify your home server.
Static IP Address: type an IP address not in the DHCP scope. This will be the IP address of your home server.
Ethernet Address: select the MAC address of the network adapter of your home server. See the First Step.
Default Gateway: type the IP address of your router
Subnet Mask: usually 255.255.255.0

Click OK, and then click Accept.
To set a static IP address for Windows Home Server
See the following links for directions:
http://www.homeserverland.com/wiki/w/whs/assign-static-ip-address.aspx
http://wiki.wegotserved.com/index.php?title=Set_up_Static_IP_for_Windows_Home_Server
UPnP Router Configuration
The Sonicwall TZ100 broadband router does not support UPnP.
Manual Router Configuration
You must manually configure your router to forward the following ports to the IP address of your Windows Home Server:
| Service or Protocol | Port |
| HTTP | TCP 80 |
| HTTPS | TCP 443 |
| Remote Desktop Protocol (RDP) | TCP 4125 |
- HTTP is the protocol that your Web browser uses to view Web pages. You use this protocol to view your default Web page for Windows Home Server.
- HTTPS is the protocol that your Web browser uses to view secure Web pages. You use this protocol to view your Remote Access Web page for Windows Home Server.
- Remote Desktop Protocol is the service that is used to connect to your home computers via the Remote Access Computers tab.
To manually configure your router
Open the Web browser on your computer and enter the address for the Sonicwall router in the address field. The default IP address is 192.168.168.168.
At the login screen, enter the user name and password. The default user name is admin. The default password is password.
Find the screen with UPnP settings and disable UPnP.
Click Firewall, and then click Services.
Under Service Groups, View Style, click Custom Services.
Unders Services, click Add.
Enter the following settings:
Name: RDP
**
**Protocol: TCP(6)
**
Port Range: 4125 - 4125
**

Click OK.
Under Service Groups, click Add Group.
For Name, enter: WHSPorts
From the list on the left, select the following Services and add them to the list on the right with the right arrow button:
HTTP
**
HTTPSRDP**

Click OK.
On the left navigation menu, under Firewall, click Access Rules
Under Access Rules, View Style, click Drop-down Boxes.
For the From Zone, select: WAN
For the To Zone, select: LAN
Click OK.
Click Add.
Under Settings, enter the following:
Action: Allow
Service: WHSPorts
Source: Any
Destination: WAN Primary IP (or the port use use for broadband)
Users Allowed: All
Schedule: Always on

Click OK.
Close the Web browser.
With port forwarding manually configured, open the Windows Home Server Console, click Settings, click Remote Access, and then click Repair. Windows Home Server will run the configuration test to verify network settings.
Configure the D-Link DIR-825 for Remote Access

Model: DIR-825
Hardware Version: B1
Firmware Version: 2.02NA
http://www.dlink.com/products/?tab=3&pid=DIR-825&rev=DIR-825_revB
Configure Your Network
Follow the first two steps in the General Directions to verify your network is properly configured. Then, configure your home server with a static IP address.
Reserve an IP Address
There are two ways to set a static IP address for your home server: reserve an IP address on the D-Link DIR-825 router, or set the IP address of the home server to be a static IP address.
To reserve an IP address
Open the Web browser on your computer and enter the address for the D-Link router in the address field. The default IP address is 192.168.0.1.
At the login screen, enter the user name and password. The default user name is admin. The default password is blank.
On the left menu, click Network Settings.
Under DHCP Server Settings, verify Enable DHCP Server is checked.
Under Add DHCP Reservation, enter the following settings:
Computer Name: type text to identify your home server.
IP Address: type an IP address in the DHCP IP Address Range (see DHCP Server Settings). This will be the IP address of your home server.
MAC Address: typet the MAC address of the network adapter of your home server. See the First Step
Click Save.
Close the Web browser.
To set a static IP address for Windows Home Server
See the following links for directions:
- http://www.homeserverland.com/wiki/w/whs/assign-static-ip-address.aspx
- http://wiki.wegotserved.com/index.php?title=Set_up_Static_IP_for_Windows_Home_Server
UPnP Router Configuration
The D-Link DIR-825 broadband router supports UPnP. However, initial tests using UPnP to configure the router were not successful. You should use manual configuration.
Manual Router Configuration
You must manually configure your router to forward the following ports to the IP address of your Windows Home Server:
| Service or Protocol | Port |
| HTTP | TCP 80 |
| HTTPS | TCP 443 |
| Remote Desktop Protocol (RDP) | TCP 4125 |
- HTTP is the protocol that your Web browser uses to view Web pages. You use this protocol to view your default Web page for Windows Home Server.
- HTTPS is the protocol that your Web browser uses to view secure Web pages. You use this protocol to view your Remote Access Web page for Windows Home Server.
- Remote Desktop Protocol is the service that is used to connect to your home computers via the Remote Access Computers tab.
To manually configure your router
- Open the Web browser on your computer and enter the address for the D-Link router in the address field. The default IP address is 192.168.0.1.
- At the login screen, enter the user name and password. The default user name is admin. The default password is blank.
- Find the screen with UPnP settings and disable UPnP.
- On the top menu, click Advanced.
- On the left menu, click VIRTUAL SERVER.
- Click the first Application Name list box and select HTTP.
- Click the left double arrow to place HTTP in the Name box.
- In the first IP Address box, enter the IP address of your home server.
- Select the check box to enable it.
- Click the second Application Name list box and select HTTPS.
- Click the left double arrow to place HTTPS in the Name box.
- In the second IP Address box, enter the IP address of your home server.
- Select the check box to enable it.
- In the third Name box, type: RDP
- In the Public Port box, type: 4125
- In the Private Port box, type: 4125
- In the third IP Address box, enter the IP address of your home server.
- Select the check box to enable it.
- Click Save Settings.
- Click Continue when the settings are saved and close the Web browser.

With port forwarding manually configured, open the Windows Home Server Console, click Settings, click Remote Access, and then click Repair. Windows Home Server will run the configuration test to verify network settings.
Configure the Linksys WRT160N for Remote Access

Model: WRT160N
Hardware Version: V3
Firmware Version: 3.0.02
http://homesupport.cisco.com/en-us/wireless/lbc/WRT160N
Configure Your Network
Follow the first two steps in the General Directions to verify your network is properly configured. Then, configure your home server with a static IP address.
Reserve an IP Address
There are two ways to set a static IP address for your home server: reserve an IP address on the Linksys WRT160N router, or set the IP address of the home server to be a static IP address.
To reserve an IP address
- Open the Web browser on your computer and enter the address for the Linksys router in the address field. The default IP address is 192.168.1.1.
- At the login screen, enter the user name and password. The default user name is blank. The default password is admin.
- Click the Setup tab. You should be on the Basic Setup page.
- In DHCP Server Setting, verify DHCP Server is enabled.
- Click DHCP Reservation.
- In Select Clients from DHCP Tables, you should see your home server listed.
- Click the Select box to enable it.
- Click Add Clients, and the click Save Settings.
- Close the Web browser.

To set a static IP address for Windows Home Server
See the following links for directions:
- http://www.homeserverland.com/wiki/w/whs/assign-static-ip-address.aspx
- http://wiki.wegotserved.com/index.php?title=Set_up_Static_IP_for_Windows_Home_Server
UPnP Router Configuration
The Linksys WRT160N broadband router supports UPnP – a standard that simplifies router setup. If you enable UPnP in the Linksys WRT160N , Windows Home Server may be able to automatically configure your remote access settings.
- Open the Web browser on your computer and enter the address for the Linksys router in the address field. The default IP address is 192.168.1.1.
- At the login screen, enter the user name and password. The default user name is blank. The default password is admin.
- Click the Administration tab.
- For UPnP, click Enabled, and then click Save Settings.
- Close the Web browser.

With UPnP enabled, open the Windows Home Server Console, click Settings, click Remote Access, and then click Repair. Windows Home Server will attempt to automatically configure the Linksys router to forward Web site requests to your home server.
Manual Router Configuration
If you prefer to not use UPnP, you must manually configure your router to forward the following ports to the IP address of your Windows Home Server:
| Service or Protocol | Port |
| HTTP | TCP 80 |
| HTTPS | TCP 443 |
| Remote Desktop Protocol (RDP) | TCP 4125 |
- HTTP is the protocol that your Web browser uses to view Web pages. You use this protocol to view your default Web page for Windows Home Server.
- HTTPS is the protocol that your Web browser uses to view secure Web pages. You use this protocol to view your Remote Access Web page for Windows Home Server.
- Remote Desktop Protocol is the service that is used to connect to your home computers via the Remote Access Computers tab.
To manually configure your router
- Open the Web browser on your computer and enter the address for the Linksys router in the address field. The default IP address is 192.168.1.1.
- At the login screen, enter the user name and password. The default user name is admin. The default password is blank.
- Find the screen with UPnP settings and disable UPnP.
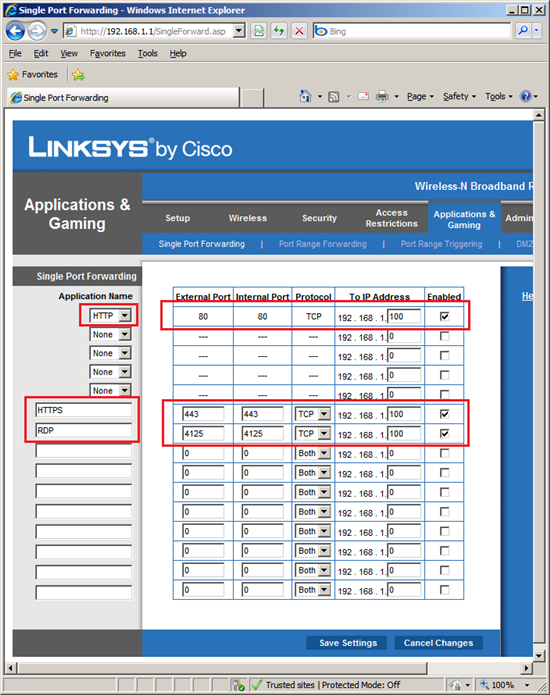
- Click the Applications and Gaming tab.
- The Single Port Forwarding page should be selected. If not, click the Single Port Forwarding tab.
- Enter the settings as in the screenshot below. The IP address should be the IP address of your home server.
- Click Save Settings, and then close the Web browser.
With port forwarding manually configured, open the Windows Home Server Console, click Settings, click Remote Access, and then click Repair. Windows Home Server will run the configuration test to verify network settings.
Configure the Linksys WR54GL for Remote Access

Model: WRT54GL
Version: 1.1
Firmware: v4.30.11
http://homesupport.cisco.com/en-us/wireless/lbc/WRT54GL
Configure Your Network
Follow the first two steps in the General Directions to verify your network is properly configured. Then, configure your home server with a static IP address.
Reserve an IP Address
To set a static IP address for Windows Home Server
See the following links for directions:
- http://www.homeserverland.com/wiki/w/whs/assign-static-ip-address.aspx
- http://wiki.wegotserved.com/index.php?title=Set_up_Static_IP_for_Windows_Home_Server
UPnP Router Configuration
The Linksys WRT54GL broadband router supports UPnP – a standard that simplifies router setup. If you enable UPnP in the Linksys WRT54GL, Windows Home Server may be able to automatically configure your remote access settings.
- Open the Web browser on your computer and enter the address for the Linksys router in the address field. The default IP address is 192.168.1.1.
- At the login screen, leave the User Name field blank and enter the router password. The default password is admin.
- Click the Administration tab, the Management page should be selected. If not, click the Management tab.
- For UPnP, click Enabled, and then click Save Settings.
- Close the Web browser.
With UPnP enabled, open the Windows Home Server Console, click Settings, click Remote Access, and then click Repair. Windows Home Server will attempt to automatically configure the Linksys router to forward Web site requests to your home server.
Manual Router Configuration
If you prefer to not use UPnP, you must manually configure your router to forward the following ports to the IP address of your Windows Home Server:
| Service or Protocol | Port |
| HTTP | TCP 80 |
| HTTPS | TCP 443 |
| Remote Desktop Protocol (RDP) | TCP 4125 |
- HTTP is the protocol that your Web browser uses to view Web pages. You use this protocol to view your default Web page for Windows Home Server.
- HTTPS is the protocol that your Web browser uses to view secure Web pages. You use this protocol to view your Remote Access Web page for Windows Home Server.
- Remote Desktop Protocol is the service that is used to connect to your home computers via the Remote Access Computers tab.
To manually configure your router
- Open the Web browser on your computer and enter the address for the Linksys router in the address field. The default IP address is 192.168.1.1.
- At the login screen, leave the User Name field blank and enter the router password. The default password is admin.
- Find the screen with UPnP settings and disable UPnP.
- Click the Applications and Gaming tab, the Port Range Forwarding page should be selected. If not, click the Port Range Forwarding tab.
- Enter the settings as in the screenshot below. The IP address should be the IP address of your home server.
- Click Save Settings, and then close the Web browser.

With port forwarding manually configured, open the Windows Home Server Console, click Settings, click Remote Access, and then click Repair. Windows Home Server will run the configuration test to verify network settings.
Configure the Watchguard Firebox X20e for Remote Access

Model: X20e
Firmware: 10.2.12
http://www.watchguard.com/products/edge-e/overview.asp?t=main
Configure Your Network
Follow the first two steps in the General Directions to verify your network is properly configured. Then, configure your home server with a static IP address.
Reserve an IP Address
There are two ways to set a static IP address for your home server: reserve an IP address on the Firebox X20e router, or set the IP address of the home server to be a static IP address.
To reserve an IP address
Open the Web browser on your computer and enter the address for the Sonicwall router in the address field. The default IP address is 192.168.111.1.
At the login screen, enter the user name and password. The default user name is admin. The default password is admin.
Click Network, and then click Trusted Network.
Verify that Enable DHCP Server on Trusted Network is checked.
Click DHCP Reservations.
Enter the following settings:
IP Address: type the IP address of your home server.
MAC Address: type the MAC address of the network adapter of your home server. See the First Step.

Click Submit.
To set a static IP address for Windows Home Server
See the following links for directions:
http://www.homeserverland.com/wiki/w/whs/assign-static-ip-address.aspx
http://wiki.wegotserved.com/index.php?title=Set_up_Static_IP_for_Windows_Home_Server
UPnP Router Configuration
The Firebox X20e broadband router does not support UPnP.
Manual Router Configuration
You must manually configure your router to forward the following ports to the IP address of your Windows Home Server:
| Service or Protocol | Port |
| HTTP | TCP 80 |
| HTTPS | TCP 443 |
| Remote Desktop Protocol (RDP) | TCP 4125 |
- HTTP is the protocol that your Web browser uses to view Web pages. You use this protocol to view your default Web page for Windows Home Server.
- HTTPS is the protocol that your Web browser uses to view secure Web pages. You use this protocol to view your Remote Access Web page for Windows Home Server.
- Remote Desktop Protocol is the service that is used to connect to your home computers via the Remote Access Computers tab.
To manually configure your router
Open the Web browser on your computer and enter the address for the Firebox router in the address field. The default IP address is 192.168.111.1.
At the login screen, enter the user name and password. The default user name is admin. The default password is admin.
Find the screen with UPnP settings and disable UPnP.
Click Firewall, and then click Configure Incoming.
Under Common Packet Filter Policies, for the HTTP and HTTPS policies, set the following:
Filter: Allow
Host: IP address of your home server
Port Redirect, HTTP: 80
Port Redirect, HTTPS: 443

Click Submit.
Under Custom Packet Filter Policies, click Add Packet Filter Policy.
Enter the following:
Policy Name: SharePoint
Incoming Tab, Incoming Filter: Allow
Policy Host: type the IP address of your home server
Properties Tab, Protocol Settings: 4125
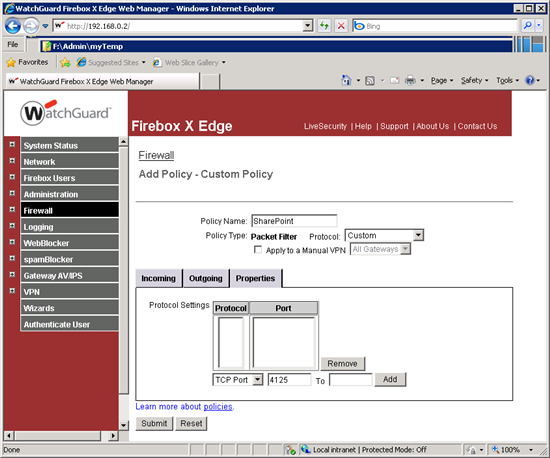
Click Add, and then click Submit.
With port forwarding manually configured, open the Windows Home Server Console, click Settings, click Remote Access, and then click Repair. Windows Home Server will run the configuration test to verify network settings.