Tutorial: Part 2 - Build a custom chat application with the prompt flow SDK
In this tutorial, you use the prompt flow SDK (and other libraries) to build, configure, evaluate, and deploy a chat app for your retail company called Contoso Trek. Your retail company specializes in outdoor camping gear and clothing. The chat app should answer questions about your products and services. For example, the chat app can answer questions such as "which tent is the most waterproof?" or "what is the best sleeping bag for cold weather?".
This part two shows you how to enhance a basic chat application by adding retrieval augmented generation (RAG) to ground the responses in your custom data. Retrieval Augmented Generation (RAG) is a pattern that uses your data with a large language model (LLM) to generate answers specific to your data. In this part two, you learn how to:
- Deploy AI models in Azure AI Studio to use in your app
- Develop custom RAG code
- Use prompt flow to test your chat app
This tutorial is part two of a three-part tutorial.
Prerequisites
Complete Tutorial: Part 1 - Create resources for building a custom chat application with the prompt flow SDK.
You need a local copy of product data. The Azure-Samples/rag-data-openai-python-promptflow repository on GitHub contains sample retail product information that's relevant for this tutorial scenario. Download the example Contoso Trek retail product data in a ZIP file to your local machine.
Application code structure
Create a folder called rag-tutorial on your local machine. This tutorial series walks through creation of the contents of each file. When you complete the tutorial series, your folder structure looks like this:
rag-tutorial/
│   .env
│   build_index.py
│   deploy.py
│   evaluate.py
│   eval_dataset.jsonl
|   invoke-local.py
│
├───copilot_flow
│   └─── chat.prompty
|   └─── copilot.py
|   └─── Dockerfile
│   └─── flow.flex.yaml
│   └─── input_with_chat_history.json
│   └─── queryIntent.prompty
│   └─── requirements.txt
│
├───data
|   └─── product-info/
|   └─── [Your own data or sample data as described in the prerequisites.]
The implementation in this tutorial uses prompt flow's flex flow, which is the code-first approach to implementing flows. You specify an entry function (which is in copilot.py), and then use prompt flow's testing, evaluation, and tracing capabilities for your flow. This flow is in code and doesn't have a DAG (Directed Acyclic Graph) or other visual component. Learn more about how to develop a flex flow in the prompt flow documentation on GitHub.
Set initial environment variables
There's a collection of environment variables used across the different code snippets. Add them all into an .env file.
Important
If you create this in a git repository, ensure that .env is in your .gitignore file so that you don't accidentally check it into the repository.
Start with these values. You'll add a few more values as you progress through the tutorial.
Create an .env file into your rag-tutorial folder. Add these variables:
AZURE_SUBSCRIPTION_ID=<your subscription id>
AZURE_RESOURCE_GROUP=<your resource group>
AZUREAI_PROJECT_NAME=<your project name>
AZURE_OPENAI_CONNECTION_NAME=<your AIServices or Azure OpenAI connection name>
AZURE_SEARCH_ENDPOINT=<your Azure Search endpoint>
AZURE_SEARCH_CONNECTION_NAME=<your Azure Search connection name>
Replace the placeholders with the following values:
Find the
<your subscription id>,<your resource group>, and<your project name>from your project view in AI Studio:- In AI Studio, go to your project and select Settings from the left pane.
- In the Project properties section, find the Subscription ID and Resource group. The Name field is
<your project name>
Still in your project Settings, in the Connected resources section, you'll see an entry for either Azure AIServices or Azure OpenAI. Select the name to open the Connection Details. The connection name appears at the top of the Connection Details page. Copy this name to use for
<your AIServices or Azure OpenAI connection name>.Go back to the project Settings page. In the Connected resources section, select the link for the Azure AI Search.
- Copy the Target URL for
<your Azure Search endpoint>. - Copy the name at the top for
<your Azure Search connection name>.
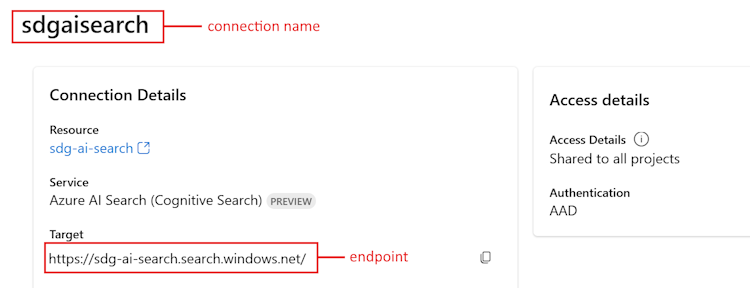
- Copy the Target URL for
Deploy models
You need two models to build a RAG-based chat app: an Azure OpenAI chat model (gpt-3.5-turbo) and an Azure OpenAI embedding model (text-embedding-ada-002). Deploy these models in your Azure AI Studio project, using this set of steps for each model.
These steps deploy a model to a real-time endpoint from the AI Studio model catalog:
Sign in to AI Studio and go to the Home page.
Select Model catalog from the left sidebar.
In the Collections filter, select Azure OpenAI.

Select the model from the Azure OpenAI collection. The first time through, select the
gpt-3.5-turbomodel. The second time, select thetext-embedding-ada-002model.Select Deploy to open the deployment window.
Select the hub that you want to deploy the model to. Use the same hub as your project.
Specify the deployment name and modify other default settings depending on your requirements.
Select Deploy.
You land on the deployment details page. Select Open in playground.
Select View Code to obtain code samples that can be used to consume the deployed model in your application.

When you deploy the gpt-3.5-turbo model, find the following values in the View Code section, and add them to your .env file:
AZURE_OPENAI_ENDPOINT=<endpoint_value>
AZURE_OPENAI_CHAT_DEPLOYMENT=<chat_model_deployment_name>
AZURE_OPENAI_API_VERSION=<api_version>
When you deploy the text-embedding-ada-002 model, add the name to your .env file:
AZURE_OPENAI_EMBEDDING_DEPLOYMENT=<embedding_model_deployment_name>
Install the Azure CLI and sign in
You install the Azure CLI and sign in from your local development environment, so that you can use your user credentials to call the Azure OpenAI service.
In most cases you can install the Azure CLI from your terminal using the following command:
You can follow instructions How to install the Azure CLI if these commands don't work for your particular operating system or setup.
After you install the Azure CLI, sign in using the az login command and sign-in using the browser:
az login
Now we create our app and call the Azure OpenAI Service from code.
Create a new Python environment
First we need to create a new Python environment we can use to install the prompt flow SDK packages. DO NOT install packages into your global python installation. You should always use a virtual or conda environment when installing python packages, otherwise you can break your global install of Python.
If needed, install Python
We recommend using Python 3.10 or later, but having at least Python 3.8 is required. If you don't have a suitable version of Python installed, you can follow the instructions in the VS Code Python Tutorial for the easiest way of installing Python on your operating system.
Create a virtual environment
If you already have Python 3.10 or higher installed, you can create a virtual environment using the following commands:
Activating the Python environment means that when you run python or pip from the command line, you then use the Python interpreter contained in the .venv folder of your application.
Note
You can use the deactivate command to exit the python virtual environment, and can later reactivate it when needed.
Upgrade pip
To make sure you have the latest version of pip, run the following command:
python -m pip install --upgrade pip
Install the prompt flow SDK
Prompt flow is a suite of development tools designed to streamline the end-to-end development cycle of LLM-based AI applications, from ideation, prototyping, testing, evaluation to production deployment and monitoring.
Use pip to install the prompt flow SDK into the virtual environment that you created.
pip install promptflow
pip install azure-identity
The prompt flow SDK takes a dependency on multiple packages, that you can choose to separately install if you don't want all of them:
promptflow-core: contains the core prompt flow runtime used for executing LLM codepromptflow-tracing: lightweight library used for emitting OpenTelemetry traces in standardspromptflow-devkit: contains the prompt flow test bed and trace viewer tools for local development environmentsopenai: client libraries for using the Azure OpenAI servicepython-dotenv: used to set environment variables by reading them from.envfiles
Create an Azure AI Search index
The goal with this RAG-based application is to ground the model responses in your custom data. You use an Azure AI Search index that stores vectorized data from the embeddings model. The search index is used to retrieve relevant documents based on the user's question.
If you don't have an Azure AI Search index already created, we walk through how to create one. If you already have an index to use, you can skip to the set the search environment variable section. The search index is created on the Azure AI Search service that was either created or referenced in the previous step.
Use your own data or download the example Contoso Trek retail product data in a ZIP file to your local machine. Unzip the file into your rag-tutorial/data folder. This data is a collection of markdown files that represent product information. The data is structured in a way that is easy to ingest into a search index. You build a search index from this data.
The prompt flow RAG package allows you to ingest the markdown files, locally create a search index, and register it in the cloud project. Install the prompt flow RAG package:
pip install promptflow-ragCreate the build_index.py file in your rag-tutorial folder.
Copy and paste the following code into your build_index.py file.
import os from dotenv import load_dotenv load_dotenv() from azure.ai.ml import MLClient from azure.identity import DefaultAzureCredential from azure.ai.ml.entities import Index from promptflow.rag.config import ( LocalSource, AzureAISearchConfig, EmbeddingsModelConfig, ConnectionConfig, ) from promptflow.rag import build_index client = MLClient( DefaultAzureCredential(), os.getenv("AZURE_SUBSCRIPTION_ID"), os.getenv("AZURE_RESOURCE_GROUP"), os.getenv("AZUREAI_PROJECT_NAME"), ) import os # append directory of the current script to data directory script_dir = os.path.dirname(os.path.abspath(__file__)) data_directory = os.path.join(script_dir, "data/product-info/") # Check if the directory exists if os.path.exists(data_directory): files = os.listdir(data_directory) # List all files in the directory if files: print( f"Data directory '{data_directory}' exists and contains {len(files)} files." ) else: print(f"Data directory '{data_directory}' exists but is empty.") exit() else: print(f"Data directory '{data_directory}' does not exist.") exit() index_name = "tutorial-index" # your desired index name index_path = build_index( name=index_name, # name of your index vector_store="azure_ai_search", # the type of vector store - in this case it is Azure AI Search. Users can also use "azure_cognitive search" embeddings_model_config=EmbeddingsModelConfig( model_name=os.getenv("AZURE_OPENAI_EMBEDDING_DEPLOYMENT"), deployment_name=os.getenv("AZURE_OPENAI_EMBEDDING_DEPLOYMENT"), connection_config=ConnectionConfig( subscription_id=client.subscription_id, resource_group_name=client.resource_group_name, workspace_name=client.workspace_name, connection_name=os.getenv("AZURE_OPENAI_CONNECTION_NAME"), ), ), input_source=LocalSource(input_data=data_directory), # the location of your files index_config=AzureAISearchConfig( ai_search_index_name=index_name, # the name of the index store inside the azure ai search service ai_search_connection_config=ConnectionConfig( subscription_id=client.subscription_id, resource_group_name=client.resource_group_name, workspace_name=client.workspace_name, connection_name=os.getenv("AZURE_SEARCH_CONNECTION_NAME"), ), ), tokens_per_chunk=800, # Optional field - Maximum number of tokens per chunk token_overlap_across_chunks=0, # Optional field - Number of tokens to overlap between chunks ) # register the index so that it shows up in the cloud project client.indexes.create_or_update(Index(name=index_name, path=index_path))- Set the
index_namevariable to the name of the index you want. - As needed, you can update the
path_to_datavariable to the path where your data files are stored.
Important
By default the code sample expects the application code structure as described previously in this tutorial. The
datafolder should be at the same level as your build_index.py and the downloadedproduct-infofolder with md files within it.- Set the
From your console, run the code to build your index locally and register it to the cloud project:
python build_index.pyOnce the script is run, you can view your newly created index in the Indexes page of your Azure AI Studio project. For more information, see How to build and consume vector indexes in Azure AI Studio.
If you run the script again with the same index name, it creates a new version of the same index.
Set the search index environment variable
Once you have the index name you want to use (either by creating a new one, or referencing an existing one), add it to your .env file, like this:
AZUREAI_SEARCH_INDEX_NAME=<index-name>
Develop custom RAG code
Next you create custom code to add retrieval augmented generation (RAG) capabilities to a basic chat application. In the quickstart, you created chat.py and chat.prompty files. Here you expand on that code to include RAG capabilities.
The chat app with RAG implements the following general logic:
- Generate a search query based on user query intent and any chat history
- Use an embedding model to embed the query
- Retrieve relevant documents from the search index, given the query
- Pass the relevant context to the Azure OpenAI chat completion model
- Return the response from the Azure OpenAI model
The chat app implementation logic
The chat app implementation logic is in the copilot.py file. This file contains the core logic for the RAG-based chat app.
Create a folder named copilot_flow in the rag-tutorial folder.
Then create a file called copilot.py in the copilot_flow folder.
Add the following code to the copilot.py file:
import os
from dotenv import load_dotenv

load_dotenv()

from promptflow.core import Prompty, AzureOpenAIModelConfiguration
from promptflow.tracing import trace
from openai import AzureOpenAI

# <get_documents>
@trace
def get_documents(search_query: str, num_docs=3):
    from azure.identity import DefaultAzureCredential, get_bearer_token_provider
    from azure.search.documents import SearchClient
    from azure.search.documents.models import VectorizedQuery

    token_provider = get_bearer_token_provider(
        DefaultAzureCredential(), "https://cognitiveservices.azure.com/.default"
    )

    index_name = os.getenv("AZUREAI_SEARCH_INDEX_NAME")

    #  retrieve documents relevant to the user's question from Cognitive Search
    search_client = SearchClient(
        endpoint=os.getenv("AZURE_SEARCH_ENDPOINT"),
        credential=DefaultAzureCredential(),
        index_name=index_name,
    )

    aoai_client = AzureOpenAI(
        azure_endpoint=os.getenv("AZURE_OPENAI_ENDPOINT"),
        azure_ad_token_provider=token_provider,
        api_version=os.getenv("AZURE_OPENAI_API_VERSION"),
    )

    # generate a vector embedding of the user's question
    embedding = aoai_client.embeddings.create(
        input=search_query, model=os.getenv("AZURE_OPENAI_EMBEDDING_DEPLOYMENT")
    )
    embedding_to_query = embedding.data[0].embedding

    context = ""
    # use the vector embedding to do a vector search on the index
    vector_query = VectorizedQuery(
        vector=embedding_to_query, k_nearest_neighbors=num_docs, fields="contentVector"
    )
    results = trace(search_client.search)(
        search_text="", vector_queries=[vector_query], select=["id", "content"]
    )

    for result in results:
        context += f"\n>>> From: {result['id']}\n{result['content']}"

    return context


# <get_documents>

from promptflow.core import Prompty, AzureOpenAIModelConfiguration

from pathlib import Path
from typing import TypedDict


class ChatResponse(TypedDict):
    context: dict
    reply: str


def get_chat_response(chat_input: str, chat_history: list = []) -> ChatResponse:
    model_config = AzureOpenAIModelConfiguration(
        azure_deployment=os.getenv("AZURE_OPENAI_CHAT_DEPLOYMENT"),
        api_version=os.getenv("AZURE_OPENAI_API_VERSION"),
        azure_endpoint=os.getenv("AZURE_OPENAI_ENDPOINT"),
    )

    searchQuery = chat_input

    # Only extract intent if there is chat_history
    if len(chat_history) > 0:
        # extract current query intent given chat_history
        path_to_prompty = f"{Path(__file__).parent.absolute().as_posix()}/queryIntent.prompty"  # pass absolute file path to prompty
        intentPrompty = Prompty.load(
            path_to_prompty,
            model={
                "configuration": model_config,
                "parameters": {
                    "max_tokens": 256,
                },
            },
        )
        searchQuery = intentPrompty(query=chat_input, chat_history=chat_history)

    # retrieve relevant documents and context given chat_history and current user query (chat_input)
    documents = get_documents(searchQuery, 3)

    # send query + document context to chat completion for a response
    path_to_prompty = f"{Path(__file__).parent.absolute().as_posix()}/chat.prompty"
    chatPrompty = Prompty.load(
        path_to_prompty,
        model={
            "configuration": model_config,
            "parameters": {"max_tokens": 256, "temperature": 0.2},
        },
    )
    result = chatPrompty(
        chat_history=chat_history, chat_input=chat_input, documents=documents
    )

    return dict(reply=result, context=documents)
The copilot.py file contains two key functions: get_documents() and get_chat_response().
Notice these two functions have the @trace decorator, which allows you to see the prompt flow tracing logs of each function call inputs and outputs. @trace is an alternative and extended approach to the way the quickstart showed tracing capabilities.
The get_documents() function is the core of the RAG logic.
- Takes in the search query and number of documents to retrieve.
- Embeds the search query using an embedding model.
- Queries the Azure Search index to retrieve the documents relevant to the query.
- Returns the context of the documents.
The get_chat_response() function builds from the previous logic in your chat.py file:
- Takes in the
chat_inputand anychat_history. - Constructs the search query based on
chat_inputintent andchat_history. - Calls
get_documents()to retrieve the relevant docs. - Calls the chat completion model with context to get a grounded response to the query.
- Returns the reply and context. We set a typed dictionary as the return object for our
get_chat_response()function. You can choose how your code returns the response to best fit your use case.
The get_chat_response() function uses two Prompty files to make the necessary Large Language Model (LLM) calls, which we cover next.
Prompt template for chat
The chat.prompty file is simple, and similar to the chat.prompty in the quickstart. The system prompt is updated to reflect our product and the prompt templates includes document context.
Add the file chat.prompty in the copilot_flow directory. The file represents the call to the chat completion model, with the system prompt, chat history, and document context provided.
Add this code to the chat.prompty file:
---
name: Chat Prompt
description: A prompty that uses the chat API to respond to queries grounded in relevant documents
model:
    api: chat
    configuration:
        type: azure_openai
inputs:
    chat_input:
        type: string
    chat_history:
        type: list
        is_chat_history: true
        default: []
    documents:
        type: object

---
system:
You are an AI assistant helping users with queries related to outdoor outdooor/camping gear and clothing.
If the question is not related to outdoor/camping gear and clothing, just say 'Sorry, I only can answer queries related to outdoor/camping gear and clothing. So, how can I help?'
Don't try to make up any answers.
If the question is related to outdoor/camping gear and clothing but vague, ask for clarifying questions instead of referencing documents. If the question is general, for example it uses "it" or "they", ask the user to specify what product they are asking about.
Use the following pieces of context to answer the questions about outdoor/camping gear and clothing as completely, correctly, and concisely as possible.
Do not add documentation reference in the response.

# Documents
{{documents}}

{% for item in chat_history %}
{{item.role}}
{{item.content}}
{% endfor %}

user:
{{chat_input}}
Prompt template for chat history
Because we're implementing a RAG-based application, there's some extra logic required for retrieving relevant documents not only for the current user query, but also taking into account chat history. Without this extra logic, your LLM call would account for chat history. But you wouldn't retrieve the right documents for that context, so you wouldn't get the expected response.
For instance, if the user asks the question "is it waterproof?", we need the system to look at the chat history to determine what the word "it" refers to, and include that context into the search query to embed. This way, we retrieve the right documents for "it" (perhaps the Alpine Explorer Tent) and its "cost."
Instead of passing only the user's query to be embedded, we need to generate a new search query that takes into account any chat history. We use another Prompty (which is another LLM call) with specific prompting to interpret the user query intent given chat history, and construct a search query that has the necessary context.
Create the file queryIntent.prompty in the copilot_flow folder.
Enter this code for specific details about the prompt format and few-shot examples.
---
 name: Chat Prompt
 description: A prompty that extract users query intent based on the current_query and chat_history of the conversation
 model:
     api: chat
     configuration:
         type: azure_openai
 inputs:
     query:
       type: string
     chat_history:
         type: list
         is_chat_history: true
         default: []

 ---
 system:
 - You are an AI assistant reading a current user query and chat_history.
 - Given the chat_history, and current user's query, infer the user's intent expressed in the current user query.
 - Once you infer the intent, respond with a search query that can be used to retrieve relevant documents for the current user's query based on the intent
 - Be specific in what the user is asking about, but disregard parts of the chat history that are not relevant to the user's intent.

 Example 1:
 With a chat_history like below:
 \```
 chat_history: [    {
       "role": "user",
       "content": "are the trailwalker shoes waterproof?"
     },
     {
       "role": "assistant",
       "content": "Yes, the TrailWalker Hiking Shoes are waterproof. They are designed with a durable and waterproof construction to withstand various terrains and weather conditions."
     }
 ]
 \```
 User query: "how much do they cost?"

 Intent: "The user wants to know how much the Trailwalker Hiking Shoes cost."
 Search query: "price of Trailwalker Hiking Shoes"


 Example 2:
 With a chat_history like below:
 \```
 chat_history: [    {
       "role": "user",
       "content": "are the trailwalker shoes waterproof?"
     },
     {
       "role": "assistant",
       "content": "Yes, the TrailWalker Hiking Shoes are waterproof. They are designed with a durable and waterproof construction to withstand various terrains and weather conditions."
     },
     {
       "role": "user",
       "content": "how much do they cost?"
     },
     {
       "role": "assistant",
       "content": "The TrailWalker Hiking Shoes are priced at $110."
     },
     {
       "role": "user",
       "content": "do you have waterproof tents?"
     },
     {
       "role": "assistant",
       "content": "Yes, we have waterproof tents available. Can you please provide more information about the type or size of tent you are looking for?"
     },
     {
       "role": "user",
       "content": "which is your most waterproof tent?"
     },
     {
       "role": "assistant",
       "content": "Our most waterproof tent is the Alpine Explorer Tent. It is designed with a waterproof material and has a rainfly with a waterproof rating of 3000mm. This tent provides reliable protection against rain and moisture."
     }
 ]
 \```
 User query: "how much does it cost?"

 Intent: "the user would like to know how much the Alpine Explorer Tent costs"
 Search query: "price of Alpine Explorer Tent"

 {% for item in chat_history %}
 {{item.role}}
 {{item.content}}
 {% endfor %}

 Current user query:
 {{query}}

 Search query:
The simple system message in our queryIntent.prompty file achieves the minimum required for the RAG solution to work with chat history.
Configure required packages
Create the file requirements.txt in the copilot_flow folder. Add this content:
openai
azure-identity
azure-search-documents==11.4.0
promptflow[azure]==1.11.0
promptflow-tracing==1.11.0
promptflow-tools==1.4.0
promptflow-evals==0.3.0
jinja2
aiohttp
python-dotenv
These packages are required for the flow to run locally and in a deployed environment.
Use flex flow
As previously mentioned, this implementation uses prompt flow's flex flow, which is the code-first approach to implementing flows. You specify an entry function (which is defined in copilot.py). Learn more at Develop a flex flow.
This yaml specifies the entry function, which is the get_chat_response function defined in copilot.py. It also specifies the requirements the flow needs to run.
Create the file flow.flex.yaml in the copilot_flow folder. Add this content:
entry: copilot:get_chat_response
environment:
  python_requirements_txt: requirements.txt
Use prompt flow to test your chat app
Use prompt flow's testing capability to see how your chat app performs as expected on sample inputs. By using your flow.flex.yaml file, you can use prompt flow to test with your specified inputs.
Run the flow using this prompt flow command:
pf flow test --flow ./copilot_flow --inputs chat_input="how much do the Trailwalker shoes cost?"
Alternatively, you can run the flow interactively with the --ui flag.
pf flow test --flow ./copilot_flow --ui
When you use --ui, the interactive sample chat experience opens a window in your local browser.
- The first time you run with the
--uiflag, you need to manually select your chat inputs and outputs from the options. The first time you create this session, select the Chat input/output field config settings, then start chatting. - The next time you run with the
--uiflag, the session will remember your settings.

When you're finished with your interactive session, enter Ctrl + C in the terminal window to stop the server.
Test with chat history
In general, prompt flow and Prompty support chat history. If you test with the --ui flag in the locally served front end, prompt flow manages your chat history. If you test without the --ui, you can specify an inputs file that includes chat history.
Because our application implements RAG, we had to add extra logic to handle chat history in the queryIntent.prompty file.
To test with chat history, create a file called input_with_chat_history.json in the copilot_flow folder, and paste in this content:
{
    "chat_input": "how much does it cost?",
    "chat_history": [
        {
        "role": "user",
        "content": "are the trailwalker shoes waterproof?"
        },
        {
        "role": "assistant",
        "content": "Yes, the TrailWalker Hiking Shoes are waterproof. They are designed with a durable and waterproof construction to withstand various terrains and weather conditions."
        },
        {
        "role": "user",
        "content": "how much do they cost?"
        },
        {
        "role": "assistant",
        "content": "The TrailWalker Hiking Shoes are priced at $110."
        },
        {
        "role": "user",
        "content": "do you have waterproof tents?"
        },
        {
        "role": "assistant",
        "content": "Yes, we have waterproof tents available. Can you please provide more information about the type or size of tent you are looking for?"
        },
        {
        "role": "user",
        "content": "which is your most waterproof tent?"
        },
        {
        "role": "assistant",
        "content": "Our most waterproof tent is the Alpine Explorer Tent. It is designed with a waterproof material and has a rainfly with a waterproof rating of 3000mm. This tent provides reliable protection against rain and moisture."
        }
    ]
    }
To test with this file, run:
pf flow test --flow ./copilot_flow --inputs ./copilot_flow/input_with_chat_history.json
The expected output is something like: "The Alpine Explorer Tent is priced at $350."
This system is able to interpret the intent of the query "how much does it cost?" to know that "it" refers to the Alpine Explorer Tent, which was the latest context in the chat history. Then the system constructs a search query for the price of the Alpine Explorer Tent to retrieve the relevant documents for the Alpine Explorer Tent's cost, and we get the response.
If you navigate to the trace from this flow run, you see the conversation in action. The local traces link shows in the console output before the result of the flow test run.

Clean up resources
To avoid incurring unnecessary Azure costs, you should delete the resources you created in this tutorial if they're no longer needed. To manage resources, you can use the Azure portal.
But don't delete them yet, if you want to deploy your chat app to Azure in the next part of this tutorial series.