Cluster access control with AKS-managed Microsoft Entra integration
When you integrate Microsoft Entra ID with your AKS cluster, you can use Conditional Access or Privileged Identity Management (PIM) for just-in-time requests to control access to your cluster. This article shows you how to enable Conditional Access and PIM on your AKS clusters.
Note
Microsoft Entra Conditional Access and Privileged Identity Management (PIM) are Microsoft Entra ID P1, P2 or Governance capabilities requiring a Premium P2 SKU. For more on Microsoft Entra ID licenses and SKUs, see Microsoft Entra ID Governance licensing fundamentals and pricing guide.
Before you begin
- See AKS-managed Microsoft Entra integration for an overview and setup instructions.
Use Conditional Access with Microsoft Entra ID and AKS
In the Azure portal, go to the Microsoft Entra ID page and select Enterprise applications.
Select Conditional Access > Policies > New policy.

Enter a name for the policy, such as aks-policy.
Under Assignments, select Users and groups. Choose the users and groups you want to apply the policy to. In this example, choose the same Microsoft Entra group that has administrator access to your cluster.
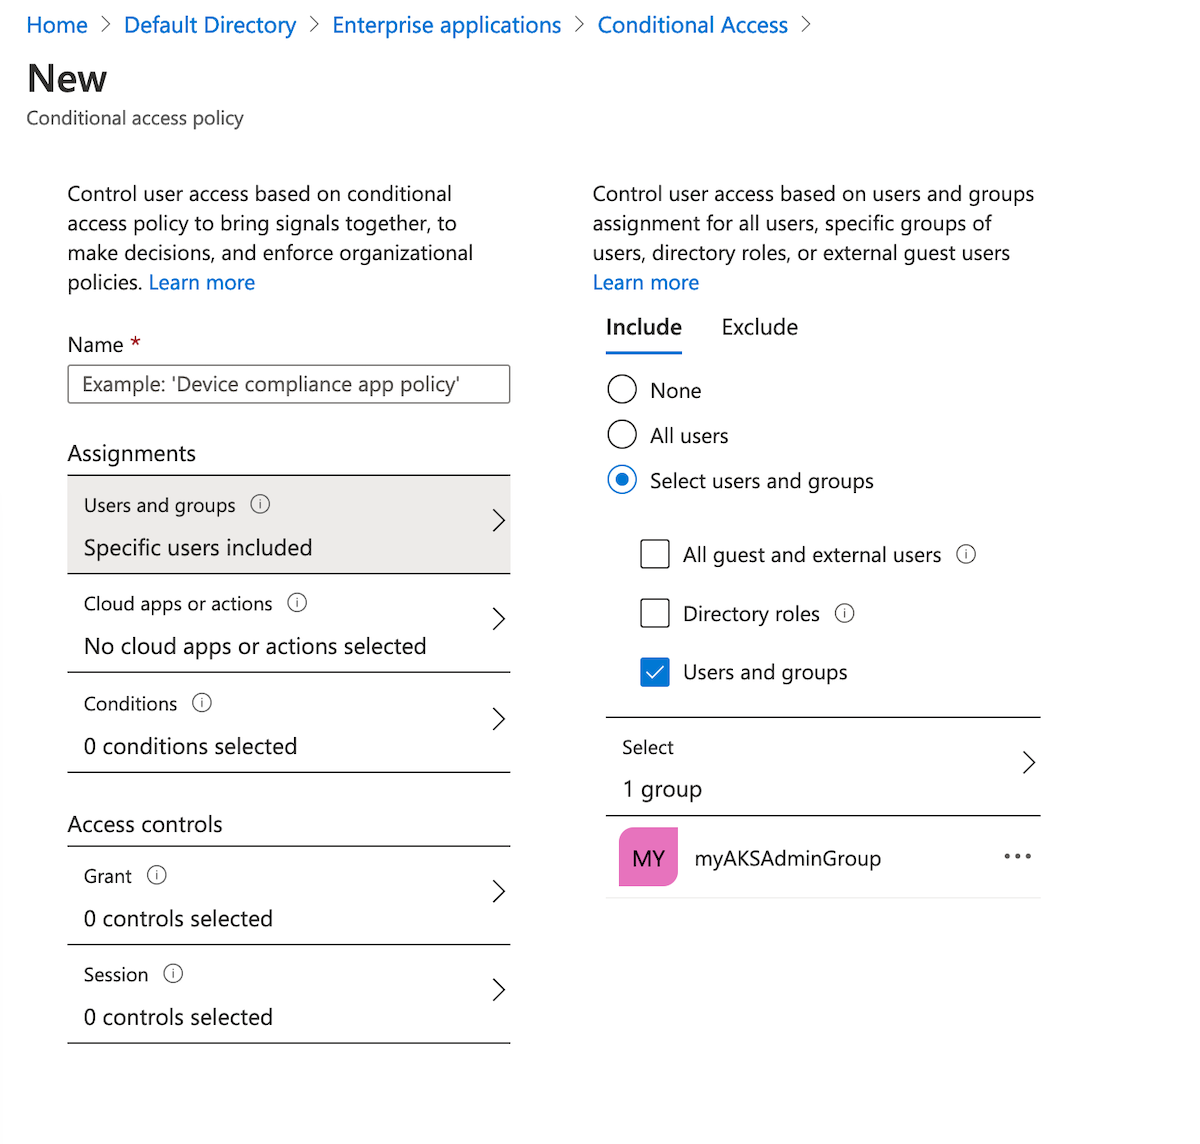
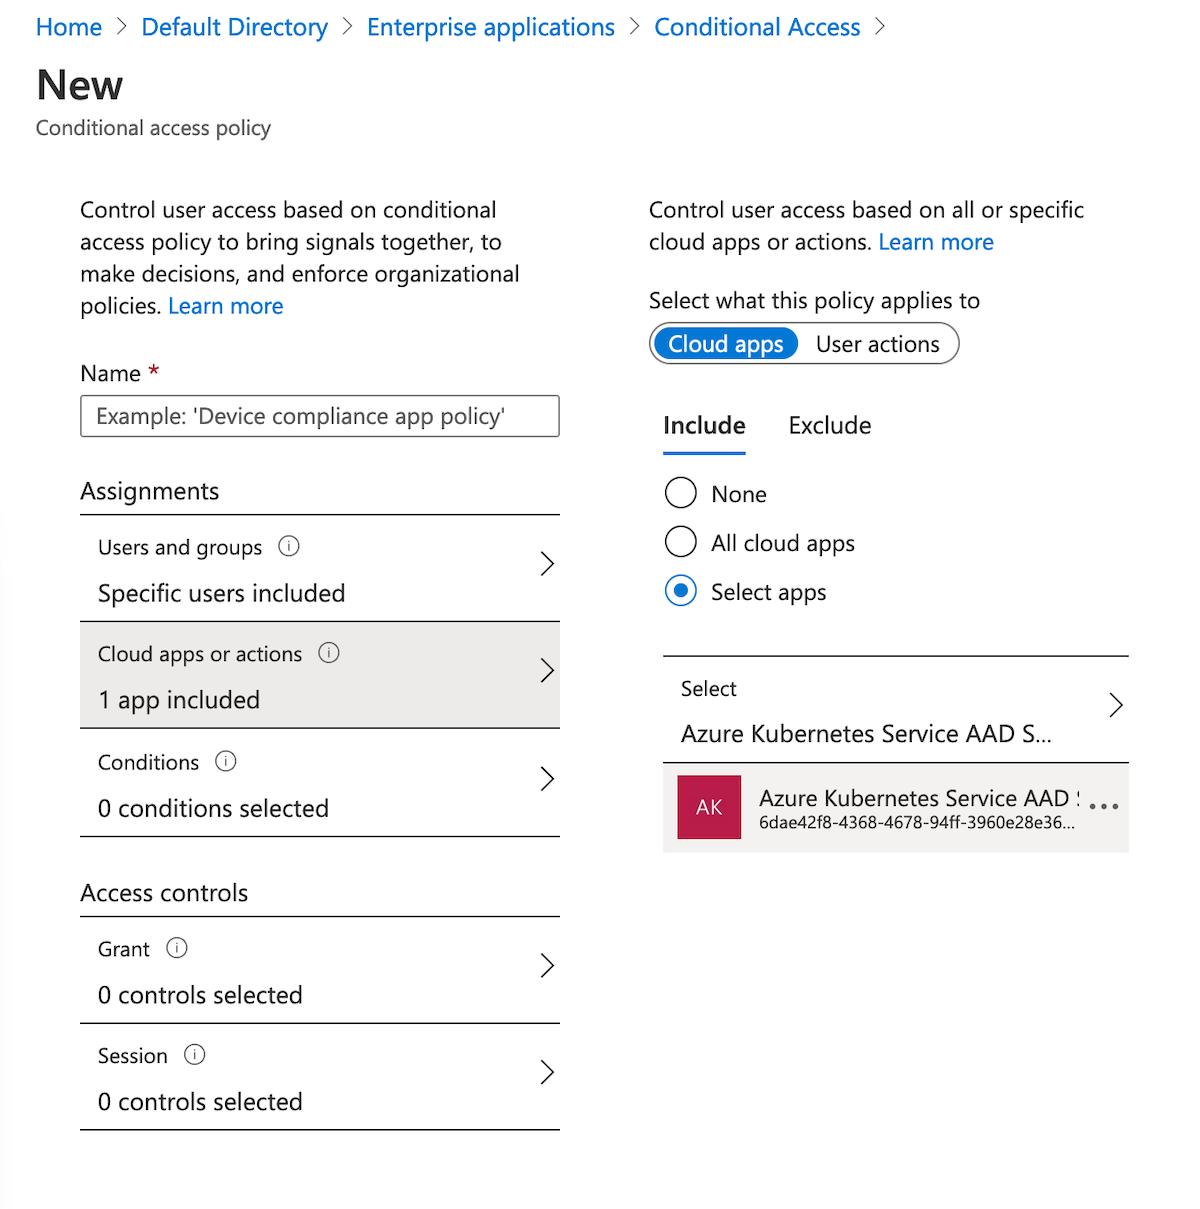
Under Cloud apps or actions > Include, select Select apps. Search for Azure Kubernetes Service and select Azure Kubernetes Service Microsoft Entra Server.
Under Access controls > Grant, select Grant access, Require device to be marked as compliant, and Require all the selected controls.

Confirm your settings, set Enable policy to On, and then select Create.


Verify your Conditional Access policy has been successfully listed
Get the user credentials to access the cluster using the
az aks get-credentialscommand.az aks get-credentials --resource-group myResourceGroup --name myManagedClusterFollow the instructions to sign in.
View the nodes in the cluster using the
kubectl get nodescommand.kubectl get nodesIn the Azure portal, navigate to Microsoft Entra ID and select Enterprise applications > Activity > Sign-ins.
Under the Conditional Access column you should see a status of Success. Select the event and then select the Conditional Access tab. Your Conditional Access policy will be listed.


Configure just-in-time cluster access with Microsoft Entra ID and AKS
In the Azure portal, go to Microsoft Entra ID and select Properties.
Note the value listed under Tenant ID. It will be referenced in a later step as
<tenant-id>.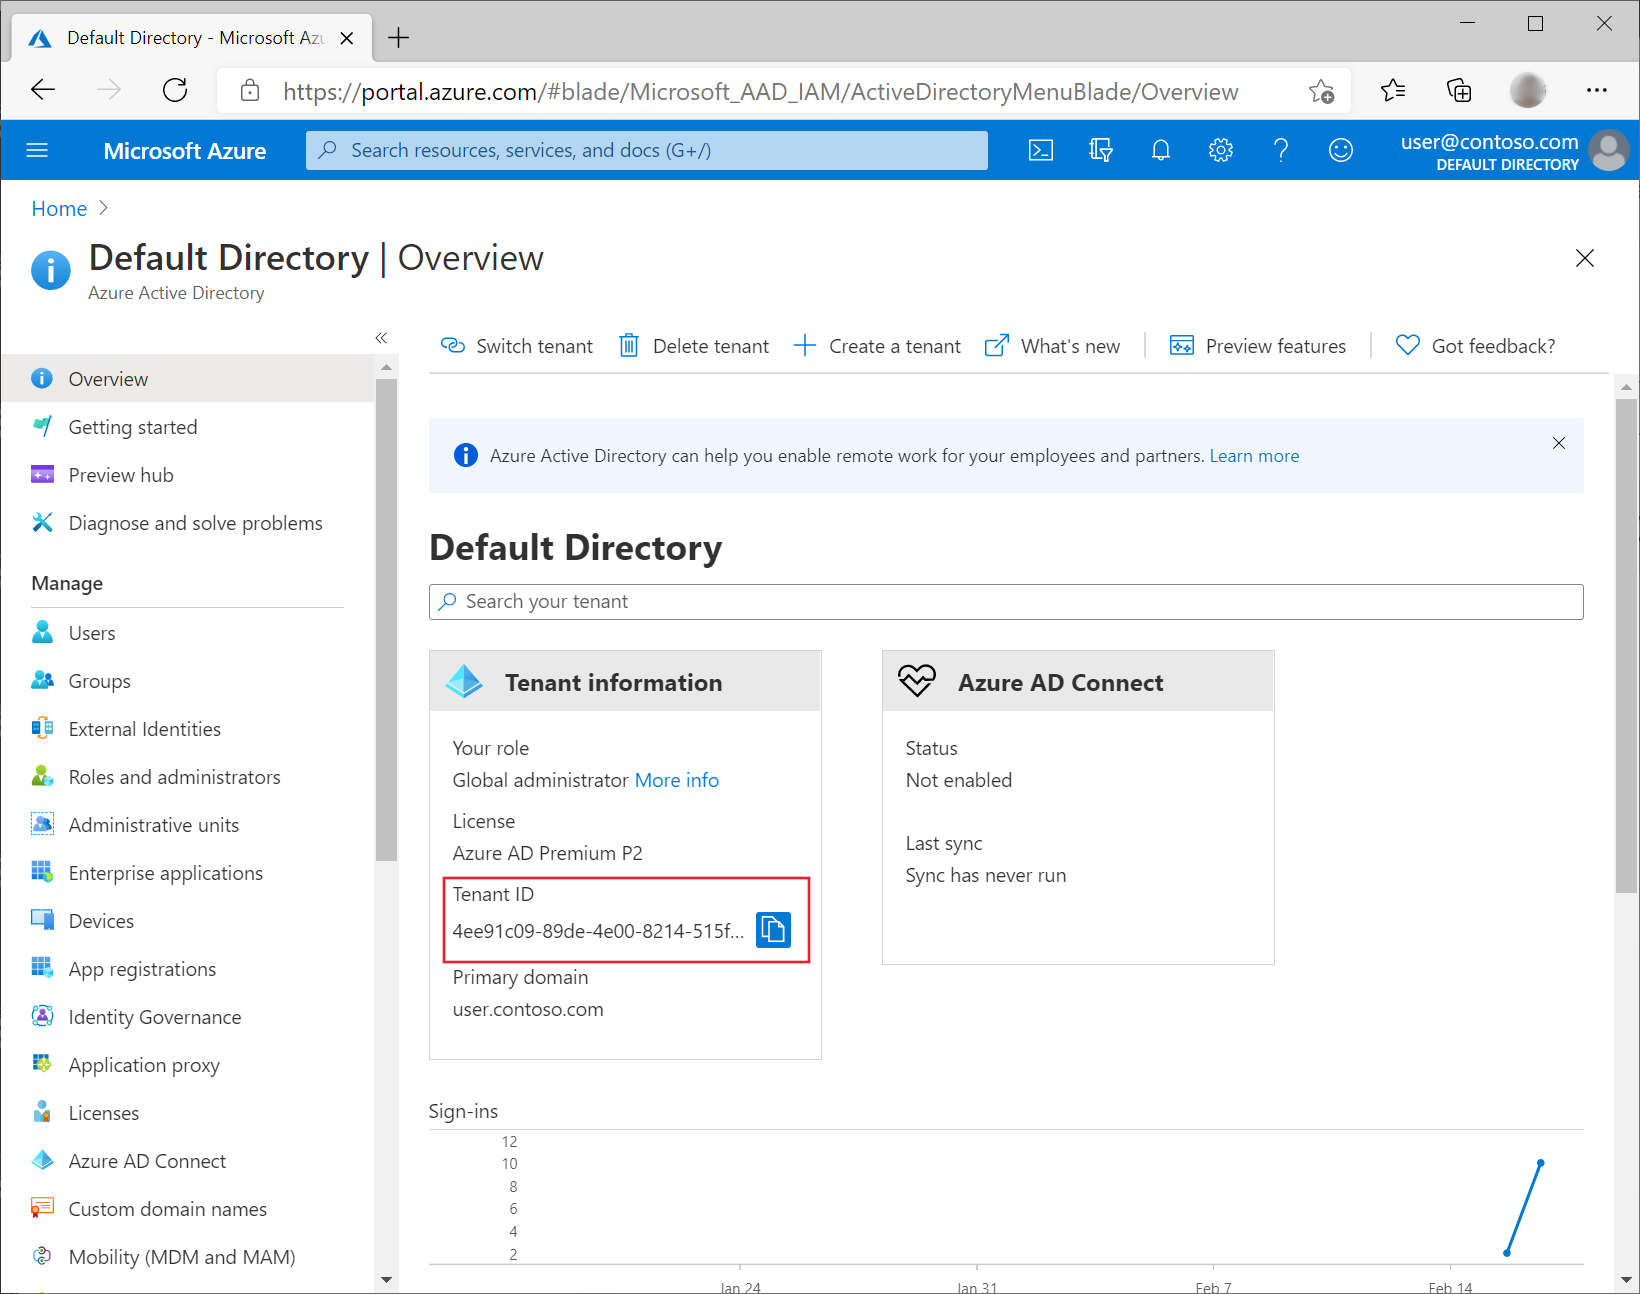
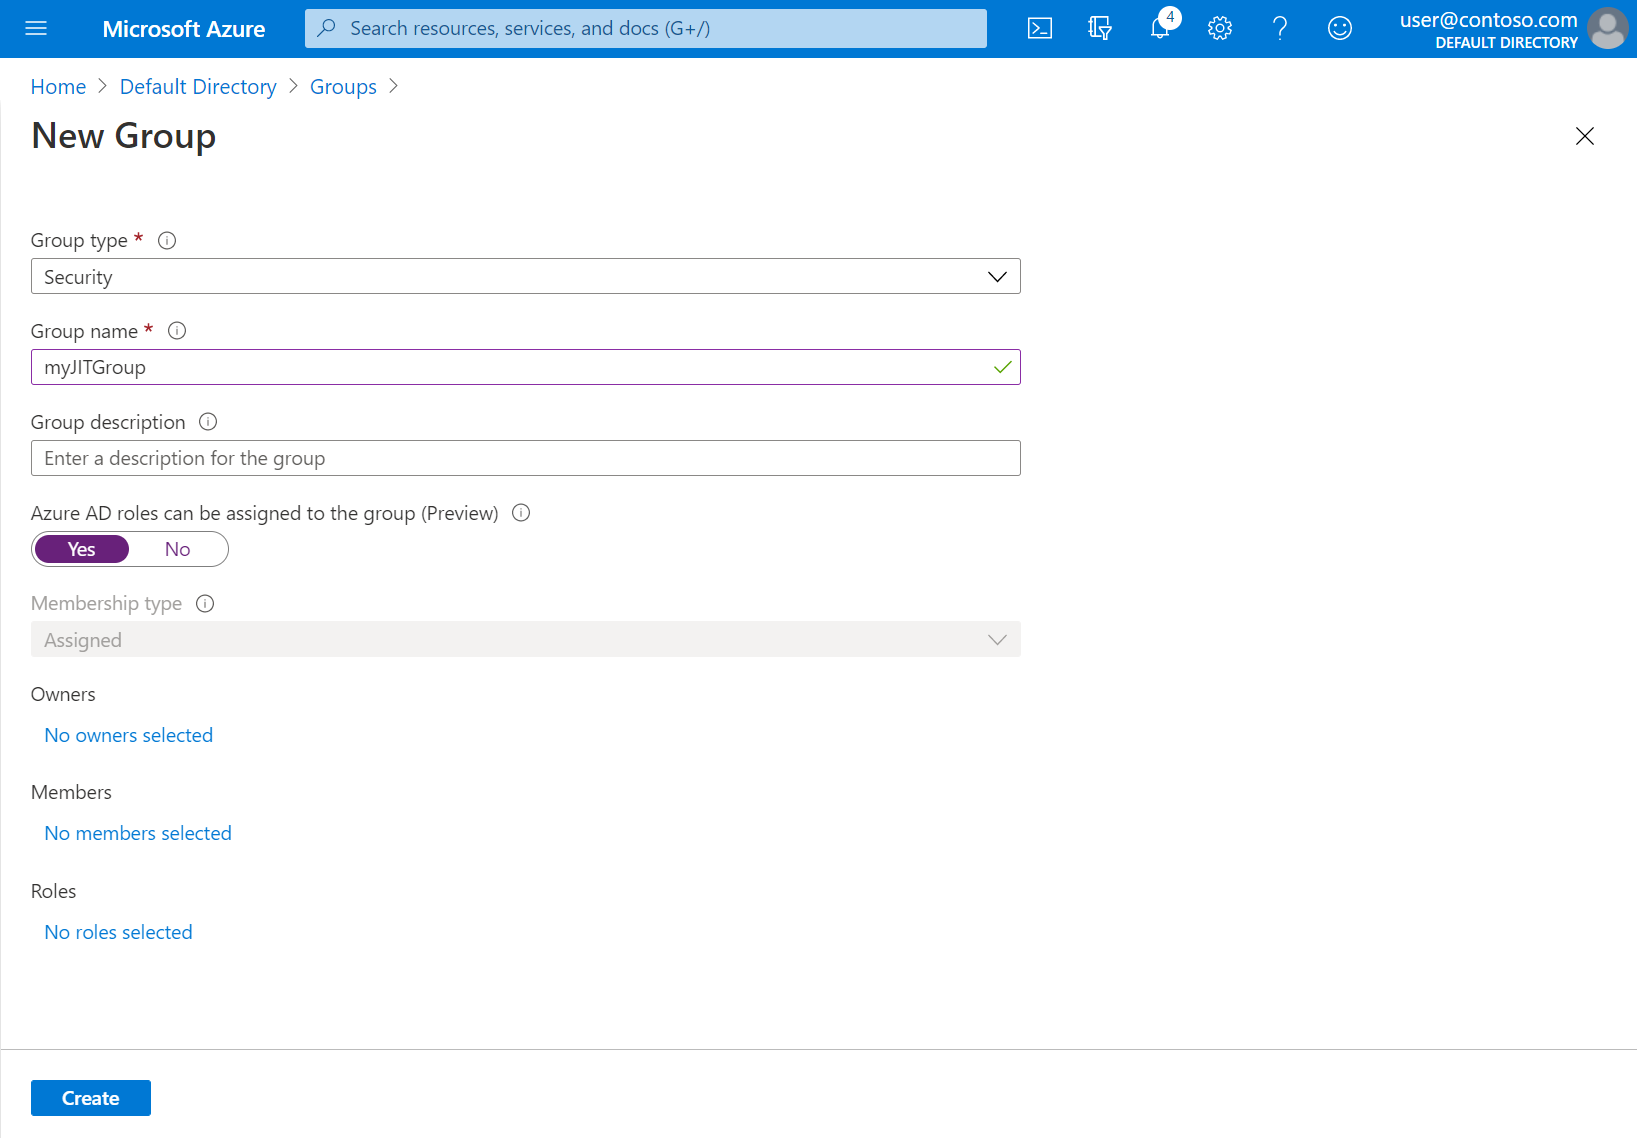
Select Groups > New group.
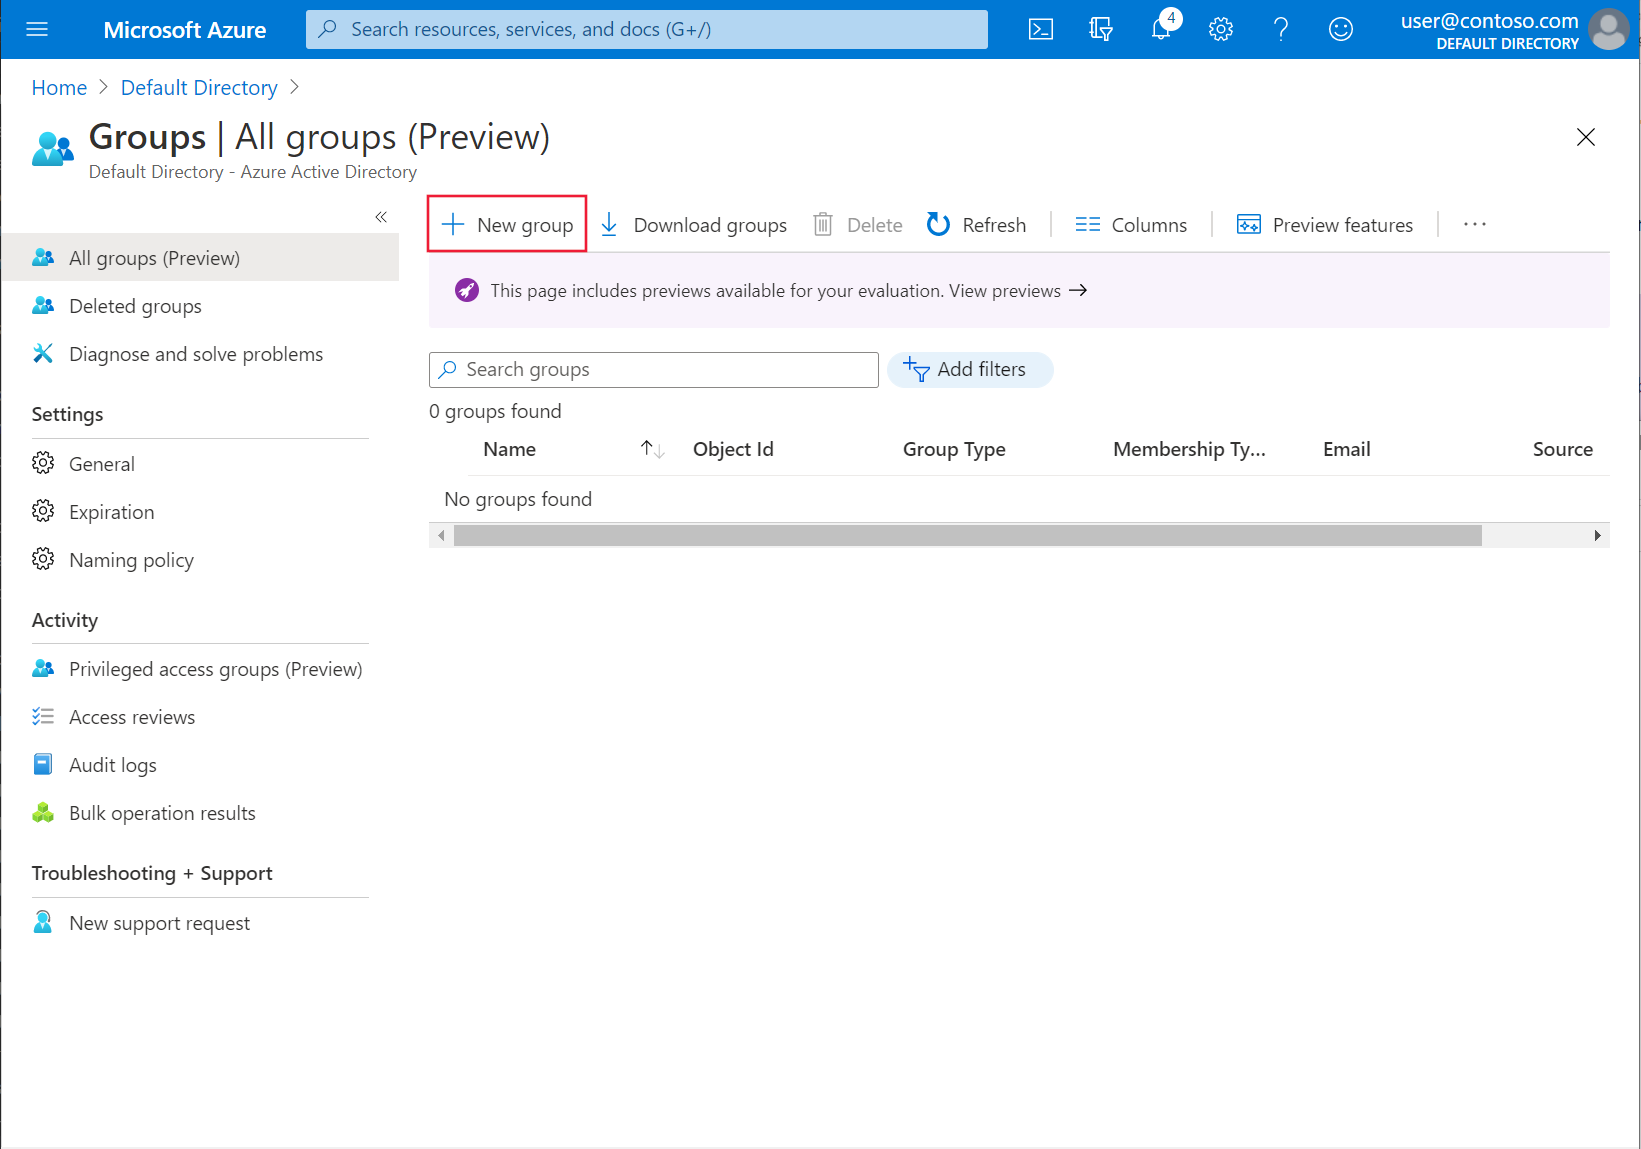
Verify the group type Security is selected and specify a group name, such as myJITGroup. Under the option Microsoft Entra roles can be assigned to this group (Preview), select Yes and then select Create.
On the Groups page, select the group you just created and note the Object ID. It will be referenced in a later step as
<object-id>.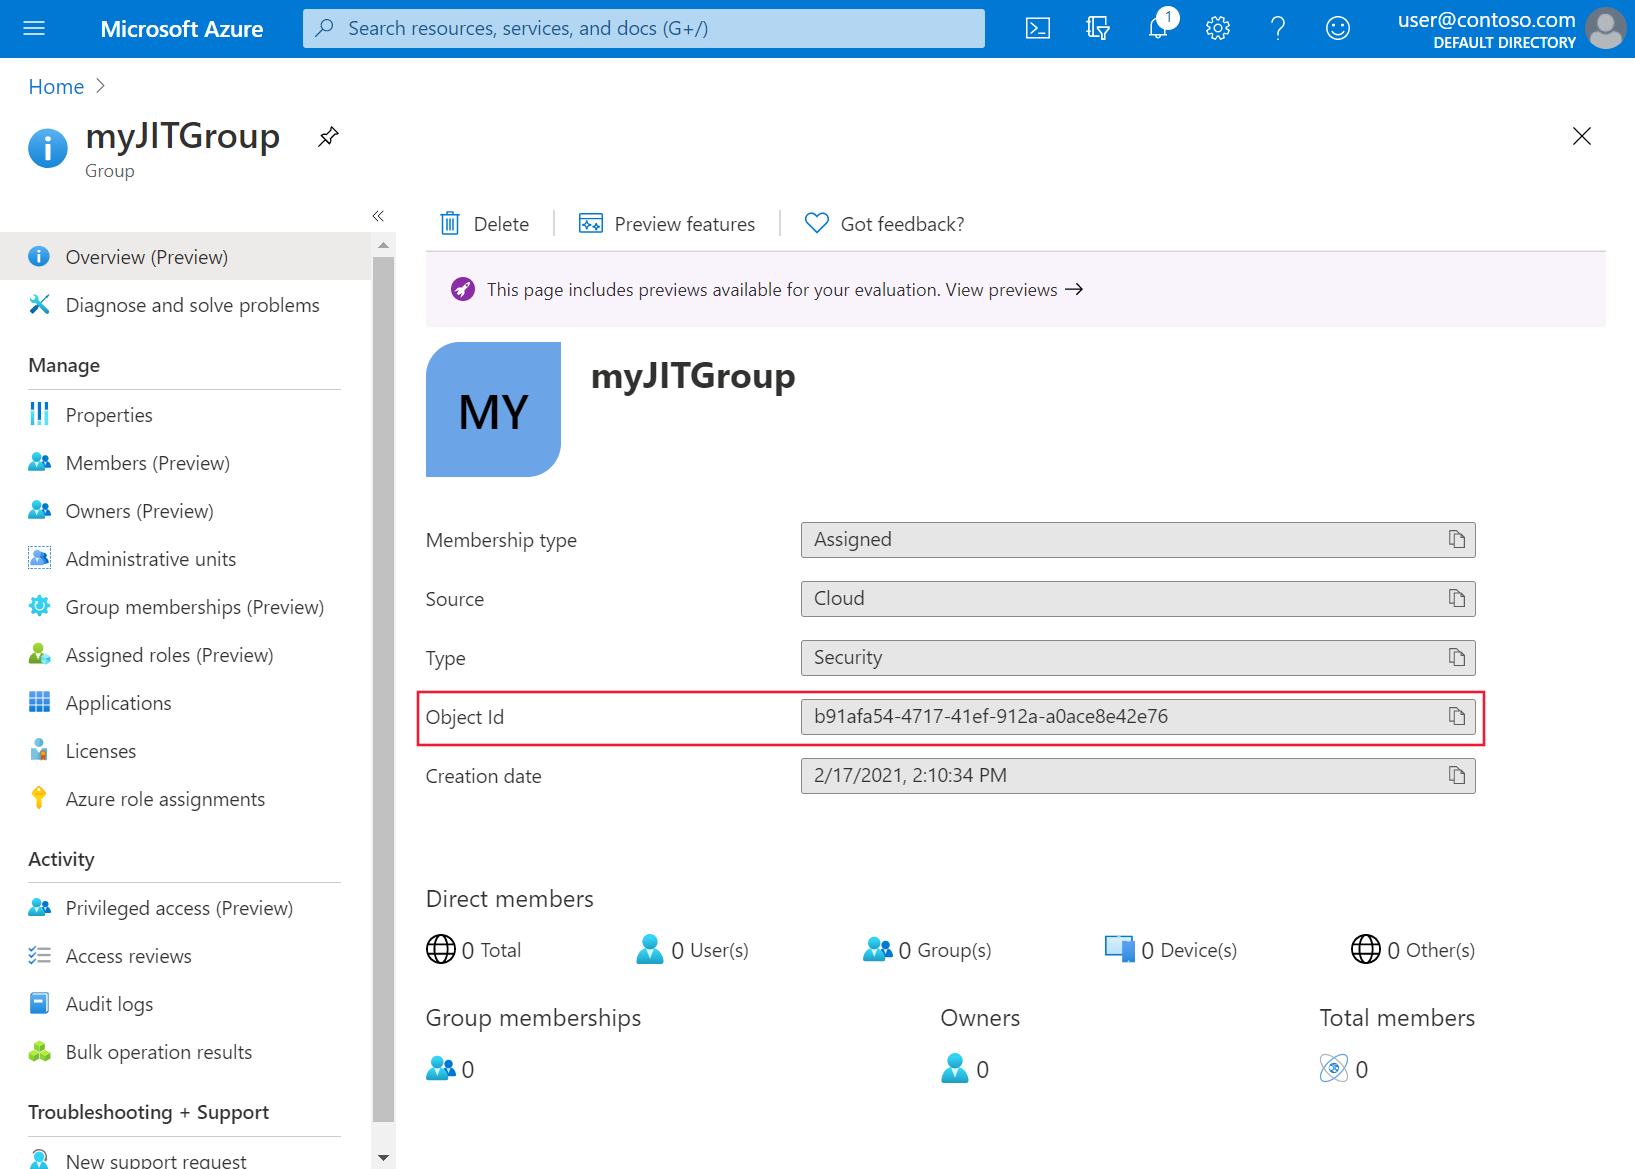
Create the AKS cluster with AKS-managed Microsoft Entra integration using the
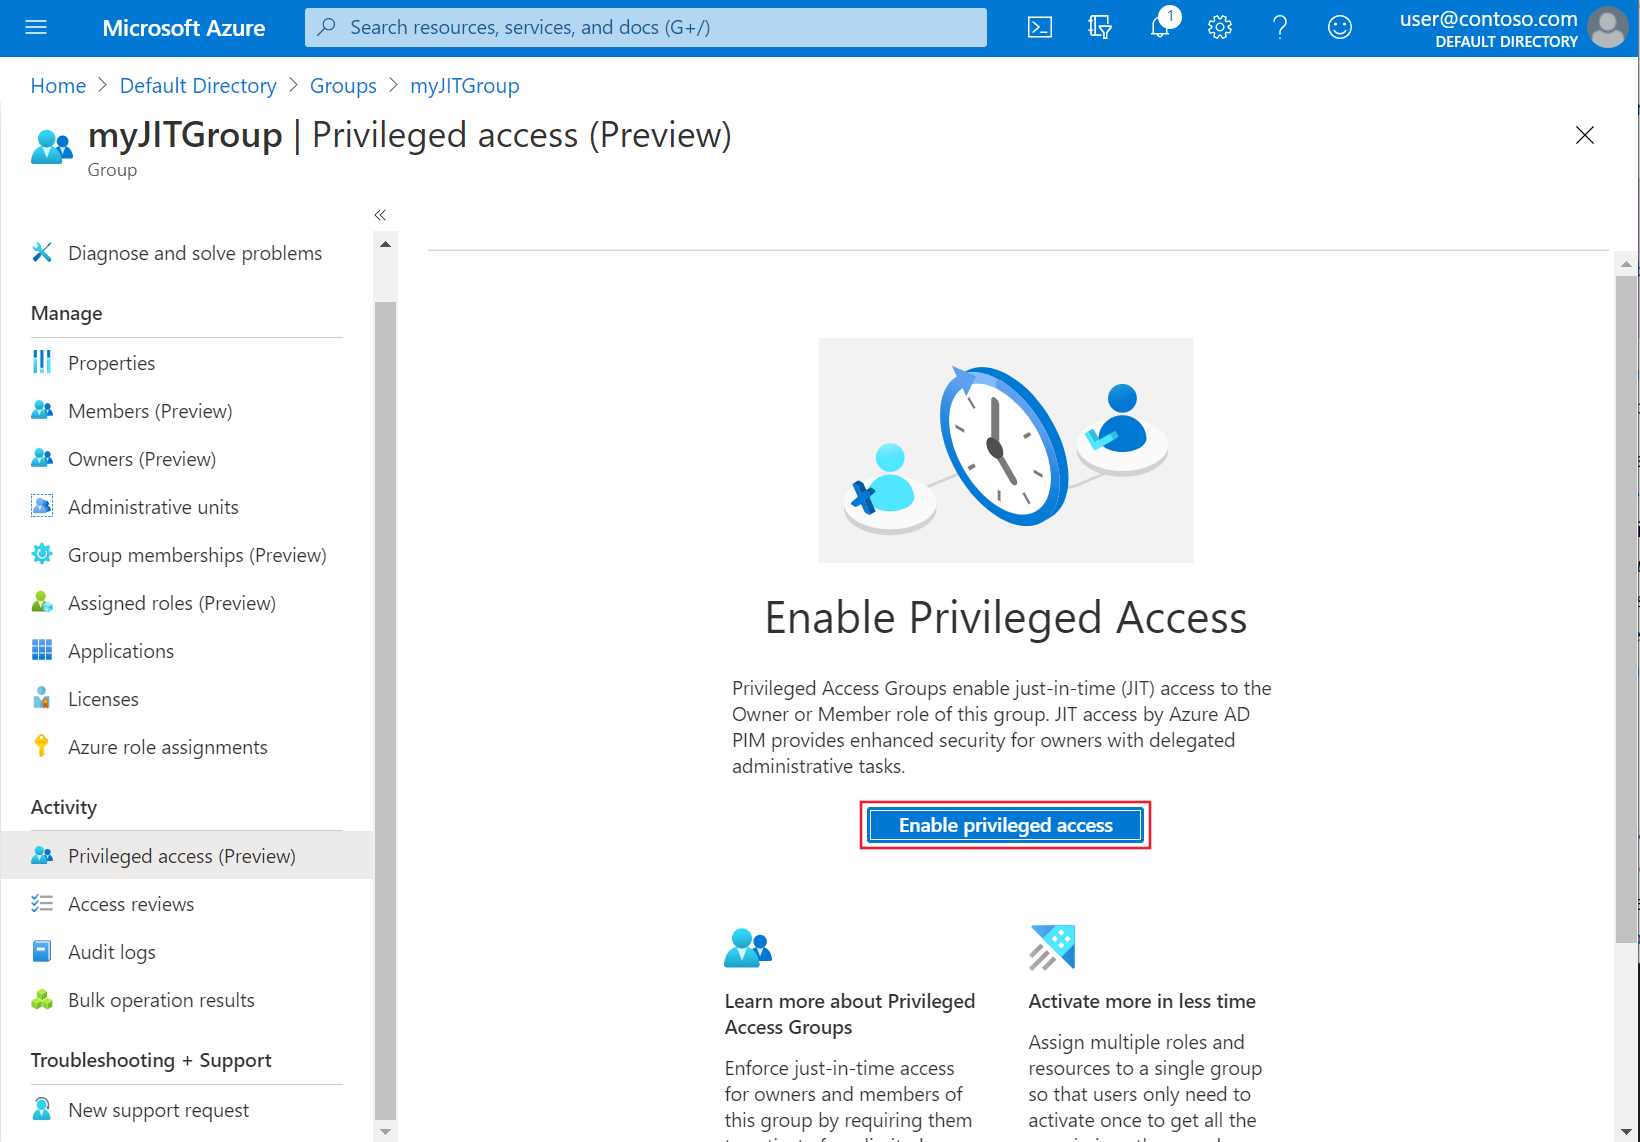
az aks createcommand with the--aad-admin-group-objects-idsand--aad-tenant-id parametersand include the values noted in the steps earlier.az aks create \ --resource-group myResourceGroup \ --name myManagedCluster \ --enable-aad \ --aad-admin-group-object-ids <object-id> \ --aad-tenant-id <tenant-id> \ --generate-ssh-keysIn the Azure portal, select Activity > Privileged Access (Preview) > Enable Privileged Access.
To grant access, select Add assignments.
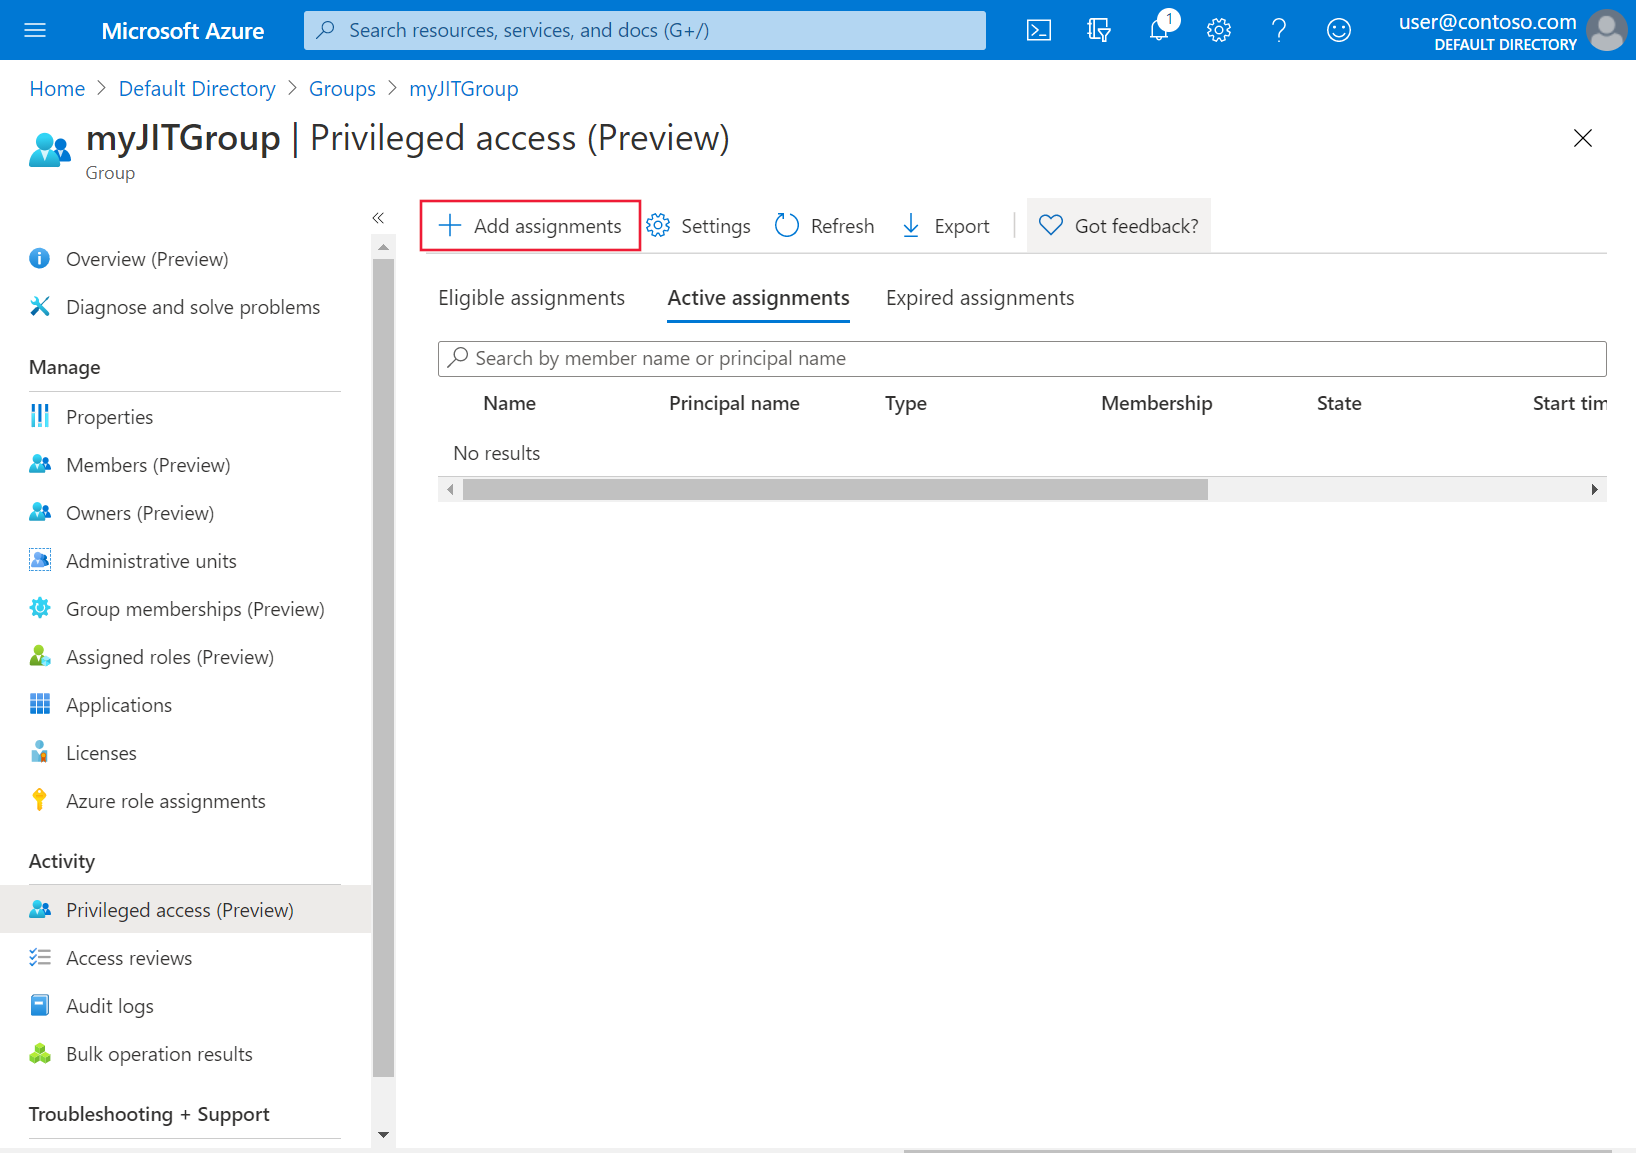
From the Select role drop-down list, select the users and groups you want to grant cluster access. These assignments can be modified at any time by a group administrator. Then select Next.

Under Assignment type, select Active and then specify the desired duration. Provide a justification and then select Assign.


For more information about assignment types, see Assign eligibility for a privileged access group (preview) in Privileged Identity Management.
Verify just-in-time access is working by accessing the cluster
Get the user credentials to access the cluster using the
az aks get-credentialscommand.az aks get-credentials --resource-group myResourceGroup --name myManagedClusterFollow the steps to sign in.
Use the
kubectl get nodescommand to view the nodes in the cluster.kubectl get nodesNote the authentication requirement and follow the steps to authenticate. If successful, you should see an output similar to the following example output:
To sign in, use a web browser to open the page https://microsoft.com/devicelogin and enter the code AAAAAAAAA to authenticate.
NAME                                STATUS   ROLES   AGE     VERSION
aks-nodepool1-61156405-vmss000000   Ready    agent   6m36s   v1.18.14
aks-nodepool1-61156405-vmss000001   Ready    agent   6m42s   v1.18.14
aks-nodepool1-61156405-vmss000002   Ready    agent   6m33s   v1.18.14
Apply just-in-time access at the namespace level
Integrate your AKS cluster with Azure RBAC.
Associate the group you want to integrate with just-in-time access with a namespace in the cluster using the
az role assignment createcommand.az role assignment create --role "Azure Kubernetes Service RBAC Reader" --assignee <AAD-ENTITY-ID> --scope $AKS_ID/namespaces/<namespace-name>Associate the group you configured at the namespace level with PIM to complete the configuration.
Troubleshooting
If kubectl get nodes returns an error similar to the following:
Error from server (Forbidden): nodes is forbidden: User "aaaa11111-11aa-aa11-a1a1-111111aaaaa" cannot list resource "nodes" in API group "" at the cluster scope
Make sure the admin of the security group has given your account an Active assignment.
Next steps
- Use kubelogin to access features for Azure authentication that aren't available in kubectl.

Azure Kubernetes Service
Feedback
Coming soon: Throughout 2024 we will be phasing out GitHub Issues as the feedback mechanism for content and replacing it with a new feedback system. For more information see: https://aka.ms/ContentUserFeedback.
Submit and view feedback for